
Categorías populares
¿Buscas un hilo?


Comentarios / Preguntas (36)
![]() Consuelo escribió:
Consuelo escribió:
Buongiorno, sarebbe fattibile questo modello in cotone? Se si, quale suggerite?
10.12.2019 - 17:37DROPS Design respondió:
Buongiorno Consuelo. Può usare il Paris (gruppo filato C come Big Merino) oppure il Safran, usato doppio. Per ogni ulteriore consiglio sulla scelta del filato e sulle quantità da ordinare, può rivolgersi al suo rivenditore Drops di fiducia. Buon lavoro!
16.12.2019 - 11:22
![]() Patti Urso escribió:
Patti Urso escribió:
There is another Mermaid Shell that I printed of this pattern that has double crochet for some symbols in the diagram where the other says treble crochet I am nearly completing the yoke with the double crochets and now I just discovered that it seems that the instructions had an error. Please confirm if the pattern I am following is not correct. Thank you.
29.11.2019 - 10:00DROPS Design respondió:
- see answer below - remember crochet terminology is different in US and in Uk English. Happy crocheting!
29.11.2019 - 10:33
![]() Patti Urso escribió:
Patti Urso escribió:
This pattern was also found with treble crochet in the diagram which one is correct?
29.11.2019 - 09:47DROPS Design respondió:
Dear Mrs Urso, make sure you are following the required English terminology, editing language if necessary by clicking on the scroll down menu under the foto. Happy crocheting!
29.11.2019 - 10:32
![]() Patti Urso escribió:
Patti Urso escribió:
Regarding your explanation “ after you have increased to 192-210-228 stitches, you have now enough stitches to repeat A.2B (= 6 stitches) a total of 32-35-38 times in width (= 32-35-38 repeats of A.2B in the round). “ does this mean that I repeat the entire A.2B from the beginning? Or just continue on the next row indicated in the chart?
26.11.2019 - 17:48DROPS Design respondió:
Dear Mrs Urso, just continue A.2B as before, ie work next row in diagram and continue diagram to the end (until it has been worked 1 time in height), but now you will repeat the diagram more times in width. Happy crocheting!
27.11.2019 - 07:44
![]() Patti Urso escribió:
Patti Urso escribió:
What does this statement mean? Then repeat A.2B 32-35-38 times in width.
26.11.2019 - 09:38DROPS Design respondió:
Dear Mrs Urso, after you have increased to 192-210-228 stitches, you have now enough stitches to repeat A.2B (= 6 stitches) a total of 32-35-38 times in width (= 32-35-38 repeats of A.2B in the round). Happy crocheting!
26.11.2019 - 09:46
![]() Patti Urso escribió:
Patti Urso escribió:
Please explain further what “Then repeat A.2B 32-35-38 times in width.”
26.11.2019 - 09:24
![]() Huet Nicole escribió:
Huet Nicole escribió:
Je reviens vers vous car je ne comprends pas A2A au total en largeur. A2A représente 10 motifs. Si c’est en largeur dois je crocheter le 1er et juste après le second car moi j’ai raisonné avant de vous écrire crocheter un tour de 1 er motif et enchaîner un tour du 2ème motif etc . De plus quand vous écrivez 16 fois et ensuite 24 fois vous rajoutez 8 tours? Je suis perdue!!!!
16.08.2019 - 18:23DROPS Design respondió:
Bonjour Mme Huet, je ne suis pas sûre de bien comprendre les 10 motifs dont vous parlez. A.2A se crochète sur 6 mailles et 10 rangs. Vous crochetez d'abord le 1er rang de A.2A sur toutes les mailles, puis le 2ème rang et ainsi de suite. c'est ainsi qu'on lit des diagrammes crochet. Bon crochet!
19.08.2019 - 08:49
![]() Huet escribió:
Huet escribió:
Merci de votre réponse je n’avais absolument rien compris!!!! Je recommence tout!!!
16.08.2019 - 11:13
![]() Huet Nicole escribió:
Huet Nicole escribió:
Bonjour quand vous écrivez 16 fois au total en largeur cela veut dire 16 tours?, ou 24 fois je n’arrive pas à comprendre merci de vos éclaircissements
15.08.2019 - 18:03DROPS Design respondió:
Bonjour Mme Huet, quand on indique "répéter de *à* 15 fois au total, on doit crocheter la partie entre les * un total de 15, on aura donc 15 "motifs" + les mailles indiquées au début du tour avant la partie entre les * + celles indiquées à la fin du tour après la partie entre les *. Au début par ex, on doit avoir 96 brides + les 3 ml du début du tour et on pourra donc répéter 16 fois A.2 (= 16 x 6 m = 96 m). Bon crochet!
16.08.2019 - 08:56
![]() Eve escribió:
Eve escribió:
Hello, I follow your page for many years (10 years +). I liked your crochet templates in the PAST. For a few years you have unfortunately changed the description totally. I do not know what it should, the internationally valid symbols for e.g. need no extra symbols, your charts are "very special" puzzling and I have never seen anywhere -and I have a large collection of Patterns from around the world. Totally impractical, mega awkward and just annoying. Please take the old symbols again
25.06.2019 - 13:32DROPS Design respondió:
Dear Eve, thanks for your loyalty, should you need any assistance reading crochet diagrams, you will find here some more explanations. Remember your DROPS store will always be able to assist you - even per mail or telephone - for any further individual help. Happy crocheting!
25.06.2019 - 15:50
|
||||||||||||||||||||||||||||||||||
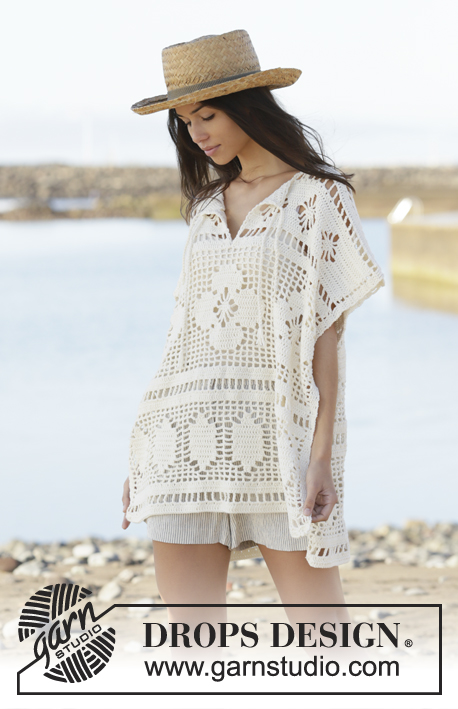
Mermaid Shell#mermaidshellponcho |
||||||||||||||||||||||||||||||||||
 |
 |
|||||||||||||||||||||||||||||||||
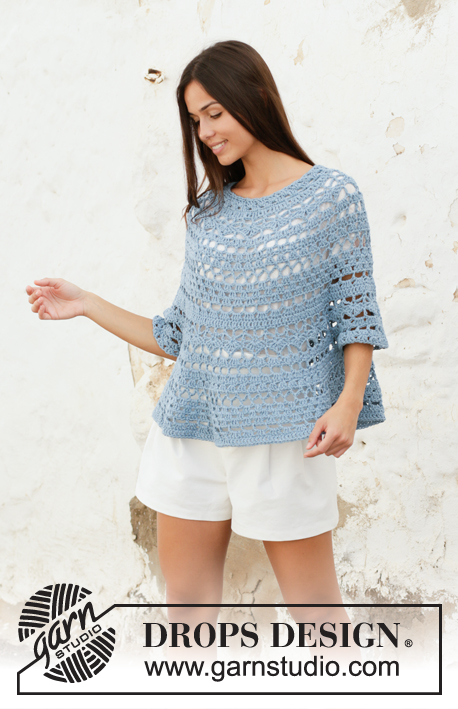
Jersey tipo poncho a ganchillo en DROPS Big Merino. La pieza está elaborada de arriba para abajo con patrón de calados. Tallas: S – XXXL.
DROPS 199-35 |
||||||||||||||||||||||||||||||||||
|
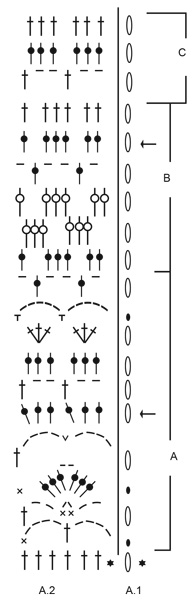
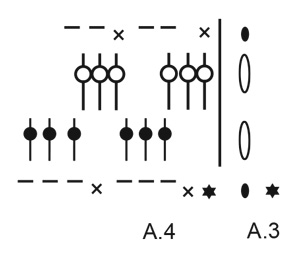
EXPLICACIONES PARA REALIZAR EL PATRÓN: ----------------------------------------------------- PATRÓN: Ver diagramas A.1 a A.4. INFORMACIÓN PARA TRABAJAR A GANCHILLO: El diagrama A.1 muestra cómo comienzan y terminan las vueltas, y se trabaja además de A.2. El diagrama A.3 muestra cómo comienzan y terminan las vueltas, y se trabaja además de A.4. TIP PARA AUMENTAR (equitativamente): Para calcular cómo aumentar equitativamente, usar el número total de puntos (p. ej. 96 puntos) y dividirlo entre el número de aumentos a hacer (p. ej. 48) = 2. Es decir, en este ejemplo, aumentar trabajando 2 puntos altos en el mismo punto a cada 2 puntos altos. ----------------------------------------------------- COMENZAR LA PIEZA AQUÍ: ----------------------------------------------------- JERSEY TIPO PONCHO – RESUMEN CORTO DE LA PIEZA: La pieza se trabaja en redondo, de arriba para abajo. Trabajar las mangas en redondo, de arriba para abajo. Trabajar la orilla del escote en redondo al final. CANESÚ: Trabajar 112-119-126 puntos de cadena en aguja de ganchillo tamaño 5 mm con Big Merino y formar un anillo con 1 punto bajísimo en el primer punto de cadena. Trabajar 3 puntos de cadena, 1 punto alto en cada uno de los primeros 6 puntos de cadena, * saltar 1 punto de cadena, trabajar 1 punto alto en cada uno de los 6 puntos de cadena siguientes *, trabajar de *a* 15-16-17 veces en total, terminar con 1 punto bajísimo en el 3er punto de cadena al principio de la vuelta = 96-102-108 puntos altos + 3 puntos de cadena. Después trabajar el patrón de la manera siguiente: Leer INFORMACIÓN PARA TRABAJAR A GANCHILLO, trabajar A.2A 16-17-18 veces en total en la vuelta – en la vuelta marcada con la flecha, aumentar 48-54-60 puntos altos distribuidos equitativamente – leer TIP PARA AUMENTAR = 144-156-168 puntos altos. ¡ACORDARSE DE MANTENER LA MISMA TENSIÓN DE TEJIDO DE LA MUESTRA! Después repetir A.2A 24-26-28 veces a lo ancho. Cuando A.2A esté terminado, trabajar A.2B sobre A.2A – en la vuelta marcada con la flecha, aumentar 48-54-60 puntos altos distribuidos equitativamente = 192-210-228 puntos altos. Después repetir A.2B 32-35-38 veces a lo ancho. Cuando A.2B esté hecho, trabajar las primeras 6 vueltas de A.2A sobre A.2B – en la vuelta marcada con la flecha, aumentar 48-54-60 puntos altos distribuidos equitativamente = 240-264-288 puntos altos. Después repetir A.2A 40-44-49 veces a lo ancho. Continuar hasta la 6ª vuelta de A.2A (= la vuelta después de la vuelta con la flecha) = 80-88-06 arcos. La pieza mide aprox. 32 cm en todas las tallas. Insertar 4 marcadores en la pieza de la manera siguiente (sin trabajar): Insertar el primer marcador después de los primeros 13-15-16 arcos (= mitad pieza de la espalda), insertar el segundo marcador después de los 14-14-16 arcos siguientes (= manga), insertar el tercer marcador después de los 26-30-32 arcos siguientes (= pieza del frente), e insertar el cuarto marcador después de los 14-14-16 arcos siguientes (= manga), restan 13-15-16 arcos en la vuelta después del último marcador (= mitad pieza de la espalda). Ahora dividir el cuerpo y las mangas en los marcadores, y terminar cada parte separadamente. ¡AHORA MEDIR LA PIEZA A PARTIR DE AQUÍ! CUERPO: = 52-60-64 arcos. Continuar hasta haber trabajado A.2A sobre estos puntos y, AL MISMO TIEMPO, en la primera vuelta, aumentar 24 puntos altos distribuidos equitativamente (después repetir A.2A 30-34-36 veces a lo ancho) = 180-204-216 puntos altos. Cuando A.2A esté hecho, trabajar A.2B sobre A.2A – en la vuelta marcada con la flecha, aumentar 36-42-48 puntos altos distribuidos equitativamente = 216-246-264 puntos altos (después repetir A.2B 36-41-44 veces a lo ancho). Cuando A.2B esté hecho, trabajar A.2C sobre A.2B 0-1-2 veces en total verticalmente. Cortar y asegurar el hilo. El cuerpo mide aprox. 14-18-22 cm a partir de la división. MANGA: = 14-14-16 arcos. Comenzar en el centro bajo la manga y después trabajar de la manera siguiente: Acordarse de la INFORMACIÓN PARA TRABAJAR A GANCHILLO, continuar con la 7ª vuelta de A.2A sobre estos puntos (= 7-7-8 veces a lo ancho), y trabajar hasta la 8ª vuelta. Después repetir las vueltas 6 a la 8 0-0-1 vez más. Cortar y asegurar el hilo. La manga mide aprox. 3-3-7 cm a partir de la división. Trabajar la otra manga de la misma manera. ORILLA DEL ESCOTE: Trabajar alrededor del escote de la manera siguiente – NOTA: Trabajar en los puntos de cadena donde se trabajaron puntos altos, pero no trabajar en los puntos de cadena que fueron saltados: Comenzar en el centro de la espalda, fijar el hilo a la pieza con 1 punto bajísimo en un punto alto, trabajar 1 punto de cadena, 1 punto bajo en el punto alto siguiente, 3 puntos de cadena, saltar 3-1-3 puntos altos, 1 punto bajo en el punto alto siguiente, * 3 puntos de cadena, saltar 3 puntos altos, 1 punto bajo en el punto alto siguiente *, trabajar de *a* 22-24-25 veces en total, trabajar 3 puntos de cadena, saltar 3 puntos altos y terminar con 1 punto bajísimo en el 1er punto de cadena al principio de la vuelta = 24-26-27 arcos. Después trabajar A.4 en redondo – acordarse de la INFORMACIÓN PARA TRABAJAR A GANCHILLO. Cuando A.4 esté hecho, cortar y asegurar el hilo. |
||||||||||||||||||||||||||||||||||
Explicaciones del diagrama |
||||||||||||||||||||||||||||||||||
|
||||||||||||||||||||||||||||||||||
 |
||||||||||||||||||||||||||||||||||
 |
||||||||||||||||||||||||||||||||||
 |
||||||||||||||||||||||||||||||||||
¿Terminaste este patrón?Entonces, etiqueta tus fotos con #dropspattern #mermaidshellponcho o envíalas a la galería #dropsfan. ¿Necesitas ayuda con este patrón?Encontrarás 10 videos tutoriales, un espacio para comentarios/preguntas y más visitando la página del patrón en garnstudio.com © 1982-2026 DROPS Design A/S. Todos los derechos reservados. Este documento, incluyendo todas sus sub-secciones, está protegido por los derechos de autor (copyright). Lee más acerca de lo que puedes hacer con nuestros patrones en la parte de abajo de cada patrón de nuestro sitio. |
||||||||||||||||||||||||||||||||||


Con más de 40 años en el diseño de modelos de punto y de ganchillo, DROPS Design ofrece una de las más vastas colecciones de patrones gratuitos en el internet - traducidos en 17 idiomas. Al día de hoy, contamos con 324 catálogos y 12239 patrones - de los cuales 11618 están traducidos en español.
Nosotros trabajamos con mucho esmero para brindarte lo mejor que las labores de punto y ganchillo tienen para ofrecer,inspiración y consejos, así como hilos de magnífica calidad a precios increíbles! Te gustaría usar nuestros patrones para otro fin además del uso personal? Puedes leer acerca de lo que estás permitida a hacer en el texto de Copyright en la parte de abajo de todos nuestros patrones. Felices labores!
Escribe un comentario sobre DROPS 199-35
¡Nos encantaría saber qué piensas acerca de este patrón!
Si quieres escribir una pregunta referente al patrón, por favor asegúrate de elegir la categoría correcta en el formulario debajo, para acelerar el proceso de respuesta. Los campos obligatorios están marcados con un *.