
Categorías populares
¿Buscas un hilo?


Comentarios / Preguntas (100)
![]() Patricia76 escribió:
Patricia76 escribió:
A quel moment prendre en compte la correction apportée je ne comprends pas. Je désire faire un modèle intermédiaire en montant 174 mailles (8 fois 21 plus 6). Est-ce possible ?
13.03.2019 - 12:25DROPS Design respondió:
Bonjour Patricia76, si vous avez imprimé le modèle après la date de la correction, le modèle imprimé est juste. Vous commencez par monter 132-216 m en fonction de la taille souhaitée et il reste ensuite 108-176 m après A.1. Si vous souhaitez modifier les dimensions, vous pouvez recalculer le nombre de mailles nécessaires avant A.1. Bon tricot!
13.03.2019 - 15:01
![]() DUPUIS escribió:
DUPUIS escribió:
J'ai oublié de demander combien de pelotes sont nécessaires pour la couverture 65-80 cm Merci
09.03.2019 - 14:56DROPS Design respondió:
Bonjour Mme Dupuis! Il vous faut environ 250 g de DROPS BABYMERINO (5 pelotes). Bon travail!
10.03.2019 - 20:48
![]() Dupuis escribió:
Dupuis escribió:
Bonjour, je souhaiterais réaliser ce modèle en taille 65/80 pouvez vous me donner quelques précisions? Merci
09.03.2019 - 14:52DROPS Design respondió:
Bonjour Mme Dupuis, il vous faudra alors 250 g DROPS BabyMerino (=2ème taille), et suivez bien les indications en 2ème position = montez 216 mailles par ex et tricotez 10 foois A.1 en largeur, etc. Bon tricot!
11.03.2019 - 10:31
![]() Annick Desnoyers escribió:
Annick Desnoyers escribió:
Combien dois-je monter de mailles .
18.02.2019 - 18:57
![]() Annick Desnoyers escribió:
Annick Desnoyers escribió:
Bonjour, Je ne comptends pas le nombre de mailles à faire. Dois-je monter 132 mailles ou 216 mailles ? Même chose pour 108-176 mailles. Pouvez-vous m'expliquer s.v.p. Merci à l'avance. Annick
18.02.2019 - 00:02DROPS Design respondió:
Bonjour Annick! Cela depend de la taille de votre couverture. Il y en a deux: premiere 45x52 cm, deuxieme 65-80 cm. Bon tricot!
18.02.2019 - 07:42
![]() RAGNHILD SOLLIE escribió:
RAGNHILD SOLLIE escribió:
Jeg har et spørsmål som ikke gjelder bølgeteppet. Er så fornøyd med dette mønsteret og skulle gjerne strikket en babykjole med samme eller lignende mønster. Har dere noe forslag til en oppskrift?
04.02.2019 - 14:52DROPS Design respondió:
Hei Ragnhild. Så flott at mønsteret falt i smak. Om du ser på oppskrift 18-13 har du en kjole med bølgekant nederst på skjørtet. God fornøyelse
08.02.2019 - 13:49
![]() Irene T. escribió:
Irene T. escribió:
Bitte überarbeitet die Anleitung. Das Muster ist schön, aber die Anleitung stimmt hinten und vorne nicht.
04.02.2019 - 14:45
![]() Irene Børve escribió:
Irene Børve escribió:
Skal A1 bare strikkes en eneste gang - i begynnelsen av teppet? Og så er det A2 som gjentas og gjentas til en er ferdig? Eller er det sånn at en strikker A1 - A2 - A1 - A2 - A1 - A2 osv hele veien?
03.02.2019 - 19:39DROPS Design respondió:
Hei Irene, A.1 er bare strikket 1 gang og deretter A.2 fram til du avslutter med en rille. God fornøyelse!
05.02.2019 - 08:22
![]() Ragnhild Sollie escribió:
Ragnhild Sollie escribió:
Angående retting av mønster. Går det greit å felle de 22 masker jevnt fordelt på pinne 1 og så begynne på A1 på pinne 3?
29.01.2019 - 13:03DROPS Design respondió:
Hei Ragnhild. Den rettelsen gjelder slutten av teppet, du strikker ikke A.1 her. "Når arbeidet måler ca 51-78 cm, strikkes det 1 rille frem og tilbake over alle maskene. SAMTIDIG på første pinne (av denne rillen) felles det 12-22 masker jevnt fordelt = 96-154 masker. Fell av med rett fra retten." A.1 strikkes bare helt på starten av teppet, og det felles som anvist i diagrammet. God fornøyelse
29.01.2019 - 14:51
![]() Dina escribió:
Dina escribió:
Har prøvet at starte på dette tæppe ,men kan ikke få det til at gå op når man i løbet af A1 og A2 tager 10 masker ind men kun 6 ud ??
26.01.2019 - 21:17DROPS Design respondió:
Hei Dina. A.1 strikkes bare 1 gang i høyden, og det er meningen at det felles 4 masker i hver A.1 slik at du har 108-176 masker på pinnen. Når du så går over til å strikke A.2 felles og økes det 6 masker i hver rapport av diagrammet og maskeantallet endrer seg derfor ikke i løpet av A.2. God fornøyesle.
29.01.2019 - 14:48
|
|||||||||||||
Good Night#goodnightblanket |
|||||||||||||
 |
 |
||||||||||||
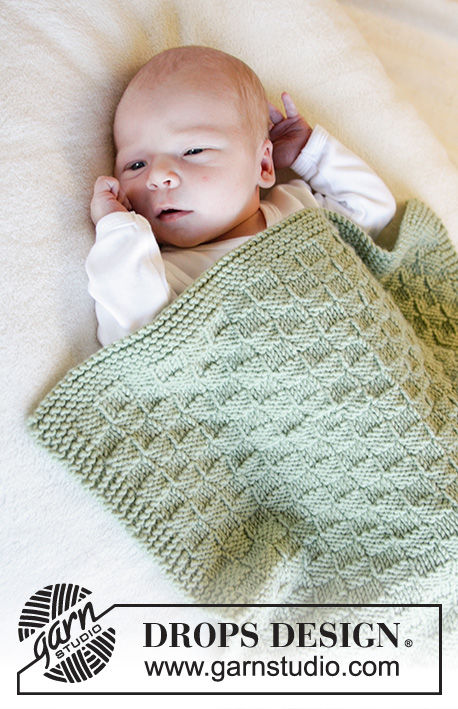
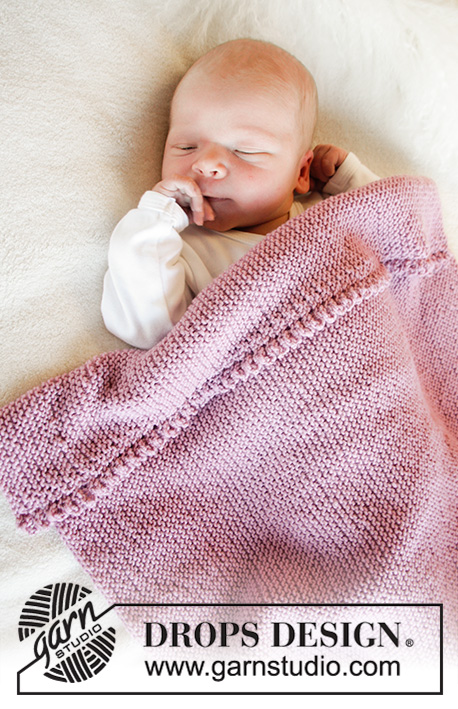
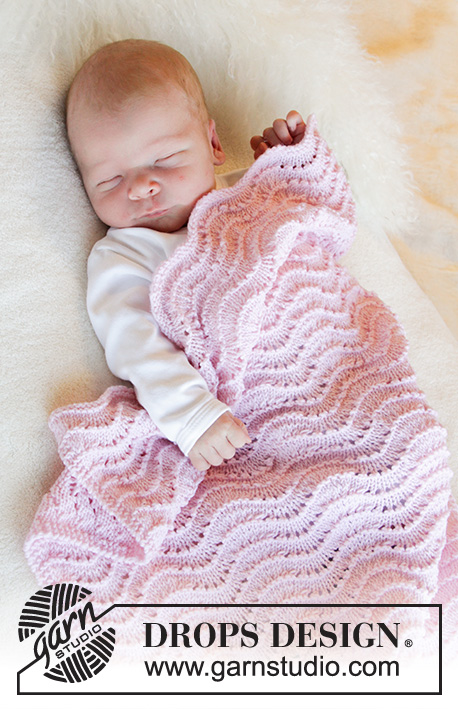
Manta de punto para bebé en DROPS BabyMerino. La labor está realizada con patrón de ondas. Tema: Manta para bebé
DROPS Baby 33-4 |
|||||||||||||
|
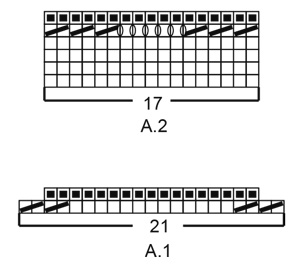
EXPLICACIONES PARA REALIZAR LA LABOR: ---------------------------------------------------------- PUNTO MUSGO (trabajado de ida y vuelta). 1 pliegue = 2 filas de derecho. PATRÓN: Ver los diagramas A.1 y A.2. Los diagramas muestran todas las filas del patrón vistas por el lado derecho. TIP PARA LAS DISMINUCIONES (repartidos): Para calcular cómo disminuir de manera repartida, contar el número total de puntos en la aguja (p.e 108 puntos), restar los puntos de la cenefa y dividirlo entre el número de disminuciones a trabajar (p.e 12) = 8,5. En este ejemplo, disminuir trabajando juntos de derecho cada 7º y 8º puntos / cada 8º y 9º puntos de modo alterno. No disminuir sobre los puntos de orillo. TIP PARA EL REMATE: Para evitar un borde de remate tenso usar una aguja de tamaño más grande. ---------------------------------------------------------- COMENZAR LA LABOR AQUÍ: ------------------------------------------------------- MANTA - RESUMEN DE LA LABOR: La manta se trabaja de ida y vuelta con aguja circular, de abajo arriba. MANTA: Montar 132-216 puntos con aguja circular tamaño 4 mm y BabyMerino. Trabajar la primera fila como sigue por el lado derecho: 3 puntos orillo en PUNTO MUSGO - leer las explicaciones arriba, trabajar A.1 hasta que quedan 3 puntos en la fila (= 6-10 repeticiones de 21 puntos) y finalizar con 3 puntos orillo en punto musgo. Después de completar A.1 hay 108-176 puntos en la fila. Trabajar la siguiente fila como sigue por el lado derecho: 3 puntos orillo en punto musgo. A.2 hasta que queden 3 puntos en la fila (= 6-10 repeticiones de 17 puntos) y finalizar con 3 puntos orillo en punto musgo. Continuar con el patrón de la misma manera. RECUERDE MANTENER LA MISMA TENSIÓN DEL TEJIDO! Cuando la labor mida aprox 51-78 cm, ajustar a después de una repetición completa en vertical, trabajar 1 pliegue de ida y vuelta sobre todos los puntos. AL MISMO TIEMPO en la primera fila disminuir 12-22 puntos repartidos - leer TIP PARA LAS DISMINUCIONES = 96 -154 puntos. Rematar de derecho por el lado derecho - leer TIP PARA EL REMATE! |
|||||||||||||
Explicaciones del diagrama |
|||||||||||||
|
|||||||||||||
 |
|||||||||||||
¿Terminaste este patrón?Entonces, etiqueta tus fotos con #dropspattern #goodnightblanket o envíalas a la galería #dropsfan. ¿Necesitas ayuda con este patrón?Encontrarás 15 videos tutoriales, un espacio para comentarios/preguntas y más visitando la página del patrón en garnstudio.com © 1982-2026 DROPS Design A/S. Todos los derechos reservados. Este documento, incluyendo todas sus sub-secciones, está protegido por los derechos de autor (copyright). Lee más acerca de lo que puedes hacer con nuestros patrones en la parte de abajo de cada patrón de nuestro sitio. |
|||||||||||||


Con más de 40 años en el diseño de modelos de punto y de ganchillo, DROPS Design ofrece una de las más vastas colecciones de patrones gratuitos en el internet - traducidos en 17 idiomas. Al día de hoy, contamos con 324 catálogos y 12252 patrones - de los cuales 11632 están traducidos en español.
Nosotros trabajamos con mucho esmero para brindarte lo mejor que las labores de punto y ganchillo tienen para ofrecer,inspiración y consejos, así como hilos de magnífica calidad a precios increíbles! Te gustaría usar nuestros patrones para otro fin además del uso personal? Puedes leer acerca de lo que estás permitida a hacer en el texto de Copyright en la parte de abajo de todos nuestros patrones. Felices labores!
Escribe un comentario sobre DROPS Baby 33-4
¡Nos encantaría saber qué piensas acerca de este patrón!
Si quieres escribir una pregunta referente al patrón, por favor asegúrate de elegir la categoría correcta en el formulario debajo, para acelerar el proceso de respuesta. Los campos obligatorios están marcados con un *.