
Categorías populares
¿Buscas un hilo?


Comentarios / Preguntas (75)
![]() Ana escribió:
Ana escribió:
I've just finished knitting the 10cm on the mid back, but I fear I may have done it wrong, as now there's a 10 cm height difference between one side of the work and the other, which doesn't make sense as we're not casting off just yet. Should I have been knitting all the stitches and not just the 28+62?
22.10.2022 - 15:28DROPS Design respondió:
Boa tarde, Now divide the piece mid back to work back and forth from mid back (this is done so that the seam is mid back). Work in garter stitch back and forth until piece measures 10 cm from the 28 stitches cast on mid front. Deve dividir as 152 malhas em 2 partes que tricota separadamente. até ter 10 cm medidos a partir da carreira em que montou a28 malhas, Bons tricôs!
23.10.2022 - 17:21
![]() Ana escribió:
Ana escribió:
I've just finished knitting the first 24cm and I'm already confused, what do you mean "cast on 1 stitch 2 times and 2 stitches 5 times"? I need a better explanation, please!
09.10.2022 - 16:36DROPS Design respondió:
Dear Ana, cast on 1 stitch at the end of each row from each side. Cast on 1 stitch at the end of the first row from the RS and WS. Repeat this once more on the next row from the RS and WS. Then, cast on 2 stitches at the end of each row from each side, but repeat this 5 times (so you increase 2 stitches at the end of the next 5 rows from the RS and 5 rows from the WS). Happy knitting!
09.10.2022 - 19:48
![]() Anna escribió:
Anna escribió:
Dzień dobry, czy jest dostępny szkic/schemat do tego projektu?
09.10.2022 - 11:54DROPS Design respondió:
Witaj Aniu, niestety nie. Napisz jeśli masz jakiś problem. Pozdrawiamy!
10.10.2022 - 10:09
![]() Jutta escribió:
Jutta escribió:
Hallo, wir haben mit der Anleitung angefangen, befinden uns aber grade in einer Sackgasse und kommen auch mit vereinten Denkkräften nicht weiter...Nach dem einseitige Anschlagen der 28 Maschen und dem Teilen an der hinteren Mitte können wir uns so langsam nicht mehr vorstellen wie es weiter geht und wie daraus die Kapuze entstehen soll. Hat jemand vielleicht eine Zeichnung? Was genau ist die hintere / vordere Mitte? Wie wird alles zusammengenäht? Ich hoffe jemand kann helfen
06.08.2022 - 15:54DROPS Design respondió:
Liebe Jutta, die Arbeit wird zuerst in Reihen von der vorderen Mitte gestrickt, dann wenn die neuen Maschen für die Öffnung für Gesicht angeschlagen wurden, soll die Arbeit von der hinteren Mitte gestrickt werden (so gibt es keine Naht an der vorderen Mitte). Am Ende nähen Sie die Kapuze oben zusammen und die unteren Reihen in der hinteren Mitte (ab den neuen Maschen bis zur Abketterand). Viel Spaß beim stricken!
08.08.2022 - 08:07
![]() Tiko escribió:
Tiko escribió:
First time I got confused with your pattern 😊1. the whole piece is in gaeter stitch except for the 158 stitches around face? 2. Is the piece worked inthe round at any stage? 3. Is it possible to send or add to the pattern a drawing fo what the finished piece looks like prior to been assambled? Thanks for the answerrs 💚
13.03.2022 - 19:12DROPS Design respondió:
Dear Tiko, 1. correct, only the ribbing edge around face is worked in rib, the whole work is then worked in garter stitch. 2. Piece is only worked in rows, but first from mid front (until opening for face is done), then from mid back (after you have increased/cast on the stitches for under face). 3. we have no chart for this sorry. Happy knitting!
14.03.2022 - 12:06
![]() Ana escribió:
Ana escribió:
Could I do the whole pattern in rib instead of garter stitch? How could I adapt from one to the other? Thank you so much!
24.02.2022 - 19:10DROPS Design respondió:
Dear Ana, your tension would be then different and your would have to re-calculate the whole pattern. You might find another pattern among these ones. Happy knitting!
25.02.2022 - 08:59
![]() Ayra escribió:
Ayra escribió:
Plz explain when you pick up 158 stitches around face opening do you have to pick up all of the stitches or you have to pick up 3 and skip one. Thanks
13.02.2022 - 20:44DROPS Design respondió:
Hi Ayra, you have to distribute new stitches evenly to have 158 stitches around face opening in total. Happy knitting!
14.02.2022 - 08:18
![]() Ayra escribió:
Ayra escribió:
Plz explain for mid back seam after working on 28 new cast on stitches and 62 stitches when you turn your work do you have to do the purl stitch from that side and also you have to work on 28 stitches.again so the mid back seam is done. Now you have to do garter stitch for all of the stitches. Thanks
04.02.2022 - 01:51DROPS Design respondió:
Dear Ayra, when you cut the yarn after the hood part, you start again piece from mid back (= approx. middle of previous rows), and will then cast on new stitches for face opening, ending rows on mid back. The seam on mid back will start here and will be sewn to the bottom edge; the 28 sts are cast on on mid front, there won't be any seam here. Hope it will help. Happy knitting!
04.02.2022 - 09:16
![]() Ayra escribió:
Ayra escribió:
Plz explain how you sew the hood in the end? Thanks
03.02.2022 - 02:10DROPS Design respondió:
Dear Ayra, fold the cast on edge double and sew cast on sts together; and then sew on mid back from the beginning of row worked from mid back (after face opening) towards the cast off edge. Happy knitting!
03.02.2022 - 08:47
![]() Marta escribió:
Marta escribió:
One follow up if I may. If there is a seam mid-back, where is the face opening. I'm really confused as you can tell.
02.02.2022 - 14:18DROPS Design respondió:
Dear Marta, you first work the hood, back and forth from mid front, then cut the yarn and start on mid back to work now from the mid back, increasing stitches on mid front and working the 2nd half of sts to mid back. The seam will be on mid back from this part. Hope it will help. Happy knitting!
02.02.2022 - 14:29
|
|
Lawless#lawlesshood |
|
 |
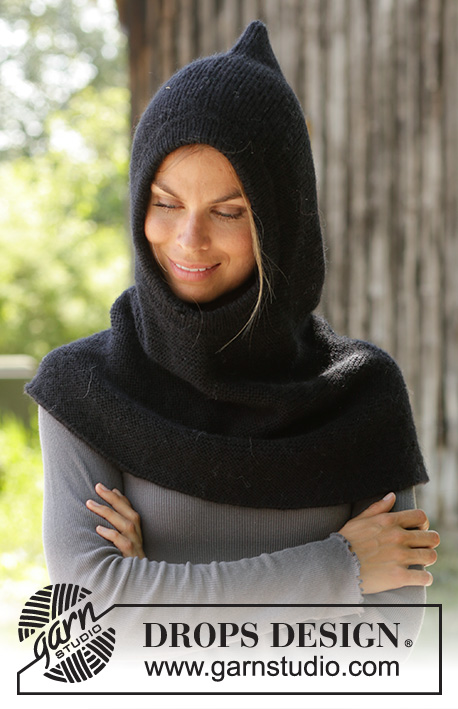 |
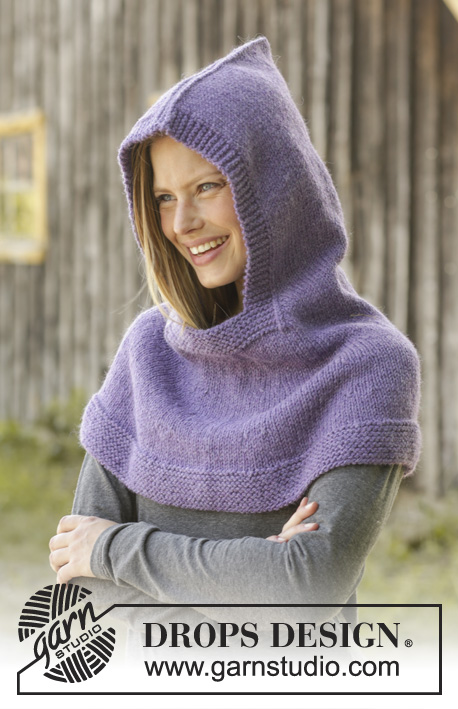
Cuello con capucha de punto en DROPS Merino Extra Fine o DROPS Karisma. La pieza está tejida de arriba para abajo en punto musgo. Tallas: S – XXXL.
DROPS 192-2 |
|
|
EXPLICACIÓN PARA REALIZAR EL PATRÓN: ----------------------------------------------------- PUNTO MUSGO (de ida y vuelta): 1 surco = tejer 2 hileras de derecho. TIP PARA AUMENTAR: Tejer hasta que reste 1 punto antes del hilo marcador, 1 lazada, tejer 2 puntos derechos (el hilo marcador está en el centro de estos puntos), 1 lazada. En la vuelta siguiente, tejer la lazada retorcida para evitar que se forme un agujero. ----------------------------------------------------- COMENZAR LA PIEZA AQUÍ: ----------------------------------------------------- CUELLO CON CAPUCHA – RESUMEN CORTO DE LA PIEZA: La pieza se teje de ida y vuelta en aguja circular, de arriba para abajo. Al final, la pieza se cose entre sí en la parte de atrás y en la parte de arriba de la capucha. CUELLO CON CAPUCHA: Montar 100 puntos en aguja circular tamaño 3 mm con Merino Extra Fine o Karisma. Tejer en PUNTO MUSGO – leer explicación arriba, de ida y vuelta. ¡RECORDARSE DE MANTENER LA MISMA TENSIÓN DE TEJIDO DE LA MUESTRA! Cuando la pieza mida 24 cm, montar puntos al final de cada hilera, a cada lado (hacia el centro del frente – hacia la cara) de la manera siguiente: Montar 1 punto 2 veces y 2 puntos 5 veces (= 12 puntos aumentados a cada lado) = 124 puntos. Al final de la hilera siguiente, montar 28 puntos al final de la hilera (hacia el centro del frente – debajo de la abertura para la cara) = 152 puntos. Tejer de derecho hasta el centro de la parte de atrás, tejiendo 62 puntos derechos después de los 28 puntos montados en el centro del frente. Ahora dividir la pieza y tejer de ida y vuelta a partir de aquí - centro de la parte de atrás (esto se hace para que la costura quede en el centro de la parte de atrás). Tejer en punto musgo de ida y vuelta hasta que la pieza mida 10 cm a partir de los 28 puntos montados en el centro del frente. Ahora insertar 8 hilos marcadores en la pieza de la manera siguiente: Comenzar en el centro de la parte de atrás e insertar el primer hilo marcador después de 10 puntos, después insertar los 7 hilos marcadores siguientes después de 19 puntos, hay ahora 9 puntos en la aguja después del último hilo marcador. Continuar en punto musgo. En la hilera siguiente por el lado derecho, aumentar 1 punto a cada lado de cada hilo marcador – leer TIP PARA AUMENTAR. Aumentar así aprox cada 3 cm 6-7-8 veces en total = 248-264-280 puntos. Tejer hasta que la pieza mida 58-60-62 cm en total. Rematar con 2 hilos. Levantar por el lado derecho 158 puntos alrededor de la abertura de la cara en una aguja circular corta tamaño 2.5 mm. Tejer 1 vuelta de revés, 1 vuelta de derecho, 1 vuelta de revés, 1 vuelta de derecho. Después tejer en resorte (= 1 derecho/1 revés) durante 6 cm. Rematar los puntos con derecho sobre derecho y revés sobre revés. Doblar la orilla en dos hacia el lado revés y coserla. ENSAMBLAJE: Hacer la costura en el bucle externo del punto más externo al centro de la parte de atrás y a lo largo de la orilla en la parte de arriba de la capucha. ORILLA ALREDEDOR DE LA CARA: Levantar, por el lado derecho, 158 puntos alrededor de la abertura de la cara en una aguja circular corta tamaño 2.5 mm. Tejer 1 vuelta de revés, 1 vuelta de derecho, 1 vuelta de revés, 1 vuelta de derecho. Después tejer en resorte (= 1 derecho/1 revés) durante 6 cm. Rematar los puntos con derecho sobre derecho y revés sobre revés. Doblar la orilla en dos hacia el lado revés y coser. |
|
¿Terminaste este patrón?Entonces, etiqueta tus fotos con #dropspattern #lawlesshood o envíalas a la galería #dropsfan. ¿Necesitas ayuda con este patrón?Encontrarás 17 videos tutoriales, un espacio para comentarios/preguntas y más visitando la página del patrón en garnstudio.com © 1982-2026 DROPS Design A/S. Todos los derechos reservados. Este documento, incluyendo todas sus sub-secciones, está protegido por los derechos de autor (copyright). Lee más acerca de lo que puedes hacer con nuestros patrones en la parte de abajo de cada patrón de nuestro sitio. |
|


Con más de 40 años en el diseño de modelos de punto y de ganchillo, DROPS Design ofrece una de las más vastas colecciones de patrones gratuitos en el internet - traducidos en 17 idiomas. Al día de hoy, contamos con 324 catálogos y 12290 patrones - de los cuales 11673 están traducidos en español.
Nosotros trabajamos con mucho esmero para brindarte lo mejor que las labores de punto y ganchillo tienen para ofrecer,inspiración y consejos, así como hilos de magnífica calidad a precios increíbles! Te gustaría usar nuestros patrones para otro fin además del uso personal? Puedes leer acerca de lo que estás permitida a hacer en el texto de Copyright en la parte de abajo de todos nuestros patrones. Felices labores!
Escribe un comentario sobre DROPS 192-2
¡Nos encantaría saber qué piensas acerca de este patrón!
Si quieres escribir una pregunta referente al patrón, por favor asegúrate de elegir la categoría correcta en el formulario debajo, para acelerar el proceso de respuesta. Los campos obligatorios están marcados con un *.