Comentarios / Preguntas (44)
![]() Ivana escribió:
Ivana escribió:
Per lo scaldacollo non ci sono spiegazioni: quali le misure finali?
02.01.2024 - 13:51DROPS Design respondió:
Buonasera Ivana, il modello è unico e le misure sono riportate nello schema in fondo alla pagina. Buon lavoro!
02.01.2024 - 19:29
![]() Laura escribió:
Laura escribió:
Non è specificato che nel 2 ferro dopo aver lavorato insieme m gettata e m passata segue 1 maglia a diritto Ferro 2: 1 m dir, * lavorare insieme a rov la m gettata e la m passata *, ripetere da *-* fino alla fine del ferro.
08.11.2021 - 12:10DROPS Design respondió:
Buonasera Laura, abbiamo corretto il testo: grazie per la segnalazione. Buon lavoro!
10.11.2021 - 22:52
![]() Maria escribió:
Maria escribió:
La taille pour fille de 8 ans s.v.p. merci
02.11.2021 - 14:45DROPS Design respondió:
Bonjour Maria, ce modèle n'est disponible que pour femme, retrouvez ici nos modèles capuche/cagoule enfant. Bon tricot!
03.11.2021 - 08:09
![]() Simone escribió:
Simone escribió:
Jeg er forvirret over størrelserne her - jeg har altid været en XS-S, nogle gange endda XXS. Men jeg synes at 29 cm fra skulder til skulder er meget kort, er det meningen? For jeg tvivler på at jeg kan passe den over skuldrene.
06.01.2021 - 15:13DROPS Design respondió:
Hej Simone, jeg synes du skal prøve at måle arbejdet rundt om dine skuldre inden du lukker af, så ser du om du er nødt til at strikke nogle flere cm. God fornøjelse!
08.01.2021 - 10:38
![]() Elisa escribió:
Elisa escribió:
Buongiorno. Cosa si intende per "imbastire un filo" nella confezione del collo? A cosa serve il filo imbastito? Grazie
05.12.2020 - 09:22DROPS Design respondió:
Buongiorno Elisa, per imbastire deve passare dentro e fuori il capo con un filo, le può essere di aiuto per la cucitura. Buon lavoro!
05.12.2020 - 20:24
![]() Gabrielle escribió:
Gabrielle escribió:
Me again... Even more confused. I was following the instruction written on the pattern ok. I watched the video on false english ribs and on the video, it is Row 1: 1 edge st in garter st, * K 1, 1 YO, slip 1 st as if to P (with yarn behind piece) *, repeat from *-* until 2 sts remain, finish with K 1 and 1 edge st in garter st. Would that be why I cannot make it go straight as it is a K instead of a P?
16.03.2020 - 08:39DROPS Design respondió:
Dear Gabrielle, follow the pattern as explained, ie work on row 1: 1 edge st in garter st, * P 1, 1 YO, slip 1 st as if to P *, repeat from *-* until 1 st remains, finish with P 1, 1 edge st in garter stitch. Row 2: 1 edge stitch in garter stitch, K.1 * P tog YO and slipped st, K 1 *, repeat from *-* until the end of row, 1 edge stitch in garter stitch. Hope this can help, but it might be quite easier for your store to help you when seeing what you worked. Happy knitting!
16.03.2020 - 10:12
![]() Gabrielle escribió:
Gabrielle escribió:
What do you mean when talking about twisting the stitches? When I knit on the WS and purl together the yarn over and the slipped stitch, the slipped stitch comes first... Would that change anything?
16.03.2020 - 08:06
![]() Gabrielle escribió:
Gabrielle escribió:
It seems to me that I am following the pattern to the letter. I start and finish my row with a garter stich and follow the instructions for inbetween but one side of my work is 10 cm longer that the other side.
16.03.2020 - 07:59DROPS Design respondió:
Dear Gabrielle, it's a bit tricky to answer you what's going on there, please show your work to your store (even per mail) so that they can see what might happen and help you further. Happy knitting!
16.03.2020 - 10:08
![]() Gabrielle escribió:
Gabrielle escribió:
Hi. I have knitted the hood twice now, but it keeps knitting on an angle.... The rows are on a slant, not straight. Can it be rectified when I block the piece?
15.03.2020 - 10:27DROPS Design respondió:
Dear Gabrielle, how your stitches slant? Are you sure you did not twisted the stitches? Did you knitted with the same gauge all the way? Usually a lot can be helped by wet-blocking the piece, it is a good idea to try. Happy Knitting!
16.03.2020 - 01:45
![]() Esperanza escribió:
Esperanza escribió:
Realmente no se cómo empezar el patrón, por el cuerpo o por la capucha. Me resulta difícil entenderlo. Si hay alguien que me pueda orientar, estaré muy agradecida. Me niego a no hacerlo, lo quiero .Gracias de antemano.
17.06.2019 - 01:57DROPS Design respondió:
Hola Esperanza. Este mini poncho se trabaja en dos partes separadas: la capucha y el cuerpo. Puedes empezar por cualquier parte. Una vez terminadas, se cosen según las instrucciones.
27.06.2019 - 23:47
Maid Marian#maidmarianbalaclava |
|||||||
|
|
|||||||
Mini-poncho de punto DROPS con capucha en falso punto inglés con 2 hilos ”Brushed Alpaca Silk”. Talla: S - XXXL.
DROPS 158-33 |
|||||||
|
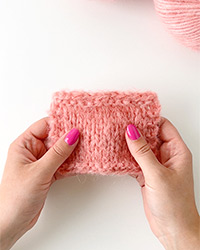
PUNTO MUSGO (de ida y vta en ag): Trabajar todas las filas de derecho. 1 pliegue = 2 filas de derecho. FALSO PUNTO INGLÉS (de ida y vta en ag): Fila 1: *1 r., 1 HEB (lazada), desl 1 pt como de r.*, repetir de * a * hasta que quede 1 pt, finalizar con 1 r. Fila 2: * Trabajar juntos de revés la HEB y el pt desl, 1 d.*, repetir de * a * hasta que quede 1 pt, finalizar con 1 d. Repetir la 1ª y 2ª fila hacia arriba. ---------------------------------------------------------------------------------------------------------------------------------------------- MINI-PONCHO: Se trabaja en 2 partes que se cosen después. CAPUCHA: Se trabaja de ida y vta en ag. Mont flojo 35-36-37 pts (incl 1 pt orillo a cada lado) con ag tamaño 9 mm con 2 hilos Brushed Alpaca Silk. Trabajar 2 pliegues en PT MUSGO - ver explicación arriba. Después trabajar FALSO PUNTO INGLÉS - ver explicación arriba - con 1 pt orillo en pt musgo a cada lado de la labor - RECUERDE MANTENER LA MISMA TENSIÓN DE LA MUESTRA! Cuando la labor mida 56-56-56 cm, trabajar 2 pliegues, rematar FLOJO. PARTE DEL CUELLO/HOMBROS: Se trabaja de ida y vta en ag. Mont FLOJO 31-34-36 pts (incl 1 pt orillo a cada lado) con ag tamaño 9 mm con 2 hilos Brushed Alpaca Silk. Trabajar 1 fila de revés, después trabajar el falso pt inglés con 1 pt orillo en pt musgo a cada lado de la labor- RECUERDE MANTENER LA MISMA TENSIÓN DE LA MUESTRA! Cuando la labor mida 58-72-86 cm, trabajar 1 fila de revés, rematar FLOJO. TERMINACIÓN: Doblar la capucha, coser a lo largo de uno de los lados largos desde el centro de la parte anterior hasta el centro de la parte posterior - ver el diagrama. Doblar el cuello y coser los lados cortos formando un anillo. Para la talla L/XL y XXL/XXXL: Pasar un hilo auxiliar a lo largo de la abertura del cuello, quitar el hilo después de terminar. Coser la parte de la capucha a la del cuello dentro de 1 pt orillo (la costura del cuello debe quedar en el lado opuesto a la abertura de la capucha). |
|||||||
Explicaciones del diagrama |
|||||||
|
|||||||

|
|||||||
¿Terminaste este patrón?Entonces, etiqueta tus fotos con #dropspattern #maidmarianbalaclava o envíalas a la galería #dropsfan. ¿Necesitas ayuda con este patrón?Encontrarás 12 videos tutoriales, un espacio para comentarios/preguntas y más visitando la página del patrón en garnstudio.com © 1982-2025 DROPS Design A/S. Todos los derechos reservados. Este documento, incluyendo todas sus sub-secciones, está protegido por los derechos de autor (copyright). Lee más acerca de lo que puedes hacer con nuestros patrones en la parte de abajo de cada patrón de nuestro sitio. |
|||||||


Escribe un comentario sobre DROPS 158-33
¡Nos encantaría saber qué piensas acerca de este patrón!
Si quieres escribir una pregunta referente al patrón, por favor asegúrate de elegir la categoría correcta en el formulario debajo, para acelerar el proceso de respuesta. Los campos obligatorios están marcados con un *.