
Categorías populares
¿Buscas un hilo?


Comentarios / Preguntas (38)
![]() Luisa escribió:
Luisa escribió:
Chiedo scusa ma non mi é chiaro come funziona lo schema. Io monto 15 m con il primo colore, ogni settimo ferro aggiungo 15 m fino ad arrivare a 55 ferri, a questo punto aggiungo 15m con il secondo colore con cui lavoro 54 f, al 55esimo aggiungo 15m del terzo colore e lavoro 6 f etc? Giusto?
12.07.2022 - 00:14DROPS Design respondió:
Buongiorno Luisa, dal 55 ferro deve iniziare ad intrecciare le maglie come indicato. Per il cambio colori deve fare riferimento a quanto riportato nel paragrafo "Strisce". Buon lavoro!
13.07.2022 - 00:09
![]() Luisa escribió:
Luisa escribió:
Buongiorno se voglio farlo più grande, come faccio? Lavoro 2 schemi di seguito?
11.07.2022 - 20:11DROPS Design respondió:
Buonasera Luisa, se vuole lavorarlo più grande può aggiungere delle ripetizioni al motivo. Buon lavoro!
11.07.2022 - 21:58
![]() Torunn Mikkelsen escribió:
Torunn Mikkelsen escribió:
Jeg forstår ikke om det skal klippes tråd eller ikke etter økning av 15 masker - det står litt ulikt i kommentarene. Så lurer jeg på om det er kun 2 pinner natur i starten eller er det tre siden det står en pinne før stjernen?
04.05.2021 - 15:56DROPS Design respondió:
Hej Torunn, Hvor i opskriften skriver vi at det skal klippes tråd? Ja du strikker 1.pind med natur fra retsiden og så 2 pinde mere siden du bytter tråd på begynnelsen av en pinne fra vrangen :)
06.05.2021 - 15:45
![]() Eveline escribió:
Eveline escribió:
What you suggest, to change color at RS (this would be row 3 / 5 /7 etc) is not what the pattern tells us to do. It clearly state to change color on wrong side. Knit first 3 rows off white, row 4 golden, row 6 off white, so I should start row 8 with golden. Only then there's no golden tread at the end of the new casts ons.. So maybe what you suggest to change on the RS will make it possible. Do you believe this is a mistake in the pattern? Or am I reading it wrong?
27.01.2021 - 15:29DROPS Design respondió:
Dear Eveline, you are right, my mistake sorry. Colour changes should be from WS - that means you will have to cut the yarn when casting the new stitches, you can cast on either with the colour of the last row from RS worked or then with the colour of the next colour that will be worked from WS. Happy knitting!
28.01.2021 - 08:46
![]() Eveline escribió:
Eveline escribió:
Hello, can you explain how I have to switch form off white to golden rod from row 7 to row 8? On row 7 I have to cast on 15 more stiches working in off white, but have to change to golden rod on row 8. Is there a way or do I have to cut cords every 15 stiches? That would be so terrible. .
26.01.2021 - 16:01DROPS Design respondió:
Dear Eveline, you are working each time 2 rows with the same colour: work row 7 to the end of the row, cast on the new stitches, turn and work row 8 with the same colour. Turn change colour and work the next 2 rows. Colour changes should be at the right side of piece, seen from RS, ie at the beg of row from RS. Happy knitting!
26.01.2021 - 16:41
![]() Yvette escribió:
Yvette escribió:
Ik snap iets niet aan dit patroon. Ik heb de eerste 7 naalden gebreidt (3 naturel, 2 oker, 2 naturel) en moet nu 15 steken aan het eind toevoegen. Maar als ik dan omkeer om rij 8 te breien moet ik overgaan op de okerkleur, echter die zit dan niet daar aan het eind van die nieuwe 15 steken.. Hoe doe je dit? Omdat dit een sjaal is wil ik de draad niet aan de andere kant meenemen, dus iets klopt niet. Hopelijk maak ik mezelf zo duidelijk en kunt u het uitleggen. Vr. gr.
19.01.2021 - 21:33DROPS Design respondió:
Dag Yvette,
Na het opzetten van de 15 steken zul je steeds de draad af moeten knippen om met de andere kleur te beginnen.
23.01.2021 - 10:58
![]() Carol Ibbetson escribió:
Carol Ibbetson escribió:
Hello again. Just checked the chart key again and realised it is non standard. i.e. a blank square is knit on BOTH sides. This could easily cause issues to a UK knitter who would be used to seeing a 'dot' for a stitch that is knit on the WS. Rest of my comments hold true though - many thanks
15.04.2019 - 16:50
![]() Carol Ibbetson escribió:
Carol Ibbetson escribió:
From a UK tech editor working on this pattern for a magazine. - chart shows stocking st instead of garter st - Color changes must be made on RS rows in garter st, not WS - Photo should be flipped vertically to match pattern Happy to check any patts if required. Just msg me. Thanks C
15.04.2019 - 16:33DROPS Design respondió:
Dear Mrs Ibbeston, the diagram key is correct to this pattern: all stitches should be worked in garter stitch = knit from right side and from wrong side. Happy knitting!
23.04.2019 - 16:01
![]() DS Meyer escribió:
DS Meyer escribió:
It might be helpful to clarify the chart. The 15 stitches are as folliws, K2tog, knit 5, yo, knit 1, yo, knit5, SKP. I misread the chart before sending my earlier comment.
22.03.2019 - 19:25
![]() DS Meyer escribió:
DS Meyer escribió:
With both a K2tog and a SKP on every right side row, the original 15 stitches decrease 2 stitches every row; with 1 yarnover, then the stitchs before and after the yarnover change each row. How do you keep 15 stitches and create the chevron look?
22.03.2019 - 18:29DROPS Design respondió:
Dear Mrs Meyer, you will keep 15 sts until row 7 then cast on 15 new sts at the end of row 7- since the number of decrease is compensated by the number of YOs you will keep the same number of sts. Happy knitting!
25.03.2019 - 08:34
|
|||||||||||||||||||
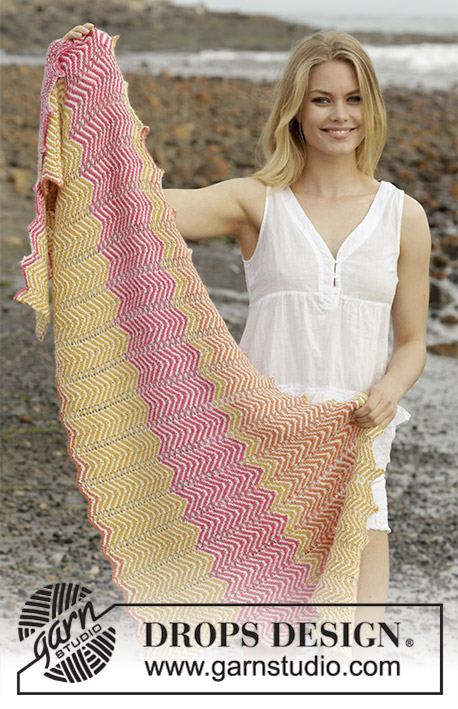
Sunrise Hues#sunrisehuesshawl |
|||||||||||||||||||
 |
 |
||||||||||||||||||
Chal de punto con patrón zigzag y franjas. La pieza está tejida en DROPS Alpaca.
DROPS 187-26 |
|||||||||||||||||||
|
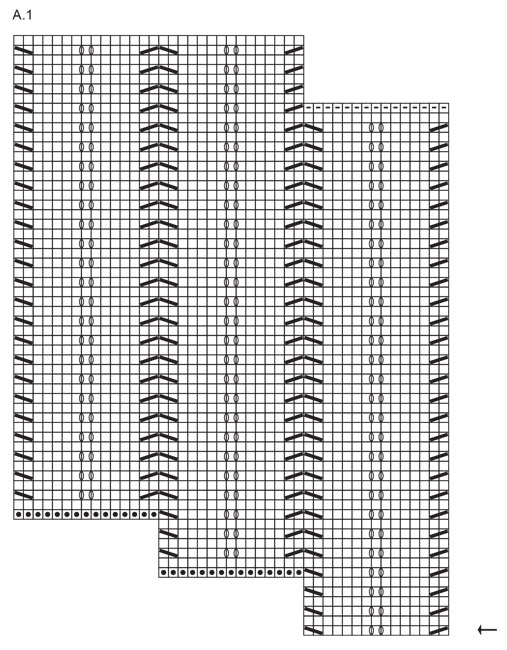
INFORMACIÓN PARA REALIZAR EL PATRÓN: FRANJAS: Cambiar de color al principio de una hilera por el lado revés. Tejer las franjas de la manera siguiente: Tejer la 1ª hilera con blanco hueso por el lado derecho, * Tejer 2 hileras con blanco hueso, 2 hileras con ocre *, repetir de *a* hasta haber tejido 55 hileras. La última hilera se teje por el lado derecho; en esta hilera rematar 15 puntos al principio de la hilera. * Tejer 2 hileras con blanco hueso, 2 hileras con naranja *, repetir de *a* hasta haber tejido 54 hileras. La última hilera se teje por el lado derecho; en esta hilera rematar 15 puntos al principio de la hilera. * Tejer 2 hileras con blanco hueso, 2 hileras con ocre *, repetir de *a* hasta haber tejido 6 hileras. La última hilera se teje por el lado derecho. * Tejer 2 hileras con blanco hueso, 2 hileras con magenta *, repetir de *a* hasta haber tejido 48 hileras. La última hilera se teje por el lado derecho; en esta hilera rematar 15 puntos al principio de la hilera. * Tejer 2 hileras con blanco hueso, 2 hileras con ocre *, repetir de *a* hasta haber tejido 54 hileras. * Tejer 2 hileras con blanco hueso, 2 hileras con naranja *, repetir de *a* hasta haber tejido 6 hileras. SURCO/PUNTO MUSGO (tejido de ida y vuelta): 1 surco = tejer 2 hileras de derecho. PATRÓN: Ver diagrama A.1. ----------------------------------------------------- CHAL: El chal tiene una forma asimétrica y se teje siguiendo un diagrama. Hay disminuciones en un lado y aumentos en el otro lado. Montar 15 puntos con aguja circular tamaño 4.5 mm y blanco hueso. Tejer de acuerdo a A.1 – ver la flecha para comenzar. Tejer FRANJAS – ver descripción arriba. En la 7ª hilera, montar 15 nuevos puntos al final de la hilera = 30 puntos. Continuar A.1 hacia arriba. A cada 6ª hilera montar 15 nuevos puntos al final de la hilera. Al principio de la 55ª hilera, rematar los primeros 15 puntos y después continuar a rematar a cada 54ª hilera como se describe en las franjas. Continuar con el patrón de acuerdo a A.1, aumentando y rematando los puntos hasta que las franjas en blanco hueso y magenta estén terminadas – remataste 3 veces en el lado y montaste nuevos puntos 27 veces = 375 puntos en la aguja. Ahora continuar sin aumentar ni rematar hasta haber tejido todas las franjas. Después rematar todos los puntos. |
|||||||||||||||||||
Explicaciones del diagrama |
|||||||||||||||||||
|
|||||||||||||||||||
 |
|||||||||||||||||||
¿Terminaste este patrón?Entonces, etiqueta tus fotos con #dropspattern #sunrisehuesshawl o envíalas a la galería #dropsfan. ¿Necesitas ayuda con este patrón?Encontrarás 13 videos tutoriales, un espacio para comentarios/preguntas y más visitando la página del patrón en garnstudio.com © 1982-2026 DROPS Design A/S. Todos los derechos reservados. Este documento, incluyendo todas sus sub-secciones, está protegido por los derechos de autor (copyright). Lee más acerca de lo que puedes hacer con nuestros patrones en la parte de abajo de cada patrón de nuestro sitio. |
|||||||||||||||||||


Con más de 40 años en el diseño de modelos de punto y de ganchillo, DROPS Design ofrece una de las más vastas colecciones de patrones gratuitos en el internet - traducidos en 17 idiomas. Al día de hoy, contamos con 324 catálogos y 12290 patrones - de los cuales 11685 están traducidos en español.
Nosotros trabajamos con mucho esmero para brindarte lo mejor que las labores de punto y ganchillo tienen para ofrecer,inspiración y consejos, así como hilos de magnífica calidad a precios increíbles! Te gustaría usar nuestros patrones para otro fin además del uso personal? Puedes leer acerca de lo que estás permitida a hacer en el texto de Copyright en la parte de abajo de todos nuestros patrones. Felices labores!
Escribe un comentario sobre DROPS 187-26
¡Nos encantaría saber qué piensas acerca de este patrón!
Si quieres escribir una pregunta referente al patrón, por favor asegúrate de elegir la categoría correcta en el formulario debajo, para acelerar el proceso de respuesta. Los campos obligatorios están marcados con un *.