
Categorías populares
¿Buscas un hilo?


Comentarios / Preguntas (48)
![]() María Fernanda Yáñez escribió:
María Fernanda Yáñez escribió:
Hola! Para la talla M, los 95 puntos de A2 no encajan con el sentido de los 7 puntos centrales de A3 (para que encajen tendría que tener 43 puntos a un lado y 45 en el otro). Hago el comentario para saber si es que hay un error en el patrón. Gracias por la respuesta.
15.03.2022 - 05:30
![]() Irene Simeone escribió:
Irene Simeone escribió:
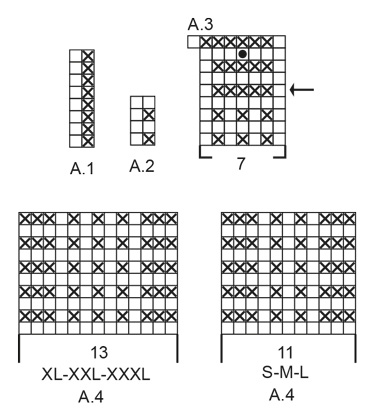
Buongiorno, un'altra domanda. Quando si deve iniziare il diagramma A.3, le istruzioni dicono di iniziare dalla riga indicata dalla freccia su un ferro sul rovescio del lavoro. Questo significa che le 7 maglie centrali devono essere lavorati così: 1 dir, 5 rov, 1 dir? Grazie ancora. Irene
03.03.2022 - 15:43DROPS Design respondió:
Buonasera Irene, dal rovescio del lavoro deve lavorare come indicato nella legenda e cioè 1 maglia rovescio, 5 maglie diritto e 1 maglia rovescio. Buon lavoro!
05.03.2022 - 22:09
![]() Irene Simeone escribió:
Irene Simeone escribió:
Buongiorno, sto seguendo le istruzioni ma sono un po' confusa :( il davanti del lavoro è quello in cui si vedono le coste oppure quello in cui ci sono una specie di nodini? spero riusciate a capire cosa intendo. Grazie mille! Irene
03.03.2022 - 15:24DROPS Design respondió:
Buonasera Irene, il davanti del lavoro è quello in cui inizia a lavorare a coste sul dietro. Buon lavoro!
04.03.2022 - 17:46
![]() Stella escribió:
Stella escribió:
When it says to work 4 rows over 10 garter stitches, does is mean 4 rows with the 10 garter stitches or the 10 garter stitches with 4 rows of A2 over it?
03.01.2022 - 21:52DROPS Design respondió:
Dear Stella, this means you work the next 4 rows with the 10 sts in garter stitch instead of pattern and the remaining stitches as before. Happy knitting!
04.01.2022 - 07:26
![]() Angela Beaty escribió:
Angela Beaty escribió:
In the Back Piece section, work from arrow in A.3 over the middle 7 stitches on row, Is this actually in the middle of the 96 stitches? So you skip the first 4 rows and just do the arrow row? Then work A.3 over the first 48 stitches do you start from the bottom of the diagram or from the arrow?
19.08.2021 - 10:21DROPS Design respondió:
Dear Angela, when you work from the arrow, yes, you're working over the middle 7 stitches of the 96 stitches and you skip the first 4 rows and start from the arrow row. In the rest of the stitches, you work A.2. After finishing A.3, in the next row, there is a split for the opening. The rows under the arrow are actually from A.2 and are there just to give a context or to make it continuous visually.
30.08.2021 - 19:26
![]() Katzilicious escribió:
Katzilicious escribió:
I'm still confused, can you explain "work from arrow in A.3 over the middle 7 stitches on row - adjust so that this row marked with arrow is worked from wrong side. On first row from right side after A.3 work over the first 44-48-52-57-63-70 stitches on row and slip the remaining 44-48-52-57-63-70 stitches on 1 stitch holder"? So how do I read the chart? From the right bottom? And when i work from arrow A.3 do i start with RS or WS? Thank you
18.05.2021 - 12:06DROPS Design respondió:
Dear Katzilicious, you read the diagram from right to left and from bottom up, from the right side. Here you have a lesson on how to read a diagram: https://www.garnstudio.com/lesson.php?id=68&cid=19 A.3 begins from the wrong side. Work 5 rows of A.3, which is in the center of the front or the back. The next step is to separate this part into two. You work one part with the V-neck and then you work the second part from the stitch holder. Happy knitting!
07.08.2021 - 11:30
![]() Jessica escribió:
Jessica escribió:
Hi again! Thanks for the help, it clears things up, but I’m still not sure what I should be doing when I switch to the A.3 chart. It says the row marked by the arrow should be worked from the WS, but to do that, I’d have to work the row below from the RS, meaning I’d be doing a row of knitting. But the A.2 pattern states that for RS rows I should P1 K1. I’m not sure how these two charts fit together. Any help would be great.
07.05.2021 - 13:32
![]() Jessica escribió:
Jessica escribió:
Hi! I’m a little confused about what to do once I’ve done the first 8 rows in A.1. I’m finishing on the WS so starting A.2 on the RS with a P1 K1 and 3 garter stitches at each end, then on the WS purling all stitches, but from previous comments that doesn’t seem to be the correct pattern, and after I got to switching to A.3, doing the row indicated by the arrow on the WS indicates that the previous RS row should be all knitted, not P1 K1 as I have done. Any help would be appreciated.
07.05.2021 - 11:22DROPS Design respondió:
Dear Jessica, the garter stitches in A.2 (= P from RS, P from WS) should be worked over the P stitches in A.1, so that you will work A.2 from RS: 3 sts in garter st, K1, (P1, K1) repeat from (to) and finish with 3 sts in garter stitch and from WS: K3, P to the last 3 sts, P3. Happy knitting!
07.05.2021 - 13:00
![]() Katzilicious escribió:
Katzilicious escribió:
I'm confuse about worked A.1 until it had been vertically worked and work A.2 over A.1 can you please explain? Thank you
06.05.2021 - 07:39DROPS Design respondió:
Dear Katzilicious, work first the 8 rows in A.1 as explained: (from RS = 3 sts in garter stitch, knit 1, repeat A.1 (read from the right towards the left= P1, K1), 3 sts in garter st / from WS: 3 sts in garter st, A.1 (read from the left towards the right = P1, K1), P1, 3 sts in garter st). Then work: 3 sts in garter st, knit 1, repeat A.2 (= 1 st in garter st, 1 st in stocking st), and finish with 3 sts in garter st, from WS: 3 sts in garter st, repeat A.1 (=1 st in stocking st = P, 1 st in garter st = K), P1, 3 sts in garter st. Hope this help. Happy knitting!
06.05.2021 - 07:45
![]() Diana escribió:
Diana escribió:
I prefer written instructions as opposed to charts. Is there anyone who has written out the instructions? Also, there are no instructions on how many inches or rows we need to knit for each diagram. I am a long time knitter but find almost all of the patterns here quite confusing with no written instructions or actual row/inches for each size. I understand the patterns are translated from Norwegian and it is not an easy task to ensure everything is explained in detail.
29.03.2021 - 22:35DROPS Design respondió:
Dear Diana, we use charts insted of written out instructions not only because they are available in many languages, but also because we believe that with charts one can see not only the very next step, but one can see teh larger picture, as how stitches and rows relate to each other en large. We also have a lesson about how to read diagrams here, and one can always ask for help in the store where they bought their DROPS yarn from (over the phone or in person). We have many knitters who actually prefer diagrams to written instructions. Happy Knitting!
30.03.2021 - 11:50
|
|||||||||||||
Mazo#mazotop |
|||||||||||||
 |
 |
||||||||||||
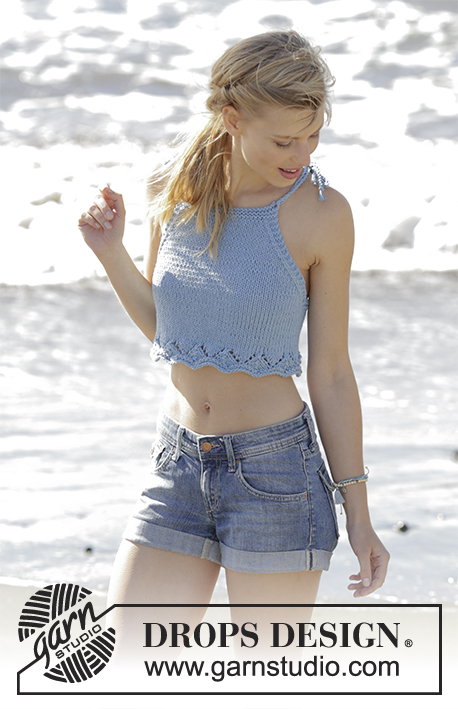
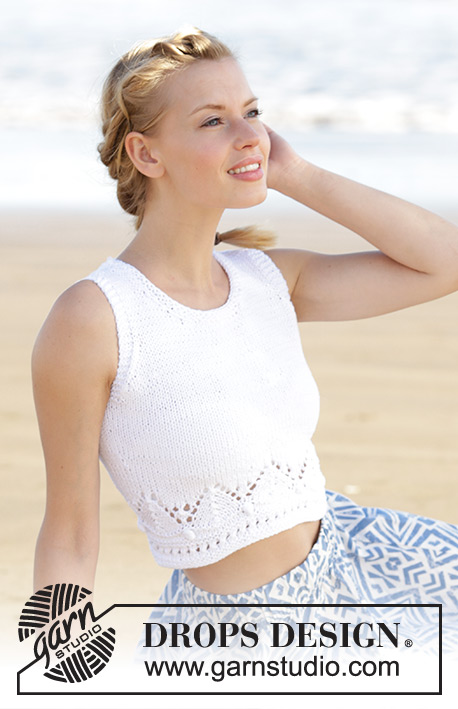
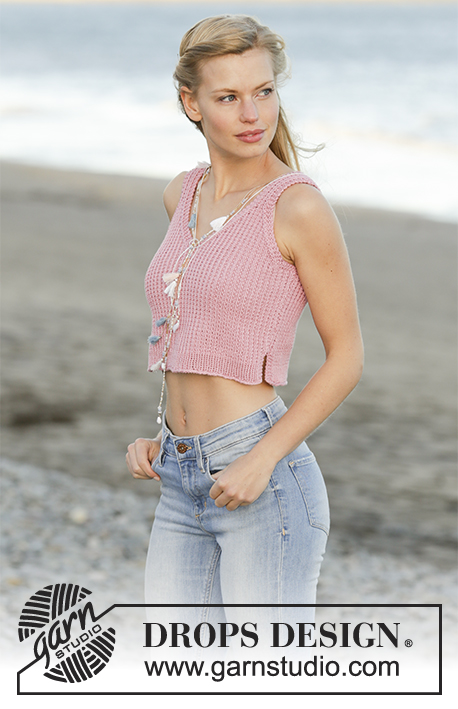
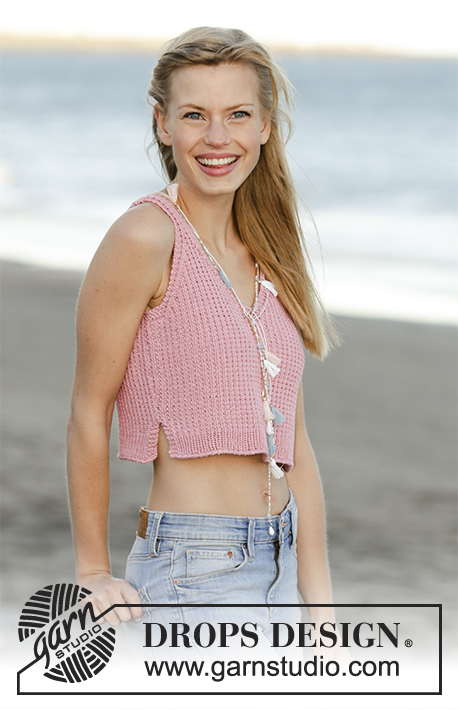
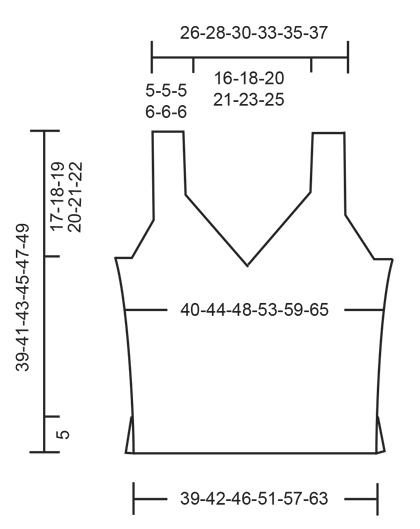
Top con escote en V, patrón texturado y aberturas en los lados, tejido de abajo para arriba en DROPS Muskat. Talla: S – XXXL.
DROPS 178-66 |
|||||||||||||
|
PUNTO MUSGO (de ida y vuelta): Tejer todas las hileras de derecho. 1 surco = 2 hileras tejidas de derecho. PATRÓN: Ver diagramas A.1 a A.4. Los diagramas muestran todas las hileras en el patrón vistas por el lado derecho. Elegir el diagrama que corresponda a tu talla. TIP PARA AUMENTAR: Aumentar 1 punto haciendo una lazada. En la hilera siguiente, tejer la lazada retorcida de derecho para evitar que se forme un agujero. NOTA: Tejer los nuevos puntos gradualmente en el patrón A.2. TIP PARA DISMINUIR: Disminuir 1 punto en el interior de 3 puntos de orillo en punto musgo. Todas las disminuciones se hacen por el lado derecho. Disminuir de la manera siguiente después de 3 puntos de orillo en punto musgo: Deslizar 1 punto como de derecho, 1 derecho, pasar el punto deslizado por encima del punto tejido. Disminuir de la manera siguiente antes de 3 puntos de orillo en punto musgo: Comenzar 2 puntos antes de los 3 puntos de orillo en punto musgo y tejer 2 puntos juntos de derecho. ----------------------------------------------------- TOP: Se teje de ida y vuelta en 2 partes que se cosen entre sí cuando están terminadas. ESPALDA: Montar 81-89-97-107-119-133 puntos con Muskat en aguja circular tamaño 4 mm. Tejer 1 hilera de revés por el lado revés. Tejer en resorte de la manera siguiente (1ª hilera = lado derecho): Tejer 3 puntos en PUNTO MUSGO – ver explicación arriba, tejer 1 punto derecho, repetir A.1 (= 2 puntos) hasta que resten 3 puntos en la hilera, tejer 3 puntos en punto musgo. Continuar el patrón de ida y vuelta de esta manera hasta haber tejido A.1 verticalmente. Después tejer A.2 (= 2 puntos) sobre A.1. RECORDARSE DE MANTENER LA MISMA TENSIÓN DE TEJIDO DE LA MUESTRA! Cuando la pieza mida 5 cm, montar 1 nuevo punto al final de las 2 hileras siguientes (marcan dónde terminan las aberturas) = 83-91-99-109-121-135 puntos. Tejer el patrón de la manera siguiente: 1 punto de orillo en punto musgo, 1 derecho, A.2 hasta que reste 1 punto, 1 punto de orillo en punto musgo. Cuando la pieza mida 7 cm, aumentar 1 punto en el interior de 1 punto de orillo en punto musgo a cada lado – LEER TIP PARA AUMENTAR! Repetir los aumentos cuando la pieza mida 10 cm = 87-95-103-113-125-139 puntos. Cuando la pieza mida 19-20-21-22-23-24 cm, tejer a partir de la flecha en A.3 sobre los 7 puntos centrales de la hilera - ajustar de modo que esta hilera marcada con flecha sea tejida por el lado revés. En la primera hilera por el lado derecho después de A.3, tejer sobre los primeros 44-48-52-57-63-70 puntos de la hilera y deslizar los 44-48-52-57-63-70 puntos restantes en 1 gancho auxiliar. LADO DERECHO DE LA ESPALDA: = 44-48-52-57-63-70 puntos. LEER TODA LA SECCIÓN SIGUIENTE – disminuir para el escote y la sisa al mismo tiempo de la manera siguiente: Tejer el patrón A.2 como antes con 3 puntos de orillo en punto musgo en dirección del escote y 1 punto de orillo en punto musgo en dirección del lado. ESCOTE: En la primera hilera por el lado derecho, comenzar a disminuir para el escote. Disminuir 1 punto en el interior de los 3 puntos de orillo en punto musgo – LEER TIP PARA DISMINUIR. Disminuir de esta manera a cada 2 hileras (es decir, a cada hilera por el lado derecho) 16-18-20-22-24-26 veces en total. SISA: Cuando la pieza mida 21-22-23-24-25-26 cm, tejer en punto musgo sobre los 10-10-12-11-11-14 puntos más externos en dirección del lado (incluyendo 1 punto de orillo en punto musgo). Cuando se han tejido 4 hileras (= 2 surcos) sobre estos puntos, rematar los primeros 7-7-9-8-8-11 puntos al principio de la hilera para la sisa. Tejer los 3 puntos siguientes en punto musgo (= orilla en dirección de la sisa). Disminuir 1 punto en el interior de los 3 puntos de orillo en punto musgo en dirección de la sisa. Disminuir de esta manera a cada 2 hileras (es decir, a cada hilera por el lado derecho) 10-12-12-14-18-20 veces en total. Después de todos los remates y disminuciones para la sisa y el escote, restan 11-11-11-13-13-13 puntos en la hilera para el tirante. Continuar el patrón como antes con 3 puntos de orillo en punto musgo a cada lado. Tejer el tirante como se muestra en A.4 – elegir el diagrama que corresponda a tu talla. Cuando la pieza mida 39-41-43-45-47-49 cm, rematar todos los puntos. LADO IZQUIERDO DE LA ESPALDA: Deslizar los 44-48-52-57-63-70 puntos del gancho auxiliar en el otro lado de vuelta en aguja circular tamaño 4 mm y tejer de la misma manera como el lado derecho de la espalda, pero en sentido inverso – NOTA: Al rematar para la sisa en el lado, rematar al principio de la hilera por el lado revés (en vez de al principio de la hilera por el lado derecho). Las disminuciones restantes para la sisa y el escote se hacen por el lado derecho. FRENTE: Montar y tejer como la pieza de la espalda. ENSAMBLAJE: Coser los dos tirantes juntamente con puntadas de grafting/costura invisible para evitar una costura abultada. Hacer la costura del lado en el interior de 1 punto de orillo en punto musgo a cada lado, a partir de la sisa y descendiendo hasta la abertura. Repetir en el otro lado. Cortar y rematar el hilo. |
|||||||||||||
Explicaciones del diagrama |
|||||||||||||
|
|||||||||||||
 |
|||||||||||||
 |
|||||||||||||
¿Terminaste este patrón?Entonces, etiqueta tus fotos con #dropspattern #mazotop o envíalas a la galería #dropsfan. ¿Necesitas ayuda con este patrón?Encontrarás 23 videos tutoriales, un espacio para comentarios/preguntas y más visitando la página del patrón en garnstudio.com © 1982-2026 DROPS Design A/S. Todos los derechos reservados. Este documento, incluyendo todas sus sub-secciones, está protegido por los derechos de autor (copyright). Lee más acerca de lo que puedes hacer con nuestros patrones en la parte de abajo de cada patrón de nuestro sitio. |
|||||||||||||


Con más de 40 años en el diseño de modelos de punto y de ganchillo, DROPS Design ofrece una de las más vastas colecciones de patrones gratuitos en el internet - traducidos en 17 idiomas. Al día de hoy, contamos con 324 catálogos y 12290 patrones - de los cuales 11673 están traducidos en español.
Nosotros trabajamos con mucho esmero para brindarte lo mejor que las labores de punto y ganchillo tienen para ofrecer,inspiración y consejos, así como hilos de magnífica calidad a precios increíbles! Te gustaría usar nuestros patrones para otro fin además del uso personal? Puedes leer acerca de lo que estás permitida a hacer en el texto de Copyright en la parte de abajo de todos nuestros patrones. Felices labores!
Escribe un comentario sobre DROPS 178-66
¡Nos encantaría saber qué piensas acerca de este patrón!
Si quieres escribir una pregunta referente al patrón, por favor asegúrate de elegir la categoría correcta en el formulario debajo, para acelerar el proceso de respuesta. Los campos obligatorios están marcados con un *.