
Categorías populares
¿Buscas un hilo?


Comentarios / Preguntas (25)
![]() Hetty escribió:
Hetty escribió:
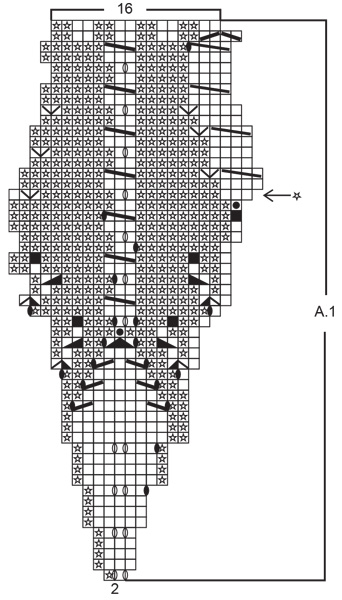
This mess concerning rows 36 and 37 is stressing me out. “The last stitch of the last report”?, “finish the round one stitch before”? Can you clarify what you mean please? How can I finish the row before the row is finished? What’s a report? Why didn’t you just alter the diagram? (I don’t know how you’d do that because I don’t understand what you’re trying to achieve).
26.04.2026 - 11:40DROPS Design respondió:
Dear Hetty, "Report" is a typo; it should be repeat. That is, when you work the last repeat of A.1 in that round, finish one stitch before the end of the round and start with the first symbol in the next round. So the last repeat of A.1 in round 36 of the chart should be purl 2 together and then you start directly with the 4 knit stitches of the first repeat of A.1 in round 37. We don't alter the chart because the knit stitch isn't omitted in all other repeats of A.1 in that same round, only at the very last repeat. At the same time, the chart in round 37 will need 4 knit stitches at the start of every repeat of A.1 in that round. So the best way to skip this stitch is to add a note to round 36 to skip the last stitch. Happy knitting!
27.04.2026 - 02:09
![]() Hetty escribió:
Hetty escribió:
Is there an alternative method to starting this beret? I can not, even trying dozens of times, to do this magic circle. Yes, I have watched the video, No, it is not working for me. It goes too quickly. I am left-handed. I do not know how to crochet. I am not from Europe or Scandinavia so I do not knit in the same way. I would be happy to have the hole if it meant I could begin this hat.
23.04.2026 - 13:16DROPS Design respondió:
Dear Hetty, you ca just cast on the 14 stitches onto 4 double pointed with your usual technique, at the very end of the beret, just thread the end through the cast on edge to tigthen/close hole. Happy knitting!
23.04.2026 - 16:15
![]() Asia escribió:
Asia escribió:
Dzień dobry, Przerobiłam okrążenie 20, które rozpoczyna się od narzutu. W okrążeniu 21 wg schematu trzeba najpierw przerobić oczko lewe a potem zrobić oczko przekręcone na prawo w narzucie.. tylko u mnie jest najpierw narzut a potem oczko lewe. Jak to rozwiązać? Pozdrawiam
12.03.2026 - 14:00DROPS Design respondió:
Witaj Asiu, okrążenie 20 zaczyna się od 1 oczka prawego, a następnie jest narzut. Pozdrawiamy!
16.03.2026 - 16:58
![]() Claire escribió:
Claire escribió:
Row 20 starts with a Yarn over then row 21 starts with the symbol '/' plus 'split square' which the instructions say "slip 1 P on cable needle behind piece, K YO twisted (= not hole), P 1 from cable needle". As my first stitch is the yarn over how does this work? I'd have to slip the YO to the cable needle? Thanks!
27.04.2023 - 15:53DROPS Design respondió:
Dear Claire, the 20th round starts with K1, Yarn over, so that you can work the cable as explained. Happy knitting!
27.04.2023 - 17:15
![]() Vanessa Bunton escribió:
Vanessa Bunton escribió:
I do not understand how the arrow code affects the working of row 37 and does this affect row 38. Thank you for your assistance
20.02.2023 - 19:29DROPS Design respondió:
Dear Mrs Bunton, this round (with a star) starts with the last stitch from last repeat, then work digaram as shown and start next repeat with last stitch 1st repeat etc. Happy knitting!
21.02.2023 - 10:04
![]() Kornelia Plitschka escribió:
Kornelia Plitschka escribió:
Ich weiß nicht warum aber in der 27. Runde komme ich einfach nicht weiter an der Stelle wo man mit der zopfnadel das erste Mal arbeiten must. Ich würde ja sagen da hat sich in der strickschrieft ein Fehler eingeschlichen weil mir aufgefallen ist dass die Erwachsenen Mütze genau an diese Stelle anders geschrieben ist
22.01.2022 - 16:01DROPS Design respondió:
Liebe Frau Plitschka, am Anfang der 27. Runde stricken Sie 1 Masche rechts (die 1. Masche A.1), dann die Zunahmen von vorrigen Runde + die nächste als Zopf (= 9. Symbol) und am Ende A.1 die letzte linke Masche + die Zunahmmen von vorrigen Runde als Zopf (= 10.Symbol) stricken. Viel Spaß beim stricken!
24.01.2022 - 10:52
![]() Sarah escribió:
Sarah escribió:
I'm having the same problem as everyone else with rows 36 & 37 -- there are 24 stitches in row 36 and then 23 stitches in row 37. It starts out well enough, but as I go around, the cable pattern gets more and more out of line, and the round ends in the middle of a repetition. Can you please direct me to a corrected pattern, or help me make sense of this discrepancy in stitches? Thanks.
25.01.2021 - 23:45DROPS Design respondió:
Hi Sarah, sorry for late answer, diagram has now been edited. Happy knitting!
26.04.2021 - 14:04
![]() Ana-Carin Eby escribió:
Ana-Carin Eby escribió:
Varv 36 och 37 i A1 beredde mig mycket problem. Det finns en tidigare kommentar om att mönstret skulle rättas men det är inte gjort. Ökningen i sista maskan på v 36 ska INTE göras. Första maskan på v 37 = sista maskan på v 36. Det måste kommenteras i mönstret annars går det inte att förstå.
04.01.2021 - 10:34
![]() Maria escribió:
Maria escribió:
Hej. Jag funderade på att sticka denna barnbasker, men förstår inte den magiska cirkeln alls. Skulle den kunna komma som instruktionsvideo? Hälsningar Maria
30.07.2020 - 20:59DROPS Design respondió:
Hej Maria, du hittar videon nederst i mönstret. Se här: Hur man lägger upp med en cirkel = magic loop
04.08.2020 - 10:41
![]() Gabriele escribió:
Gabriele escribió:
Ich meine den Fehler gefunden zu haben.In der 36.Runde darf nur 1x1Masche zugenommen werden,nicht 2x. LG.,Gabriele
09.12.2019 - 01:52
|
||||||||||||||||||||||||||||||||||||||||||||||||||||
Little Sunshine#littlesunshinehat |
||||||||||||||||||||||||||||||||||||||||||||||||||||
|
|
||||||||||||||||||||||||||||||||||||||||||||||||||||
Boina de punto con patrón de hojas tejida de arriba para abajo en DROPS Karisma.
DROPS Children 27-17 |
||||||||||||||||||||||||||||||||||||||||||||||||||||
|
PATRÓN: Ver diagrama A.1. CÍRCULO MÁGICO: Para evitar un agujero en el centro, comenzar con esta técnica: Sostener la punta del hilo en la mano izquierda y hacer un bucle alrededor del dedo índice izquierdo (de izquierda a derecha). Sostener el bucle con el pulgar izquierdo y el dedo índice. Insertar la aguja a través del bucle, coger el hilo del ovillo (es decir, colocar el hilo 1 vez sobre la aguja, del frente hacia atrás), extraer el hilo a través del bucle, 1 HEB (lazada) (ahora colocar el hilo de atrás hacia el frente) y extraer la HEB a través del pt en la ag, * insertar la ag a través del bucle, 1 HEB (colocar el hilo de atrás hacia el frente), extraer la HEB a través del bucle, 1 HEB (de atrás hacia el frente) y extraer la HEB a través del pt más externo en la ag derecha (es decir, el último pt hecho) *, repetir de *a* hasta tener 14 pts en la ag. Distribuir los pts en 4 ag de doble punta tamaño 3 o 3.5 mm como está explicado en el patrón. Después tejer como está explicado en el patrón – AL MISMO TIEMPO, halar la punta del hilo para fruncir el bucle y que el agujero desaparezca. ------------------------------------------------------ BOINA: Tejer en redondo en ag de doble punta, cambiar a ag circular cuando sea necesario. Comenzar con Karisma y el CÍRCULO MÁGICO – ver explicación arriba = 14 pts. Distribuir los pts en 4 ag de doble punta tamaño 3 o 3.5 mm con 4 pts en cada una de las primeras 3 ag y 2 pts en la última ag. Tejer el patrón en redondo de acuerdo al diagrama A.1 (= 7 repeticiones de 2 pts). RECORDARSE DE MANTENER LA MISMA TENSIÓN DE TEJIDO DE LA MUESTRA! Cuando reste 1 vta en A.1, se tienen 112 pts en la ag. Cambiar a ag circular tamaño 2.5 o 3 mm y continuar en resorte en redondo como se muestra en la última vta de A.1. Cuando el resorte mida 4-5 cm, rematar con derecho sobre derecho y revés sobre revés (asegurarse de evitar que quede una orilla de remate apretada). |
||||||||||||||||||||||||||||||||||||||||||||||||||||
Explicaciones del diagrama |
||||||||||||||||||||||||||||||||||||||||||||||||||||
|
||||||||||||||||||||||||||||||||||||||||||||||||||||
 |
||||||||||||||||||||||||||||||||||||||||||||||||||||
¿Terminaste este patrón?Entonces, etiqueta tus fotos con #dropspattern #littlesunshinehat o envíalas a la galería #dropsfan. ¿Necesitas ayuda con este patrón?Encontrarás 22 videos tutoriales, un espacio para comentarios/preguntas y más visitando la página del patrón en garnstudio.com © 1982-2026 DROPS Design A/S. Todos los derechos reservados. Este documento, incluyendo todas sus sub-secciones, está protegido por los derechos de autor (copyright). Lee más acerca de lo que puedes hacer con nuestros patrones en la parte de abajo de cada patrón de nuestro sitio. |
||||||||||||||||||||||||||||||||||||||||||||||||||||


Con más de 40 años en el diseño de modelos de punto y de ganchillo, DROPS Design ofrece una de las más vastas colecciones de patrones gratuitos en el internet - traducidos en 17 idiomas. Al día de hoy, contamos con 324 catálogos y 12290 patrones - de los cuales 11673 están traducidos en español.
Nosotros trabajamos con mucho esmero para brindarte lo mejor que las labores de punto y ganchillo tienen para ofrecer,inspiración y consejos, así como hilos de magnífica calidad a precios increíbles! Te gustaría usar nuestros patrones para otro fin además del uso personal? Puedes leer acerca de lo que estás permitida a hacer en el texto de Copyright en la parte de abajo de todos nuestros patrones. Felices labores!
Escribe un comentario sobre DROPS Children 27-17
¡Nos encantaría saber qué piensas acerca de este patrón!
Si quieres escribir una pregunta referente al patrón, por favor asegúrate de elegir la categoría correcta en el formulario debajo, para acelerar el proceso de respuesta. Los campos obligatorios están marcados con un *.