
Categorías populares
¿Buscas un hilo?


Comentarios / Preguntas (84)
![]() Kim Oliver escribió:
Kim Oliver escribió:
At body increases every 10th row - I have done the arithmetic and don't think these should include side increases, just those on either side of the cables? Thanks for your ongoing help, Kim
11.07.2019 - 14:29DROPS Design respondió:
Dear Mrs Oliver, on body you increase first in the P-sections you first decreased (= 6 sts increased), then increase every 10th row on each side of the cables: 18 sts increased a total of 7 times. There were 144-160-172 sts + 6 + (18 sts x 7) = 276-292-304 sts in size S-M-L. Happy knitting!
11.07.2019 - 14:55
![]() Kim Oliver escribió:
Kim Oliver escribió:
Hallo again, just checking the pattern correction for the body. I cannot see what is different in the correction. Do I work straight for 4cm before beg my decreases? Many thanks, Kim
07.07.2019 - 13:46DROPS Design respondió:
Dear Kim, our pattern texts are updated immediately as there appears some correction - thats why you cant see any difference, i.e. pattern is correct, tab with correction details is for info what was corrected. Decreasing: after dividing piece you just continue with knitting pattern as before until piece measures 4 cm (from dividing); afterwards you start decreasing. Happy knitting!
07.07.2019 - 22:09
![]() Kim Oliver escribió:
Kim Oliver escribió:
Hello looking for advice with this pattern. I am knitting the smallest size and have charted the instructions starting at: ‘Now work pattern as follows from RS: 4 band sts in garter st, P 1, A.1 (= 4 sts) 2-2-2-3-3-3 times, P…’ the instructions that indicate where the garment is divided into sections, such as left front and then sleeve do not appear to be correct. Additionally, the instructions for increasing refer to A2 on raglan body and sleeve however if you read the pattern as
19.06.2019 - 15:10DROPS Design respondió:
Dear Mrs Oliver, in size S you will work and increase for raglan as follows: 4 band sts in garter st, P1, A.1 (= 4 sts) 2 times, P1, K1, increase for raglan on front piece here (= left front piece), A.2 (= 8 sts on 1st row), increase on sleeve here, K14 increase on sleeve here (= sleeve), A.2, increase on back piece here K1, P1, A.1 5 times, P1, K1, increase on back piece here (= back piece), A.2, K14, increase on sleeve here (= sleeve), A.2, increase on front piece hereK1, P1, A.1 2 times, P1, 4 band sts in garter st. - see increase on body and sleeve for your size. Happy knitting!
19.06.2019 - 15:43
![]() Kim Oliver escribió:
Kim Oliver escribió:
Thank you. I understand the way to read the diagram - it is the stitches in between that I am unsure about. On the WS how should I interpret the pattern? Do I use the same instructions and repeat the stitches except for the changes to diagram stitches? Should I be purling where I previously knitted? Thanks! Kim.
06.05.2019 - 16:00DROPS Design respondió:
Dear Mrs Oliver, the stitches between diagrams should be worked with K over K and P over P, ie where you worked at the end of RS row: P1, band sts, you will work band sts, K1 - and the sts worked K from RS will be P from WS. Happy knitting!
06.05.2019 - 16:05
![]() Kim Oliver escribió:
Kim Oliver escribió:
Yoke: 'Work one row from WS same way' - how do I read the instructions for the stitches between the chart. Do I begin : Band, P1, A1 - or do I change all purl stitches between the chart to knit?
06.05.2019 - 12:30DROPS Design respondió:
Dear Mrs Oliver, from WS work the diagrams reading from the left towards the right (= 2nd row = WS), and K over K, P over P remaining stitches (with the 4 front band sts in garter st as before). Read more about diagrams here. Happy knitting!
06.05.2019 - 14:48
![]() Kim Oliver escribió:
Kim Oliver escribió:
Yoke: First set of elevations, then a purl row. My garment suggests the next row should be knit, not purl after elevations have been worked. Am I wrong? Thanks - Kim
30.04.2019 - 15:33DROPS Design respondió:
Dear Mrs Oliver, the last short row on elevation is worked over 24-24-28-28-32-32 sts from WS, then turn and work from RS to the end of the row, turn and purl next row from WS over all sts (with 4 sts in garter st on each side), next row is now from RS. Happy knitting!
30.04.2019 - 16:52
![]() Bonita Poirier escribió:
Bonita Poirier escribió:
Please disregard previous question. I tried to delete it but could not. Thank you!
04.04.2019 - 19:22
![]() Bonita Poirier escribió:
Bonita Poirier escribió:
I have tried to alter the pattern to a size between what is given in the instructions. I am now at the part where I need to divide for sleeves. I am unable to tell from pictures whether or not the pattern on the raglan continues down the sleeve. I.e. when setting aside the stitches for the sleeve, are the pattern raglan stitches included? One raglan - from the front, or back or both?
04.04.2019 - 18:32DROPS Design respondió:
Dear Mrs Poirier, when you divide piece for sleeves the raglan stitches will be divided in two, one part for sleeve and one part for front/back pieces, ie you divide in the middle of the raglan stitches. Happy knitting!
05.04.2019 - 09:10
![]() Ingrid escribió:
Ingrid escribió:
In A1, the K between cables instead of P, is this every 11th row until the end? Thank you
08.02.2019 - 10:31DROPS Design respondió:
Dear Ingrid, correct, you will K the sts between cables every 11 row, ie every time you work row 11 in A.1 to the end. Happy knitting!
08.02.2019 - 11:59
![]() Chris Durb escribió:
Chris Durb escribió:
BODY: Inc 2 sts every other row 4-4-5-6-7-9 times and 1 st every other row 11-14-14-14-15-14 times ; Do I knit all 2 sts increase rows (row 1, 3, 5, 7 for Small) before I start the inc 1 st (for example starting with row 9 for small? Or am I to alternate 2 sts inc with the 1 st increase rows?
27.01.2019 - 22:18DROPS Design respondió:
Dear Mrs Durb, on the first increase row in size S, inc 2 sts on front pieces + on back piece and only 1 st on sleeves (=12 sts inc) 1 time, then inc 1 st on body and sleeves (= 8 sts inc) on every other round. Happy knitting!
28.01.2019 - 12:03
|
|||||||||||||||||||
Lobelia#lobeliacardigan |
|||||||||||||||||||
 |
 |
||||||||||||||||||
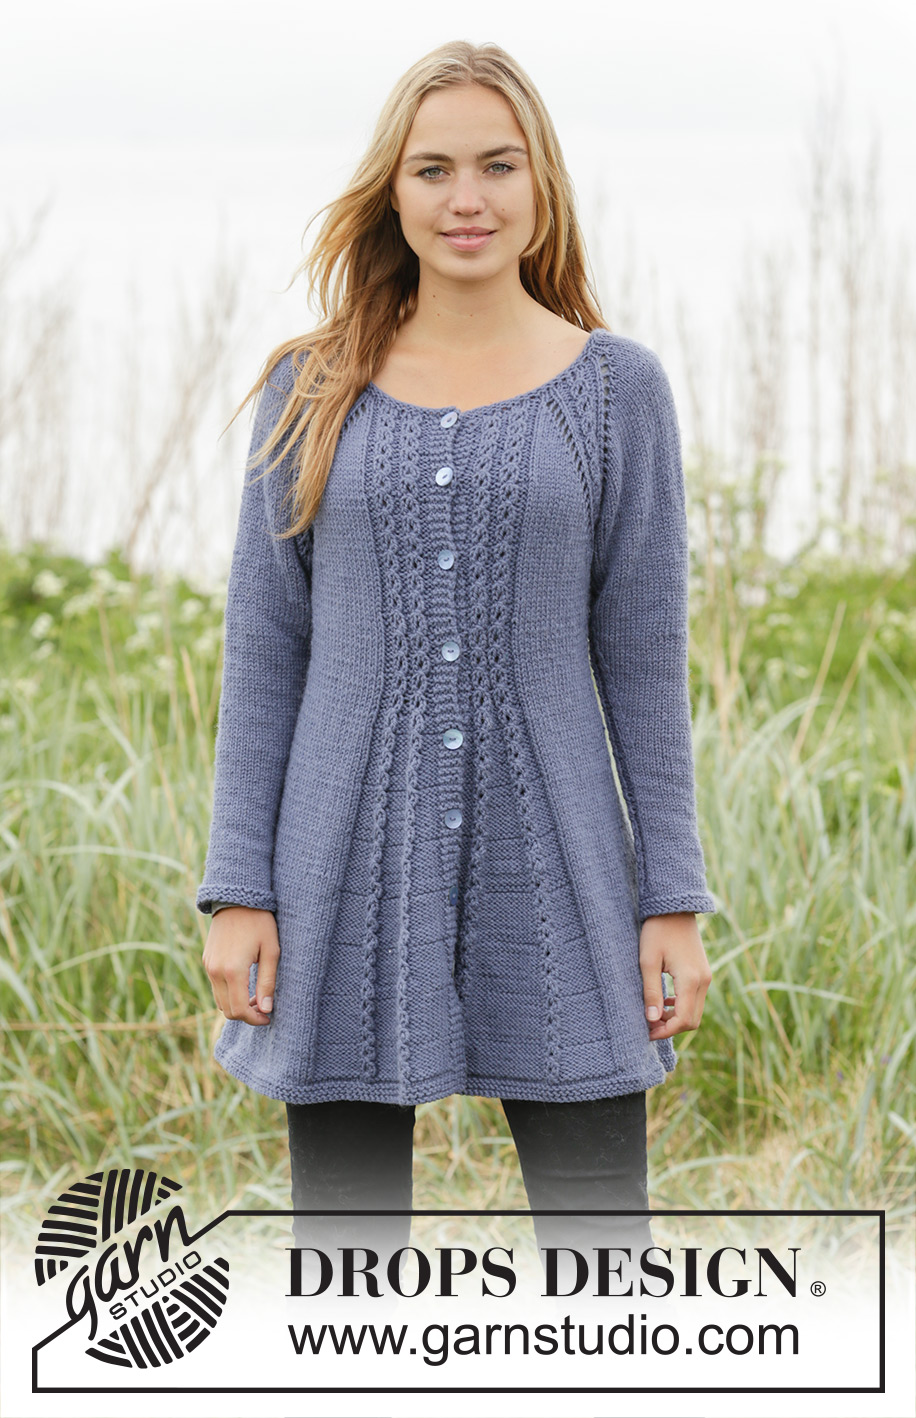
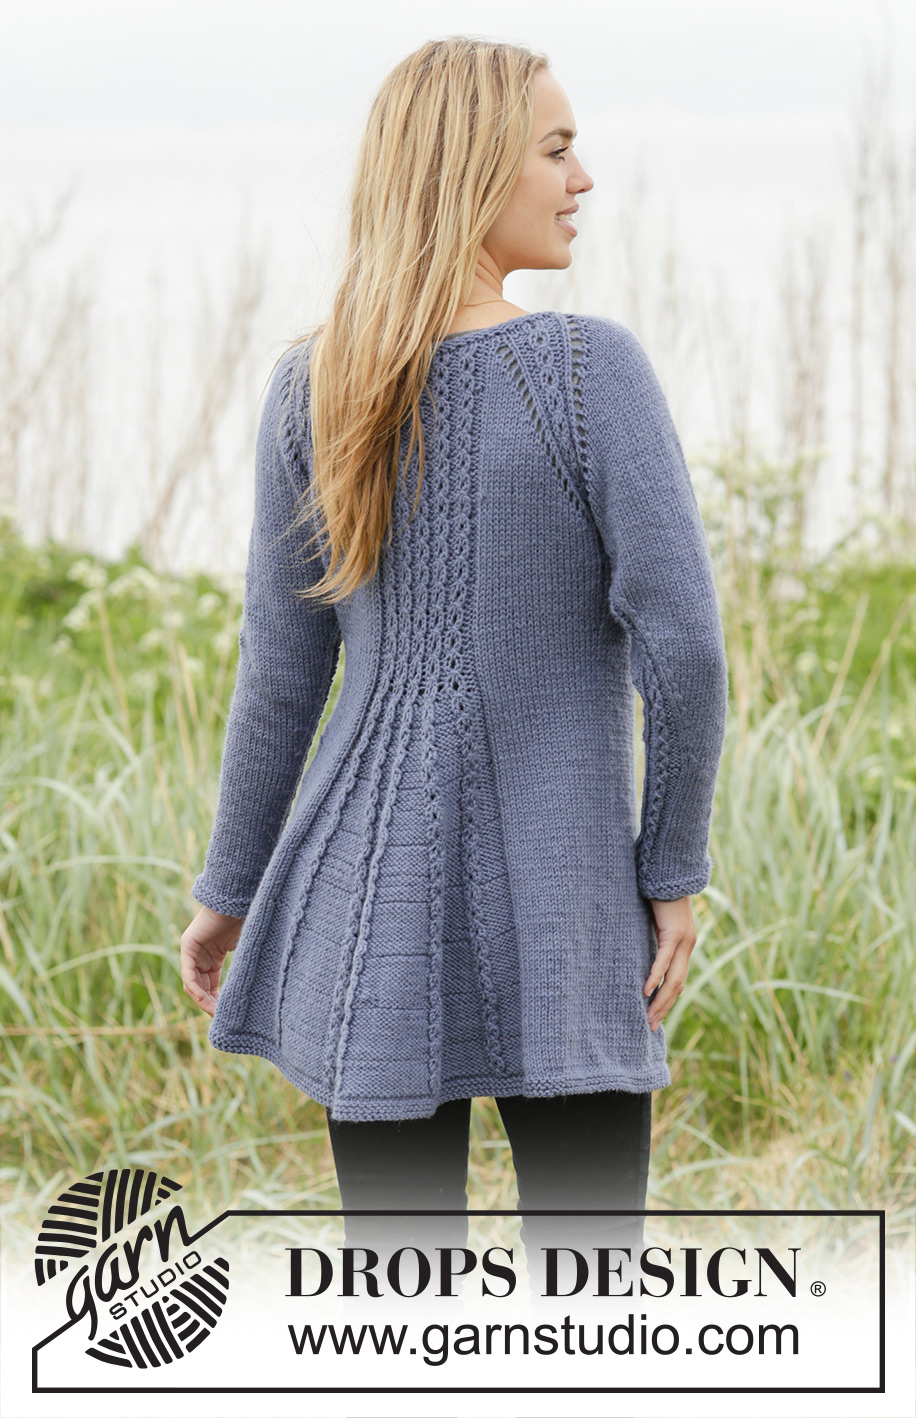
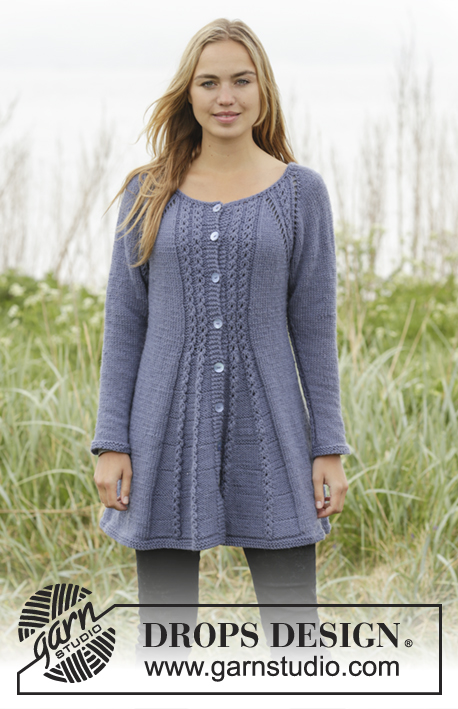
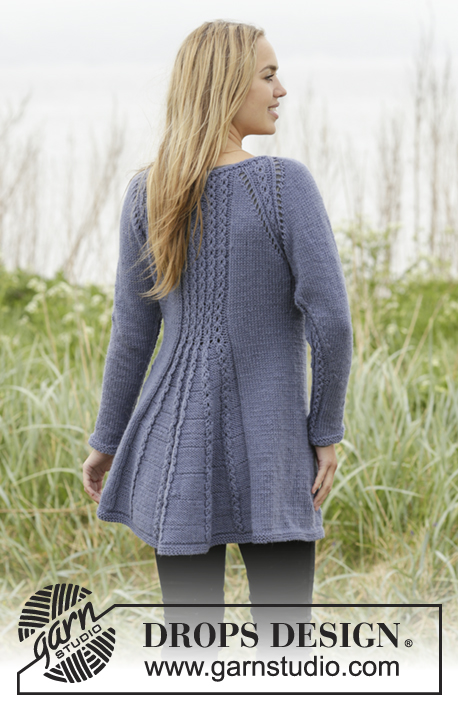
Chaqueta de punto DROPS con raglán y torsadas, tejida de arriba para abajo, en “Nepal”. Talla: S – XXXL.
DROPS 171-14 |
|||||||||||||||||||
|
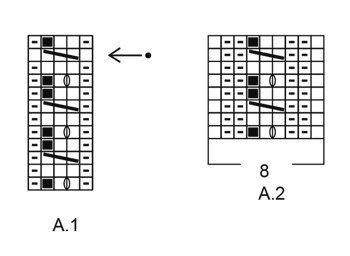
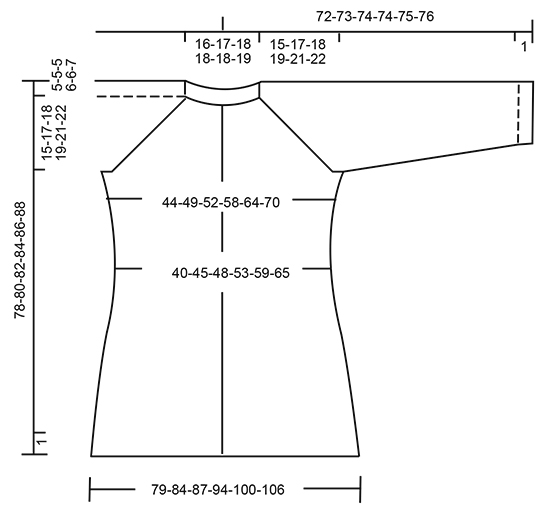
PT MUSGO (tejido en redondo): 1 surco = 2 vtas. * 1 vta de derecho y 1 vta de revés *, repetir de *a*. PT MUSGO (de ida y vuelta): Tejer todas las hileras de derecho. 1 surco = 2 hileras tejidas de derecho. PATRÓN: Ver diagramas A.1 y A.2. Los diagramas muestran todas las hileras en el patrón vistas por el LD. TIP-1 PARA AUMENTAR (distribuidos equitativamente): Para calcular con qué frecuencia se deben hacer los aumentos, usar el número total de pts (p.ej. 97 pts), menos los bordes delanteros (p.ej. 8 pts) y dividir los pts restantes entre el número de aumentos a ser hechos (p.ej. 20) = 4.4. Es decir, en este ejemplo, aumentar 1 pt alternadamente por cada 4º y 5º pt (y no aumentar sobre los bordes delanteros). TIP-2 PARA AUMENTAR (cuerpo): Todos los aumentos son hechos por el LD. Aumentar 1 pt revés haciendo una HEB (lazada). En la hilera siguiente, tejer la HEB retorcida de derecho para evitar agujeros. RAGLÁN DE LAS MANGAS: Aumentar para las mangas 1 pt después/antes de A.2 haciendo una HEB (= 2 pts aumentados en cada manga). En la hilera siguiente, tejer las HEBs de revés para crear agujeros. RAGLÁN DEL CUERPO: Aumentar primero 2 pts antes/después de A.2 en los frentes y en la espalda (= 8 pts aumentados en total), después aumentar 1 pt antes/después de A.2 en los frentes y en la espalda (= 4 pts aumentados en total). Aumentar 2 pts antes de A.2 de la manera siguiente: Tejer hasta que reste 1 pt antes de A.2, 1 HEB, 1 d, 1 HEB. Aumentar 2 pts después de A.2 de la manera siguiente: 1 HEB, 1 d, 1 HEB. NOTA: En la hilera siguiente, tejer las HEBs más próximas a A.2 de revés, para crear agujeros. Tejer las otras HEBs retorcidas de revés para evitar agujeros. Aumentar 1 pt antes/después de A.2 de la manera siguiente: Aumentar 1 pt haciendo una HEB. En la hilera siguiente, tejer las HEBs de revés para crear agujeros. TIP-1 PARA DISMINUIR (cuerpo): Tejer hasta que resten 4 pts antes del marcapuntos, tejer 2 pjd, 4 d (el marcapuntos está entre estos pts), deslizar el pt siguiente como de derecho, 1 d, pasar el pt desl por encima. Repetir del otro lado (= 4 pts disminuidos). TIP-2 PARA DISMINUIR (mangas): Tejer hasta que resten 2 pts antes de A.2, tejer 2 pjd, A.2, deslizar el pt siguiente como de derecho, 1 d, pasar el pt desl por encima (= 2 pts disminuidos). OJALES: Disminuir para los ojales en el borde delantero derecho. Es decir, el borde al final de la hilera, visto por el LD. 1 ojal = tejer juntamente de derecho el 3er y el 4º pt a partir de la orilla y hacer 1 HEB. Disminuir para los ojales cuando la pieza mida (a partir de la orilla de montaje y a lo largo del borde): TALLA S: 2, 11, 20, 29, 38 y 47 cm. TALLA M: 2, 11, 20, 29, 38 y 47 cm. TALLA L: 2, 12, 21, 31, 40 y 50 cm. TALLA XL: 2, 12, 21, 31, 40 y 50 cm. TALLA XXL: 2, 12, 22, 32, 42 y 52 cm. TALLA XXXL: 2, 12, 22, 32, 42 y 52 cm. TIP PARA REMATAR: Para evitar que la orilla de remate quede apretada, puedes usar una ag ½ número más grande. ------------------------------------------------------ CHAQUETA: Tejida de ida y vuelta en ag circular, de arriba para abajo. PECHERA: Montar 97-99-103-109-111-117 pts (incl. 4 pts del borde en pt musgo a cada lado de la pieza) en ag circular tamaño 4.5 mm. Tejer 2 surcos en PT MUSGO – ver explicación arriba y aumentar 17-19-19-25-27-25 pts distribuidos equitativamente en la última hilera por el LD – LEER TIP-1 PARA AUMENTAR = 114-118-122-134-138-142 pts. Cambiar a ag circular tamaño 5 mm. Ahora tejer una elevación en pt jersey en la parte de atrás del escote de la manera siguiente: Tejer los primeros 61-63-67-73-77-79 pts, virar y tejer 16-16-20-20-24-24 pts, virar y tejer 20-20-24-24-28-28 pts, virar y tejer 24-24-28-28-32-32 pts, virar y tejer el resto de la hilera. Después tejer 1 hilera de revés con 4 pts del borde en pt musgo a cada lado de la pieza. RECORDARSE DE LOS OJALES! Ahora tejer el patrón de la manera siguiente por el LD: 4 pts del borde en pt musgo, 1 r, A.1 (= 4 pts) 2-2-2-3-3-3 veces, 1 r, 1-2-2-1-2-3 d (= pieza del frente izquierdo), A.2 (= 8 pts en la 1ª hilera), 14-14-16-16-16-16 d (= manga), A.2, 1-2-2-1-2-3 d, 1 r, A.1 5-5-5-7-7-7 veces, 1 r, 1-2-2-1-2-3 d (= pieza de la espalda), A.2, 14-14-16-16-16-16 d (= manga), A.2, 1-2-2-1-2-3 d, 1 r, A.1 2-2-2-3-3-3 veces, 1 r, 4 pts del borde en pt musgo. Tejer 1 hilera por el LR de la misma manera. RECORDARSE DE MANTENER LA MISMA TENSIÓN DE TEJIDO DE LA MUESTRA! En la hilera siguiente por el LD, comenzar a aumentar para el RAGLÁN DEL CUERPO y el RAGLÁN DE LAS MANGAS – ver explicación arriba. NOTA: Aumentar de manera diferente en las mangas y en el cuerpo. CUERPO: Aumentar 2 pts a cada 2 hileras 4-4-5-6-7-9 veces y 1 pt a cada 2 hileras 11-14-14-14-15-14 veces (= 15-18-19-20-22-23 veces en total). MANGAS: Aumentar de esta manera a cada 2 hileras 15-18-19-20-22-23 veces en total. Cuando todos los aumentos estén hechos, se tienen 250-278-294-318-342-362 pts en la ag. Ahora tejer de la manera siguiente por el LR: Tejer los primeros 38-42-44-49-53-57 pts (= pieza del frente derecho), deslizar los 52-58-62-64-68-70 pts siguientes en un gancho auxiliar (= manga), montar 6-6-8-8-10-12 pts bajo la manga, tejer los 70-78-82-92-100-108 pts siguientes (= pieza de la espalda), deslizar los 52-58-62-64-68-70 pts siguientes en un gancho auxiliar (= manga), montar 6-6-8-8-10-12 pts bajo la manga, tejer los 38-42-44-49-53-57 pts restantes (= pieza del frente izquierdo). La pieza mide aprox 15-17-18-19-21-22 cm a lo largo del borde delantero. CUERPO: Se tienen ahora 158-174-186-206-226-246 pts para el cuerpo. AHORA MEDIR LA PIEZA A PARTIR DE AQUÍ! Continuar el patrón de ida y vuelta como antes e insertar un marcapuntos en el centro de los nuevos pts bajo la manga a cada lado. Después disminuir a cada lado de la pieza y en el patrón de la manera siguiente: DISMINUCIONES EN LOS LADOS: Cuando la pieza mida 4 cm, disminuir 1 pt a cada lado del marcapuntos a cada lado – LEER TIP-1 PARA DISMINUIR (cuerpo). Repetir las disminuciones a cada 8ª hilera 2 veces en total = 8 pts disminuidos en total. DISMINUCIONES EN EL PATRÓN: Cuando la pieza mida 6 cm, disminuir 1 pt tejiendo 2 pjr en cada sección de reveses entre 2 torsadas = 6-6-6-10-10-10 pts disminuidos (es decir, disminuir 1-1-1-2-2-2 pts en cada pieza del frente y 4-4-4-6-6-6 pts en la pieza de la espalda). Cuando todas las disminuciones estén hechas, se tienen 144-160-172-188-208-228 pts en la ag. Cuando la pieza mida 15-15-16-16-16-16 cm, aumentar 1 pt revés en cada sección donde los pts reveses fueron disminuidos – LEER TIP-2 PARA AUMENTAR (= 6-6-6-10-10-10 pts aumentados) = 150-166-178-198-218-238 pts. En la hilera siguiente por el LD, aumentar 1 pt revés a cada lado de cada torsada = 18-18-18-26-26-26 pts aumentados en la ag. Aumentar de esta manera a cada 10ª-10ª-10ª-14ª-14ª-14ª hilera (= a cada 5ª-5ª-5ª-7ª-7ª-7ª hilera por el LD) 7-7-7-5-5-5 veces en total = 276-292-304-328-348-368 pts. Cuando todos los aumentos estén hechos, continuar de ida y vuelta en el patrón. Cuando la pieza mida 56-56-57-57-57-57 cm – ajustar para terminar después de la 4ª o de la 8ª hilera en el patrón, tejer 2 hileras en pt jersey en el interior de los 4 pts del borde en pt musgo a cada lado de la pieza. Cambiar a ag circular tamaño 4.5 mm y tejer 2 surcos. Rematar – LEER TIP PARA REMATAR. MANGA: Tejer las mangas en redondo en ag de doble punta. Deslizar los 52-58-62-64-68-70 pts del gancho auxiliar en las ag de doble punta tamaño 5 mm y levantar 1 pt en cada uno de los 6-6-8-8-10-12 nuevos pts montados bajo las mangas = 58-64-70-72-78-82 pts. Insertar un marcapuntos en el centro de los nuevos pts. AHORA MEDIR LA PIEZA A PARTIR DE AQUÍ! Ahora tejer A.2 (= 8 pts en la 1ª hilera) al centro bajo la manga (es decir, se tienen 4 pts de A.2 a cada lado del marcapuntos), tejer los pts restantes en la vta en pt jersey). Cuando la pieza mida 4 cm, disminuir 1 pt a cada lado de A.2 – LEER TIP-2 PARA DISMINUIR (mangas). Disminuir de esta manera a cada 8ª-6ª-5ª-4ª-4ª-4ª vta 11-14-15-19-18-19 veces en total = 36-36-40-40-42-44 pts. Cuando la manga mida 48-47-46-45-44-44 cm, cambiar a ag de doble punta tamaño 4.5 mm. Tejer 2 surcos. Rematar. Tejer otra manga de la misma manera. ENSAMBLAJE: Coser los botones en el borde delantero izquierdo. |
|||||||||||||||||||
Explicaciones del diagrama |
|||||||||||||||||||
|
|||||||||||||||||||
 |
|||||||||||||||||||
 |
|||||||||||||||||||
¿Terminaste este patrón?Entonces, etiqueta tus fotos con #dropspattern #lobeliacardigan o envíalas a la galería #dropsfan. ¿Necesitas ayuda con este patrón?Encontrarás 30 videos tutoriales, un espacio para comentarios/preguntas y más visitando la página del patrón en garnstudio.com © 1982-2026 DROPS Design A/S. Todos los derechos reservados. Este documento, incluyendo todas sus sub-secciones, está protegido por los derechos de autor (copyright). Lee más acerca de lo que puedes hacer con nuestros patrones en la parte de abajo de cada patrón de nuestro sitio. |
|||||||||||||||||||


Con más de 40 años en el diseño de modelos de punto y de ganchillo, DROPS Design ofrece una de las más vastas colecciones de patrones gratuitos en el internet - traducidos en 17 idiomas. Al día de hoy, contamos con 324 catálogos y 12290 patrones - de los cuales 11675 están traducidos en español.
Nosotros trabajamos con mucho esmero para brindarte lo mejor que las labores de punto y ganchillo tienen para ofrecer,inspiración y consejos, así como hilos de magnífica calidad a precios increíbles! Te gustaría usar nuestros patrones para otro fin además del uso personal? Puedes leer acerca de lo que estás permitida a hacer en el texto de Copyright en la parte de abajo de todos nuestros patrones. Felices labores!
Escribe un comentario sobre DROPS 171-14
¡Nos encantaría saber qué piensas acerca de este patrón!
Si quieres escribir una pregunta referente al patrón, por favor asegúrate de elegir la categoría correcta en el formulario debajo, para acelerar el proceso de respuesta. Los campos obligatorios están marcados con un *.