
Categorías populares
¿Buscas un hilo?


Comentarios / Preguntas (23)
![]() Irene escribió:
Irene escribió:
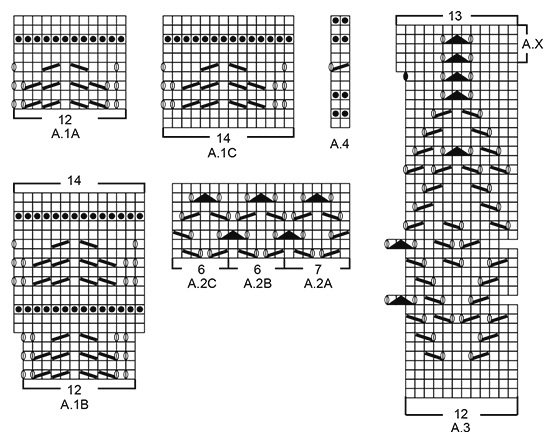
Good morning, I have a question: How can I work pattern A3 without circular neeedls? How can I start the pattern at rows 11 and 17? Thank you very much!
17.05.2018 - 11:37DROPS Design respondió:
Dear Irene, you can try starting with K2 tog, YO over the first 2 sts 1st repeat A.3 and finish with YO, slip 1 as if to K, K1, psso. Happy knitting!
17.05.2018 - 13:27
![]() Jamie escribió:
Jamie escribió:
Bonjour ! Diagramme A2B troisième rang commence par une maille endroit et puis un jeté? ou par deux mailles ensemble et un jeté? Merci
02.04.2018 - 23:03DROPS Design respondió:
Bonjour Jamie, au 3ème rang de A.2, tricotez les 2 dernières mailles de A.2A/A.2B avec la 1ère m de A.2B/du A.2B suivant/de A.2C. Le jeté après la double diminution devient la 1ère maille du A.2B suivant/de A.2C. Bon tricot!
03.04.2018 - 10:02Maria escribió:
Hi, what is the gauge on the skirt? I'm not able to find it.
16.01.2017 - 16:21DROPS Design respondió:
Dear Maria, you will find gauge under tab "Materials" tog with amount of yarn and needle sizes. Happy knitting!
16.01.2017 - 16:59
![]() Alex escribió:
Alex escribió:
Hello! I'm on chart A.2 and my question is: where A.2C "meet" A.2A is the pattern different from the rest of the row? Thanks a lot
14.10.2016 - 22:11DROPS Design respondió:
Hello Alex. The pattern is mainly the same. You will just find 1 st more between the last repeat on round (A.2c) and first repeat on next round (A.2a). Also on round 3: you finish A.2c with: slip 1 st as if to K, K 1, psso, and you start A.2a with: K 2 tog, whereas, on the rest of round, where A.2a meet A.2b and where A.2b meet A.2c you finish/start with slip 1 st as if to K, K 2 tog, psso. Happy knitting!
15.10.2016 - 12:33
![]() Hélène Decq escribió:
Hélène Decq escribió:
Bonjour, Je suis en train de réaliser ce tricot et je ne comprends pas le schéma A.3 aux rangs 11 et 17. Pourquoi le diagramme est-il décalé? Comment prendre en compte ce décalage dans les rangs pour garder le dessin? Doit-on tricoter 1 maille ou 3 mailles endroits en début de rang? Merci beaucoup pour votre réponse et l'aide que vous pourrez apporter!
08.09.2016 - 11:06DROPS Design respondió:
Bonjour Mme Decq, lorsque vous tricotez le 1er A.3 du tour, tricotez les 2 premières m à l'end et commencez le diagramme ensuite à la 1ère case = 1 m end, 2 m ens à l'end, 1 jeté etc... terminez le diagramme en tricotant la dernière m du 1er motif avec les 2 premières m du motif suivant = le 1er jeté = dernière m du motif, surjet double + jeté = 2 premières m du motif suivant. Ainsi, à la fin du tour, quand il reste 1 m, faites 1 jeté (= dernière m du tour), glissez la dernière m du tour, tricotez les 2 premières m du tour ens à l'end, passez la m glissée par-dessus la m tricotée = 1ère m du tour, 1 jeté = 2ème m du tour. Bon tricot!
08.09.2016 - 13:48
![]() Tina Schjønberg escribió:
Tina Schjønberg escribió:
Efter mønsterdelen A.1B er der vist 2 lininer glatstrik.... Herefter skal man begynde på mønster A.1C. Som også starter med 2 omgange glatstrik... Kommer her ikke 2 omgange for meget? Skal man ikke starte direkte på mønsterdelen på 1C.
16.06.2016 - 08:34DROPS Design respondió:
Hej Tina. Mönstret skulle vaere korrekt, men synes du selv det er paenere kan du jo undlade de 2 omg glatstrik. God fornöjelse videre.
16.06.2016 - 14:30
![]() Steffi escribió:
Steffi escribió:
Bin jetzt bei Muster A3 angelangt. Habe jetzt Runde 10 fertig. Werde aber aus dem Diagramm in Runde 11 und 17 nicht schlau. Warum ist diese Runde versetzt? Hat das eine Bedeutung oder stricke ich einfach normal weiter? Danke
23.03.2016 - 10:46DROPS Design respondió:
Liebe Steffi, das Diagramm ist in dieser Runde nur wegen der Darstellung verschoben, stricken Sie ganz normal weiter und lassen Sie sich davon nicht irritieren.
23.03.2016 - 14:23
![]() Lisa escribió:
Lisa escribió:
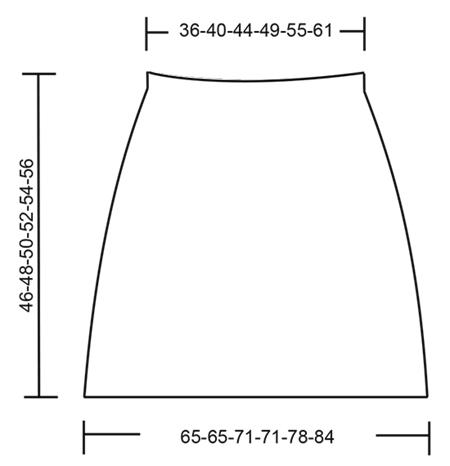
I'm considering making this skirt. I've scoured the pattern several times and cannot find any schematics for it so I'm not certain what size to make without this information. Thanks for any help.
20.02.2016 - 17:47DROPS Design respondió:
Dear Lisa, you will find the measurement chart at the bottom of the pattern - measurements are in cm (convert here into inch) taken flat from side to side. Happy knitting!
22.02.2016 - 09:39
![]() Anja escribió:
Anja escribió:
Der ist Suuuuper schön! Summerdream wäre ein schöner Name Bis wann kann man mit der Anleitung rechnen? Diesen würde ich gerne für mich machen und ihn stolz im Büro tragen
19.01.2016 - 23:19
![]() Laura escribió:
Laura escribió:
I've a weakness for skirts! This is beautiful absolutely beautiful.
11.01.2016 - 15:40
|
||||||||||||||||||||||
Summer Elegance#summereleganceskirt |
||||||||||||||||||||||
|
|
||||||||||||||||||||||
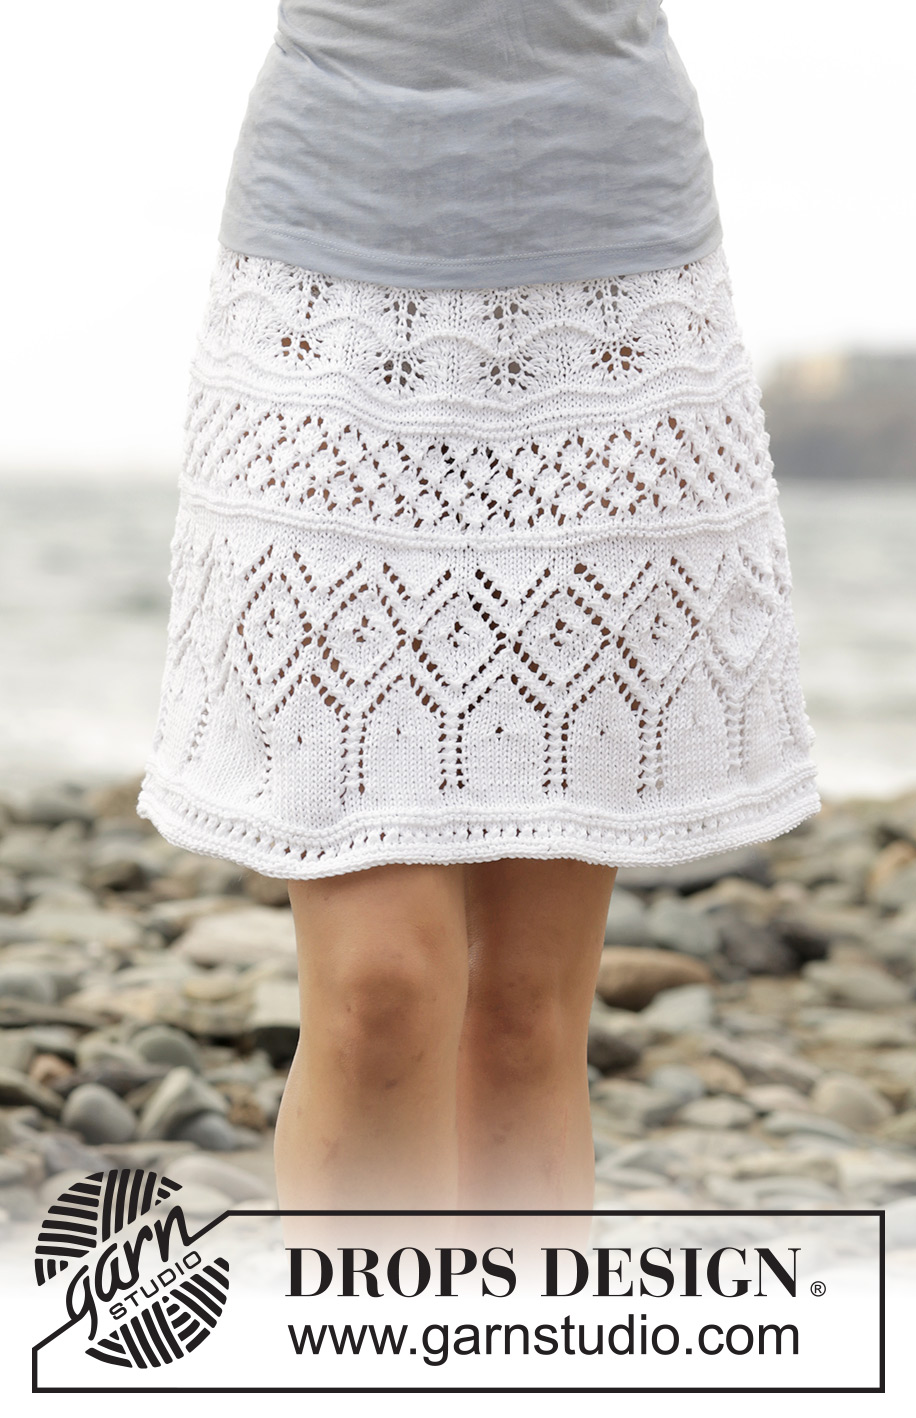
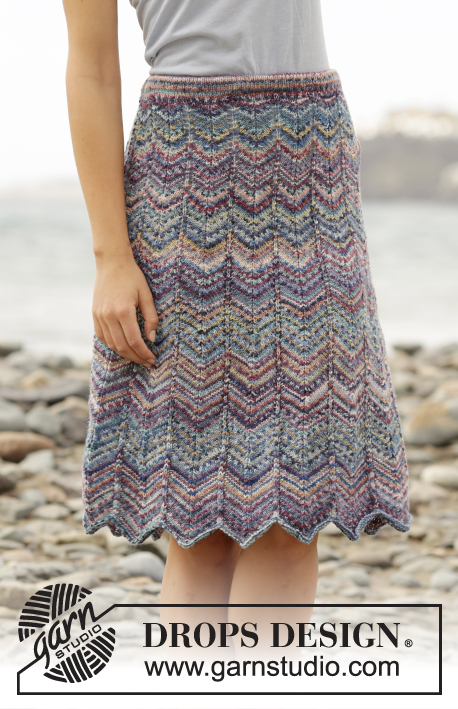
Falda de punto DROPS con patrón de calados, tejida de arriba para abajo, en “Muskat”. Talla: S – XXXL.
DROPS 169-24 |
||||||||||||||||||||||
|
PT MUSGO (tejido en redondo): 1 surco = 2 vtas. * 1 vta de derecho y 1 vta de revés *, repetir de *a*. TIP PARA AUMENTAR (aplica a la distribución de los aumentos): Para calcular con qué frecuencia se deben hacer los aumentos, usar el número total de pts en la hilera (p.ej. 150 pts) y dividirlo entre el número de aumentos a ser hechos (p.ej. 8) = 18.8. Es decir, en este ejemplo, aumentar después de aprox cada 19º pt. NOTA: Aumentar 1 pt haciendo 1 HEB (lazada). En la vta siguiente, tejer la HEB retorcida de derecho (si la vta siguiente es en pt jersey) o retorcida de revés (si la vta siguiente es de revés) para evitar agujeros. PATRÓN: Ver diagramas A.1 a A.4. ------------------------------------------------------ FALDA: Tejida en redondo en ag circular, de arriba para abajo. Montar 150-168-184-204-230-256 pts en ag circular tamaño 3 mm con Muskat. Tejer 2 cm en pt jersey (= cinturilla), después tejer 1 vta de revés (= orilla de doblez). Cambiar a ag circular tamaño 3.5 mm. Insertar 1 marcapuntos en la pieza, AHORA MEDIR LA PIEZA A PARTIR DE AQUÍ! Tejer en pt jersey. Cuando la pieza mida 3-3-4-4-5-5 cm, aumentar 8-6-10-6-4-4 pts distribuidos equitativamente – LEER TIP PARA AUMENTAR = 158-174-194-210-234-260 pts. RECORDARSE DE MANTENER LA MISMA TENSIÓN DE TEJIDO DE LA MUESTRA! Cuando la pieza mida 6-6-8-8-10-10 cm, cambiar a ag circular tamaño 3 mm. Tejer 2 surcos en PT MUSGO – ver explicación arriba y aumentar AL MISMO TIEMPO 10-6-10-6-6-4 pts distribuidos equitativamente en la 1ª vta = 168-180-204-216-240-264 pts. Cambiar nuevamente a ag circular tamaño 3.5 mm y tejer el patrón en redondo de acuerdo al diagrama A.1A (= 14-15-17-18-20-22 repeticiones de 12 pts). Después de A.1A, tejer A.1B. Cuando A.1B ha sido tejido una vez verticalmente, hay 196-210-238-252-280-308 pts en la ag. Tejer A.1C una vez verticalmente. Cambiar a ag circular tamaño 3 mm y tejer 2 surcos y, al mismo tiempo, aumentar 27-19-15-7-9-5 pts distribuidos equitativamente en la 1ª vta = 223-229-253-259-289-313 pts. Cambiar nuevamente a ag circular tamaño 3.5 mm y tejer el patrón en redondo de acuerdo al diagrama A.2 de la manera siguiente: Tejer A.2A (= 7 pts), repetir A.2B hasta que resten 6 pts en la vta (= 35-36-40-41-46-50 repeticiones de 6 pts) y terminar con A.2C (= 6 pts). Cuando A.2 ha sido tejido 2 veces verticalmente, cambiar a ag circular tamaño 3 mm. Tejer 2 surcos y, AL MISMO TIEMPO, aumentar 29-23-23-17-11-11 pts distribuidos equitativamente en la 1ª vta = 252-252-276-276-300-324 pts. Cambiar nuevamente a ag circular tamaño 3.5 mm y tejer el patrón en redondo de acuerdo al diagrama A.3 (= 21-21-23-23-25-27 repeticiones de 12 pts). Cuando A.3 ha sido tejido una vez verticalmente, hay 273-273-299-299-325-351 pts en la ag. Ahora repetir A.X sobre A.3 hasta que la pieza mida aprox 42-44-46-48-50-52 cm (o el largo deseado, restan aprox 4 cm para completar las medidas). Tejer el patrón en redondo de acuerdo al diagrama A.4 y, después, rematar FLOJO. ENSAMBLAJE: Doblar la cinturilla para el LR y coser con puntos cuidados – NOTA: Dejar una pequeña abertura para pasar el elástico. |
||||||||||||||||||||||
Explicaciones del diagrama |
||||||||||||||||||||||
|
||||||||||||||||||||||
 |
||||||||||||||||||||||
 |
||||||||||||||||||||||
¿Terminaste este patrón?Entonces, etiqueta tus fotos con #dropspattern #summereleganceskirt o envíalas a la galería #dropsfan. ¿Necesitas ayuda con este patrón?Encontrarás 17 videos tutoriales, un espacio para comentarios/preguntas y más visitando la página del patrón en garnstudio.com © 1982-2026 DROPS Design A/S. Todos los derechos reservados. Este documento, incluyendo todas sus sub-secciones, está protegido por los derechos de autor (copyright). Lee más acerca de lo que puedes hacer con nuestros patrones en la parte de abajo de cada patrón de nuestro sitio. |
||||||||||||||||||||||


Con más de 40 años en el diseño de modelos de punto y de ganchillo, DROPS Design ofrece una de las más vastas colecciones de patrones gratuitos en el internet - traducidos en 17 idiomas. Al día de hoy, contamos con 324 catálogos y 12239 patrones - de los cuales 11618 están traducidos en español.
Nosotros trabajamos con mucho esmero para brindarte lo mejor que las labores de punto y ganchillo tienen para ofrecer,inspiración y consejos, así como hilos de magnífica calidad a precios increíbles! Te gustaría usar nuestros patrones para otro fin además del uso personal? Puedes leer acerca de lo que estás permitida a hacer en el texto de Copyright en la parte de abajo de todos nuestros patrones. Felices labores!
Escribe un comentario sobre DROPS 169-24
¡Nos encantaría saber qué piensas acerca de este patrón!
Si quieres escribir una pregunta referente al patrón, por favor asegúrate de elegir la categoría correcta en el formulario debajo, para acelerar el proceso de respuesta. Los campos obligatorios están marcados con un *.