
Categorías populares
¿Buscas un hilo?


Comentarios / Preguntas (24)
![]() Nicole escribió:
Nicole escribió:
"size needed to get 21 sts x 28 rows in lace pattern = 4" x 4" (10 x 10 cm)." What is the lace pattern referring to?
23.03.2026 - 17:06DROPS Design respondió:
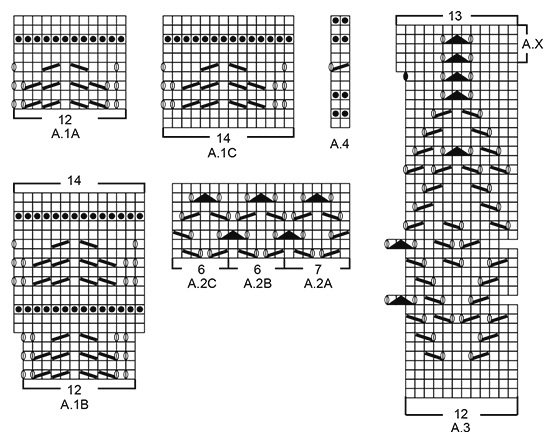
Hi Nicole, The lace pattern is the pattern on the skirt (with decorative holes). Regards, Drops Team.
24.03.2026 - 06:35
![]() Gerda escribió:
Gerda escribió:
Ik geloof dat er een fout is in de teltekening en dat A.1A moet beginnen met 2 nld tricot steek en niet A.1C
30.03.2025 - 12:24
![]() Amanda Phily escribió:
Amanda Phily escribió:
What does “knit A.X over A.3” mean? Do I just knit the A.X portion over and over (after I knit A.3 one time) until I get to the desired length?
14.04.2024 - 04:06DROPS Design respondió:
Dear Amanda, yes, that is exactly what that sentence means. You should knit the pattern A.x over the stitches of A.3, and repeat those rows, until you get to the correct measurements. Happy Knitting!
14.04.2024 - 07:11
![]() Sharon escribió:
Sharon escribió:
I used the smaller needles for the garter rows on the hems, and for the eyelet row at the bottom. This worked out to be the perfect size. I did a very simple bind off ; a crochet slip stitch using a 4mm crochet hook which worked perfectly. On the second skirt I made the top stockinette section with smaller needles and more stitches to get a denser, sturdier fabric around the waist/hips ,( no unsightly increases were needed for the next section. )
13.08.2022 - 02:43
![]() Sharon escribió:
Sharon escribió:
This skirt was so lovely to wear that I made a second one. The first was made with Belle and has such a soft and drapey fabric, the 2nd with muskat ended up much bigger after blocking so do a swatch first .Belle is a lot lighter as it uses less yarn so better in hot weather.
13.08.2022 - 02:31
![]() Ekaterina escribió:
Ekaterina escribió:
Hallo, my waist is much smaller than other parts of body. How elastic will be the top? It will be my first work with the Muskat. Maybe better to add the buttons already from the begin of the work?
15.09.2021 - 14:19
![]() Alysia escribió:
Alysia escribió:
The pattern says that from the cast on to the folding edge is the hem. However, this is actually waist band, correct? The pattern is worked from top, or waist, down?
28.07.2021 - 16:20DROPS Design respondió:
Dear Alysia, yes, that is correct - skirt is worked top down, from waist to the bottom edge. Happy knitting!
28.07.2021 - 17:34
![]() Sharon escribió:
Sharon escribió:
Sorry, I meant A4.
24.01.2021 - 16:34DROPS Design respondió:
Dear Sharon, A.4 is worked with needle size 3,5mm just as for A.3. Happy knitting!
25.01.2021 - 10:30
![]() Sharon escribió:
Sharon escribió:
Is A3 idone with the 3mm needles? Or is it different from the other garter rows because it forms the hem? PS Ive enjoyed making this in Belle. Belle makes a gorgeous fabric , thank you. I learned to read knitting charts , it wasnt too hard.
24.01.2021 - 14:16DROPS Design respondió:
Dear Sharon, diagrams are worked with the larger needles and between diagrams you will work 2 ridges with the smaller needles. Happy knitting!
25.01.2021 - 09:54
![]() Aneta escribió:
Aneta escribió:
Hello, I don’t know how to start the row 11 and 17 in A.3 pattern. The first 2 stitches are missed somehow in the pattern. I don’t get it.
28.08.2019 - 15:10DROPS Design respondió:
Dear Aneta, on the first repeat on the round, slip the first 2 stitches on the right needle and work first A.3: the last st in first A.3 is worked together with the 2 stitches on next A.3 - the new stitches (= decrease + YO) are now the first 2 sts on next repeat. Continue like this, and on last repeat on the round, work the last st last repeat tog with the first 2 sts on the round you slipped (= these are now the first 2 sts on the round). Happy knitting!
28.08.2019 - 15:32
|
||||||||||||||||||||||
Summer Elegance#summereleganceskirt |
||||||||||||||||||||||
|
|
||||||||||||||||||||||
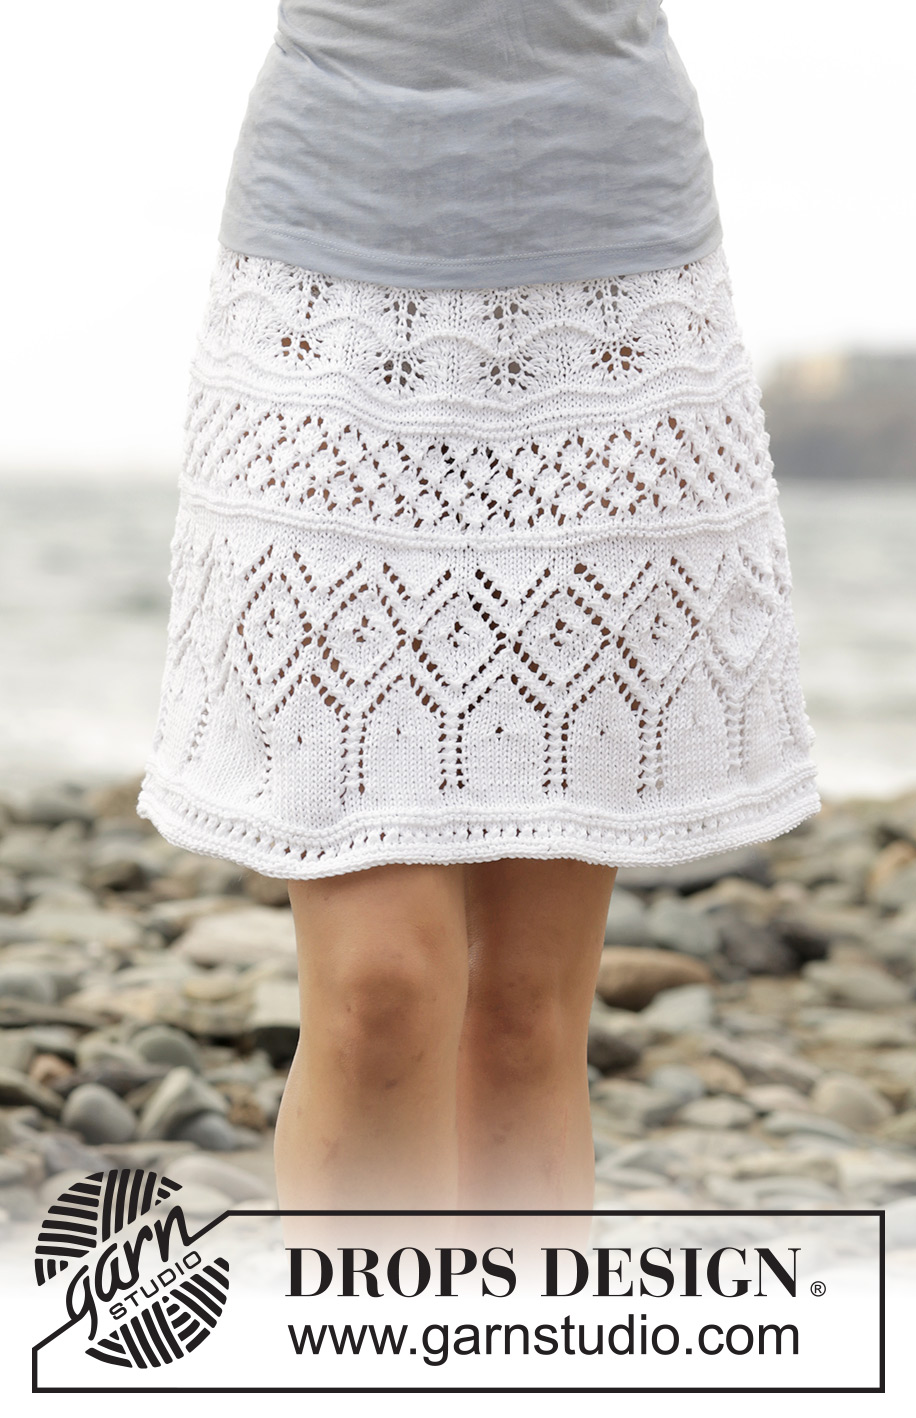
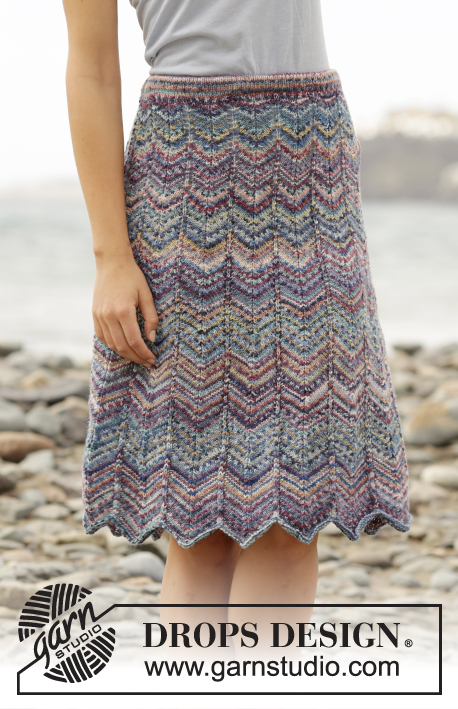
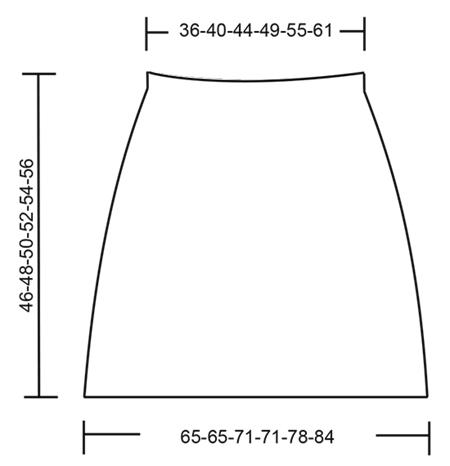
Falda de punto DROPS con patrón de calados, tejida de arriba para abajo, en “Muskat”. Talla: S – XXXL.
DROPS 169-24 |
||||||||||||||||||||||
|
PT MUSGO (tejido en redondo): 1 surco = 2 vtas. * 1 vta de derecho y 1 vta de revés *, repetir de *a*. TIP PARA AUMENTAR (aplica a la distribución de los aumentos): Para calcular con qué frecuencia se deben hacer los aumentos, usar el número total de pts en la hilera (p.ej. 150 pts) y dividirlo entre el número de aumentos a ser hechos (p.ej. 8) = 18.8. Es decir, en este ejemplo, aumentar después de aprox cada 19º pt. NOTA: Aumentar 1 pt haciendo 1 HEB (lazada). En la vta siguiente, tejer la HEB retorcida de derecho (si la vta siguiente es en pt jersey) o retorcida de revés (si la vta siguiente es de revés) para evitar agujeros. PATRÓN: Ver diagramas A.1 a A.4. ------------------------------------------------------ FALDA: Tejida en redondo en ag circular, de arriba para abajo. Montar 150-168-184-204-230-256 pts en ag circular tamaño 3 mm con Muskat. Tejer 2 cm en pt jersey (= cinturilla), después tejer 1 vta de revés (= orilla de doblez). Cambiar a ag circular tamaño 3.5 mm. Insertar 1 marcapuntos en la pieza, AHORA MEDIR LA PIEZA A PARTIR DE AQUÍ! Tejer en pt jersey. Cuando la pieza mida 3-3-4-4-5-5 cm, aumentar 8-6-10-6-4-4 pts distribuidos equitativamente – LEER TIP PARA AUMENTAR = 158-174-194-210-234-260 pts. RECORDARSE DE MANTENER LA MISMA TENSIÓN DE TEJIDO DE LA MUESTRA! Cuando la pieza mida 6-6-8-8-10-10 cm, cambiar a ag circular tamaño 3 mm. Tejer 2 surcos en PT MUSGO – ver explicación arriba y aumentar AL MISMO TIEMPO 10-6-10-6-6-4 pts distribuidos equitativamente en la 1ª vta = 168-180-204-216-240-264 pts. Cambiar nuevamente a ag circular tamaño 3.5 mm y tejer el patrón en redondo de acuerdo al diagrama A.1A (= 14-15-17-18-20-22 repeticiones de 12 pts). Después de A.1A, tejer A.1B. Cuando A.1B ha sido tejido una vez verticalmente, hay 196-210-238-252-280-308 pts en la ag. Tejer A.1C una vez verticalmente. Cambiar a ag circular tamaño 3 mm y tejer 2 surcos y, al mismo tiempo, aumentar 27-19-15-7-9-5 pts distribuidos equitativamente en la 1ª vta = 223-229-253-259-289-313 pts. Cambiar nuevamente a ag circular tamaño 3.5 mm y tejer el patrón en redondo de acuerdo al diagrama A.2 de la manera siguiente: Tejer A.2A (= 7 pts), repetir A.2B hasta que resten 6 pts en la vta (= 35-36-40-41-46-50 repeticiones de 6 pts) y terminar con A.2C (= 6 pts). Cuando A.2 ha sido tejido 2 veces verticalmente, cambiar a ag circular tamaño 3 mm. Tejer 2 surcos y, AL MISMO TIEMPO, aumentar 29-23-23-17-11-11 pts distribuidos equitativamente en la 1ª vta = 252-252-276-276-300-324 pts. Cambiar nuevamente a ag circular tamaño 3.5 mm y tejer el patrón en redondo de acuerdo al diagrama A.3 (= 21-21-23-23-25-27 repeticiones de 12 pts). Cuando A.3 ha sido tejido una vez verticalmente, hay 273-273-299-299-325-351 pts en la ag. Ahora repetir A.X sobre A.3 hasta que la pieza mida aprox 42-44-46-48-50-52 cm (o el largo deseado, restan aprox 4 cm para completar las medidas). Tejer el patrón en redondo de acuerdo al diagrama A.4 y, después, rematar FLOJO. ENSAMBLAJE: Doblar la cinturilla para el LR y coser con puntos cuidados – NOTA: Dejar una pequeña abertura para pasar el elástico. |
||||||||||||||||||||||
Explicaciones del diagrama |
||||||||||||||||||||||
|
||||||||||||||||||||||
 |
||||||||||||||||||||||
 |
||||||||||||||||||||||
¿Terminaste este patrón?Entonces, etiqueta tus fotos con #dropspattern #summereleganceskirt o envíalas a la galería #dropsfan. ¿Necesitas ayuda con este patrón?Encontrarás 17 videos tutoriales, un espacio para comentarios/preguntas y más visitando la página del patrón en garnstudio.com © 1982-2026 DROPS Design A/S. Todos los derechos reservados. Este documento, incluyendo todas sus sub-secciones, está protegido por los derechos de autor (copyright). Lee más acerca de lo que puedes hacer con nuestros patrones en la parte de abajo de cada patrón de nuestro sitio. |
||||||||||||||||||||||


Con más de 40 años en el diseño de modelos de punto y de ganchillo, DROPS Design ofrece una de las más vastas colecciones de patrones gratuitos en el internet - traducidos en 17 idiomas. Al día de hoy, contamos con 324 catálogos y 12290 patrones - de los cuales 11673 están traducidos en español.
Nosotros trabajamos con mucho esmero para brindarte lo mejor que las labores de punto y ganchillo tienen para ofrecer,inspiración y consejos, así como hilos de magnífica calidad a precios increíbles! Te gustaría usar nuestros patrones para otro fin además del uso personal? Puedes leer acerca de lo que estás permitida a hacer en el texto de Copyright en la parte de abajo de todos nuestros patrones. Felices labores!
Escribe un comentario sobre DROPS 169-24
¡Nos encantaría saber qué piensas acerca de este patrón!
Si quieres escribir una pregunta referente al patrón, por favor asegúrate de elegir la categoría correcta en el formulario debajo, para acelerar el proceso de respuesta. Los campos obligatorios están marcados con un *.