
Categorías populares
¿Buscas un hilo?


Comentarios / Preguntas (54)
![]() Brandi Perkins escribió:
Brandi Perkins escribió:
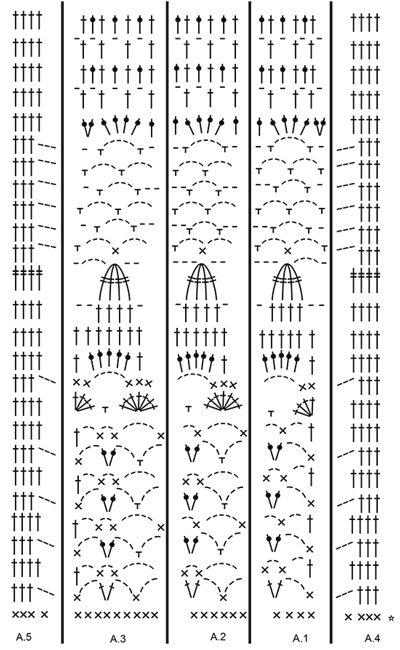
In the first row where it says skip chain 1 am I supposed to chain 1 and skip the next chain or just skip the next chain?
25.08.2017 - 04:54DROPS Design respondió:
Hello Brandi. You just skip the next chain. Happy crocheting!
25.08.2017 - 14:55
![]() Melitta Wicht escribió:
Melitta Wicht escribió:
Guten Tag, ich möchte den DROPS 168-13 häkeln leider verstehe ich das Diagramm nicht. Muß ich das Diagramm von rechts nach links häkeln (1. Reihe) und in der nächsten Reihe von links nach rechts (2. R) usw. Bitte um kurze Antwort. Danke im voraus,
26.04.2017 - 12:00DROPS Design respondió:
Liebe Frau Wicht, ja genau, Hinreihen lesen Sie von unten am rechten Ecke von rechts nach links, und Rückreihen von links nach rechts. Viel Spaß beim häkeln!
26.04.2017 - 15:02
![]() Monika escribió:
Monika escribió:
In the diagram, it shows a row of SC at the bottom, is this the second row as described in text part of the pattern, or a second row of sc?
19.02.2017 - 18:23DROPS Design respondió:
Dear Monica, the sc row at the very start of diagram is the one explained at the very beg of the pattern (see star-symbol). Happy crocheting!
20.02.2017 - 10:21
![]() Frances Miller escribió:
Frances Miller escribió:
When following the chart, do I go A4, A1, A2, A3, A5 each row or do I reverse it when doing the next row and then go back to A4 to start next row?
17.09.2016 - 04:45DROPS Design respondió:
Dear Mrs Miller you work from A.4 to A.5 on the first row, and then from A.5 to A.4 on the next row. Happy crocheting!
18.09.2016 - 23:19
![]() Frances Miller escribió:
Frances Miller escribió:
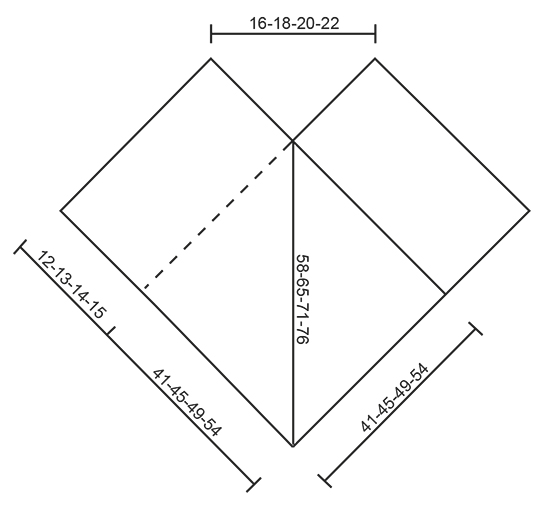
In the diagram showing the pieces attached are the measurements written in cm? Also can you tell what finished measurements are for each size? I am not sure what size to make for someone who has 39" bust.
07.09.2016 - 15:12DROPS Design respondió:
Dear Mrs Miller, all measurements in chart are in cm, taken flat from side to side. A good idea would be to measure a similar garment she has and like the shape to find out the matching size - read more here. Happy crocheting!
07.09.2016 - 15:51
![]() Silje escribió:
Silje escribió:
Veldig kjekk oppskrift. Eneste er at jeg sitter litt fast på diagrammet når jeg er ferdig med første repetisjon. Hvordan gjentar jeg diagrammet? Antall masker i siste runde vs første runde (andre runde i diagrammet) stemmer ikke overens...?
26.07.2016 - 18:20DROPS Design respondió:
Hei Silje. Du skal haekle paa samme maade igen som i begyndelsen: A.4 = 4 m, A.1 = 4 m, A.2 = 6 m, A.3 = 9 m og A.5 = 4 m per gentagelse. Du har rigtig nok 6 m til slut af A.1, men du har 7 til slut i A.3 - saa totalt skulle du have det samme antal masker. Dvs, det rykker lidt, men naar du starter forfra gaar du tilbage igen om du forstaar :-)
29.07.2016 - 11:16
![]() Kelly Taylor escribió:
Kelly Taylor escribió:
Is there any way to get a written out version of this pattern? I'm not used to having only the diagram to work with, and am having some trouble figuring it out. I would greatly appreciate any help you can offer. Thank you!
25.07.2016 - 18:35DROPS Design respondió:
Dear Mrs Taylor, there is only diagram to this pattern, each symbol in diagram represents 1 st or 1 group of sts as explained under diagram text - start at the bottom corner on the right side and read towards the left: A.4 1 time in width, A.1 1 time in width, repeat A.2 6-7-8-9 times in width, A.3 1 time in width, and finish with A.5 1 time in width. From WS read from the left towards the right: A.5, A.3, repeat A.2, A.1 and finish with A.4. Happy crocheting!
26.07.2016 - 10:09
![]() Åse Westgaard escribió:
Åse Westgaard escribió:
Hei. Dette gjelder oppskrift 168-13, men det er generelt alle oppskriftene deres. Hvorfor står det hekle(legg opp) et antall masker, så står det (tel: antall masker) det samme maskeantallet ?? Med vennlig hilsen Åse
30.06.2016 - 10:58DROPS Design respondió:
Hej Åse. Der staar ikke noget tel i opskriften? Jeg tror det er din Skype der er koplet paa en maade og aendrer antallet til et telefonnummer.
30.06.2016 - 11:47
![]() Judy escribió:
Judy escribió:
How much yarn, eg how many balls of 50g , is required for small Drops 168-13 please. Sorry if I have missed information on pattern
10.06.2016 - 10:34DROPS Design respondió:
Dear Judy. S/M uses 450 gr = 9 balls. You can find it at the top of the pattern. ;-)
10.06.2016 - 10:44
![]() Marie escribió:
Marie escribió:
Bonjour, J'aimerais bien comprendre le dessin des mesures. Est-ce que la mesure 41-45-49-54 cm correspond à la largeur d'une écharpe selon la grandeur choisie?
28.04.2016 - 01:57DROPS Design respondió:
Bonjour Marie, c'est exact, ces mesures correspondent à la largeur de chaque pièce. Bon crochet!
28.04.2016 - 08:26
|
|||||||||||||||||||||||||||||||
Sky Love#skyloveponcho |
|||||||||||||||||||||||||||||||
 |
 |
||||||||||||||||||||||||||||||
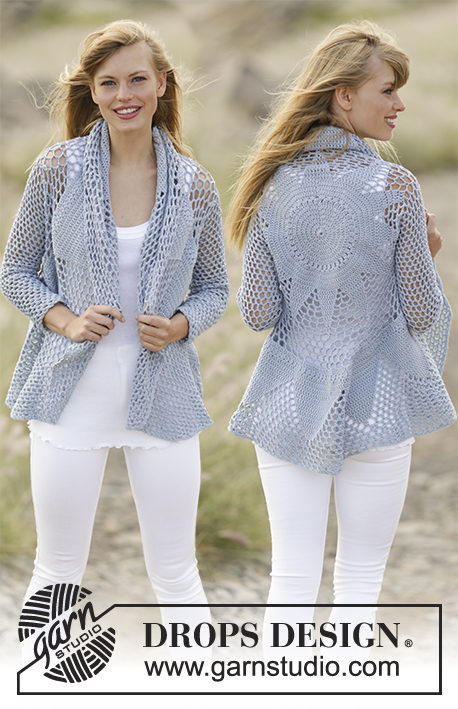
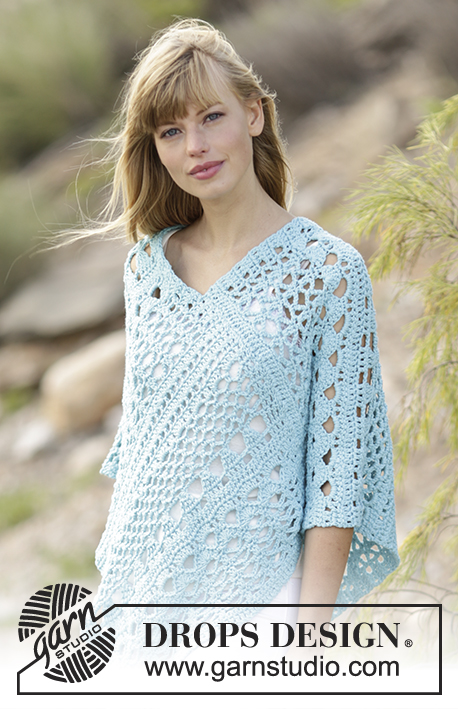
Poncho a ganchillo DROPS con patrón de calados en ”Paris”. Talla: S - XXXL.
DROPS 168-13 |
|||||||||||||||||||||||||||||||
|
INFORMACIÓN PARA REALIZAR EL TRABAJO: Comenzar cada fila de p.b. con 1 p.de cad. (sustituye al 1er p.b.) Comenzar cada fila de p.a. con 3 p.de cad. (sustituyen al 1er p.a.) Comenzar cada fila de p.a.d. con 4 p.de cad. (sustituyen al 1er p.a.d.) PATRÓN: Ver los diagramas A.1-A.5 ----------------------------------------------------------------------- PONCHO: La labor se trabaja como 2 bufandas y al finalizar se cosen formando el poncho. Trabajar 77-85-93-101 p.de cad. con ag de ganchillo tamaño 5 mm con Paris. Trabajar 1 p.a. en el 4º p.de cad. del ganchillo (= 2 p.a.), 1 p.a. en el sig p.de cad., *saltar 1 p.de cad, 1 p.a. en cada uno de los sig 3 p.de cad*, repetir de * a * en toda la fila = 57-63-69-75 p.a. Trabajar 1 p.b. en cada p.a. (= LR) - leer INFORMACIÓN PARA REALIZAR EL TRABAJO = 57-63-69-75 p.b. Ahora trabajar como sigue: A.4 sobre los primeros 4 p.b., A.1 sobre los sig 4 p.b., A.2 sobre los sig 36-42-48-54 p.b. (= 6-7-8-9 vcs en el ancho), A.3 sobre los sig 9 p.b., finalizar con A.5 sobre los últimos 4 p.b. Continuar con el patrón de la misma manera, RECUERDE MANTENER LA MISMA TENSIÓN DEL TEJIDO! Trabajar hasta que la labor mida 65-71-77-84 cm, finalizar con 1 fila de p.a. del diagrama, asegurar el hilo. Trabajar la segunda parte de la misma manera. TERMINACIÓN: Unir el borde de remate de la 1ª parte con el lado largo derecho de la 2ª parte - en la parte inferior, hacia el borde de montaje y 41-45-49-54 cm hacia arriba - asegurate de no estirar la labor en exceso. Coser las 2 partes con pequeñas puntadas. Después coser el borde de remate de la 2ª parte al lado derecho de la 1ª parte de la misma manera. |
|||||||||||||||||||||||||||||||
Explicaciones del diagrama |
|||||||||||||||||||||||||||||||
|
|||||||||||||||||||||||||||||||
 |
|||||||||||||||||||||||||||||||
 |
|||||||||||||||||||||||||||||||
¿Terminaste este patrón?Entonces, etiqueta tus fotos con #dropspattern #skyloveponcho o envíalas a la galería #dropsfan. ¿Necesitas ayuda con este patrón?Encontrarás 8 videos tutoriales, un espacio para comentarios/preguntas y más visitando la página del patrón en garnstudio.com © 1982-2026 DROPS Design A/S. Todos los derechos reservados. Este documento, incluyendo todas sus sub-secciones, está protegido por los derechos de autor (copyright). Lee más acerca de lo que puedes hacer con nuestros patrones en la parte de abajo de cada patrón de nuestro sitio. |
|||||||||||||||||||||||||||||||


Con más de 40 años en el diseño de modelos de punto y de ganchillo, DROPS Design ofrece una de las más vastas colecciones de patrones gratuitos en el internet - traducidos en 17 idiomas. Al día de hoy, contamos con 324 catálogos y 12290 patrones - de los cuales 11685 están traducidos en español.
Nosotros trabajamos con mucho esmero para brindarte lo mejor que las labores de punto y ganchillo tienen para ofrecer,inspiración y consejos, así como hilos de magnífica calidad a precios increíbles! Te gustaría usar nuestros patrones para otro fin además del uso personal? Puedes leer acerca de lo que estás permitida a hacer en el texto de Copyright en la parte de abajo de todos nuestros patrones. Felices labores!
Escribe un comentario sobre DROPS 168-13
¡Nos encantaría saber qué piensas acerca de este patrón!
Si quieres escribir una pregunta referente al patrón, por favor asegúrate de elegir la categoría correcta en el formulario debajo, para acelerar el proceso de respuesta. Los campos obligatorios están marcados con un *.