
Categorías populares
¿Buscas un hilo?


Comentarios / Preguntas (54)
![]() Silvia escribió:
Silvia escribió:
The video doesn't help...but thanks
20.03.2019 - 15:25
![]() Silvia escribió:
Silvia escribió:
I am just not getting how to put the pieces together...they are both the same size....and the video hasn't helped at all....where do I need to go from here? Thanks for any help you can give me.
19.03.2019 - 19:50DROPS Design respondió:
Dear Silvie, this video shows how to assembly such a poncho, ie 2 rectangular pieces together into a poncho. The video shows 2 knitted pieces but you have to sew the both crocheted pieces the same way here. Happy crocheting!
20.03.2019 - 08:43
![]() Tertia escribió:
Tertia escribió:
Thanks for a quick response! Must have had a blonde moment!
22.02.2019 - 09:03
![]() Tertia escribió:
Tertia escribió:
EXCUSE MY IGNORANCE but how do I print this pattern out?
21.02.2019 - 16:46DROPS Design respondió:
Hi Tertia! Before the pattern instructions, on the right, there is a printer icon with the word 'pattern'. Click there any you will be able to print the pattern. Kind regards!
22.02.2019 - 08:20Carla escribió:
Que es p.t.?
07.01.2019 - 23:42DROPS Design respondió:
Hola Carla. Abreviatura pt = punto.
16.01.2019 - 16:02
![]() Leah escribió:
Leah escribió:
I want to express my thank you to how well you provide what you provide and how gracious you are with your responses to various comments that are sometimes written when people are frustrated with their project. I'm so impressed with how you can overcome so many cultural and language differences with the charts and videos. My world has expanded through the service you provide. I will buy your yarns whenever possible to support this.
03.11.2018 - 13:26
![]() Leah escribió:
Leah escribió:
In working towards the 65 cm length of the scarf and wanting to end on a DC row, what is done to make up the difference? Do you repeat the pattern in its sequence or is it best to expand certain sections? Thank you,
03.11.2018 - 13:14DROPS Design respondió:
Dear Leah, Depending on your tension in height you will have to work either some more rows or fewer rows so that piece will end with a dc row - piece may measures a few more cm or be somewhat shorter, adjust to the best measurements. Happy crocheting!
05.11.2018 - 08:53Irene Hendry escribió:
Monica, please help. Pattern drops168-13. I am not understanding how to join the two part to form the poncho. Thanks in advance. Irene
10.01.2018 - 13:12DROPS Design respondió:
Dear Mrs Hendry, this shows how to assembly a poncho made of 2 rectangles, pieces are knitted in the video but the technique will be the same for a crocheted poncho. Happy assembly!
10.01.2018 - 13:46
![]() Hanna B escribió:
Hanna B escribió:
Har ni glömt skriva att det ska virkas en lm mellan alla grupper av tre stolpar i första varvet/uppläggningsvarvet?
30.08.2017 - 16:20DROPS Design respondió:
Hej Hanna, första varvet beskriver vi såhär: * hoppa över 1 lm, 1 st i var och en av de 3 nästa lm *, upprepa *-* v ut. Lycka till!
12.09.2017 - 15:27
![]() Janneke Koster escribió:
Janneke Koster escribió:
Ik vind dit een erg mooi patroon, maar ik kan hem niet meer in Mn favorieten zetten. Klopt dit? Er stond toch altijd ergens een hartje om hem in de favorieten te plaatsen. Deze kan ik nergens meer vinden? Hoe kan dat???
28.08.2017 - 22:38DROPS Design respondió:
Hallo Janneke, Bovenaan het patroon, na het stuk over hoeveel garen en welke naalden je nodig hebt, staat een roze knop, waarmee je hem kunt toevoegen aan je favorieten.
29.08.2017 - 17:45
|
|||||||||||||||||||||||||||||||
Sky Love#skyloveponcho |
|||||||||||||||||||||||||||||||
 |
 |
||||||||||||||||||||||||||||||
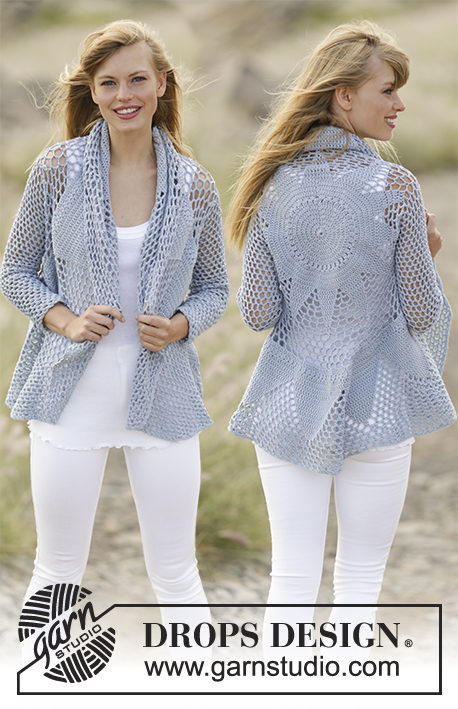
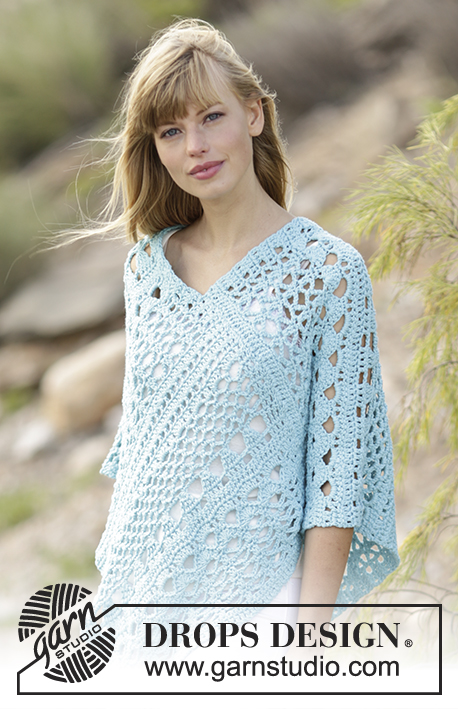
Poncho a ganchillo DROPS con patrón de calados en ”Paris”. Talla: S - XXXL.
DROPS 168-13 |
|||||||||||||||||||||||||||||||
|
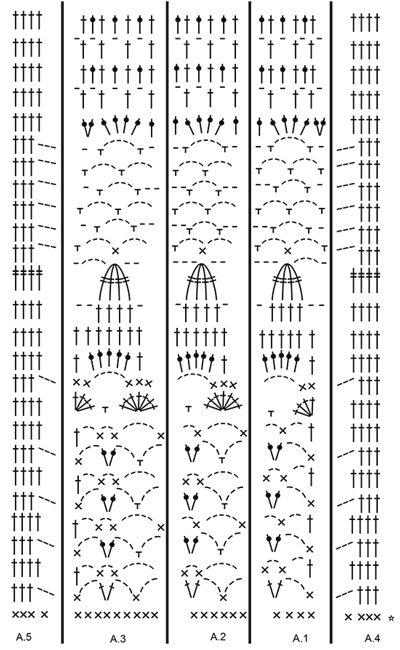
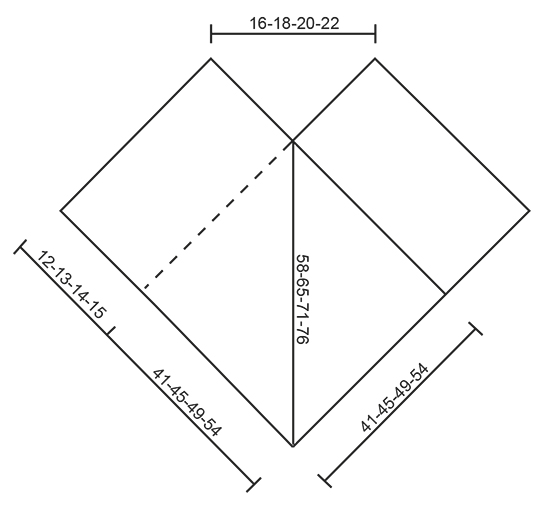
INFORMACIÓN PARA REALIZAR EL TRABAJO: Comenzar cada fila de p.b. con 1 p.de cad. (sustituye al 1er p.b.) Comenzar cada fila de p.a. con 3 p.de cad. (sustituyen al 1er p.a.) Comenzar cada fila de p.a.d. con 4 p.de cad. (sustituyen al 1er p.a.d.) PATRÓN: Ver los diagramas A.1-A.5 ----------------------------------------------------------------------- PONCHO: La labor se trabaja como 2 bufandas y al finalizar se cosen formando el poncho. Trabajar 77-85-93-101 p.de cad. con ag de ganchillo tamaño 5 mm con Paris. Trabajar 1 p.a. en el 4º p.de cad. del ganchillo (= 2 p.a.), 1 p.a. en el sig p.de cad., *saltar 1 p.de cad, 1 p.a. en cada uno de los sig 3 p.de cad*, repetir de * a * en toda la fila = 57-63-69-75 p.a. Trabajar 1 p.b. en cada p.a. (= LR) - leer INFORMACIÓN PARA REALIZAR EL TRABAJO = 57-63-69-75 p.b. Ahora trabajar como sigue: A.4 sobre los primeros 4 p.b., A.1 sobre los sig 4 p.b., A.2 sobre los sig 36-42-48-54 p.b. (= 6-7-8-9 vcs en el ancho), A.3 sobre los sig 9 p.b., finalizar con A.5 sobre los últimos 4 p.b. Continuar con el patrón de la misma manera, RECUERDE MANTENER LA MISMA TENSIÓN DEL TEJIDO! Trabajar hasta que la labor mida 65-71-77-84 cm, finalizar con 1 fila de p.a. del diagrama, asegurar el hilo. Trabajar la segunda parte de la misma manera. TERMINACIÓN: Unir el borde de remate de la 1ª parte con el lado largo derecho de la 2ª parte - en la parte inferior, hacia el borde de montaje y 41-45-49-54 cm hacia arriba - asegurate de no estirar la labor en exceso. Coser las 2 partes con pequeñas puntadas. Después coser el borde de remate de la 2ª parte al lado derecho de la 1ª parte de la misma manera. |
|||||||||||||||||||||||||||||||
Explicaciones del diagrama |
|||||||||||||||||||||||||||||||
|
|||||||||||||||||||||||||||||||
 |
|||||||||||||||||||||||||||||||
 |
|||||||||||||||||||||||||||||||
¿Terminaste este patrón?Entonces, etiqueta tus fotos con #dropspattern #skyloveponcho o envíalas a la galería #dropsfan. ¿Necesitas ayuda con este patrón?Encontrarás 8 videos tutoriales, un espacio para comentarios/preguntas y más visitando la página del patrón en garnstudio.com © 1982-2026 DROPS Design A/S. Todos los derechos reservados. Este documento, incluyendo todas sus sub-secciones, está protegido por los derechos de autor (copyright). Lee más acerca de lo que puedes hacer con nuestros patrones en la parte de abajo de cada patrón de nuestro sitio. |
|||||||||||||||||||||||||||||||


Con más de 40 años en el diseño de modelos de punto y de ganchillo, DROPS Design ofrece una de las más vastas colecciones de patrones gratuitos en el internet - traducidos en 17 idiomas. Al día de hoy, contamos con 324 catálogos y 12290 patrones - de los cuales 11685 están traducidos en español.
Nosotros trabajamos con mucho esmero para brindarte lo mejor que las labores de punto y ganchillo tienen para ofrecer,inspiración y consejos, así como hilos de magnífica calidad a precios increíbles! Te gustaría usar nuestros patrones para otro fin además del uso personal? Puedes leer acerca de lo que estás permitida a hacer en el texto de Copyright en la parte de abajo de todos nuestros patrones. Felices labores!
Escribe un comentario sobre DROPS 168-13
¡Nos encantaría saber qué piensas acerca de este patrón!
Si quieres escribir una pregunta referente al patrón, por favor asegúrate de elegir la categoría correcta en el formulario debajo, para acelerar el proceso de respuesta. Los campos obligatorios están marcados con un *.