
Categorías populares
¿Buscas un hilo?


Comentarios / Preguntas (30)
![]() Edda Gramaticopolo escribió:
Edda Gramaticopolo escribió:
Non riesco proprio a fare correttamente 2 m a rovescio ritorto, mi viene sempre la catenella.. Non capisco dove sbaglio e passo ore a riguardare al rallentatore il video...invierei la foto se riuscissi...
20.03.2024 - 11:47DROPS Design respondió:
Buonasera Edda, può mandare una mail a italian@garnstudio.com. Buon lavoro!
20.03.2024 - 18:37
![]() Judit Boeszormenyi escribió:
Judit Boeszormenyi escribió:
Guten Tag! Ich stricke Clever Clark Cardigan fur 5-6 Jährigen. Wie mach ich nach allen Raglanabnahmen und den Halsausschnittabnahmen weiter? Es liegen ja 57 Maschen am Nadel. Sogar mit den atillgelegten 2x11 Maschen werden nur 79 Maschen darauf und zwei Löcher dazwischen... Bitte um Hilfe! ♥️ Judit Boszormenyi
02.06.2023 - 19:33DROPS Design respondió:
Liebe Frau Boeszormenyi, also ja genau nach allen Raglanzunahmen sind es nur noch 57 Maschen übrig, dann stricken Sie die stillgelegten Maschen vom Vorderteil, fassen Sie neuen Maschen in den abgekettenen Maschen für den Halsausschnitt bis Maschen auf der Nadel auf, stricken Sie die 57 Maschen der Passe, fassen Sie neuen Maschen in den abgekettenen Maschen für den Halsausschnitt bis die stillgegelten Maschen auf und stricken Sie die stillgelegten Maschen für die Halsblende. Viel Spaß beim stricken!
05.06.2023 - 09:25
![]() Clare Rees escribió:
Clare Rees escribió:
This pattern have been a nightmare! I am now at the neck edge. I have two lots of 13 stitches sitting on a stitch holder. What do I do? Where is the next row - I presume past the stitch holder but that is not where my yarn end is! I presume I rejoin the yarn to work the stitches either side of the holder? and I cast off 2 stitches at the beginning of the row and one stitch twice. but what then? I am so confused!
15.03.2023 - 21:34DROPS Design respondió:
Dear Mrs Rees, you have slipped the first 13 sts on both front piece aside, and then cast off stitfches for neck on each side. Finish all raglan and cast off for neck until they are all done. Now knit up the 13 sts on right front piece, pick up sts along neck + shoulder, work the remaining sts on yoke, pick up sts along shoulder + neck and knit up the 13 sts on left front piece. Happy knitting!
16.03.2023 - 09:02
![]() Lelletta escribió:
Lelletta escribió:
Buonasera, mi piacerebbe che lo scollo fosse un po' meno aperto...posso fare qualche giro di ferri in più diminuendo ancora qualche maglia? Grazie per la risposta e buon lavoro!
03.10.2022 - 18:35DROPS Design respondió:
Buonasera Lelletta, può apportare le modifiche che preferisce al modello. Buon lavoro!
03.10.2022 - 18:39
![]() Clare Rees escribió:
Clare Rees escribió:
Please could you tell me which 6 stitches to cast off on the sleeve as this has been knitted as a tube and doesn't have a seam. Thank you.
26.02.2022 - 19:10DROPS Design respondió:
Dear Mrs Rees, you will sew together the 6 sts cast off mid under sleeve to the 6 sts cast off for armhole at the end of body - see also this video. Happy knitting!
28.02.2022 - 10:54
![]() Mrs Clare Rees escribió:
Mrs Clare Rees escribió:
Hello Please can you tell me how to work the A1 and A2 pattern for the Clever Cardigan when using double pointed needles for the sleeves as the usual knit stitches only produce stocking stitch (as I found out to my cost!!!) Thank you. Clare Rees
24.01.2022 - 23:11DROPS Design respondió:
Dear Mrs Rees, when working in the round, you are always working the stitches from the right side, ie either K or P from RS just as shown in diagram and explained in the diagram key (ex; A.1: K1 round, P1 round, K1 round, P1 round, K 3 round, P1 round, K1 round, P1 round, K1 round). Happy knitting!
25.01.2022 - 09:56
![]() Clare Rees escribió:
Clare Rees escribió:
I am knitting the sleeve for the clever clark cardigan but please could you explain the way to increase. What does under sleeve mean? Am I increasing at each end of the knitting or in the middle? Thank you.
29.11.2021 - 18:37DROPS Design respondió:
Hello Clare Rees! The beginning of the round is in the middle of under sleeve, meaning closest to the body. Work until there is 1 stitch left before the marker at the beginning of the round, make 1 yarn over, knit 2 (the marker sits in the middle of these 2 stitches), 1 yarn over. On the next round knit the yarn overs twisted to avoid holes. Then work the new stitches in stocking stitch (= 2 stitches increased). Hope it helps! Happy knitting!
29.11.2021 - 20:26
![]() Gunilla escribió:
Gunilla escribió:
Stickar stl 2år. Har 59 m kvar på stickan+13 maskor i varje kant på framstyckena. På halskanten står det att jag ska sticka upp 86-96 maskor runt halsen men jag har ju maskorna kvar på stickan. Fattar ingenting.
09.11.2021 - 18:14DROPS Design respondió:
Hej Gunilla. Du sätter tillbaka de första 13 maskorna på ena sidan (ena kanten) på stickan, stickar upp några maskor mellan dessa och resterande maskor, stickar maskorna du har kvar (59 m), stickar upp några maskor på andra sidan mellan dessa och de sista 13 m, sedan stickar du de sista 13 m (andra kanten). Du ska nu ha ca 86-96 m totalt på stickan. På nästa varv minskar du jämnt fördelat till 76 m totalt. Mvh DROPS Design
10.11.2021 - 08:59
![]() Anna Maria Vitulano escribió:
Anna Maria Vitulano escribió:
Buongiorno. Mi piacerebbe realizzare questo modello, ma nella taglia 9 mesi. È possibile avere 8ndicazioni in merito? Grazie mille e complimenti.
07.09.2021 - 07:47DROPS Design respondió:
Buonasera Anna Maria, questo modello non è disponibile per la taglia 9 mesi: ci sono tanti altri modelli per la taglia che desidera e altri in arrivo nei prossimi giorni. Continui a monitorare il nostro sito. Buon lavoro!
08.09.2021 - 00:00
![]() Clare Rees escribió:
Clare Rees escribió:
T hi ani’s for the reply to my earlier question - I’m sorry to trouble you with another but I want to be sure! So to make the buttonhole I work to the last 4 stitches on a wrong side and then what is the order? Is it k1 k2 together Yarn over K1? Thank you!
23.06.2021 - 11:21DROPS Design respondió:
Dear Mrs Rees, the buttonholes are worked on the left front band edge, ie work from right side until 4 sts remain at the end of the row, make 1 yarn over, knit the next 2 stitches together and knit the last 2 sts. On next row, knit all front band stitches as before. Hope it will helps. Happy knitting!
23.06.2021 - 14:01
|
|||||||
Clever Clark Cardigan |
|||||||
|
|
|||||||
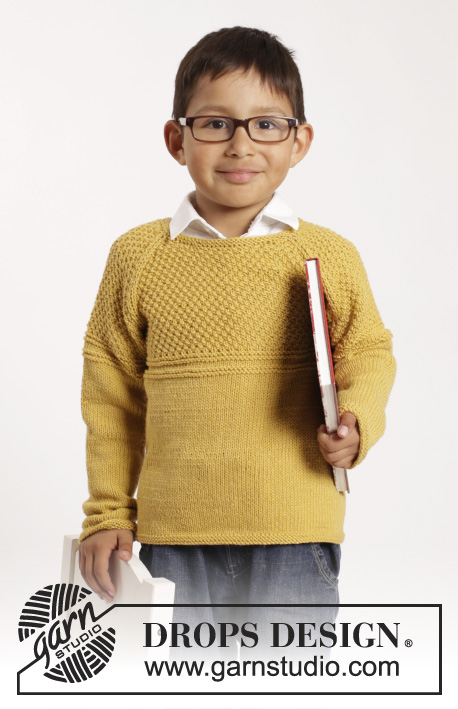
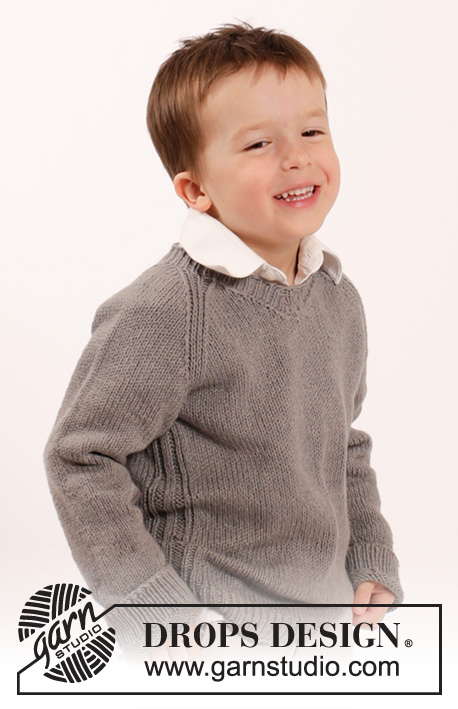
Chaqueta de punto DROPS con raglán y patrón de relieve en ”Cotton Merino”. Talla 1-10 años
DROPS Extra 0-1143 |
|||||||
|
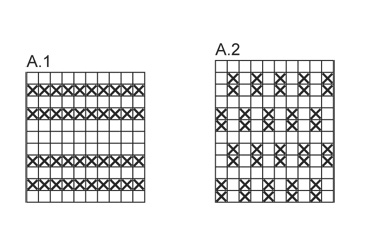
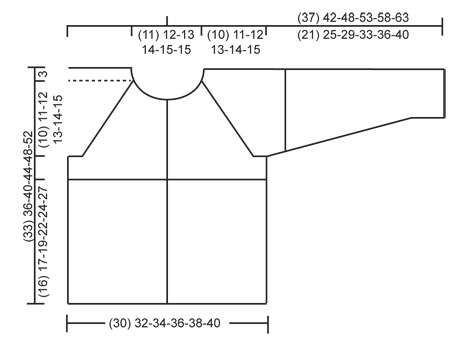
PUNTO MUSGO (de ida y vta): Trabajar todas las filas de derecho. 1 pliegue = 2 filas de derecho. PT MUSGO (en redondo): 1 pliegue = 2 vtas. *1 vta de derecho y 1 vta de revés*, repetir de *a*. OJALES: Cerrar para los ojales en la cenefa izquierda. 1 ojal = hacer 1 HEB cuando queden 4 pts en la ag., trabajar juntos de derecho los sig 2 pts y finalizar con 2 d. Cerrar para los ojales cuando la labor mida: TALLA 12/18 MESES: 2, 6, 10, 14, 18, 22, 26 y 29 cm. TALLA 2 AÑOS: 2, 6, 10, 14, 18, 22, 26 y 31 cm. TALLA 3/4 AÑOS: 2, 7, 12, 17, 22, 27, 31 y 35 cm. TALLA 5/6 AÑOS: 2, 7, 12, 17, 22, 27, 33 y 39 cm. TALLA 7/8 AÑOS: 2, 8, 14, 20, 26, 32, 37 y 42 cm. TALLA 9/10 AÑOS: 2, 8, 14, 20, 26, 32, 39 y 46 cm. PATRÓN: Ver los diagramas A.1 y A.2. Los diagramas muestran todas las filas del patrón visto por el LD. RAGLÁN: Dism para el raglán en cada transición entre las mangas y el cuerpo. POR EL LD: Comenzar 2 pts antes del marcapuntos (MP), 2 pjd, desl 1 pt como de derecho, 1 d., pasar el pt desl por encima (= 2 pts dism). POR EL LR: Comenzar 2 pts antes del marcapuntos, 2 pjr retorcido, 2 pjr (= 2 pts dism). ---------------------------------------------------------- CUERPO: Se trabaja de ida y vta con ag circular desde el centro del delantero. Mont (135) 143-151-159-167-179 pts (incl 5 pts de la cenefa a cada lado hacia el centro del delantero) con ag circular tamaño 3 mm y Cotton Merino. Trabajar 2 pliegues en PUNTO MUSGO - ver explicaciones arriba. Cambiar a ag circular tamaño 4 mm y trabajar en pt jersey con 5 pts de la cenefa en pt musgo a cada lado hacia el centro del delantero. RECUERDE MANTENER LA MISMA TENSIÓN DEL TEJIDO y RECUERDE LOS OJALES en la cenefa izquierda - ver explicaciones arriba. Cuando la labor mida (16) 17-19-22-24-27 cm, trabajar el patrón según el diagrama A.1 (continuar en los pts de la cenefa como antes). Después de completar A.1, trabajar según el diagrama A.2 (continuar en los pts de la cenefa como antes). Cuando la labor mida (20) 22-25-28-31-34 cm, trabajar la sig fila por el LR como sigue: (33) 35-37-39-41-44 pts (= delantero izquierdo), cerrar 6 pts para la sisa, trabajar (57) 61-65-69-73-79 pts (= espalda), cerrar 6 pts para la sisa, trabajar los últimos (33) 35-37-39-41-44 pts (= delantero derecho). Dejar la labor en espera y trabajar las mangas. MANGA: Se trabaja en redondo con ag de doble punta. Mont (34) 36-38-38-40-40 pts en ag de doble punta tamaño 3 mm y Cotton Merino. Trabajar 2 pliegues en PT MUSGO - ver explicación arriba. Cambiar a ag de doble punta tamaño 4 mm y trabajar en pt jersey. Cuando la labor mida (6) 6-7-6-7-7 cm, aum 2 pts en el centro bajo la manga. Repetir los aum cada (1½) 2-2-2-2-2 cm un total de (9) 9-10-13-14-16 vcs = (52) 54-58-64-68-72 pts. AL MISMO TIEMPO cuando la labor mida (17) 20-23-27-29-33 cm, trabajar el patrón en redondo siguiendo el diagrama A.1. Cuando se ha completado A.1 trabajar el patrón en redondo siguiendo el diagrama A.2. AL MISMO TIEMPO cuando la labor mida (21) 25-29-33-36-40 cm (ajustar para finalizar en la misma vta del diagrama que en el cuerpo), cerrar los 6 pts del centro bajo la manga = (46) 48-52-58-62-66 pts. Dejar la labor en espera y trabajar la otra manga. CANESÚ: Desl las mangas a la misma ag circular del cuerpo donde se cerró para las sisas (sin trabajar los pts) = (215) 227-243-263-279-299 pts. Insertar 1 MP en todas las transiciones entre las mangas y el cuerpo = 4 MPs. LEER TODA LA SECCIÓN SIGUIENTE ANTES DE CONTINUAR! RAGLÁN: Continuar con el patrón como antes en todos los pts con 5 pts de la cenefa en pt musgo a cada lado del centro del delantero. AL MISMO TIEMPO en la primera fila dism para el raglán - ver explicaciones arriba (= 8 pts dism). Repetir las dism cada 2ª fila un total de (13) 14-16-15-17-17 vcs y después cada fila un total de (3) 3-3-7-7-9 vcs. ESCOTE: AL MISMO TIEMPO cuando la labor mida (29) 31-35-39-42-46 cm, desl los (13) 13-12-11-9-10 pts más externos a cada lado en el centro del delantero a un gancho aux ( trabajar los pts antes de pasarlos al gancho aux). Continuar cerrando para el escote al inicio de cada fila a cada lado como sigue: cerrar 2 pts (1) 1-1-1-2-2 vcs y 1 pt (0) 1-2-2-2-2 vcs. Después de todas las dism del raglán y el escote, quedan (57) 59-59-57-57-59 pts en la ag y la labor mide aprox. (33) 36-40-44-48-52 cm hasta el hombro. CENEFA DEL ESCOTE: Recoger por el LD aprox. 86 - 96 pts alrededor del escote (incl los pts del gancho aux del delantero) con ag circular tamaño 3 mm y Cotton Merino. Trabajar 1 fila de revés y al mismo tiempo dism el nº de pts de forma repartida hasta (70) 76-82-86-90-90 pts - no dism sobre los pts de la cenefa. Trabajar 1 fila de derecho por el LD y 1 fila de derecho por el LR antes de rematar todos los pts de derecho por el LD. TERMINACIÓN: Coser la abertura bajo las mangas. Coser los botones. |
|||||||
Explicaciones del diagrama |
|||||||
|
|||||||
 |
|||||||
 |
|||||||
¿Terminaste este patrón?Entonces, etiqueta tus fotos con #dropspattern o envíalas a la galería #dropsfan. ¿Necesitas ayuda con este patrón?Encontrarás 31 videos tutoriales, un espacio para comentarios/preguntas y más visitando la página del patrón en garnstudio.com © 1982-2026 DROPS Design A/S. Todos los derechos reservados. Este documento, incluyendo todas sus sub-secciones, está protegido por los derechos de autor (copyright). Lee más acerca de lo que puedes hacer con nuestros patrones en la parte de abajo de cada patrón de nuestro sitio. |
|||||||


Con más de 40 años en el diseño de modelos de punto y de ganchillo, DROPS Design ofrece una de las más vastas colecciones de patrones gratuitos en el internet - traducidos en 17 idiomas. Al día de hoy, contamos con 325 catálogos y 12298 patrones - de los cuales 11698 están traducidos en español.
Nosotros trabajamos con mucho esmero para brindarte lo mejor que las labores de punto y ganchillo tienen para ofrecer,inspiración y consejos, así como hilos de magnífica calidad a precios increíbles! Te gustaría usar nuestros patrones para otro fin además del uso personal? Puedes leer acerca de lo que estás permitida a hacer en el texto de Copyright en la parte de abajo de todos nuestros patrones. Felices labores!
Escribe un comentario sobre DROPS Extra 0-1143
¡Nos encantaría saber qué piensas acerca de este patrón!
Si quieres escribir una pregunta referente al patrón, por favor asegúrate de elegir la categoría correcta en el formulario debajo, para acelerar el proceso de respuesta. Los campos obligatorios están marcados con un *.