
Categorías populares
¿Buscas un hilo?


Comentarios / Preguntas (36)
![]() Afshan Raheel escribió:
Afshan Raheel escribió:
How many stitches after row 2?
27.09.2017 - 18:43DROPS Design respondió:
Dear Mrs Afsha, after row 1 you will have the same number of sts as you will not increase in row 1 - It can be a good idea to insert a marker between each repetition so that you can easily follow your work and the diagram. Happy crocheting!
28.09.2017 - 09:31
![]() Afsha Raheel escribió:
Afsha Raheel escribió:
Plz help me with 2nd row of yoke. It will be double crochet in each stich ? If we do not divide in a1 a2 a3? And 3rd row. What is above a1 6 dc? If its according to diagram then what does row 2 mentions a2 4 time a3 2 time????
27.09.2017 - 18:22DROPS Design respondió:
Dear Mrs Afsha, on 2nd round on yoke you will work 1st row in each diagram as stated, ie in the 2 larger sizes you will work 2nd round as follows: A.1 over the first 6dc, A.2 over the next 24dc (= 4times in total = repeat 4 times in width row 1 in A.2)), A.3 over the next 12dc (= 2times in total), A.2 over the next 12 dc (= 2 times), A.3 over the next 12 dc (= 2 times), A.2 over the next 54-60 dc (= 9-10 times), A.3 over the next 12 dc (= 2 times), A.2 over the next 12 dc (= 2 times), A.3 over the next 12 dc (= 2 times), A.2 over the last 24-30 dc (= 4-5 times). Happy crocheting!
28.09.2017 - 09:30Asraa escribió:
Hi. I have just completed A3 and the 5th rounds of A1 and A2 for the size medium. However the count of my tr stitches is only 196.If I count the chain stitches in between then the stitch count goes well over 252. However if I apply some mathematics and get the stitch by multiplying the number of tr stitches in each mode (A1,A2,A3) by the number of times they are repeated it comes out as 196= 2 (for A1) +26(for A2) +168(for A3). Kindly help me with this.
30.08.2017 - 19:22DROPS Design respondió:
Dear Asraa, by the time you finish the last row of pattern A.3 you should have the following stitch counts: A.1 (6 sts), A.2 (12 sts), A.3 (2 x 21= 42 sts), A.2 (6 sts), A.3 (42 sts), A.2 (36 sts), A.3 (42 sts), A.2 (6 sts), A.3 (42 sts) A.2 (18 sts) that adds up to 252 sts, hich is the number of stitches you have to continue to work with. I hope this helps. Happy Crocheting!
31.08.2017 - 06:12Asraa escribió:
Hi. I have just started this pattern and I am a bit confused in the 3rd round for the yoke. It says to work A1 in the first 6 trebles. Am I supposed to the entire A1 as is showed in the diagram i.e. the entire vertical line? Or am I supposed to do the first rows of each A1, A2 and A3 for this round and then proceed to the next rows in the upcoming rounds?
28.08.2017 - 17:59DROPS Design respondió:
Dear Asraa, work the first row in A.1 over the firt 6 tr, then work first row of A.2, A.3 etc.. on same row, you will work diagrams row by row. Happy crocheting!
29.08.2017 - 09:05
![]() Mai Kruse escribió:
Mai Kruse escribió:
Hejsa, jeg er netop blevet færdig med A1 og A2 i højden. Nu skal jeg færdiggøre A3 i højden og fortsætte forfra med A1 og A2. Men så vil mønstret jo ikke gå op? Mvh mai
06.07.2017 - 00:00DROPS Design respondió:
Hej Mai, jo du fortsætter alle 3 diagrammer, det er samme mønter hele vejen rundt, men A.3 viser hvordan du tager ud. God fornøjelse!
12.07.2017 - 14:07
![]() Sunny escribió:
Sunny escribió:
Hello, I am at the body part, size M. What is it mean by "Repeat A.2 2 times more in width"? does it mean to do 2 rows of A.2? or A.2 needs to be done twice for every A.2 pattern by looking at the beginning of the YOKE (A.1, A.2, and A.3 are listed) thank you!
23.03.2017 - 15:41DROPS Design respondió:
Dear Sunny, you have just inc 12 sts evenly, and A.2 = 6 sts in width, so that you have now enough room to work 2 more repeats of A.2 in width over the 180 sts = work A.1 1 time in width, then repeat A.2 29 times in total in width = 180 sts. Happy crocheting!
23.03.2017 - 16:17
![]() Darlene Wick escribió:
Darlene Wick escribió:
Hi, Iam having trouble with this pattern. I have done every row like it says but where I get confused is It says after you do A.3 you are supposed to have 252 sts. then it tells you on row 6 to do the arm part. Well Am I supposed to do A1 and A.2 all the way and then do A.3. Be cause if I do there will be to many sts. Please help me.
07.08.2016 - 04:56DROPS Design respondió:
Dear Mrs Wick, when you have crocheted A.1 and A.2 1 time in height repeat these both diagrams in height while continuing crocheting A.3. So that when A.3 has been worked 1 time in height, next row will be row 6 in A.1 and A.2. Happy crocheting!
08.08.2016 - 09:42
![]() Sandra Karinsdotter escribió:
Sandra Karinsdotter escribió:
Fin modell, men skulle vilja virka den med betydligt djupare och vidare urringning, så att "ärmarna" hasar ner lite, och sedan virka fast två snoddar som löper över axlarna och håller klänningen uppe = en bit av axeln lämnas bar. Förstår att det borde funka om jag börjar virka "en bit in i mönstret", men har svårt att beräkna på vilket ställe det isf är lämpligt att börja, och hur många fler maskor jag då borde starta med, i stl S?
28.07.2016 - 22:30DROPS Design respondió:
Hej Sandra, Du kan fråga om hjälp till at räkna om mönstret om du går till DROPS butiken där du har köpt garnet. Vi har inte möjlighet at ändra på våra mönster. Lycka till!
22.12.2016 - 09:44
![]() Michelle escribió:
Michelle escribió:
Hej. Jeg forstår ikke række 4/5 i diagram A1 og a2. Man skal hækle stangmasker i luftmasker, (ovenover de to fastmasker.) men kan ikke se hvor de to luftmasker kommer fra. Skal de laves i mellem de 2 fastmasker??
30.06.2016 - 07:55DROPS Design respondió:
Hej Michelle. Du har lavet de to luftmasker i omg för mellem de to fastmasker.
10.11.2016 - 16:21
![]() Katie escribió:
Katie escribió:
I did not mean to enter the question when it happened, and I did not mean to enter it twice. It sounds like the directions are telling me to dc in first 6 stitches like A.1, and dc in next 12 stitches two times, like in A.2, but when I do that and go around, it makes over 300 stitches in row two, but there is only 132 stitches in row two. So how do I do that. Is there a place where a new row begins that is not made clear in that paragraph?
31.01.2016 - 02:02DROPS Design respondió:
Dear Katie, in size M or L (132 sts) work as follows: A.1 over the first 6 dc, A.2 over the next 12 dc (= 2 times in total), A.3 over the next 12 dc (= 2 times in total), A.2 over the next 6 dc (= 1 time), A.3 over the next 12 dc (= 2 times), A.2 over the next 36 dc (= 6 times), A.3 over the next 12 dc (= 2 times), A.2 over the next 6 dc (= 1 time), A.3 over the next 12 dc (= 2 times), A.2 over the last 18 dc (= 3 times)= 6+12+12+6+12+36+12+6+12+18=132 sts. Happy crocheting!
01.02.2016 - 10:23
|
|||||||||||||||||||||||||||||||
Toulouse#toulousedress |
|||||||||||||||||||||||||||||||
|
|
|||||||||||||||||||||||||||||||
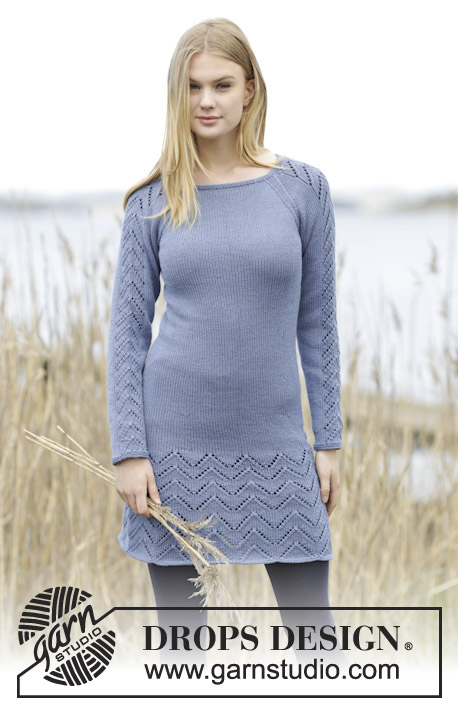
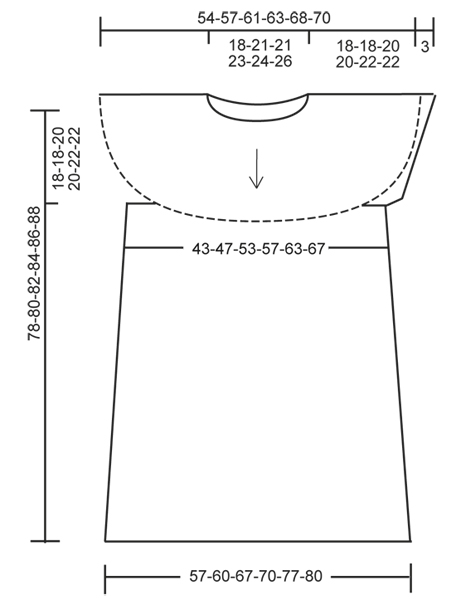
Vestido en ganchillo DROPS con patrón de calados y pechera redonda, trabajado de arriba para abajo en “Cotton Merino”. Talla: S – XXXL.
DROPS 165-36 |
|||||||||||||||||||||||||||||||
|
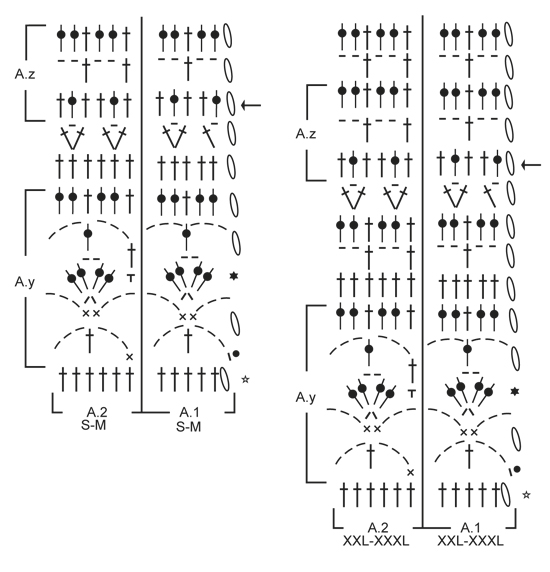
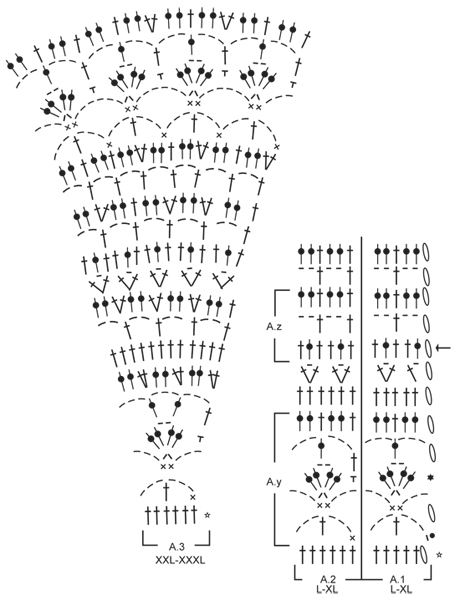
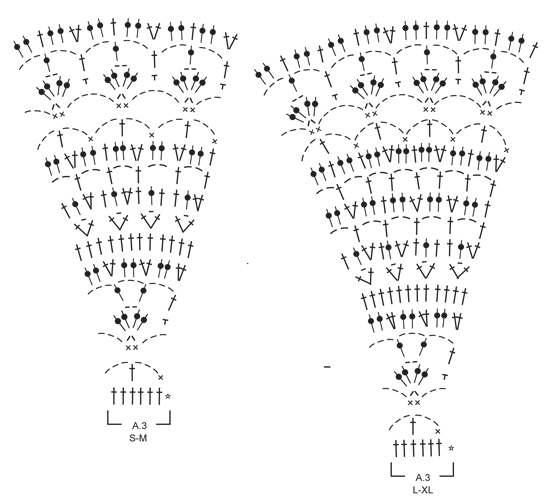
INFORMACIÓN PARA LA ELABORACIÓN DEL TRABAJO: En cada vta de p.a., sustituir el primer p.a. con 3 cad y terminar la vta con 1 p.bjs en la 3ª cad del principio de la vta. TIP PARA AUMENTAR: Aumentar 1 p.a. trabajando 2 p.a. en 1 p.a. PATRÓN: Ver diagramas A.1 a A.3. Elegir el diagrama para la talla correcta. A.1 muestra cómo comienza y termina el patrón. ----------------------------------------------------- PECHERA: Trabajada en redondo, de arriba para abajo, comenzar al centro de la espalda. Montar 128-138-138-163-168-173 cad en ag de ganchillo tamaño 4 mm con Cotton Merino y formar un anillo con 1 p.bjs en la primera cad. Trabajar la vta sig de la manera sig: Trabajar 3 cad (= 1 p.a.) – LEER INFORMACIÓN PARA LA ELABORACIÓN DEL TRABAJO, 1 p.a. en la primera cad del anillo de cad, 1 p.a. en cada una de las 2 cad sig, * saltar 1 cad, 1 p.a. en cada una de las 4 cad sig *, repetir de *a* en toda la vta, terminar con 1 p.bjs en la 3ª cad del principio de la vta = 104-112-112-132-136-140 p.a. En la vta sig, aumentar 16-20-20-24-44-52 p.a. distribuidos equitativamente – LEER TIP PARA AUMENTAR = 120-132-132-156-180-192 p.a. Continuar a trabajar de la manera sig: Trabajar A.1 sobre los primeros 6 p.a., A.2 sobre los 12-12-12-18-24-24 p.a. sig (= 2-2-2-3-4-4 veces en total), A.3 sobre los 12 p.a. sig (= 2 veces en total), A.2 sobre los 6-6-6-12-12-12 p.a. sig (= 1-1-1-2-2-2 veces), A.3 sobre los 12 p.a. sig (= 2 veces), A.2 sobre los 30-36-36-42-54-60 p.a. sig (= 5-6-6-7-9-10 veces), A.3 sobre los 12 p.a. sig (= 2 veces), A.2 sobre los 6-6-6-12-12-12 p.a. sig (= 1-1-1-2-2-2 veces), A.3 sobre los 12 p.a. sig (= 2 veces), A.2 sobre los últimos 12-18-18-18-24-30 p.a. (= 2-3-3-3-4-5 veces). NOTA: En las tallas S+XL+XXL comenzar la vta ligeramente hacia un lado para que el patrón calce. Continuar el patrón de esta manera. RECORDARSE DE MANTENER LA MISMA TENSIÓN DE LA MUESTRA! Cuando A.1/A.2 han sido trabajados 1 vez verticalmente, repetirlos en dirección hacia arriba. Cuando A.3 ha sido trabajado 1 vez verticalmente, hay 240-252-292-316-340-352 p.a. en la vta. La pieza mide aprox 18-18-20-20-22-22 cm (medida a partir de la orilla del escote). Ahora trabajar de la manera sig (= 6ª vta en A.1/A.2): Trabajar 1 p.a. en cada uno de los primeros 39-39-44-50-56-56 p.a. (= mitad pieza de la espalda), trabajar 6-6-8-8-8-8 cad, saltar 48-48-58-64-64-64 p.a. (= sisa), trabajar 1 p.a. en cada uno de los 72-78-88-94-106-112 p.a. sig (= pieza del frente), trabajar 6-6-8-8-8-8 cad, saltar 48-48-58-64-64-64 p.a. (= sisa), trabajar 1 p.a. en cada uno de los últimos 33-39-44-44-50-56 p.a. = 144-156-176-188-212-224 p.a. y 6-6-8-8-8-8 cad de cada lado de la pieza (= 156-168-192-204-228-240 pts en total). Insertar 1 marcapuntos en la pieza, AHORA MEDIR LA PIEZA A PARTIR DE AQUÍ! CUERPO: Trabajar la vta sig de la manera sig (= 7ª vta en A.1/A.2): Trabajar A.1 1 vez, después trabajar A.2 sobre los 150-162-186-198-222-234 p.a./cad restantes (= 25-27-31-33-37-39 veces en total a lo ancho). Continuar trabajando el patrón verticalmente. AL MISMO TIEMPO, en la vta marcada con una flecha en el diagrama, aumentar 12 p.a. distribuidos equitativamente (es decir, trabajar 2 p.a. en cada 13º-14º-16º-17º-19º-20º p.a.) = 168-180-204-216-240-252 p.a. Repetir A.2 2 veces más a lo ancho. Repetir los aumentos a cada 10 cm, ajustar para aumentar en una vta de p.a., 3 veces más = 204-216-240-252-276-288 p.a. Por cada aumento, repetir A.2 2 veces más a lo ancho. Después del último aumento, repetir A.2 33-35-39-41-45-47 veces en total a lo ancho. Cuando la pieza mida aprox 44-46-46-48-48-50 cm (a partir del marcapuntos) – ajustar para que la última vta sea una vta de p.a., trabajar A.y 3 veces en total verticalmente. Después trabajar A.z 1 vez verticalmente. La pieza mide aprox 78-80-82-84-86-88 cm en total a partir de la orilla del escote. Cortar y asegurar el hilo. ORILLA DE LA MANGA: Trabajada en redondo. Comenzar al centro bajo la manga. Trabajar 1 p.bjs en la 4ª cad al centro bajo la manga, 3 cad, 1 p.a. en cada una de las 2-2-4-4-4-4 cad sig, 1 p.a. en cada uno de los 48-48-58-64-64-64 p.a. para la manga y, AL MISMO TIEMPO, disminuir 6-6-4-4-0-0 p.a. distribuidos equitativamente y 1 p.a. en cada una de las últimas 3 cad montadas bajo la manga = 48-48-62-68-72-72 p.a. Trabajar 2 vtas con 1 p.a. en cada p.a. Cortar y asegurar el hilo. Trabajar una orilla igual en la otra manga. |
|||||||||||||||||||||||||||||||
Explicaciones del diagrama |
|||||||||||||||||||||||||||||||
|
|||||||||||||||||||||||||||||||
 |
|||||||||||||||||||||||||||||||
 |
|||||||||||||||||||||||||||||||
 |
|||||||||||||||||||||||||||||||
 |
|||||||||||||||||||||||||||||||
¿Terminaste este patrón?Entonces, etiqueta tus fotos con #dropspattern #toulousedress o envíalas a la galería #dropsfan. ¿Necesitas ayuda con este patrón?Encontrarás 10 videos tutoriales, un espacio para comentarios/preguntas y más visitando la página del patrón en garnstudio.com © 1982-2026 DROPS Design A/S. Todos los derechos reservados. Este documento, incluyendo todas sus sub-secciones, está protegido por los derechos de autor (copyright). Lee más acerca de lo que puedes hacer con nuestros patrones en la parte de abajo de cada patrón de nuestro sitio. |
|||||||||||||||||||||||||||||||


Con más de 40 años en el diseño de modelos de punto y de ganchillo, DROPS Design ofrece una de las más vastas colecciones de patrones gratuitos en el internet - traducidos en 17 idiomas. Al día de hoy, contamos con 324 catálogos y 12290 patrones - de los cuales 11685 están traducidos en español.
Nosotros trabajamos con mucho esmero para brindarte lo mejor que las labores de punto y ganchillo tienen para ofrecer,inspiración y consejos, así como hilos de magnífica calidad a precios increíbles! Te gustaría usar nuestros patrones para otro fin además del uso personal? Puedes leer acerca de lo que estás permitida a hacer en el texto de Copyright en la parte de abajo de todos nuestros patrones. Felices labores!
Escribe un comentario sobre DROPS 165-36
¡Nos encantaría saber qué piensas acerca de este patrón!
Si quieres escribir una pregunta referente al patrón, por favor asegúrate de elegir la categoría correcta en el formulario debajo, para acelerar el proceso de respuesta. Los campos obligatorios están marcados con un *.