
Categorías populares
¿Buscas un hilo?


Comentarios / Preguntas (68)
![]() Amy escribió:
Amy escribió:
To whom it may concern: I was wondering when I am knitting the 12 stitches do I knit both ends of the row in garter stitch or just the last stitch of the row. Thank you in advance for your help Amy
31.10.2015 - 16:27DROPS Design respondió:
Dear Amy, when you are working the 12 sts for mid upper part, work the 1st and last st in garter st. See also the video in previous answer. Happy knitting!
31.10.2015 - 18:20
![]() Amy escribió:
Amy escribió:
To whom it may concern: The problem I am having is I have the 10 stitches on my needle for the top portion of the slipper but when I reach the 7 cm am I suppose to increase on those 10 stitches to reach the number 61 stitches that I need or do I start increasing after after the 7 cm. It says to pick up 12 stitches after I reach the 7 cm on either side of the edge stitch. That is where I am having the problem. Thank you again for your help
29.10.2015 - 04:56DROPS Design respondió:
Dear Amy, after you have worked the 7 cm over the mid sts, and 10 sts left, pick up 12 sts along both side of the upper foot (along right side of the middle part + along left side of the middle part) + slip sts from thread back on needle = you have a total of 61 sts on needle and your work looks like as in video, time code 5:18 approx. Happy knitting!
29.10.2015 - 09:32
![]() Amy escribió:
Amy escribió:
To whom it may concern: I am still confused as to how many rows I need because there is no explanation for when I go to start the pattern 2 portion of the slipper part and how many increases I need to reach the required amount of sts as well. I tried to watch the video but it was hard to follow when the sped up the knitting part. Thank you again for your help Amy
28.10.2015 - 16:04DROPS Design respondió:
Dear Amy, wijth pattern 2 portion of the slipper part, do you mean the edge around leg? Work first 4 ridges in garter st (= 8 K rows) but on the 8th K row increase 6 sts evenly - see here how to increase evenly. Then work following A.1 until 35-38 cm, work 4 ridges (8 K rows), but on the 1st of these 8 rows, decrease 6 sts evenly. Happy knitting!
28.10.2015 - 18:26
![]() Amy escribió:
Amy escribió:
Amy 25.10.2015 kl. 00:38: To whom it may concern: I am currently working on the slipper boot pattern and am wondering how I am suppose to do the heel of the slipper when it doesn't say how many rows to do it just say to work back and forth on the needles. If you could let me know it would be appreciated Thank you in advance for your help
25.10.2015 - 15:33
![]() Amy escribió:
Amy escribió:
To whom it may concern: I am currently working on the slipper boot pattern and am wondering how I am suppose to do the heel of the slipper when it doesn't say how many rows to do it just say to work back and forth on the needles. If you could let me know it would be appreciated Thank you in advance for your help
25.10.2015 - 00:38
![]() Yvonne escribió:
Yvonne escribió:
Kan ik de slof ook op 2 pennen breien ?
10.06.2015 - 23:26DROPS Design respondió:
Hoi Yvonne. Nee, enkele delen van deze slof worden in de rondte gebreid.
11.06.2015 - 13:44
![]() Trudy escribió:
Trudy escribió:
I guess I did not make myself clear. I understand about putting the stitches back on the needles, although I am not sure if we are using three now or four. If we are using four - then I need to know how many stitches are put onto the fourth needle which would be the heal area of the boot.
12.04.2015 - 17:54DROPS Design respondió:
Dear Trudy, distribute the sts on 4 needle or as in the video, making sure the markers are on the correct places. Happy knitting!
13.04.2015 - 09:32
![]() Elaine Langille escribió:
Elaine Langille escribió:
I don't understand "knit over knit" and "purl over purl" I watched the video, but still didn't know how to do it
11.02.2015 - 03:56DROPS Design respondió:
Dear Mrs Langille, you work pattern 2 over the 12 sts as follows from RS: 1 edge st in garter st, *K2,P2* over the next 10 sts and finish with 1 edge st in garter st. On next row from WS work 1 edge st in garter st, *P2/K2* over the next 2 sts, 1 edge st in garter st. Happy knitting!
11.02.2015 - 09:14
![]() M Damen escribió:
M Damen escribió:
Een opmerking niet over de sloffen maar over de gebruikte taal. gecontroleerd is met 1 L niet met 2. Deze fout staat al enkele jaren bij ieder patroon.
04.01.2015 - 20:21Dianne Perrin escribió:
Drops 158-47 pattern no an-025 I do not understand the directions for A.1 which is the first row and which x box is a p from rs and which x box is k from ws and which blank box is k from rs and which blank box is p from ws
16.12.2014 - 07:15DROPS Design respondió:
Dear Mrs Perrin, please click here to read more about diagrams. Row 1 = K5, (P2, K2) repeat (to) a total of 5 times, K3. Row2= K3, (P2, K2) repeat (to) a total of 5 times, P2, K3. Happy knitting!
16.12.2014 - 09:58
|
|||||||
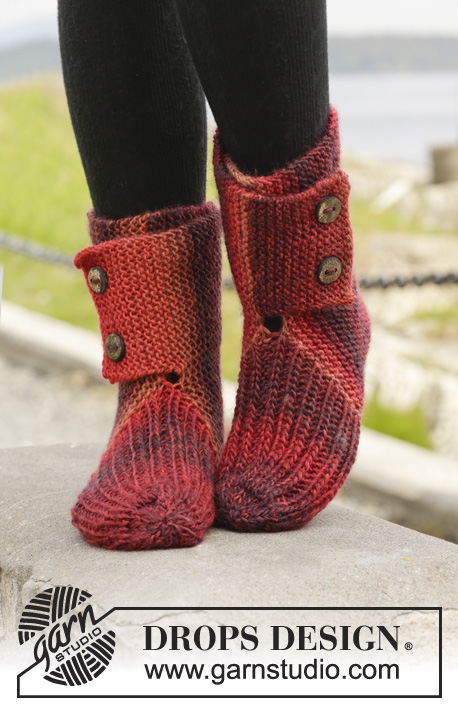
One Step Ahead#onestepaheadslippers |
|||||||
 |
 |
||||||
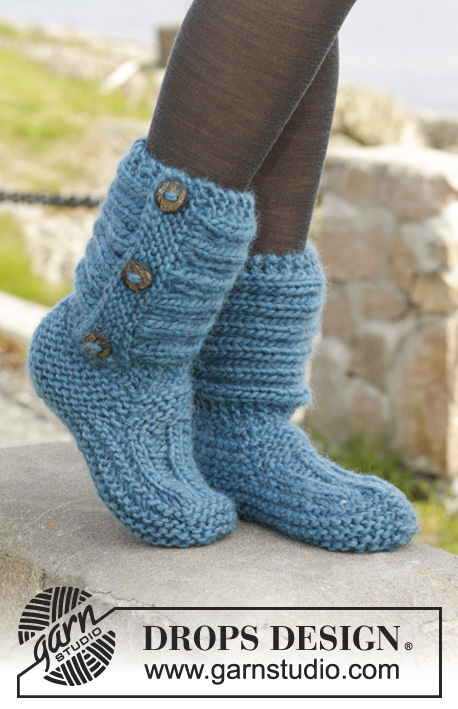
Zapatillas de punto DROPS en punto musgo y punto elástico en "Andes".
DROPS 158-47 |
|||||||
|
PUNTO MUSGO ( en redondo con ag de doble punta): *1 vta de derecho y 1 vta de revés*, repetir de *a*. 1 pliegue = 2 vtas. PUNTO MUSGO (de ida y vta en ag): Trabajar todas las filas de derecho. 1 pliegue = 2 filas de derecho. PATRÓN: Ver el diagrama A.1 PATRÓN 2: Fila 1 (= LD): * 2 d., 2 r.*,repetir de * a * hasta que queden 2 pts, 2 d. Fila 2 (= LR): trabajar derecho sobre derecho y revés sobre revés. Repetir la 2ª fila. ---------------------------------------------------------------------------------------------------------------------------------------------- ZAPATILLA: Primero se trabaja un borde en la parte inferior de la pierna, después se trabaja la parte del pie. Finalmente se teje la caña amplia de lado a lado. BORDE: Mont 37-37-39 pts con ag de doble punta tamaño 6 mm con Andes. Trabajar en PT MUSGO en redondo - ver explicaciones arriba - hasta que la labor mida aprox 4 cm., finalizar después de 1 vta de revés. RECUERDE MANTENER LA MISMA TENSIÓN DE LA MUESTRA! PIE: Ahora trabaja la labor de ida y vta. Dejar los primeros 10 pts en la ag, desl los 27-27-29 pts restantes a un gancho aux. Ahora trabajar la parte central según el PATRÓN 2 - ver explicaciones arriba, sobre los 10 pts - AL MISMO TIEMPO al final de las sig 2 filas montar 1 pt orillo nuevo (trabajar los pts orillo en PT MUSGO - ver explicación arriba) = 12 pts. Cuando la parte central mida 7-8½-10 cm, cerrar 1 pt orillo a cada lado = 10 pts. Desl los pts desde el gancho aux de vta a la ag y recoger 12-14-16 pts a cada lado de la parte central (dentro de 1 pt orillo) = 61-65-71 pts en la ag. AHORA MEDIR LA LABOR DESDE AQUÍ! Insertar 1 marcapuntos (MP) en el centro de los 10 pts de la parte central (= centro de la parte delantera en la punta ) y 1 MP en el pt de la parte posterior del talón, ahora hay 30-32-35 pts entre los MP a cada lado. Continuar la labor en redondo en pt musgo. Cuando la labor mida 2 cm, trabajar 2 pjd a cada lado de cada MP cada 2ª vta (= 4 pts menos por vta). Continuar dism hasta que la labor mida 5-5-6 cm. Rematar los pts restantes. Hacer la costura bajo el pie cogiendo la parte exterior del pt para evitar una costura abultada. CAÑA AMPLIA TEJIDA DE LADO A LADO: Se trabaja de ida y vta en ag. Mont 22 pts con ag tamaño 6 mm coh Andes. Trabajar 4 pliegues, AL MISMO TIEMPO en la última fila aum 6 pts repartidos = 28 pts. Trabajar según A.1 (= 28 pts) hasta que la labor mida aprox 35-36-38 cm. Trabajar 4 pliegues, AL MISMO TIEMPO en la 1ª fila dism 6 pts repartidos = 22 pts. Rematar. Colocar el borde de remate sobre el borde de montaje y coser 3 botones a modo de adorno en los pliegues de la caña. TERMINACIÓN: Coser la caña a la fila de montaje del borde de la pierna. Coser la caña para que los botones queden en el exterior de la zapatilla con la apertura mirando hacia atrás, hacia el talón - coser por el LR para que la costura sea invisible. Trabajar otra zapatilla de la misma manera, asegúrate de que la abertura de la caña queda en el lado opuesto. |
|||||||
Explicaciones del diagrama |
|||||||
|
|||||||
 |
|||||||
¿Terminaste este patrón?Entonces, etiqueta tus fotos con #dropspattern #onestepaheadslippers o envíalas a la galería #dropsfan. ¿Necesitas ayuda con este patrón?Encontrarás 18 videos tutoriales, un espacio para comentarios/preguntas y más visitando la página del patrón en garnstudio.com © 1982-2026 DROPS Design A/S. Todos los derechos reservados. Este documento, incluyendo todas sus sub-secciones, está protegido por los derechos de autor (copyright). Lee más acerca de lo que puedes hacer con nuestros patrones en la parte de abajo de cada patrón de nuestro sitio. |
|||||||


Con más de 40 años en el diseño de modelos de punto y de ganchillo, DROPS Design ofrece una de las más vastas colecciones de patrones gratuitos en el internet - traducidos en 17 idiomas. Al día de hoy, contamos con 324 catálogos y 12290 patrones - de los cuales 11675 están traducidos en español.
Nosotros trabajamos con mucho esmero para brindarte lo mejor que las labores de punto y ganchillo tienen para ofrecer,inspiración y consejos, así como hilos de magnífica calidad a precios increíbles! Te gustaría usar nuestros patrones para otro fin además del uso personal? Puedes leer acerca de lo que estás permitida a hacer en el texto de Copyright en la parte de abajo de todos nuestros patrones. Felices labores!
Escribe un comentario sobre DROPS 158-47
¡Nos encantaría saber qué piensas acerca de este patrón!
Si quieres escribir una pregunta referente al patrón, por favor asegúrate de elegir la categoría correcta en el formulario debajo, para acelerar el proceso de respuesta. Los campos obligatorios están marcados con un *.