
Categorías populares
¿Buscas un hilo?


Comentarios / Preguntas (61)
![]() Lappi escribió:
Lappi escribió:
Miten voin laskea kaula-aukkoa korkeammalle? Tarkoitan ylemmäs, on liian iso.. Miten vähennän kavennuksia. En ole hyvä näissä jutuissa.
27.04.2026 - 09:18DROPS Design respondió:
Saat korkeamman kaula-aukon, jos neulot muutaman senttimetrin enemmän ennen kuin päätät pääntien silmukat ohjeen mukaan.
28.04.2026 - 16:37
![]() Claire escribió:
Claire escribió:
Reading the pattern I am confused from BACK PIECE = number of stitches. Are these continued on from the jacket instructions as not clear
03.02.2026 - 19:40DROPS Design respondió:
Hi Claire, Yes, you should have this number of stitches left on the back piece after casting off for the armholes on each side. Regards, Drops Team.
06.02.2026 - 07:14
![]() Jenny Carton escribió:
Jenny Carton escribió:
I have just finished this gorgeous jacket. I admit I used double knitting yarn in cotton . So have used size 4mm needles. The effect is wonderful and I have received many compliments. I'm not sure how to add a picture of my finished jacket.
26.09.2024 - 21:51
![]() Anna Watson escribió:
Anna Watson escribió:
Hello I am knitting this lovely cardigan and have reached the point where the jacket measures 42 cm and I have to cast off 6 stitches for the arm holes which is fine. However I do not understand the next bit which starts Back Piece =. Have I to separate out so many stitches for the back piece? I have I'm afraid found this pattern very hard to follow: ( Hope you can help. Many thanks. Anna
25.11.2020 - 17:57DROPS Design respondió:
Dear Mrs Watson, when piece measures 42 cm you should now cast off 6 sts for both armholes, ie cast off 3 sts on each side of both markers to divide piece into the both front pieces and the back piece, in 4th size work: 55 sts, cast off 6 sts, work 110 sts, cast off 6 sts, work 55 sts - you keep sts of back piece on the needle and slip the sts of both front pieces on a thread/stitch holder and work now first back piece and when back piece is finished, work left front piece then right front piece. Happy knitting!
26.11.2020 - 09:38
![]() Anne Cole escribió:
Anne Cole escribió:
I’m new to knitting what size needle do I use to get large?
03.10.2020 - 09:43DROPS Design respondió:
See answer below :)
05.10.2020 - 09:07
![]() Anne Cole escribió:
Anne Cole escribió:
What size needle do I use to get a large size? I’m new to knitting.
03.10.2020 - 09:41DROPS Design respondió:
Dear Mrs Cole, you will find all these informations under header, ie you are working here with needle size 4 mm or the size require to get the correct tension of 21 sts x 40 rows in garter st = 10 x 10 cm. Read more about tension here. Happy knitting!
05.10.2020 - 09:07
![]() Marianne escribió:
Marianne escribió:
Hallo, omdat eerdere patronen die ik heb gebreid wat kort uitvielen, wil ik deze graag een centimeter of 5 langer maken. Moet ik dan op 5cm + 4 beginnen met minderen of kan ik beter meer steken opzetten en vaker minderen (ik brei de L). Alvast bedankt
12.03.2020 - 21:36DROPS Design respondió:
Dag Marianne,
Als je het vest alleen langer wilt maken zou ik 5 cm later beginnen met meerderen. Als je hem ook breder wilt maken aan de onderkant zou ik inderdaad meer steken opzetten en eerder beginnen met minderen zodat je daarmee de extra opgezette steken mindert.
22.03.2020 - 11:32
![]() Sheila escribió:
Sheila escribió:
Hi I'm picking up stitches on right band. Do I pick up from bottom or top edge, it says pick up inside 1edge st mid front so I'm a bit confused. Thanks,
20.11.2019 - 18:23DROPS Design respondió:
Dear Sheila, you will knit up the stitches from RS, ie from bottom to top on right front piece and from top to bottom on left front piece. The stitches are picked up inside the first stitch on edge - see for example this video showing how to pick stitches inside 1 edge stitch. Happy knitting!
21.11.2019 - 08:48
![]() Wietske Baars escribió:
Wietske Baars escribió:
Hallo, is het ook mogelijk dit vest op gewone pennen te breien ipv op een rondbreipen? Als dat inderdaad ook zou kunnen, kan u mij dan ook uitleggen hoe? Alvast hartelijk dank.
05.10.2019 - 22:20DROPS Design respondió:
Dag Wietske,
Ja, dat zou wel kunnen bij dit patroon. We hebben een instructie gemaat waarin staat hoe je een patroon aanpast om met rechte naalden te kunnen breien. Deze vindt je hier.
06.10.2019 - 16:30
![]() Anita Monsieur escribió:
Anita Monsieur escribió:
Ikben bezig met de mouwen bij de minderingen moet ik dan aan de beide kanten minderen? Hoeveel steken blijven er over op het einde? Ik brei maat M Alvast bedankt
11.09.2019 - 10:46DROPS Design respondió:
Dag Anita,
Voor maat M minder je 1 keer 4 st + 4 keer 2 st. + 1 keer 1 st aan beide zijden. Dit zijn in totaal 26 steken waardoor je 50 steken over houd. Dan minder je steeds 2 steken aan beide kanten tot het werk 55 cm meet, waarna je nog een keer 3 steken afkant, voordat je de overgebleven steken afkant. Hoeveel steken je over houdt, hangt dus een beetje af van wanneer je op die 55 cm zit (dus je stekenverhouding in de hoogte)
13.09.2019 - 10:16
|
|
Seascapes#seascapescadigan |
|
 |
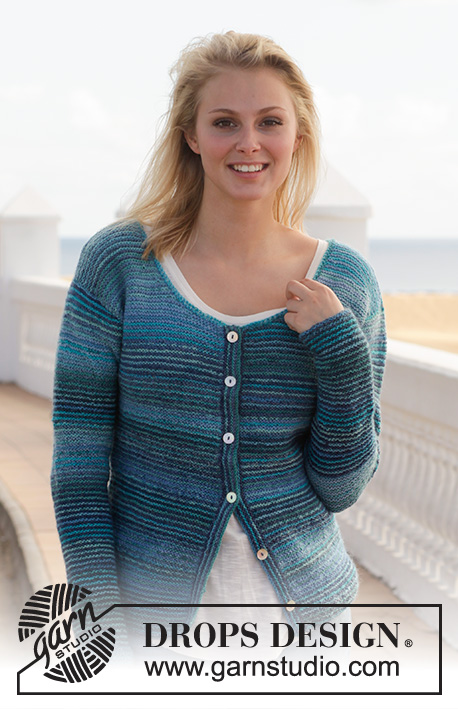 |
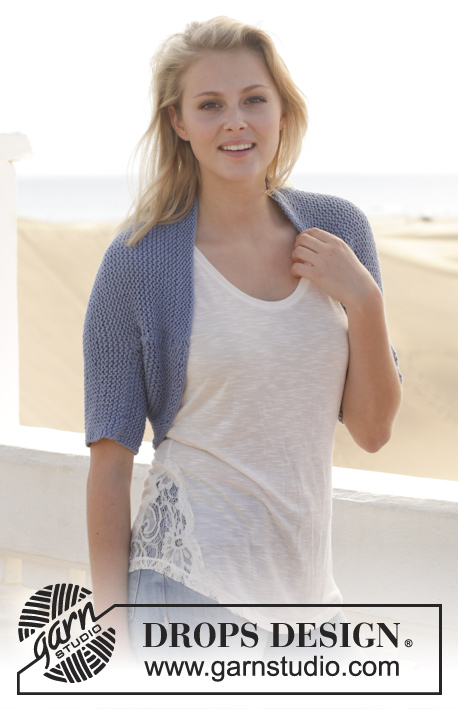
Chaqueta de punto DROPS en punto musgo con "Fabel" y "Delight". Talla: S - X XXL.
DROPS 153-7 |
|
|
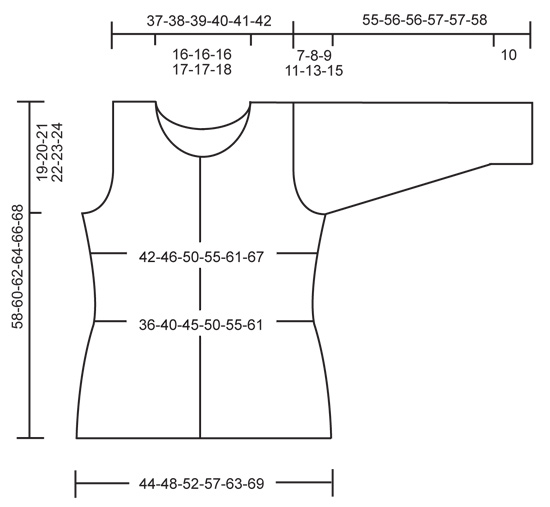
PUNTO MUSGO ( de ida y vta en ag): Trabajar todas las filas de derecho. 1 pliegue = 2 filas de derecho. RAYAS: * 1 pliegue Fabel, 1 pliegue Delight *, repetir de * a * la labor entera. TIP PARA LAS DISMINUCIONES: Dism 1 pt antes del marcapuntos (MP) como sigue: Trabajar hasta que queden 2 pts antes del MP, desl 1 pt como del derecho, 1 d., pasar el pt desl por encima. Dism 1 pt después del MP como sigue: 2 pjd. TIP PARA LOS AUMENTOS: Aum 1 pt a cada lado de cada MP como sigue: Trabajar hasta que quede 1 pt antes del MP, hacer 1 HEB (lazada), 2 d. ( el MP queda entre estos pts), hacer 1 HEB. En la sig fila trabajar las HEB de derecho retorcido ( es decir tejer por detrás del pt en vez de por delante) para evitar que se formen agujeros. -------------------------------------------------------------- CHAQUETA: Se trabaja de ida y vta en ag circular. Mont 184-200-220-240-264-288 pts en ag circular tamaño 4 mm con Delight. Trabajar en PT MUSGO y RAYAS - ver explicaciones arriba. Insertar 2 marcapuntos (MP) en la labor a 46-50-55-60-66-72 pts de cada lado (espalda= 92-100-110-120-132-144 pts). RECUERDE MANTENER LA MISMA TENSIÓN DE LA MUESTRA! Cuando la labor mida 4 cm, dism 1 pt a cada lado de cada MP - LEER TIP PARA LAS DISMINUCIONES ARRIBA! Repetir cada 2 cm un total de 8 vcs = 152-168-188-208-232-256 pts. Cuando la labor mida 24 cm, aum 1 pt a cada lado de ambos MP - LEER TIP PARA LOS AUMENTOS arriba. Repetir cada 2-2-2½-2½-3-3 cm un total de 6 vcs = 176-192-212-232-256-280 pts. Cuando la labor mida 39-40-41-42-43-44 cm, cerrar 6 pts para la sisa a cada lado ( cerrar 3 pts a cada lado de los MP) y finalizar cada parte por separado. ESPALDA: = 82-90-100-110-122-134 pts. Cerrar para la sisa a cada lado al inicio de cada fila como sigue: 2 pts 1-2-4-6-8-10 vcs y 1 pt 0-1-1-1-2-3 vcs = 78-80-82-84-86-88 pts. Cuando la labor mida 54-56-58-59-61-63 cm, cerrar los 30-30-30-32-32-34 pts centrales para el escote y finalizar cada lado por separado. Continuar cerrando 2 pts en la sig fila hacia el escote = 22-23-24-24-25-25 pts restantes para el hombro. Rematar cuando la labor mida 58-60-62-64-66-68 cm. DELANTERO IZQUIERDO: = 41-45-50-55-61-67 pts. Cerrar para la sisa en el lado como se describe para la espalda = 39-40-41-42-43-44 pts. Cuando la labor mida 47-49-50-52-53-55 cm cerrar para el escote. Cerrar 8-8-8-9-9-10 pts, después cerrar 3 pts 1 vez, 2 pts 2 vcs y 1 pt 2 vcs = 22-23-24-24-25-25 pts restantes para el hombro. Rematar cuando la labor mida 58-60-62-64-66-68 cm. DELANTERO DERECHO: = 41-45-50-55-61-67 pts. Trabajar como el delantero izquierdo pero a la inversa. MANGA: Se trabaja de ida y vta en ag circular. Mont 46-48-50-52-54-56 pts en ag circular tamaño 4 mm con Delight. Trabajar en pt musgo y rayas como antes. Cuando la labor mida 10 cm, aum 1 pt dentro de 1 pt orillo a cada lado. Repetir cada 3-2½-2½-2-1½-1½ cm un total de 12-14-15-17-19-20 vcs = 70-76-80-86-92-96 pts. Cuando la labor mida 48-48-47-46-44-43 cm (ATENCIÓN! medidas más cortas en las tallas más grandes debido a una mayor largura de la copa de la manga y una mayor anchura de hombros), cerrar al inicio de cada fila para la copa de la manga como sigue: 4-4-4-3-3-3 pts 1 vez, 2 pts 3-4-4-4-4-4 vcs, 1 pt 0-1-1-3-8-11 vcs, ahora cerrar 2 pts a cada lado hasta que la labor mida 54-55-55-56-56-57 cm. Cerrar 3 pts a cada lado y después rematar los pts restantes. La labor mide aprox 55-56-56-57-57-58 cm. TERMINACIÓN: Hacer la costura de los hombros. Montar y hacer la costura de las mangas CENEFA DEL ESCOTE: Recoger 94-108 pts por el LD con Fabel en ag circular tamaño 4 mm a lo largo del escote. Trabajar 1 pliegue y rematar de derecho por el LR. CENEFA DERECHA: Trabajar de ida y vta en pt musgo y con rayas. Recoger 98-102-106-110-112-114 pts dentro de 1 pt orillo en el borde central del delantero derecho con Delight. Trabajar una fila de derecho por el LR. En la sig fila por el LD cerrar para los 6-6-6-7-7-7 ojales como sigue: 7-6-5-8-4-6 pts de derecho, *2 pjd, 1 HEB floja, 15-16-17-14-15-15 pts de derecho *, repetir de *a* 4-4-4-5-5-5 vcs más (= un total de 5-5-5-6-6-6 vcs ) y finalizar con 2 pjd, 1 HEB y 4 d. En la sig fila trabajar las HEBs de derecho. Continuar en pt musgo y rayas hasta que la cenefa mida aprox 2-2-2-3-3-3 cm, rem flojo todos los pts. CENEFA IZQUIERDA. Trabajar de la misma manera que la cenefa derecha pero sin ojales. Coser los botones. |
|
 |
|
¿Terminaste este patrón?Entonces, etiqueta tus fotos con #dropspattern #seascapescadigan o envíalas a la galería #dropsfan. ¿Necesitas ayuda con este patrón?Encontrarás 18 videos tutoriales, un espacio para comentarios/preguntas y más visitando la página del patrón en garnstudio.com © 1982-2026 DROPS Design A/S. Todos los derechos reservados. Este documento, incluyendo todas sus sub-secciones, está protegido por los derechos de autor (copyright). Lee más acerca de lo que puedes hacer con nuestros patrones en la parte de abajo de cada patrón de nuestro sitio. |
|


Con más de 40 años en el diseño de modelos de punto y de ganchillo, DROPS Design ofrece una de las más vastas colecciones de patrones gratuitos en el internet - traducidos en 17 idiomas. Al día de hoy, contamos con 324 catálogos y 12290 patrones - de los cuales 11675 están traducidos en español.
Nosotros trabajamos con mucho esmero para brindarte lo mejor que las labores de punto y ganchillo tienen para ofrecer,inspiración y consejos, así como hilos de magnífica calidad a precios increíbles! Te gustaría usar nuestros patrones para otro fin además del uso personal? Puedes leer acerca de lo que estás permitida a hacer en el texto de Copyright en la parte de abajo de todos nuestros patrones. Felices labores!
Escribe un comentario sobre DROPS 153-7
¡Nos encantaría saber qué piensas acerca de este patrón!
Si quieres escribir una pregunta referente al patrón, por favor asegúrate de elegir la categoría correcta en el formulario debajo, para acelerar el proceso de respuesta. Los campos obligatorios están marcados con un *.