
Categorías populares
¿Buscas un hilo?


Comentarios / Preguntas (85)
![]() Margaret J Ritchey escribió:
Margaret J Ritchey escribió:
How do I make the "leaves'" / green part at the top of beanie look puffed up. Mine is flat.
16.09.2019 - 23:59DROPS Design respondió:
Dear Mrs Ritchey, it's a bit tricky to answer you here, you might have to try with larger needles. Do not hesitate to bring your work to your store (or send them a picture per mail), they would be able to help you. Happy knitting!
19.09.2019 - 10:03
![]() Gillian escribió:
Gillian escribió:
Could I knit this hat on single point needles ? Thanks
15.09.2019 - 10:11DROPS Design respondió:
Dear Gillian, you will find how to adapt a pattern into straight needles here. Happy knitting!
16.09.2019 - 11:06
![]() Cindy Rand escribió:
Cindy Rand escribió:
Can you tell me how many balls of yarn I need for each color? Orange and Forest Green. Thanks
17.08.2019 - 03:47DROPS Design respondió:
Hello Cindy. Drops Karisma comes in 50 gr balls, so you will need 1 ball of orange for sizes: 0/6 months, 1 year, 2/4 and 5/6 years; 2 balls of orange for size 7/8 years. You also need 1 ball of forest green for all sizes. Happy knitting!
17.08.2019 - 08:32
![]() Catherine escribió:
Catherine escribió:
Je t'ai regardé mais je n'ai rien trouvé, merci de me faire un dessins à savoir quand vous commencez les diminutions et si c'est avec le 1er vert et l'orange juste à droite, en les prenant ensemble. J'ai même essayé de traduire de l'allemand et de l'anglais en français, mais rien vu, ce modèle reste en suspens, dommage, il me faudrait un dessin de près pour voir où les dim. se trouvent ou schéma.
01.04.2019 - 12:37DROPS Design respondió:
Bonjour Catherine, nous n'avons pas de schéma supplémentaires disponibles pour ce modèle, pour toute assistance personnelle complémentaire, merci de bien vouloir demander au magasin où vous avez acheté votre laine, vous pouvez contacter votre magasin DROPS même par mail ou téléphone. Bon tricot!
01.04.2019 - 12:44
![]() Catherine escribió:
Catherine escribió:
Pour les marqueurs c'est ok, après dessin, car vraiment entre deux il n'y en a que 8 mailles, mais d'un marqueur à l'autre marqueur il y en a bien 9. J'ai besoin de savoir quand commence les diminutions de la feuille, après le schéma A2 ou quand on pose les marqueurs soit juste à côté de la première maille verte, au tout début. Merci
01.04.2019 - 11:33DROPS Design respondió:
Bonjour Catherine, on commence à diminuer au 1er tour après A.2. Bon tricot!
01.04.2019 - 12:42
![]() Catherine escribió:
Catherine escribió:
Vous marquez 10 marqueurs, non, pour faire 90, soit 9x9 = 81 plus 9 marqueurs = 90, à revoir car je ne peux pas continuer ce bonnet, je l'ai tricoté jusqu'à 5 h du mat. Merci pour vos réponses. Dommage que je ne puisse pas vous avoir au tél.
01.04.2019 - 10:53DROPS Design respondió:
Bonjour Catherine, vous avez 81 m dans la 1ère taille, vous placez vos marqueurs ainsi: *comptez 9 m, placez 1 marqueur* répétez de *à* tout le tour = vous avez bien 9 marqueur espacés de 9 mailles chacun.
01.04.2019 - 12:40
![]() Catherine escribió:
Catherine escribió:
Bonjour, Pourquoi avec votre fil marqueur vous prenez la maille avant et après d'une autre manière, le tricot ne sera plus la même chose ? en passant le fil dessus et ensuite par l'arrière à l'avant, ça va aussi, non ? il gênera plus, mais tant pis
01.04.2019 - 10:36DROPS Design respondió:
Bonjour Catherine, dans cette vidéo on augmente 1 maille avant et 1 maille après le fil marqueur - dans ce bonnet, on va diminuer 1 maille avant le marqueur. Passez simplement le fil marqueur devant et derrière l'ouvrage comme on le montre dans la vidéo.
01.04.2019 - 12:38
![]() Catherine escribió:
Catherine escribió:
Bonjour, Vous marquez A2 terminer - en même temps diminuer tous les 2 tours, si je regarde votre photo du bonnet, il me semble que je vois toutes la grille A2 faite sans diminution, à partir de quel tous de A2 commencez- vous à diminuer ???? car le 1er et le second à l'air sans diminution, l'explication n'est pas clair, il faut faire le dessin différent et noter dessus avec une flèche où diminuer. Merci.
01.04.2019 - 04:07DROPS Design respondió:
Bonjour Catherine, vous placez un marqueur toutes les 9 mailles et tricotez A.2, et après A.2, vous diminuez 1 m à droite de chaque marqueur (= avant chaque marqueur), dès le 1er tour après A.2 puis tous les 2 tours.
01.04.2019 - 12:36
![]() Catherine escribió:
Catherine escribió:
Je tricote ce bonnet avec du n° 5, que dois-je prendre pour la tige comme n° d'aiguille ? Ce modèle n'a pas l'air facile de son explication, dommage car ça décourage, merci de faire quelque chose plus facile à comprendre. I’m knitting this hat with number 5, what should I take for the shank as a needle? This model doesn’t seem easy to explain, too bad because it discourages, thanks for doing something easier to understand.
30.03.2019 - 19:27DROPS Design respondió:
Bonjour Catherine, ce modèle se tricote sur la base de 22 m x 30 rangs avec des aiguilles 3,5 (ou celles qui vous permettront d'avoir le bon échantillon) - nous ne sommes pas en mesure de pouvoir adapter chacun de nos modèles à chaque demande, n'hésitez pas à contacter - même par mail ou téléphone - le magasin où vous avez acheté votre laine si nécessaire.
01.04.2019 - 12:34
![]() Catherine escribió:
Catherine escribió:
Madame, Apparamment ce modèle est compliqué est contient plusieurs erreurs, pourriez-vous le remettre en ordre pour pouvoir le faire juste. Merci Ma'am, Apparently this template is complicated and contains several errors, could you put it back in order to be able to do it right. Thank you
30.03.2019 - 19:15DROPS Design respondió:
Bonjour Catherine, ce modèle est l'un des plus populaires et aucune erreur - sauf les corrections déjà faites - n'ont été rapportées. Voir ci-dessus les réponses à vos autres questions. Bon tricot!
01.04.2019 - 12:33
|
||||||||||
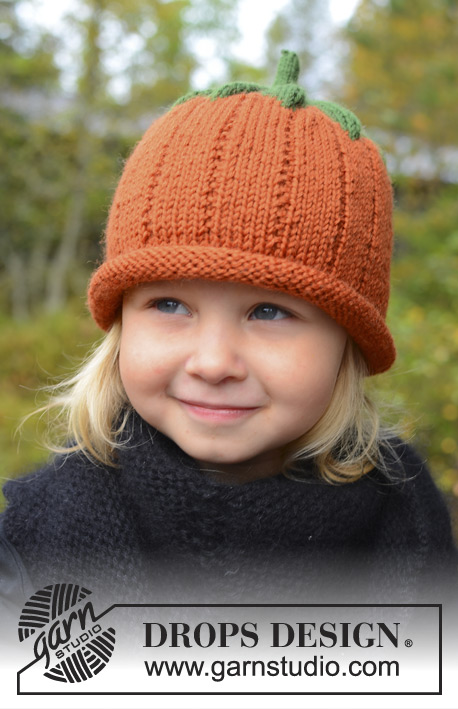
Sweet Pumpkin#sweetpumpkinhat |
||||||||||
 |
 |
|||||||||
Gorro de punto en forma de calabaza para bebé y niños en DROPS Karisma. Tallas 0 – 8 años. Tema: Halloween.
DROPS Extra 0-966 |
||||||||||
|
PATRÓN: Ver diagramas A.1 y A.2. Los diagramas son vistos por el LD. ------------------------------------------------------ GORRO: Mon 84-90-96-102-108 pts con naranja en ag de doble punta o aguja circular tamaño 3.5 mm. Tejer 1 vta de revés, después tejer en pt jersey. ¡Recordar mantener la misma tensión de tejido de la muestra! Cuando la pieza mida 6 cm, insertar 1 marcapuntos (= orilla que se enrolla), ahora medir la pieza a partir de aquí y tejer de acuerdo al diagrama A.1. Cuando la pieza mida 7-8-9-10-12 cm, dism 3-0-6-3-0 pts distribuidos equitativamente = 81-90-90-99-108 pts. Después insertar 9-10-10-11-12 marcapuntos en la pieza con 9 pts de separación entre uno y otro marcapuntos. El primer pt después del primer marcapuntos = primer pt de A.2. Ahora tejer A.2, pero continuar con derechos y reveses como en A.1 en la sección en color naranja. Después de A.2, tejer con verde bosque hasta el fin – AL MISMO TIEMPO, dism a cada 2 vtas: 1 pt en el lado derecho de todos los marcapuntos hasta que resten 9-10-10-11-12 pts en la ag. Cambiar a las ag de doble punta tamaño 2 mm y tejer 3 cm sobre estos pts para el tallo. Pasar el hilo a través de los pts restantes y rem. |
||||||||||
Explicaciones del diagrama |
||||||||||
|
||||||||||
 |
||||||||||
¿Terminaste este patrón?Entonces, etiqueta tus fotos con #dropspattern #sweetpumpkinhat o envíalas a la galería #dropsfan. ¿Necesitas ayuda con este patrón?Encontrarás 11 videos tutoriales, un espacio para comentarios/preguntas y más visitando la página del patrón en garnstudio.com © 1982-2026 DROPS Design A/S. Todos los derechos reservados. Este documento, incluyendo todas sus sub-secciones, está protegido por los derechos de autor (copyright). Lee más acerca de lo que puedes hacer con nuestros patrones en la parte de abajo de cada patrón de nuestro sitio. |
||||||||||


Con más de 40 años en el diseño de modelos de punto y de ganchillo, DROPS Design ofrece una de las más vastas colecciones de patrones gratuitos en el internet - traducidos en 17 idiomas. Al día de hoy, contamos con 324 catálogos y 12278 patrones - de los cuales 11658 están traducidos en español.
Nosotros trabajamos con mucho esmero para brindarte lo mejor que las labores de punto y ganchillo tienen para ofrecer,inspiración y consejos, así como hilos de magnífica calidad a precios increíbles! Te gustaría usar nuestros patrones para otro fin además del uso personal? Puedes leer acerca de lo que estás permitida a hacer en el texto de Copyright en la parte de abajo de todos nuestros patrones. Felices labores!
Escribe un comentario sobre DROPS Extra 0-966
¡Nos encantaría saber qué piensas acerca de este patrón!
Si quieres escribir una pregunta referente al patrón, por favor asegúrate de elegir la categoría correcta en el formulario debajo, para acelerar el proceso de respuesta. Los campos obligatorios están marcados con un *.