
Categorías populares
¿Buscas un hilo?


Comentarios / Preguntas (48)
![]() Lois Busch escribió:
Lois Busch escribió:
Thank you for your prompt reply Im impressed, most helpful Lois
08.07.2024 - 00:22
![]() Lois Busch escribió:
Lois Busch escribió:
#db-026 repeat these 6 rows upwards does that mean k rows 6 to 1 Then when I get to 1 do I start again at 6 or do 1 to 6 then 6 to 1. Thanks
06.07.2024 - 23:57DROPS Design respondió:
Dear Lois, continue working rows 1 to 6 in the same order. Happy knitting!
07.07.2024 - 22:51
![]() Helga Eitel escribió:
Helga Eitel escribió:
Ich habe den Schal ohne Probleme gestrickt. Mit der Mütze habe ich insofern Probleme weil ich nicht weiß wie und wo ich die Gesamtlänge von 50 cm messen soll. Die Mütze hat so eine komische Form mit Beulen dass ich ratlos bin. Bitte geben Sie mir einen Tipp. Vielen Dank.
08.09.2022 - 16:34DROPS Design respondió:
Liebe Frau Eitel, es wird an der längeren Länge gemessen, dhan der rechten Seiten der Arbeit (von der Vorderseite gesehen), wo Sie immer 8 Masche rechts vor der Abnahmen gestrickt haben). Viel Spaß beim stricken!
09.09.2022 - 08:43
![]() Maski escribió:
Maski escribió:
Thanks so much for your quick reply.. now I can get on with knitting the hat tonight. Thank you also for sharing the pattern.
24.06.2021 - 23:04
![]() Maski escribió:
Maski escribió:
Are the instructions given for the hat, for the S size or the L size? I can find only one set of instructions although there are two sizes given at the top.
24.06.2021 - 13:02DROPS Design respondió:
Dear Maski, the number of stitches to cast on is the same for both sizes (hat is worked diagonally, but lengthwise), and work the short rows until piece measures 50 cm (S/M) or 52 cm (M/L) towards the bottom of hat. Happy knitting!
24.06.2021 - 17:34
![]() An escribió:
An escribió:
Wordt er niet eerst een rand gebreid bij de muts aub? Op de foto lijkt het of er een rand is van een 10-15cm alvorens het gedraaide patroon begint. Of ben ik hier fout? Alvast bedankt voor uw antword;
26.04.2021 - 14:08DROPS Design respondió:
Dag An,
De muts wordt zijdelings gebreid, waarbij de eerste 8 steken recht worden gebreid. Deze 8 steken zijn de rand. Doordat er na de rand 2 steken samen worden gebreid en aan het eind 1 omslag wordt gemaakt, ontstaat a.h.w. de afschuining.
29.04.2021 - 14:47
![]() Tessa escribió:
Tessa escribió:
Thank you for answering, but I still don't understand. If I work the entire pattern repeat to create 6 rows, I don't get ribbing on one edge? So is every row typed in the pattern a right side row?
21.03.2021 - 22:56DROPS Design respondió:
Dear Tessa, I'm sorry, I don't udnerstand your meaning there, work the pattern as explained: row 1: K8, K2 tog, K33, YO, K9, turn and on row 2 from WS knit all sts (52 sts). work row 3: K8, K2 tog, K33, YO, K5, turn and on row 4 knit all sts (52 sts). Work Row 5: K8, K2 tog, K33, YO, K1, turn and work row 6 from WS (= 44 sts). Repeat these 6 rows. Happy knitting!
22.03.2021 - 09:41
![]() Tessa escribió:
Tessa escribió:
Hi, even looking through the questions I am confused. When working the wrong side, do I knit every stitch, turn, and resume the pattern on the RS, or do I do the YO/K2tog pattern on the wrong side as well? In other words, are pattern rows counted on the RS only, or is the WS row counted as well - is the pattern repeat 6 or 12 rows total? Thank you
11.03.2021 - 22:23DROPS Design respondió:
Dear Tessa, from wrong side just knit all stitches (knit yarn over twsited to avoid holes) - and repeat the 6 rows (row 1 to 6 as described in the pattern, ie 3 rows from right side with their 3 rows worked from wrong side). Happy knitting!
12.03.2021 - 08:38
![]() Anita Abd escribió:
Anita Abd escribió:
Bonjour je suis débutante et je veux réaliser le bonnet mais je n\'est pas compris comment tricoter en point mousse et en même temps suivre l\'explication !! svp est-ce que je commence par le point mousse et a l\'endroit je suie l\'explication ?? merci infiniment
23.12.2020 - 00:26DROPS Design respondió:
Bonjour Anita, le bonnet se tricote au point mousse, autrement dit, vous allez tricoter toutes les mailles à l'endroit et ce, tous les rangs. Tricotez les 6 rangs comme indiqué et répétez les jusqu'à la hauteur souhaitée. Bon tricot!
23.12.2020 - 07:12
![]() Ria De Klerk escribió:
Ria De Klerk escribió:
In de aangegeven afmeting van de sjaal staat een fout. Er staat daar: maat ongeveer 24 x 150 cm. Ik denk dat daar moet staan: ongeveer 150 cm.
17.11.2020 - 12:31
|
|
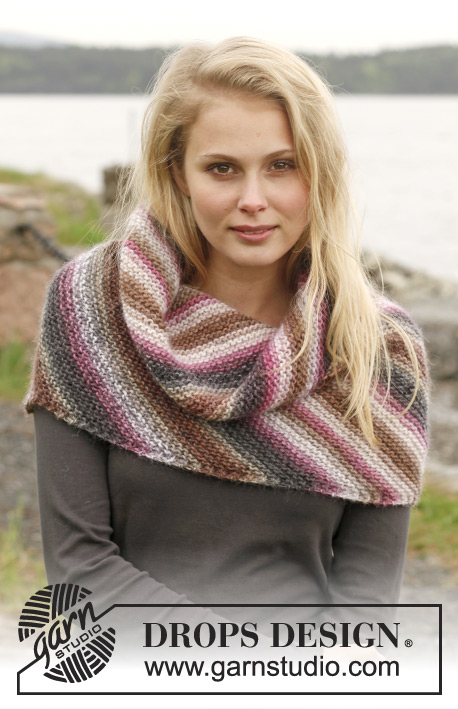
Candy Crush Set#candycrushset |
|
 |
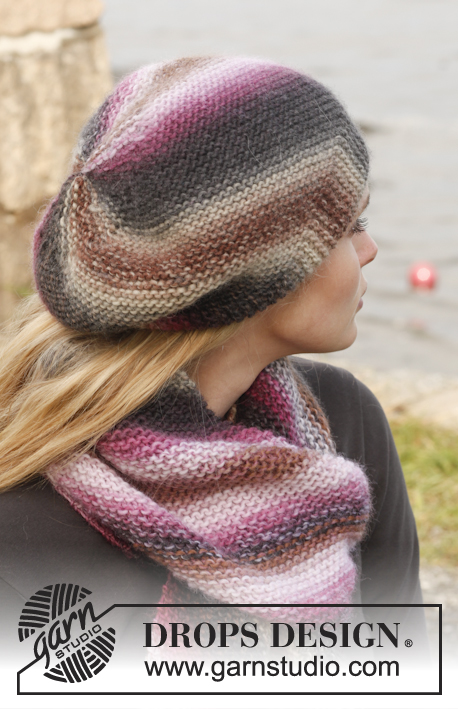 |
El conjunto se compone de: Gorro y bufanda de punto DROPS en punto musgo en ”Big Delight”.
DROPS 151-20 |
|
|
PT MUSGO ( de ida y vta en ag): Trabajar todas las filas de derecho. 1 pliegue = 2 filas de derecho. TIP PARA LOS AUMENTOS: Aum 1 pt haciendo 1 HEB (lazada) después del 1er pt orillo, en la sig fila trabajar la HEB de derecho retorcido ( es decir tejer por detrás del pt en vez de por delante) para evitar que se formen agujeros. TIP PARA LAS DISMINUCIONES: Dism dentro de 1 pt orillo en pt musgo haciendo 2 pjd. ------------------------------------------------------------------------------ GORRO: Trabajar de lado a lado, de ida y vta en ag con filas acortadas. Mont 52 pts en ag tamaño 5 mm con Big Delight. Trabajar en PT MUSGO - ver explicaciones arriba, AL MISMO TIEMPO trabajar como sigue - por el LD: Fila 1- 2: 8 d., 2 pjd. 33 d., 1 HEB, 9 d. Girar y trabajar la vta ( trabajar la HEB como derecho retorcido). Fila 3- 4: 8 d., 2 pjd. 33 d., 1 HEB, 5 d. Girar y trabajar la vta ( trabajar la HEB como derecho retorcido). Fila 5- 6: 8 d., 2 pjd. 33 d., 1 HEB, 1 d. Girar y trabajar la vta (trabajar la HEB como derecho retorcido). Repetir estas 6 filas hacia arriba. Rem cuando la labor mida 50-52 cm de largo (= borde de abajo) TERMINACIÓN: Coser la fila de montaje y la fila del remate de los pts. Pasar el hilo por los puntos del borde superior y fruncir. ----------------------------------------------------- BUFANDA: Se trabaja de ida y vta en ag circular. Mont 3 pts en ag circular tamaño 6 mm con Big Delight. Trabajar en PT MUSGO - ver explicaciones arriba (1ª fila = LD). Después aum 1 pt al inicio de cada fila - leer TIP PARA LOS AUMENTOS. Repetir los aum hasta que haya 49 pts en la ag. La labor mide aprox 23 cm medido por el lado con aum. Continuar en pt musgo como antes, AL MISMO TIEMPO dism 1 pt al inicio de cada fila por el LD - LEER TIP PARA LAS DISMINUCIONES, y continuar los aum como antes al inicio de cada fila por el LR. Continuar con los aum y dism a cada lado de la labor hasta finalizar las medidas (el nº de puntos no varía). Cuando la labor mida 150 cm - medido a lo largo del lado de la bufanda (no en la dirección del tejido) dism 1 pt al inicio de cada fila trabajando 2 pjd. Trabajar hasta que queden 3 pts. Rematar y asegurar los hilos sueltos. |
|
¿Terminaste este patrón?Entonces, etiqueta tus fotos con #dropspattern #candycrushset o envíalas a la galería #dropsfan. ¿Necesitas ayuda con este patrón?Encontrarás 10 videos tutoriales, un espacio para comentarios/preguntas y más visitando la página del patrón en garnstudio.com © 1982-2026 DROPS Design A/S. Todos los derechos reservados. Este documento, incluyendo todas sus sub-secciones, está protegido por los derechos de autor (copyright). Lee más acerca de lo que puedes hacer con nuestros patrones en la parte de abajo de cada patrón de nuestro sitio. |
|


Con más de 40 años en el diseño de modelos de punto y de ganchillo, DROPS Design ofrece una de las más vastas colecciones de patrones gratuitos en el internet - traducidos en 17 idiomas. Al día de hoy, contamos con 324 catálogos y 12290 patrones - de los cuales 11685 están traducidos en español.
Nosotros trabajamos con mucho esmero para brindarte lo mejor que las labores de punto y ganchillo tienen para ofrecer,inspiración y consejos, así como hilos de magnífica calidad a precios increíbles! Te gustaría usar nuestros patrones para otro fin además del uso personal? Puedes leer acerca de lo que estás permitida a hacer en el texto de Copyright en la parte de abajo de todos nuestros patrones. Felices labores!
Escribe un comentario sobre DROPS 151-20
¡Nos encantaría saber qué piensas acerca de este patrón!
Si quieres escribir una pregunta referente al patrón, por favor asegúrate de elegir la categoría correcta en el formulario debajo, para acelerar el proceso de respuesta. Los campos obligatorios están marcados con un *.