
Categorías populares
¿Buscas un hilo?


Comentarios / Preguntas (50)
![]() Martina escribió:
Martina escribió:
Hallo. Der Mustersatz geht bei mir nicht auf. Das heisst, ab dem ich die Reihe mit den Umschlägen stricke wirkt für mich das Muster nicht so wie auf dem Bild. Ich fange mit den ersten 5 rechten Maschen an ( die ersten 2 rechten stricke ich zusammen dann stricke ich 2 Umschläge und dann bleibt noch eine rechte und eine linke Masche übrig. Hier hebe ich die rechte Masche ab und ziehe sie dann über die darauf folgende linke Masche, die ich zuvor rechts strickte? Ist das so richtig? LG Martina
23.03.2022 - 21:07DROPS Design respondió:
Liebe Martina, da Sie gleichzeitig für den Raglanabnehmen haben Sie nach und nach immer weniger Maschen, die in A.1 passen am Anfang und am Ende von jedem Teil (Vorder-, Rückenteil und Ärmel), wenn Sie nicht genügend Maschen um die Abnahmen + Umschlag bei der 3. Reihe zu stricken, dann stricken Sie diese Maschen rechts, aber das Muster muss immer in der Höhe wiederholt werden (also das Muster nicht verschieben, ben den ganzen Muster stricken Sie wie im Diagram gezeigt). Viel Spaß beim stricken!
24.03.2022 - 09:54
![]() Patricia Schwartz escribió:
Patricia Schwartz escribió:
I have placed markers at the beginning of the round and 102stitches apart.( Size med). When beginning the garter section 4 stitches each side of marker on each side . The. Problem is my first marker is at the beginning of my round . To do 4 stitches before an after marker means I would be knitting the entire round finishing up with last 4 stitches garter before starting the next round. When binding these stitches off creates a gap . What did I do wrong?
02.06.2020 - 22:21DROPS Design respondió:
Dear Mrs Schwartz, work the cast off row for armhole as follows: cast off the first 4 sts on round (the first 4 sts in garter st of the round), work until 4 sts remain before next marker, cast off the next 8 sts (= 4 sts before + 4 sts after marker), work until 4 sts remain before end of round, cast off the last 4 sts, cut the yarn and pull it through the last st. Join then yarn again on front piece to work yoke. Happy knitting!
03.06.2020 - 07:06
![]() Sabine escribió:
Sabine escribió:
Hallo, ich möchte diese Tunika mit einem anderen Garn stricken. Mein Garn ist von Lana Grossa und heißt Summer Lace. Es besteht zu 97 % aus Baumwolle und zu 3 % aus Polyester bei einer Lauflänge von 195 m auf 50 g. 25 M und 32 R sollen 10 x 10 cm ergeben. Kann ich dieses Garn verwenden? Wie rechne ich die Maschenzahl um? Vielen Dank für Ihre Unterstützung. Mit freundlichen Grüßen Sabine
02.06.2020 - 18:41DROPS Design respondió:
Liebe Sabine, wir bitten um Verständnis, dass wir nicht Produkte unserer Konkurrenz empfehlen können und dass der Kauf des Materials uns hilft, weiterhin kostenlose Anleitungen zur Verfügung stellen zu können.
03.06.2020 - 06:39
![]() Tracey escribió:
Tracey escribió:
Where do I put markers after complete 6 garter rows. I’m doing 5th size do I put marker in the beg Continue in stockinette st. REMEMBER THE GAUGE! Insert 2 markers in the piece, 88-102-116-130-144 sts apart. When piece measures 7 cm / 2¾'', dec 1 st on each side of markers, repeat dec every 3 cm / 1 1/8'' 5 more times (6 dec in total) = 152-180-208-236-264 sts.
29.01.2020 - 15:03DROPS Design respondió:
Dear Tracey, in 5th size insert 1 marker at the beg of the round and the other marker after 144 sts. Happy knitting!
29.01.2020 - 15:54
![]() Pamela Thomas escribió:
Pamela Thomas escribió:
Good day, I am making this sweater in size M (the second in the stitch count), and I have now had to rip it back multiple times trying to get it to work. If I'm suppose to have 276 stitches when starting the lace pattern, why does the instruction only cover 266 of those stitches. (84+4+42+4+84+42+2=266) I can only assume that this discrepancy is the cause of the pattern not lining up properly with the sleeves. Help?
17.08.2015 - 03:18DROPS Design respondió:
Dear Mrs Thomas, work the 276 sts as follows: K 2, P 2, A.1 over the next 84 sts, K 4 (marker is in the middle of these 4 sts), P 2, A.1 over the next 42 sts, K 4 (marker is in the middle of these 4 sts), P 2, A.1 over the next 84 sts, K 4 (marker is in the middle of these 4 sts), P 2, A.1 over the next 42 sts, K 2 (marker is after these sts). Happy knitting!
17.08.2015 - 09:48
![]() Kirsten escribió:
Kirsten escribió:
Blusen får en meget stor halsåbning, hvis man følger opskriften. Der bør tages væsentlig flere masker ind på de sidste 4 omgange!
13.07.2014 - 12:34Olga Ivanova escribió:
Might be useful to mention that the required gauge is for stockinette in the round.
30.07.2013 - 10:31Nathalie Vergobbi escribió:
Bonjour, Le top ci me plait bcp,voilà,il y a 232 mailles en aiguilles circulaires,je divise en 2 ca fait 116 mailles +2(mailles lisieres),c bien ca?.
18.07.2013 - 20:11DROPS Design respondió:
C'est tout à fait ça, attention pour l'empiècement à bien recalculer pour tomber juste avec les manches/les diminutions. Bon tricot !
19.07.2013 - 09:40Nathalie Vergobbi escribió:
Bonjour, le top se peut se faire avec des aiguilles droites aussi?
18.07.2013 - 20:04DROPS Design respondió:
Bonjour Mme Vergobbi, vous pouvez tout à fait le tricoter en allers et retours si vous le souhaitez, il suffit de répartir les mailles. Attention toutefois à bien recompter pour l'empiècement avec les manches. Bon tricot !
19.07.2013 - 09:38
![]() Marie-france escribió:
Marie-france escribió:
Merci pour la réponse. mais si le marqueur côté est à l'endroit du changement de tour, les augmentation ou diminutions de chaque côté ne seront pas sur le même tour. Cela risque d'être compliqué. De plus, je ne comprend à quel endroit du tricot on doit se trouver pour commencer l'empiècement expliqué au 2ème paragraphe "tricoter ensuite 2 m end, 2 m env, A1....
04.04.2013 - 13:58DROPS Design respondió:
Si vous diminuez comme indiqué dans l'astuce au début des explications, les diminutions seront joliment situées. Vous pouvez aussi tout à fait considérer votre début du tour au milieu dos si vous préférez. Pour l'empiècement, le tour commence avec les mailles du devant (cf 1er tour de l'empiècement). Bon tricot!
04.04.2013 - 15:11
|
||||||||||||||||
Sunny#sunnytunic |
||||||||||||||||
 |
 |
|||||||||||||||
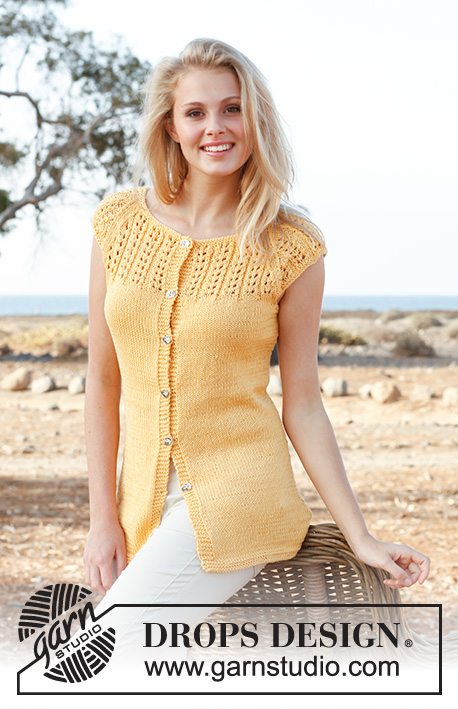
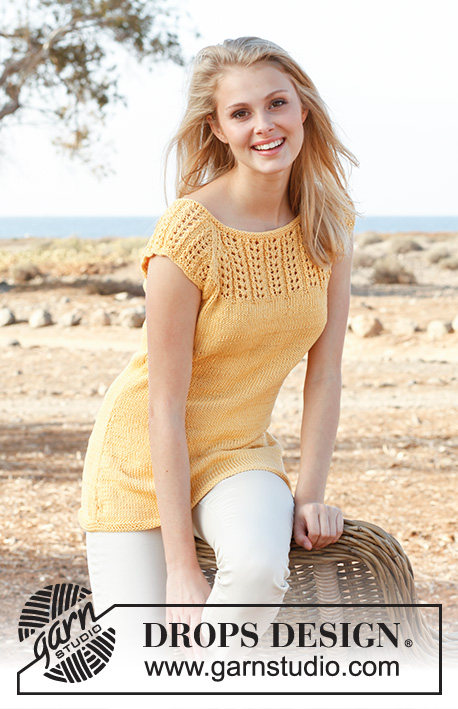
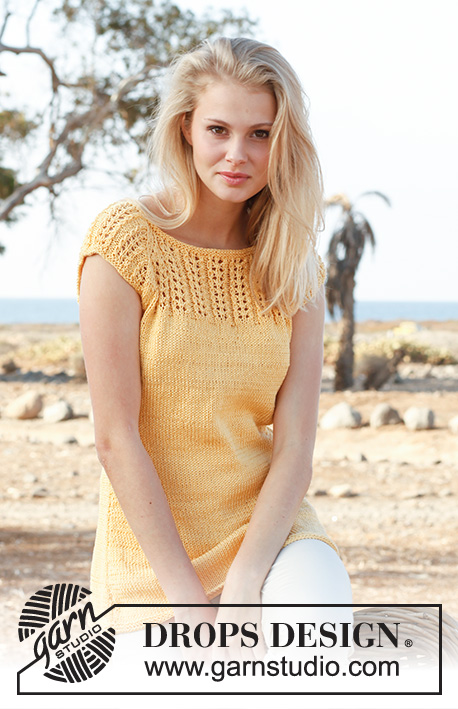
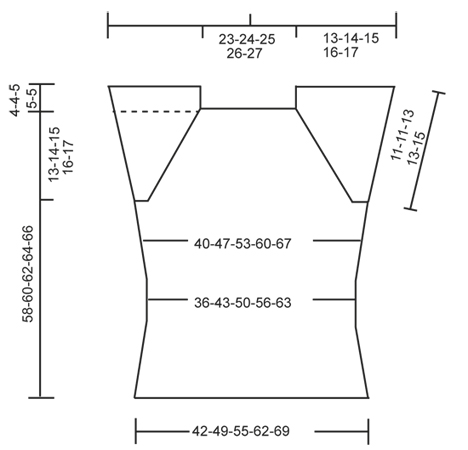
Top de punto DROPS con raglán, mangas cortas y patrón de calados, en “Muskat”. Talla: S – XXXL.
DROPS 147-6 |
||||||||||||||||
|
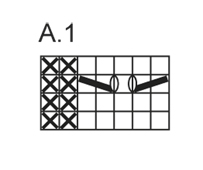
PT MUSGO (en redondo en ag circular): 1 surco= 2 vueltas = * 1 vta de derecho y 1 vta de revés *, repetir de *a*. PATRÓN: Ver diagrama A.1. TIP PARA DISMINUCIÓN: Dism de la manera sig por el LD: Empezar 3 pts antes del marcapuntos: Tejer 2 pjd, 2d (el marcapuntos está en el centro de estos pts), deslizar 1 pt de derecho, 1d, pasar el pt desl por encima. TIP PARA LA ELABORACIÓN DEL TEJIDO: Si la tensión del tejido no es igual a la muestra en altura y el tejido está muy apretado, las dism del raglán quedarán muy cortas y las sisas muy pequeñas. Esto puede ser ajustado tejiendo 1 hilera suplementaria sin dism a intervalos regulares entre las dism. ------------------------------------------------------ ------------------------------------------------------ TOP: Tejido en redondo en ag circular. Mon 176-204-232-260-288 pts en ag circular tamaño 4 mm. Tejer 3 surcos en PT MUSGO – ver explicación arriba. Continuar en pt jersey. RECUERDE MANTENER LA MISMA TENSIÓN DE TEJIDO DE LA MUESTRA! Insertar 2 marcapuntos en la pieza, con 88-102-116-130-144 pts de separación entre uno y otro. Cuando la pieza mida 7 cm, dism 1 pt en cada lado de los marcapuntos, repetir esta dism a cada 3 cm 5 veces más (6 dism en total) = 152-180-208-236-264 pts. Cuando la pieza mida 28 cm, aum 1 pt en cada lado de los marcapuntos, repetir este aum a cada 5-5-5½-5½-6 cm 3 veces más (4 aum en total) = 168-196-224-252-280 pts. Cuando la pieza mida 44-45-46-47-48 cm, tejer en pt musgo sobre 8 pts en cada lado (= 4 pts de cada lado del marcapuntos en cada lado), tejer los pts restantes como antes. Después de haber tejido 4 vtas en pt musgo sobre los 8 pts en cada lado, rem estos 8 pts para las sisas = 152-180-208-236-264 pts. La pieza ahora mide aprox 45-46-47-48-49 cm. PECHERA: Tejer la vta sig de la manera sig: Tejer en pt jersey sobre la pieza del delantero, mon 48-48-55-55-62 nuevos pts sobre la sisa, tejer en pt jersey sobre la pieza de la espalda, mon 48-48-55-55-62 nuevos pts sobre la otra sisa = 248-276-318-346-388 pts. Tejer 3 vtas sobre todos los pts de la manera sig: Tejer en pt musgo sobre los 44-44-51-51-58 nuevos pts centrales para la manga, tejer los otros pts en pt jersey. Insertar 1 marcapuntos en cada lado de los nuevos pts para la manga en cada lado de la pieza (= 4 marcapuntos). LEER TODA LA SECCIÓN SIGUIENTE ANTES DE CONTINUAR! Ahora tejer de la manera sig: 2d, 2r, A.1 sobre los 70-84-98-112-126 pts sig, 4d (el marcapuntos está en el centro de estos 4 pts), 2r, A.1 sobre los 42-42-49-49-56 pts sig, 4d (el marcapuntos está en el centro de estos 4 pts), 2r, A.1 sobre los 70-84-98-112-126 pts sig, 4d (el marcapuntos está en el centro de estos 4 pts), 2r, A.1 sobre los 42-42-49-49-56 pts sig, 2d (el marcapuntos está después de estos pts). En la vta sig, empezar a dism para el raglán en cada una de las 4 transiciones entre el cuerpo y las mangas (es decir, 8 dism por cada vta de dism) – LEER TIP PARA DISMINUCIÓN Y TIP PARA LA ELABORACIÓN DEL TEJIDO! Repetir estas dism a cada 4ª vta 2-3-2-3-2 veces más, y a cada 2 vtas 12-11-15-14-18 veces (15-15-18-18-21 dism en total). Cambiar a una ag circular más corta cuando sea necesario. Después de todas las dism, se tienen 128-156-174-202-220 pts restantes en la vta. Tejer 2 surcos y, AL MISMO TIEMPO, en la 1ª vta, dism 0-10-16-28-34 pts distribuidos equitativamente = 128-146-158-174-186 pts. Rem. |
||||||||||||||||
Explicaciones del diagrama |
||||||||||||||||
|
||||||||||||||||
 |
||||||||||||||||
 |
||||||||||||||||
¿Terminaste este patrón?Entonces, etiqueta tus fotos con #dropspattern #sunnytunic o envíalas a la galería #dropsfan. ¿Necesitas ayuda con este patrón?Encontrarás 15 videos tutoriales, un espacio para comentarios/preguntas y más visitando la página del patrón en garnstudio.com © 1982-2026 DROPS Design A/S. Todos los derechos reservados. Este documento, incluyendo todas sus sub-secciones, está protegido por los derechos de autor (copyright). Lee más acerca de lo que puedes hacer con nuestros patrones en la parte de abajo de cada patrón de nuestro sitio. |
||||||||||||||||


Con más de 40 años en el diseño de modelos de punto y de ganchillo, DROPS Design ofrece una de las más vastas colecciones de patrones gratuitos en el internet - traducidos en 17 idiomas. Al día de hoy, contamos con 324 catálogos y 12290 patrones - de los cuales 11685 están traducidos en español.
Nosotros trabajamos con mucho esmero para brindarte lo mejor que las labores de punto y ganchillo tienen para ofrecer,inspiración y consejos, así como hilos de magnífica calidad a precios increíbles! Te gustaría usar nuestros patrones para otro fin además del uso personal? Puedes leer acerca de lo que estás permitida a hacer en el texto de Copyright en la parte de abajo de todos nuestros patrones. Felices labores!
Escribe un comentario sobre DROPS 147-6
¡Nos encantaría saber qué piensas acerca de este patrón!
Si quieres escribir una pregunta referente al patrón, por favor asegúrate de elegir la categoría correcta en el formulario debajo, para acelerar el proceso de respuesta. Los campos obligatorios están marcados con un *.