
Categorías populares
¿Buscas un hilo?


Comentarios / Preguntas (272)
![]() Confused escribió:
Confused escribió:
Hi! Am currently stuck at the point where instructed :"Now slip the 24-24-26 (28-28) band sts towards mid front on a stitch holder. Then cast on 2 new sts at the end of row from RS (towards neck)" Where are the 2 new sts to be added? Between the 24 band(garter) sts and the stocking sts? Or right at the beginning of the 24 band sts? Instructions say "towards neck" but the 24 sts are on stitch holder... Are these extra sts to be worked in garter or stocking sts? Thank you
07.06.2025 - 13:26DROPS Design respondió:
Dear Confused, you cast on at the very end of the row from the right side, next to where you placed the 24 sts on the stitch holder. So on the side where you moved stitches for the neck you will now cast on 2 stitches. The 24 stitches are later used for the hood, while the back will be worked over the stitches on the needles, including the stitches newly cast on. These stitches are worked in stocking stitch. Happy knitting!
08.06.2025 - 15:15
![]() Em escribió:
Em escribió:
I really appreciate all the lovely free patterns, but I’m really struggling to understand this one. The pattern says “ Cast on 43-47-51 (56-59) sts (incl 1 edge st in the side and 24-24-26 (28-28) band sts ”. As I am knitting the second size, would I cast on 47 sts total or do I cast on 47+1+24 for a total of 72 sts? I began by simply casting on 47 sts but after knitting for a bit, the resulting piece of knitting looks much too small (although my gauge matches the pattern). Thank you!
25.02.2025 - 13:58DROPS Design respondió:
Dear Em, you should cast on 47 stitches only, the 24 sts for the front band stiches are already included in the number of stitches, so that you will work the bottom ridges: 23 sts stocking stitch and 24 stitches garter stitch, seen from RS. Make sure to keep same tension as swatch. Happy knitting!
26.02.2025 - 10:37
![]() Mindy escribió:
Mindy escribió:
Also, is the edge stitch a garter stitch? I don't see it explained anywhere in the pattern. Thanks!
17.12.2024 - 18:05DROPS Design respondió:
Dear Mindy, you can work the edge stitch on the side(s) in garter stitch if you want; but there is no extra edge stitch, the edge stitches are included in the number of stitches to cast on. Happy knitting!
20.12.2024 - 08:16
![]() Mindy escribió:
Mindy escribió:
Hello! I love your patterns and am excited to start this one! Question: You don't state whether the odd or even rows are right side or wrong side, at the start. So how do I know, after knitting the 6 garter stitch rows, whether the next row is a RS or WS to start the stockinette section? Thanks for your help!
17.12.2024 - 17:47DROPS Design respondió:
Hi Mindy, The first row after the ridges in garter stitch is from the right side. So all the odd rows onwards are from the right side. Happy Christmas!
18.12.2024 - 07:05
![]() Ann escribió:
Ann escribió:
In the Drops Buttercup baby jacket, what does 'after every other cm mean? Is that every alternate cm or is it after every following cm ? This instruction is in the jacket front and in the hat where it will make a definite difference whether it's after every cm or after two cms. Thank you in advance. Your answer to my question on 28.10 was very clear and helpful. Thank for your answer.
28.11.2024 - 18:26DROPS Design respondió:
Dear Ann, it means you will alternate. So you work the short rows, then work 1cm normally, work short rows again, now work 2cm normally, work short rows, then work 1cm normally, e.t.c. Happy knitting!
07.12.2024 - 19:09
![]() Ann Stevens escribió:
Ann Stevens escribió:
Drops buttercup baby jacket; a further question. When piece measures 19---30 cm, then repeat short rows every other cm. until finished measurements. Does every other cm mean alternate centimetres, so after two cm do two short rows? Or do you mean after each cm do the short rows? Thank you. Ann Stevens
15.11.2024 - 07:15
![]() Ann Stevens escribió:
Ann Stevens escribió:
Drops Buttercup baby jacket. Still confused. Left front; ready to start short rows. Wrong side facing, knit band garter stitches, then turn and knit back to front edge. Second row is knit all the way across to side edge. Is that the two rows in garter stitch? Then continue in pattern for another 4cm and repeat short rows etc. etc. please help.
28.10.2024 - 19:36DROPS Design respondió:
Dear Mrs Stevens, starting from WS knit the first 24-28 (see size) stitches (front band); turn (leaving the remaining stitches unworked) and work these stitches from RS ; turn and work now the first 12-14 sts only, turn (leaving the remaining sts unworked), and work these stitches from RS, turn and work now all stitches as before. You have worked 4 rows for short rows; repeat on every 4th cm (and then on every 2nd cm). Happy knitting!
29.10.2024 - 08:59
![]() Carol escribió:
Carol escribió:
Buttercup sweater. Short rows. Very confusing for me. Do you garter st the band, then turn, then knit row back? Then is work 2 garter rows only over outermost 12 sets part of the short row? I know how to do short rows but can’t figure this out the way it’s written. HELP!
05.06.2024 - 01:49DROPS Design respondió:
Dear Carol, yes, when you knit the short rows, you knit the band stitches, turn, knit back, turn at the edge, and then knit the whole row. HERE is a video that might help you. Happy Knitting!
05.06.2024 - 02:03
![]() Reta Warren escribió:
Reta Warren escribió:
Can you knittering in wool
12.04.2024 - 05:51
![]() Mariagrazia escribió:
Mariagrazia escribió:
Ho realizzato il cardigan e le scarpine per una bimba di pochi mesi, seguendo le istruzioni, e il risultato è veramente bello. Per quanto abbia tenuto ben stretto il filo, purtroppo i buchi ai giri di ritorno con i ferri accorciati sono molto visibili, e un po' rovinano l'estetica del cardigan. Apprezzo comunque la morbidezza che il capo ha acquistato proprio con la tecnica dei ferri accorciati,darebbe bello trovare una soluzione all'inconveniente. Grazie
15.10.2023 - 20:37
|
|
Buttercup#buttercupset |
|
 |
 |
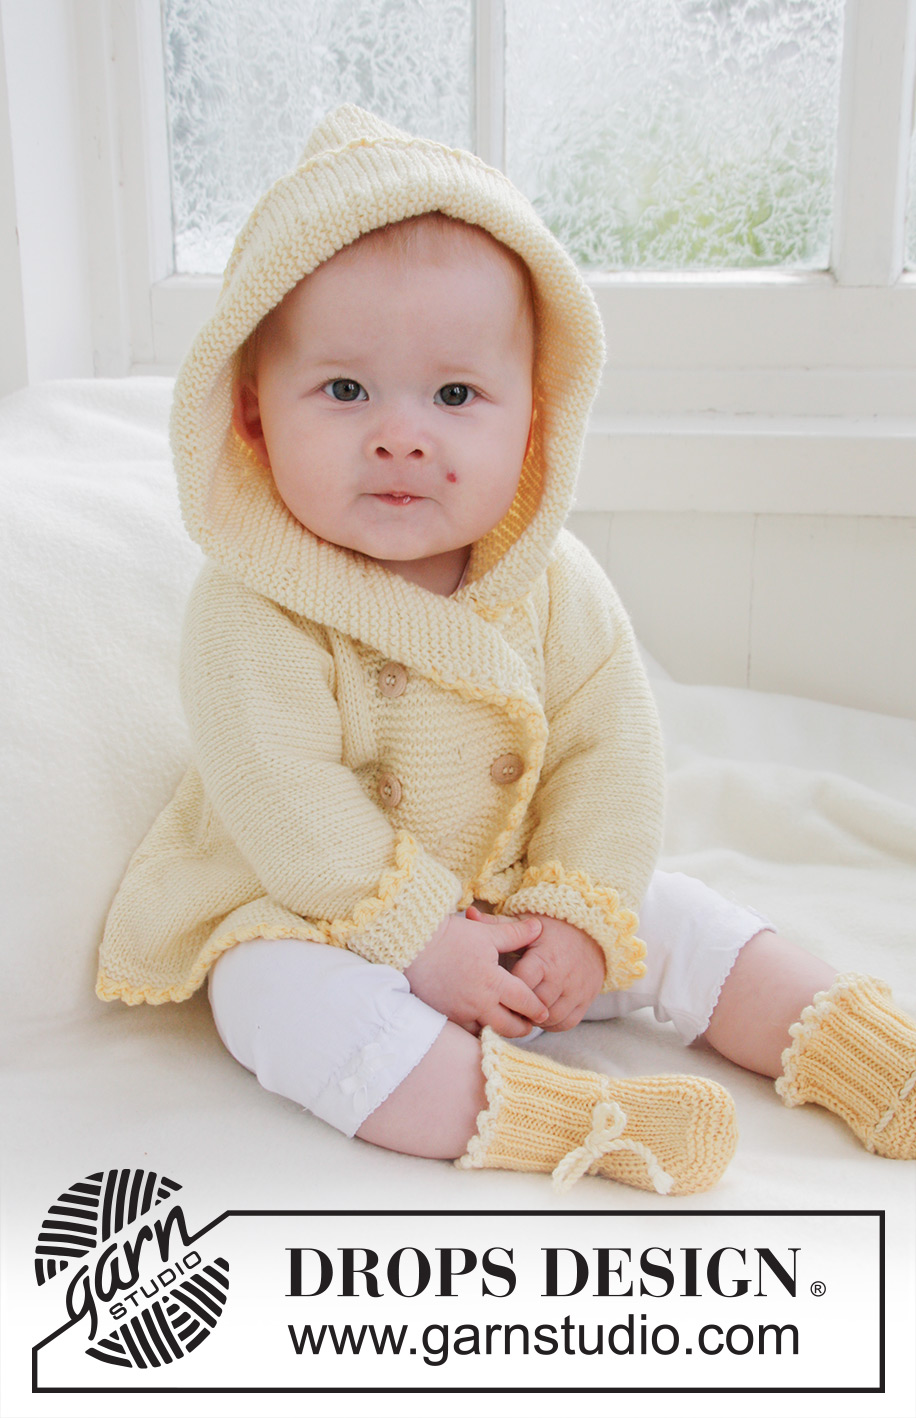
Saco de punto con capucha y patucos para bebés y niños en DROPS BabyMerino.
DROPS Baby 21-1 |
|
|
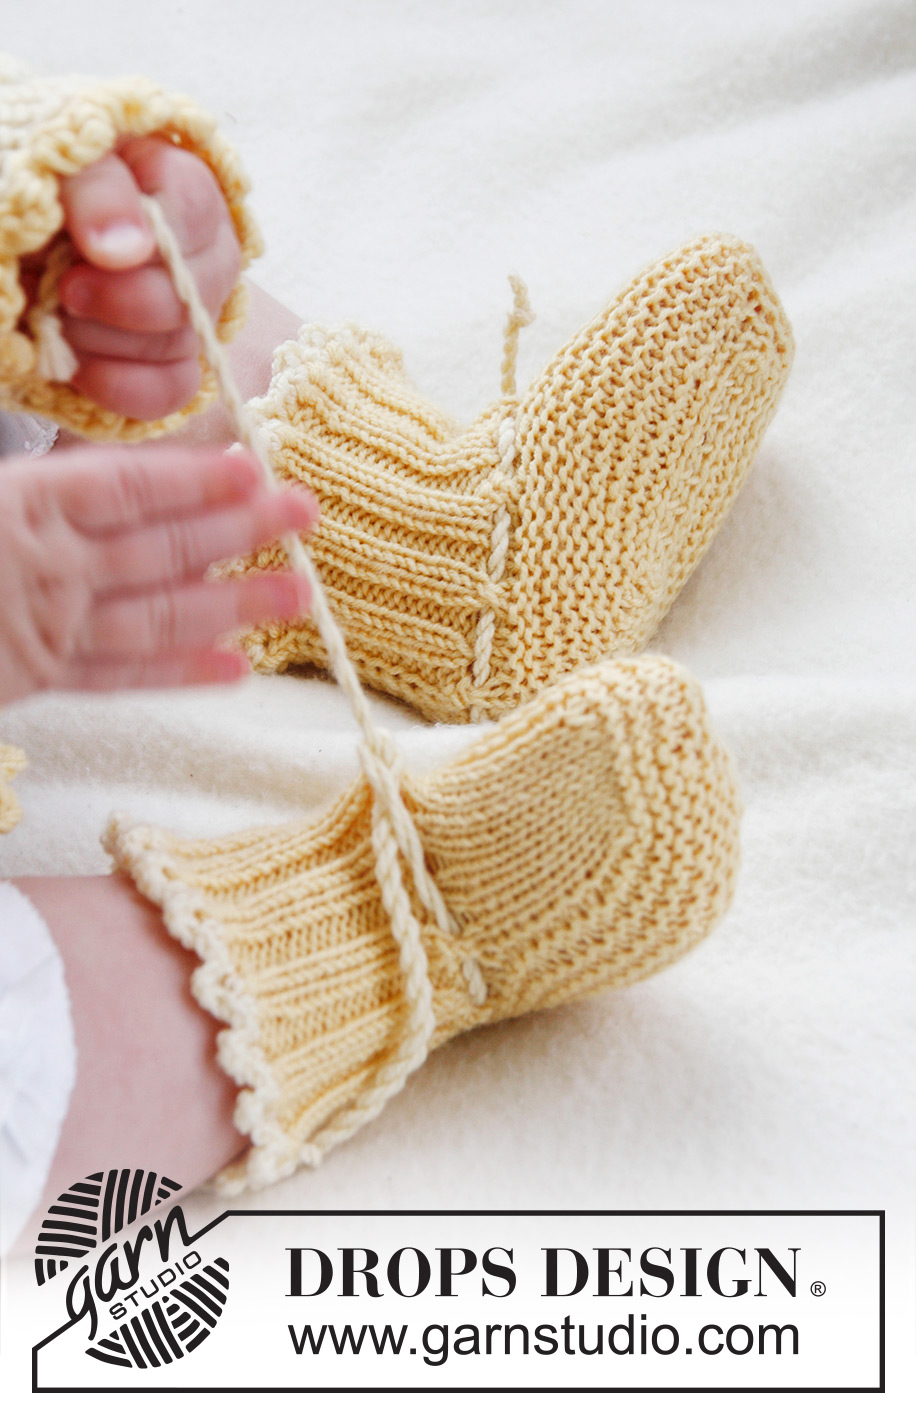
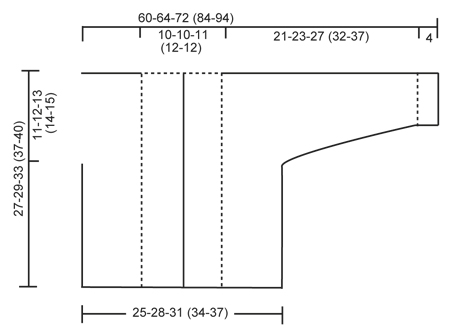
PT MUSGO (de ida y vuelta en la ag): Todas las vtas de derecho. VUELTAS CORTAS: * Tejer 2 vtas en pt musgo sobre los 24-24-26 (28-28) pts del borde, tejer 2 vtas en pt musgo únicamente sobre los 12-12-13 (14-14) pts externos. NOTA: En el momento de virar en el centro de la pieza, deslizar el primer pt, tensar el hilo y continuar como antes. Esto se hace para evitar que se formen agujeros en las transiciones *. OJALES: El saco tiene botonadura doble. Rem para 4 ojales en el borde derecho. 1 OJAL = Tejer juntos de derecho el 4º y el 5º pt a partir de la orilla y hacer 1 HEB (lazada). En la misma vta también tejer juntos de derecho el 4º y el 5º ÚLTIMOS pts en el borde, hacer 1 HEB. Rem para 2 ojales cuando la pieza mida: TALLA 1/3 MESES: 14 y 19 cm TALLA 6/9 MESES: 16 y 21 cm TALLA 12/18 MESES: 18 y 24 cm TALLA 2 AÑOS: 20 y 27 cm TALLA 3/4 AÑOS: 22 y 30 cm ------------------------------------------------------ SACO: Tejido de ida y vuelta en ag circular. Empezar en la pieza del frente, mon pts para la manga y tejer hasta el hombro. Tejer la otra pieza del frente, juntar las dos piezas del frente y tejer hacia abajo en la pieza de la espalda. DELANTERO IZQUIERDO: Leer toda la sección siguiente antes de continuar! Mon 43-47-51 (56-59) pts (incl 1 pt de orillo en el lado y 24-24-26 (28-28) pts del borde en el centro del frente) en ag tamaño 2.5 mm con Baby Merino. Tejer 6 vtas en PT MUSGO – ver explicación arriba. Cambiar a ag circular tamaño 3 mm y tejer en pt jersey, mas continuar tejiendo los 24-24-26 (28-28) pts del borde en el centro del frente en pt musgo. Cuando la pieza mida 4 cm, tejer VUELTAS CORTAS – ver explicación arriba (1ª vta = por el LR). Repetir de *a* 1 vez a cada 4 cm hasta que la pieza mida 19-21-24 (27-30) cm, después repetir de *a* 1 vez a cada 2 cm hasta completar las medidas. AL MISMO TIEMPO, cuando la pieza mida 16-17-20 (23-25) cm, mon pts nuevos al final de cada vta por el LR (en el lado de la manga): 6 pts 2-2-3 (3-3) veces, 8 pts 1-1-1 (2-3) veces y 21-22-22 (25-26) pts 1 vez = 84-89-99 (115-127) pts para el hombro/manga. Tejer los pts aum en pt jersey. Cuando todos los pts han sido montados, continuar en pt jersey y pt musgo como antes y, AL MISMO TIEMPO, también tejer los 10 pts externos en la manga en pt musgo. Cuando la pieza mida 27-29-33 (37-40) cm, insertar un marcapuntos (MP) = centro en la parte de arriba del hombro. Ahora deslizar los 24-24-26 (28-28) pts del borde en el centro del frente en un gancho o seguro aux. Después mon 2 pts nuevos al final de la vta por el LD (de lado del escote), y repetir el aum en la vta sig de lado del escote = 64-69-77 (91-103) pts en la ag. Tejer 1 vta por el LR. Colocar todos los pts en un gancho o seguro aux. DELANTERO DERECHO: Mon y tejer como lo hizo en el delantero izquierdo, pero a la inversa. Adicionalmente, rem para los OJALES en el borde – ver explicación arriba. NOTA! Deslizar los pts en un gancho o seguro aux después de la última vta con aum (es decir, última vta = por el LR). ESPALDA: Tejer la pieza del delantero izquierdo en la ag circular, mon 16-16-18 (20-20) pts nuevos (= parte de atrás del escote) y tejer la pieza del delantero derecho en la ag circular = 144-154-172 (202-226) pts. AHORA MEDIR LA PIEZA A PARTIR DE LOS MARCAPUNTOS EN LOS HOMBROS. Continuar en pt jersey y pt musgo al final en cada manga , de ida y vuelta en la ag. Cuando la pieza mida 8½-9½-10 (10-11) cm, empezar a rem los pts de las mangas. Rem al inicio de cada vta, en cada lado, de la manera sig: 21-22-22 (25-26) pts 1 vez, 8 pts 1-1-1 (2-3) veces y 6 pts 2-2-3 (3-3) veces = 62-70-76 (84-90) pts en la ag. Continuar en pt jersey con 1 pt de orillo en cada lado. Cuando la pieza mida aprox 26-28-32 (36-39) cm – doblar la pieza en dos en los MP en los hombros y asegurarse que la pieza de la espalda sea del mismo largo que la pieza del delantero hasta las vtas en pt musgo, cambiar a ag tamaño 2.5 mm y tejer 6 vtas en pt musgo, después rem. TERMINACIÓN: Hacer las costuras de las mangas y laterales a 1 pt del pt de orillo. Coser los botones. CAPUCHA: Levantar aprox 102-106-112 (118-122) pts (incl los pts de los ganchos o seguros aux en el frente – NOTA: Si más/menos pts han sido levantados, dism/aum equitativamente en la 1ª vta. Continuar en pt musgo sobre todos los pts y, AL MISMO TIEMPO, tejer vueltas cortas en cada lado a cada 2 cm – VER EXPLICACIÓN ARRIBA. Rem cuando la capucha mida aprox 21-23-25 (27-28) cm. Unir la capucha con una costura prolija en la parte de arriba – coser en la hebra delantera del pt externo para evitar que se forme una costura abultada. ORILLA EN GANCHILLO: Trabajar una orilla alrededor de todo el saco. Empezar en la parte de abajo de la pieza delantera derecha con 2 hilos amarillo Baby Merino y ag de ganchillo tamaño 3 mm, de la manera sig: Hacer 1 p.b., * 3 cad, 1 p.a. en la 1ª cad, saltar aprox ½ cm, 1 p.b. en el pt sig *, repetir de *a*. Trabajar de la misma manera alrededor de las aberturas en las mangas. PATUCO: El patuco es tejido de ida y vuelta a partir del centro de la parte de atrás. Mon 48-52-56 (56) pts en ag tamaño 2.5 mm con 2 hilos amarillo Baby Merino. Retirar 1 hilo y tejer resorte (= 2d/2r) por 5-6-6 (7) cm – ajustar para que la vta sig sea tejida por el LR. Tejer 1 vta de revés por el LR y al mismo tiempo dism 14-14-18 (14) pts distribuidos equitativamente = 34-38-38 (42) pts. En la vta sig tejer ojetes, de la manera sig, por el LD: 1d, * 2 pjd, 1 HEB *, repetir de *a* y terminar con 1d. Tejer 1 vta de revés por el LR. Ahora deslizar los 12-13-13 (15) pts externos en cada lado en un gancho o seguro aux. Tejer 4-4½-5½ (6½) cm en pt jersey sobre los 10-12-12 (12) pts centrales. Deslizar los pts de los ganchos o seguros aux de regreso en la ag y levantar 10-11-13 (16) pts en cada lado de la pieza del centro = 54-60-64 (74) pts en la ag. Tejer cada vta de derecho sobre todos los pts por 3-4-5 (5) cm y, al mismo tiempo, después de 1½-2-2½ (3) cm, dism en vtas alternas, de la manera sig, hasta completar: Dism 1 pt al inicio y al final de la vta y tejer 2 pjd en cada lado de los 2 pts centrales. Rem y unir con una costura en el centro de la parte de abajo del pie y continuar hacia arriba en el centro de la parte de atrás, en la hebra delantera de los pts externos, para evitar que se forme una costura abultada. Tejer el otro patuco de la misma manera. CORDONES: Cortar 3 hilos amarillo claro de aprox 1 metro, retorcerlos juntos firmemente, doblarlos en dos y se retorcerán nuevamente, hacer un nudo en cada extremo. Pasar el cordón de arriba hacia abajo a través de los ojetes en el patuco. ORILLA EN GANCHILLO: Con ag de ganchillo tamaño 2.5 mm y amarillo claro, trabajar una orilla en la parte de arriba del patuco, de la manera sig: 1 p.b. en el primer pt, * 3 cad, 1 p.a. en la 1ª cad, saltar aprox ½ cm, 1 p.b. en el pt sig *, repetir de *a* y terminar con 1 p.bjs en el p.b. del inicio de la vta. |
|
 |
|
¿Terminaste este patrón?Entonces, etiqueta tus fotos con #dropspattern #buttercupset o envíalas a la galería #dropsfan. ¿Necesitas ayuda con este patrón?Encontrarás 21 videos tutoriales, un espacio para comentarios/preguntas y más visitando la página del patrón en garnstudio.com © 1982-2026 DROPS Design A/S. Todos los derechos reservados. Este documento, incluyendo todas sus sub-secciones, está protegido por los derechos de autor (copyright). Lee más acerca de lo que puedes hacer con nuestros patrones en la parte de abajo de cada patrón de nuestro sitio. |
|


Con más de 40 años en el diseño de modelos de punto y de ganchillo, DROPS Design ofrece una de las más vastas colecciones de patrones gratuitos en el internet - traducidos en 17 idiomas. Al día de hoy, contamos con 324 catálogos y 12290 patrones - de los cuales 11675 están traducidos en español.
Nosotros trabajamos con mucho esmero para brindarte lo mejor que las labores de punto y ganchillo tienen para ofrecer,inspiración y consejos, así como hilos de magnífica calidad a precios increíbles! Te gustaría usar nuestros patrones para otro fin además del uso personal? Puedes leer acerca de lo que estás permitida a hacer en el texto de Copyright en la parte de abajo de todos nuestros patrones. Felices labores!
Escribe un comentario sobre DROPS Baby 21-1
¡Nos encantaría saber qué piensas acerca de este patrón!
Si quieres escribir una pregunta referente al patrón, por favor asegúrate de elegir la categoría correcta en el formulario debajo, para acelerar el proceso de respuesta. Los campos obligatorios están marcados con un *.