
Categorías populares
¿Buscas un hilo?


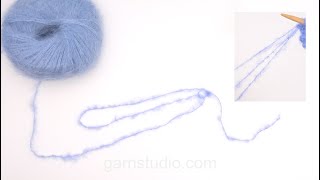
Montaje de puntos – con bucles (anillos)

Patrones que utilizan esta técnica


Video #4, listado en: Aprende a hacer punto, Cómo montar puntos, Variaciones del montaje de puntos básico
Nuestros videos no tienen sonido. Somos una empresa internacional y nuestros videos son vistos por personas que hablan diferentes idiomas y muchas de ellas no comprenden el español. Consecuentemente, como no hay un idioma determinado a usar por nosotros, hemos escrito las instrucciones que acompañan el video, y no hay ningún sonido que interfiera mientras se ve el video.
Puedes ajustar la velocidad de este video haciendo clic en el ícono en la barra de reproducción.
Dejar un comentario o pregunta acerca de este video
Tu dirección de email no será publicada. Los campos obligatorios están marcados con un *.
También te podría gustar...


Con más de 40 años en el diseño de modelos de punto y de ganchillo, DROPS Design ofrece una de las más vastas colecciones de patrones gratuitos en el internet - traducidos en 17 idiomas. Al día de hoy, contamos con 324 catálogos y 12291 patrones - de los cuales 11689 están traducidos en español.
Nosotros trabajamos con mucho esmero para brindarte lo mejor que las labores de punto y ganchillo tienen para ofrecer,inspiración y consejos, así como hilos de magnífica calidad a precios increíbles! Te gustaría usar nuestros patrones para otro fin además del uso personal? Puedes leer acerca de lo que estás permitida a hacer en el texto de Copyright en la parte de abajo de todos nuestros patrones. Felices labores!
How do I cast on 3 sts behind the stiches on the stich holder for the thumb ?
08.03.2021 - 18:22DROPS Design :
Dear Anita, this video shows (time code 02:35) how to cast on new stitches for thumb over the stitches increased/put on a stitch holder for thumb. Hope this will help. Happy knitting!
09.03.2021 - 08:09Enkelt och pedagogiskt som alla de andra videorna som hjälpt mig genom många stickprojekt! Tack!
19.07.2020 - 08:44Jeg elsker og strikke men har aldri klart og lage løkker men etter denne videoen så har jeg klart det❤️❤️❤️Tusen takk
13.11.2019 - 15:40I learned the thumb cast on, but it had one more step. Before I slip the yarn off the left thumb, I take the other strand of yarn. And cast over the needle with right hand. Then slip the thumb loop over the top of the needle and pull both strands snug. It make a good solid cast-on, almost like the cast-on was a knitted row. Hope this makes sense. Not sure how to do a video, but hope you try to see if it works for you.
09.02.2015 - 00:11Heel goede instructiefilm, ik kan breien sinds mijn zesde en dit is hoe je moet opzetten
08.08.2014 - 15:25Bedankt erg handig.
29.09.2012 - 22:15Dere blir bare bedre og bedre
25.09.2009 - 21:13