
Categorías populares
¿Buscas un hilo?


Comentarios / Preguntas (66)
![]() Linda Langlois escribió:
Linda Langlois escribió:
Bonjour, mon questionnement se situe au début du rang 7 c'est-à-dire: est-ce que je commence par une maille endroit selon le graphique ou si je dois faire le M.1A (2 mailles) avant le commencer le M.1B. Le nombre de répétition du motif est-il 4 fois comme le rang 3? J'ai essayé de le faire en commençant par 1 m. end., 1 jeté et en continuant avec le M.1B et en terminant le rang par 1 m. end. mais j'arrive à 5 répétitions au lieu de 4. Est-ce correct?
07.11.2019 - 15:10DROPS Design respondió:
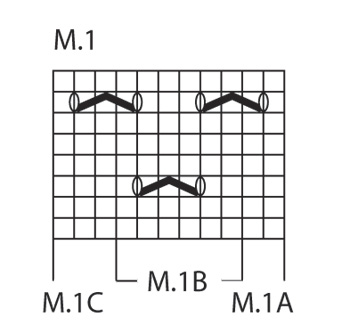
Bonjour Mme Langlois, vous devez toujours tricoter: 1 x M.1A, puis vous répétez M.1B et terminez par M.1C, au 7ème rang de M.1, tricotez les 2 premières m de A, puis vous répétez les mailles de B et terminez par les mailes de C - cf réponse ci-dessous pour le détail des mailles du 7ème rang. Bon tricot!
07.11.2019 - 15:23
![]() Linda Langlois escribió:
Linda Langlois escribió:
: M.1A (= 2 sts), then repeat M.1B a total of 4 times in width (= 24 sts) and finish with M.1C (= 3 sts) = 2+24+3= 29 stitches. Happy knitting! mais pour le rang 7???
05.11.2019 - 19:10
![]() Linda Langlois escribió:
Linda Langlois escribió:
Pouvez-vous m'explique le rang 7 du diagramme par rapport au rang 3? J'essaie de comprendre le M.1B Merci
05.11.2019 - 18:22DROPS Design respondió:
Bonjour Mme Langlois, au rang 7 de M.1, vous tricotez: 1 m end, 1 jeté (= 2 m pour A), glissez la m suivante (=la dernière m de A, 2 m ens à l'end, m glissée par-dessus m tricotée), 1 jeté, 3 m end, 1 jeté (= M.1B), tricotez maintenant la dernière m de M.1B avec les 2 premières m du M.1B suivant (puis de M.1C la dernière fois). Bon tricot!
06.11.2019 - 08:43
![]() Christine escribió:
Christine escribió:
I am almost ready to decrease for the toe shaping...once again, I do not understand...I have 52 stitches, but the pattern says separate 25 stitches , for the underfoot and 25 stitches for the upper foot...what happens to the other 2 sts?, sigh...sorry to be such a pain...
03.10.2019 - 02:34DROPS Design respondió:
Dear Christine, there should be 25 stitches for both upper and under foot + 1 stitch with marker on each side = 52 sts in total. Happy knitting!
03.10.2019 - 09:29
![]() Kendall escribió:
Kendall escribió:
Christine,thanks for your help I appreciated it😊I figured out to put the 35 stitches to the side by talking it over with my sister,she knits too,and the comment just confirmed it which is great and if you still need help on when to start the lace pattern,you start the lace pattern the row after you pick up the 14 side stitches go across the top of the sock and pick up the other 14 stitches once you get back to the 29 stitches that’s when you do the lace pattern I hope I helped😊
01.10.2019 - 15:40
![]() Christine escribió:
Christine escribió:
Kendall, clearly I was wrong. This is not a typo error. As you can see from the answers. I was wrong and hope I have not confused you. now I understand. if you need help, don’t be shy, I can now help 😊
01.10.2019 - 02:06
![]() Christine escribió:
Christine escribió:
Thank you for your answer. Does that mean that I should put 3 stitches from the 35 to the 14 stitches picked up on both sides, and work the decrease including those 3 stitches? Thank you.
30.09.2019 - 14:11DROPS Design respondió:
Dear Christine, you will decrease before the 29 stitches (first 3 from the 35 sts are worked with the picked up stitches in stocking stitch) and after the 29 stitches in pattern (= the last 3 from the 35 sts are worked with the picked up sts in stocking st), ie these 3 sts on either side of the 29 middle sts will be worked in stocking stitch and decreased for instep. Happy knitting!
30.09.2019 - 16:04
![]() Christine escribió:
Christine escribió:
At what point do you start working with the Diagram please? I am totally confused. I am at the point where I have picked up 14 stitches on both sides as well as the 35 stitches that were on the stitch holder. I now have 76 stitches on the needles, but I am unsure how to proceed at this point. With big thanks in advance.
28.09.2019 - 20:03DROPS Design respondió:
Dear Christine, once you get the 76 sts on the needle (= heel is now worked),k you now work the stitches from under foot in stocking stitch (= over the first 3 sts from the 35 sts slipped on a thread + the last 3 sts from these 35 sts (=29 sts remain for upper foot) + the stitches from heel while decreasing for instep and work the 29 stitches (upper foot, the stitches slipped on a thread) in pattern: : M.1A (= 2 sts), then repeat M.1B a total of 4 times in width (= 24 sts) and finish with M.1C (= 3 sts) = 2+24+3= 29 stitches. Happy knitting!
30.09.2019 - 10:26
![]() Christine escribió:
Christine escribió:
Kendall, I just started this yesterday and came across the same problem. I figured it out to be simply a typo, and followed the pattern with 35 (for the medium sock). It is working out perfectly like that. I hope this helps.
28.09.2019 - 18:49
![]() Kendall escribió:
Kendall escribió:
How come you go from 35 stitches on top of the foot to 29?wheres the rest of the stitches?and then at the end when you work the toe where’s the missing two stitches?
28.09.2019 - 16:28
|
|||||||
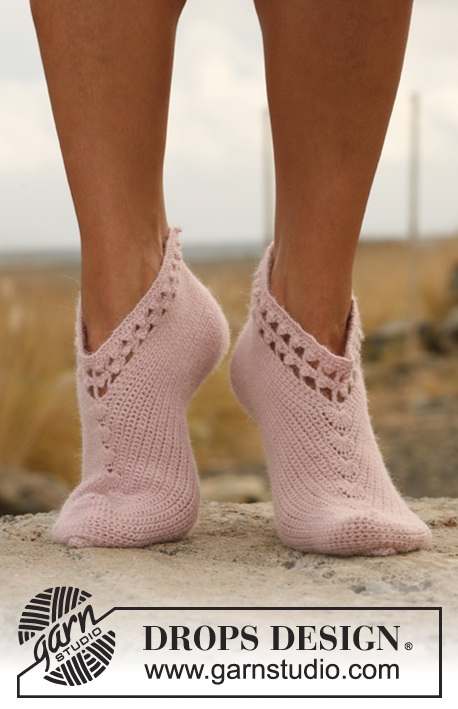
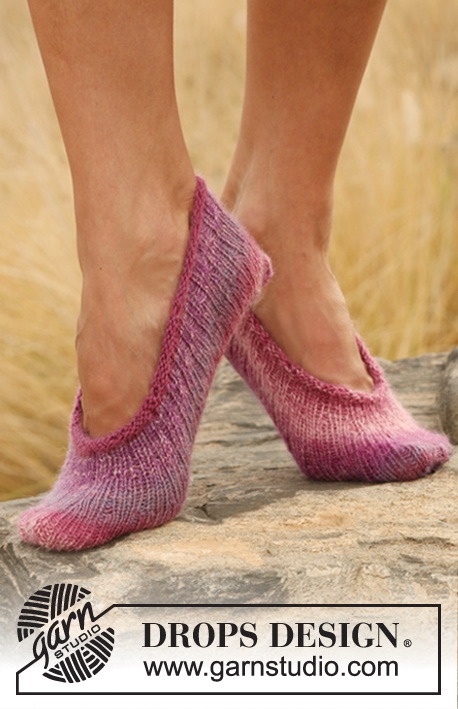
Neptunia Socks#neptuniasocks |
|||||||
|
|
|||||||
Calcetines tobilleros de punto DROPS con calado en "Fabel".
DROPS 129-18 |
|||||||
|
PATRÓN: Ver el diagrama M.1. TIP PARA LA DISMINUCIÓN DEL TALÓN: FILA 1 (=LD): Trabajar la fila hasta que queden 5-5-6 pts, desl el sig pt del derecho, 1 d., pasar el pt desl por encima, girar la labor. FILA 2 (=LR): Trabajar la fila hasta que queden 5-5-6 pts, desl el sig pt del revés, 1 r., pasar el pt desl por encima, girar la labor. FILA 3 (=LD): Trabajar la fila hasta que queden 4-4-5 pts, desl el sig pt del derecho, 1 d., pasar el pt desl por encima, girar la labor. FILA 4 (=LR): Trabajar la fila hasta que queden 4-4-5 pts, desl el sig pt del revés, 1 r., pasar el pt desl por encima, girar la labor. Continuar las dism de esta manera con 1 pt menos antes de cada dism hasta que queden 13-13-15 pts en la ag. ---------------------------------------------------------- CALCETÍN: Se trabaja en redondo con ag de doble punta. Mont 50-56-60 pts en ag de doble punta tamaño 2.5 mm con Fabel. Trabajar 1 vta de derecho, continuar en pt elástico = 1d./ 1r. un total de 2-2-3 cm. Ahora dejar los primeros 21-21-25 pts en la ag para el talón y desl los últimos 29-35-35 pts a un gancho aux (= empeine). Trabajar en pt jersey de ida y vta en los pts del talón un total de 5-5.5-6 cm. Insertar un MP en el centro del talón - ahora medir la labor desde aquí! Dism para el talón - ver TIP PARA LA DISMINUCIÓN DEL TALÓN! Después de las dism del talón, recoger 13-14-15 pts a lo largo de cada lado del talón y desl los 29-35-35 pts desde el gancho aux de vta a la ag = 68-76-80 pts. Insertar un MP a cada lado de los 29-29-35 pts centrales en el empeine. Continuar en pt jersey en la planta del pie, trabajar los 29-29-35 pts del empeine como sigue: M.1A (=2 pts), repetir M.1 B sobre los sig 24-24-30 pts (=4-4-5 vcs) y finalizar con M.1 C (= 3 pts). AL MISMO TIEMPO dism a cada lado como sigue: Trabajar juntos de derecho retorcido (es decir por detrás del pt en vez de por delante) los últimos 2 pts antes de los 29-29-35 pts y trabajar juntos de derecho los primeros 2 pts después de los 29-29-35 pts centrales del empeine. Repetir estas dism cada 2ª vta un total de 10-12-12 vcs = 48-52-56 pts. Continuar hasta que la labor mida 18-19-22 cm desde el MP del talón (= quedan aprox 4-5-5-cm). Insertar un MP en el primer pt de cada lado de manera que haya 23-25-27 pts para la planta del pie y 23-25-27 pts del empeine.Continuar en pt jersey sobre todos los pts , AL MISMO TIEMPO dism para la punta del pie a cada lado del los MP como sigue - comenzar 2 pts antes del MP: tejer juntos del derecho los 2 pts, 1 d. (el MP está en este pt) ,2 pts juntos del derecho retorcido. Continuar la dism a cada lado en cada 2ª vta un total de 4-7-6 vcs y luego en cada vta un total de 6-4-6 vcs = 8 pts quedan en la ag. Cortar el hilo, pasar a través de los pts restantes, fruncir y asegurar. |
|||||||
Explicaciones del diagrama |
|||||||
|
|||||||
 |
|||||||
¿Terminaste este patrón?Entonces, etiqueta tus fotos con #dropspattern #neptuniasocks o envíalas a la galería #dropsfan. ¿Necesitas ayuda con este patrón?Encontrarás 18 videos tutoriales, un espacio para comentarios/preguntas y más visitando la página del patrón en garnstudio.com © 1982-2026 DROPS Design A/S. Todos los derechos reservados. Este documento, incluyendo todas sus sub-secciones, está protegido por los derechos de autor (copyright). Lee más acerca de lo que puedes hacer con nuestros patrones en la parte de abajo de cada patrón de nuestro sitio. |
|||||||


Con más de 40 años en el diseño de modelos de punto y de ganchillo, DROPS Design ofrece una de las más vastas colecciones de patrones gratuitos en el internet - traducidos en 17 idiomas. Al día de hoy, contamos con 324 catálogos y 12290 patrones - de los cuales 11675 están traducidos en español.
Nosotros trabajamos con mucho esmero para brindarte lo mejor que las labores de punto y ganchillo tienen para ofrecer,inspiración y consejos, así como hilos de magnífica calidad a precios increíbles! Te gustaría usar nuestros patrones para otro fin además del uso personal? Puedes leer acerca de lo que estás permitida a hacer en el texto de Copyright en la parte de abajo de todos nuestros patrones. Felices labores!
Escribe un comentario sobre DROPS 129-18
¡Nos encantaría saber qué piensas acerca de este patrón!
Si quieres escribir una pregunta referente al patrón, por favor asegúrate de elegir la categoría correcta en el formulario debajo, para acelerar el proceso de respuesta. Los campos obligatorios están marcados con un *.