
Categorías populares
¿Buscas un hilo?


Comentarios / Preguntas (40)
![]() Cath Bat escribió:
Cath Bat escribió:
Modèle 122- 6 Col châle. J'ai relevé 150 mailles et dois tricoter 1 rang end sur envers. En même temps il faut ajuster le nbre de mailles à 167 173 179 etc... Je ne comprends pas. Faut- il ajouter 29 mailles pour la taille L ? Pourquoi ne pas indiquer le nbre exact de mailles à relever dès le début ? Merci.
05.09.2025 - 18:55DROPS Design respondió:
Bonjour Mme Bat, le nombre de mailles que vous allez relever peut dépendre de différents facteurs, mais pour le col, vous devez ensuite ajuster le nombre de mailles à 179, si vous en avez relevé 150, alors vous allez effectivement augmenter 29 mailles au tout premier rang, utilisez la caculette en bas de page si besoin. Bon tricot!
08.09.2025 - 10:02
![]() Beatriz Sánchez escribió:
Beatriz Sánchez escribió:
Referente a este modelo la sisa me gustaría hacerla más ancha, para que no me quede ajustada. ¿Tengo que coger una talla más de la manga o cómo podría hacer la modificación? Haré el jersey de talla L, ¿puedo hacer las mangas con la talla XL? Y la última pregunta, ¿el ancho se mide con la medida del pecho dividiéndola en dos partes iguales? Gracias.
04.11.2023 - 22:49
![]() Sherry escribió:
Sherry escribió:
Thank you for your reply. I assume after casting off the 8 Stitches at underarm I continue in back and forth stocking stitch until the top and THEN decrease to form the cap of the sleeve? I was always taught the cap of the sleeve started at the underarm and went to the shoulder, but I gather this pattern is different.
26.01.2023 - 05:11DROPS Design respondió:
Dear Sherry, you first cast off (not decrease) 8 sts mid under sleeve, then continue back and forth on needle from mid under sleeve casting off at the beginning of each row on each side (= both from RS and WS) for the sleeve cap: 2 sts 3 times (= 2 sts at the beg of next 6 rows), etc.. so that you cast off the same number of sts on each side of the sleeve. So this pattern is not different. Happy knitting!
26.01.2023 - 10:18
![]() Sherry escribió:
Sherry escribió:
It says to continue until sleeve measures 22”, which is less than 3” from start of underarm decrease (19 1/4”.) With all of the decreases ( including the initial 8) this only adds up to 9 rows, which is nowhere near the 7 1/2” to fit into the body of the sweater.
24.01.2023 - 18:27DROPS Design respondió:
Dear Sherry, sleeve should be 22½'' in total minus 19 1/4" when you start sleeve cap - ie a total of 3,25" = ca 8 cm. Hope it can help. Happy knitting!
25.01.2023 - 11:40
![]() Sherry escribió:
Sherry escribió:
Hi Drops Design… Thank you for your prompt reply. At the underarm of the sleeve I had 58 stitches and 19 1/4” in length, as per the pattern. I bound off 8 stitches ( all in 1 row- now 50 stitches) under the arm, then 2 stitches at the beginning of the row 3 times ( 6 rows and now 44 stitches, and 1 stitch once both sides(2 rows-42 stitches).
24.01.2023 - 18:25DROPS Design respondió:
Dear Sherry, the total length of sleeve cap for size S should be 8 cm (see chart) and all the cast off stitches should be sewn along the whole armhole, should you have increased then cast off as in the pattern, then the sleeve should fit nicely around armhole. Happy knitting!
25.01.2023 - 11:37
![]() Sherry escribió:
Sherry escribió:
I am making this sweater in size small and the body piece from the underarm to the shoulder is 7 1/2” , however when I knit the sleeve the length from the underarm to the shoulder is only 3 inches. Is there a correction for the sleeve cap, as 3” is far too small. Thank you and I look forward to your reply.
22.01.2023 - 05:05DROPS Design respondió:
Hi Sherry, The sleeve cap and top of sleeve should fit into the armhole (so be bigger than your 3 inches). Have you followed all the increases correctly and worked the sleeve cap back and forth to finish? Happy knitting!
22.01.2023 - 08:16
![]() Eva-Helena Hall escribió:
Eva-Helena Hall escribió:
Hej ! På denna beskrivning står det att man ska lägga upp maskor från båda garnsorterna samtidigt, då undrar jag varför man tipsar att byta nystan så att färgerna stämmer vid bytet av nystan?????? Eva-Helena
07.01.2022 - 12:51
![]() Janet Ter Meer escribió:
Janet Ter Meer escribió:
Bij het afslanken voor de mouw staat aan het begin van elke naald. Is dat dan elke heen en teruggaande naald of alleen elke heengaande naald. Dit laatste heb ik namelijk gedaan maar dit lijkt mij niet juist.
10.12.2019 - 21:22DROPS Design respondió:
Dag Janet,
Je kant voor de mouw af aan het begin van elke naald, dus zowel op de heengaande als de teruggaande naald.
12.12.2019 - 09:01
![]() Kath Wilmott escribió:
Kath Wilmott escribió:
I hope this is the last question I have to ask, but on the collar instructions, it says "work all sts from stitch holder and every 3 sts work this together with next st." Does this mean knit 2 together on every three sts, which will mean decreasing 6 sts on each stitch holder totalling 12 sts. So why then does it say I should have 202 sts left? because, I had 202 stitches before I started the decreases, therefore, I should have 190 sts left.??
26.11.2019 - 22:16DROPS Design respondió:
Dear Mrs Willmott, when you worked the short rows, you left 3 sts unworked at the end of each row. When working all stitches back, you might have a small gap every third stitch due to the short rows. To avoid these gaps, pick up the thread before the next stitch and put it twisted on needle and work these both stitch (= thread picked up + next stitch) together; this will happen every 3rd stitch = this won't change your number of stitches, you should still have 202 sts at the end of this row. Happy knitting!
27.11.2019 - 07:55
![]() Kath Wilmott escribió:
Kath Wilmott escribió:
Sorry, me again! Are you sure you mean dec. '3' stitches because the pattern says '2' stitches 3 times? Also you say 'then 1 stitch 2 times (4 decreaes) ? Surely 1 x 2 is 2, not 4?
28.10.2019 - 17:37DROPS Design respondió:
Hi Kath, Each decrease is at both ends of the row - each time you start a new row you cast off; so decrease 1 two times means 1 at each end x 2, so 4 stitches decreased. Hope this helps.
29.10.2019 - 07:15
|
|
Autumn Sunset#autumnsunsetsweater |
|
|
|
|
Pulóver DROPS tejido en “Delight” y “Alpaca” con cuello chal. Talla: S – XXXL.
DROPS 122-6 |
|
|
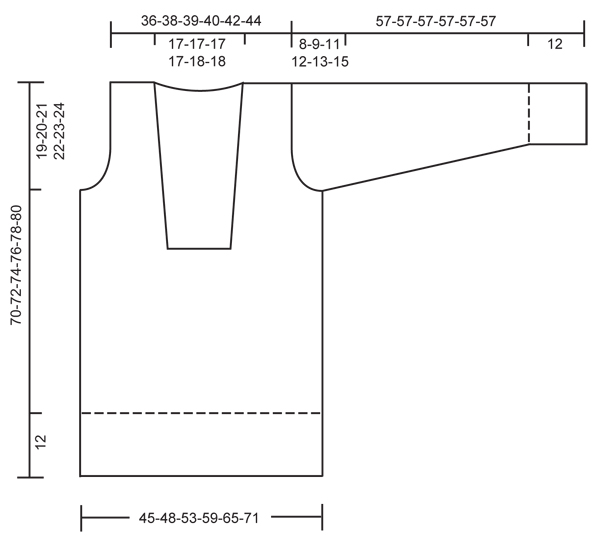
TIP PARA CAMBIAR DE OVILLO DE LANA: Para que las transiciones de color en Delight queden prolijas al momento de cambiar de ovillo de lana, es importante encontrar un ovillo que empiece con la misma tonalidad con la que terminó el último ovillo. PT MUSGO (de ida y vuelta en la ag): Tejer todas las hileras de derecho. TIP PARA DISMINUCIÓN (aplica a la línea del escote): Hacer todas las dism por el LD. Dism de la manera sig al inicio de la hilera: 1d, deslizar 1 pt de derecho, 1d, pasar el pt desl por encima. Dism de la manera sig al final de la hilera: Tejer la hilera hasta que resten 3 pts, tejer 2 pjd y 1d. ------------------------------------------------------ CUERPO: Tejido en redondo. Ver TIP PARA CAMBIAR DE OVILLO DE LANA! Mon 228-240-270-300-330-360 pts en ag circular tamaño 4 mm con 1 hilo de cada calidad. Tejer 1 vta en pt jersey y continuar en resorte 3d/2r. Cuando la pieza mida 12 cm, cambiar a ag circular tamaño 5 mm. Tejer 1 vta de derecho y, AL MISMO TIEMPO, tejer juntos de derecho cada 2º y 3er pt a lo largo de toda la vta = 152-160-180-200-220-240 pts. Continuar en pt jersey. Insertar un marcapuntos al inicio de la vta y 1 marcapuntos después de 76-80-90-100-110-120 pts (para marcar los lados). RECUERDE MANTENER LA MISMA TENSIÓN DE TEJIDO DE LA MUESTRA! Cuando la pieza mida 37-38-39-40-41-42 cm, tejer la vta sig de la manera sig: 27-29-34-39-43-48 pts derechos, 22-22-22-22-24-24 pts reveses, y después tejer de derecho los pts restantes de la vta. Tejer la vta sig de la manera sig: 28-30-35-40-44-49 pts derechos, rem 20-20-20-20-22-22 pts (= para el escote al centro del frente), tejer de derecho los pts restantes de la vta hasta donde los pts fueron rem. Ahora continuar de ida y vuelta en la ag a partir del centro del frente con 1 pt en PT MUSGO – ver arriba – en cada lado del escote. LEER TODA LA SECCIÓN SIGUIENTE ANTES DE CONTINUAR! DISM PARA EL ESCOTE: Cuando la pieza mida 42-43-44-45-46-47 cm, dism 1 pt en cada lado del escote – VER TIP PARA DISMINUCIÓN! Repetir la dism a cada 5 cm un total de 4 veces. SISA: Al mismo tiempo, cuando la pieza mida 51-52-53-54-55-56 cm, rem 8 pts en cada lado para la sisa (es decir, 4 pts en cada lado del marcapuntos). Completar cada pieza por separado. DELANTERO IZQUIERDO: Continuar dism para el escote – AL MISMO TIEMPO, rem para la sisa al inicio de cada hilera a partir del lado: 2 pts 1-1-2-4-5-6 veces y 1 pt 1-2-4-4-5-7 veces. Cuando todas las dism estén terminadas, se tienen 17-18-19-20-21-22 pts en el hombro. Continuar hasta que la pieza mida 70-72-74-76-78-80 cm, rem. DELANTERO DERECHO: Como la pieza del delantero izquierdo, mas en sentido inverso. ESPALDA: = 68-72-82-92-102-112 pts. Rem para la sisa al inicio de cada hilera, en cada lado, como se describe para la pieza del frente = 62-64-66-68-72-74 pts. Cuando la pieza mida 68-70-72-74-76-78 cm, rem los 24-24-24-24-26-26 pts centrales para el escote y completar cada hombro por separado. Rem 2 pts en la línea del escote en la hilera sig = 17-18-19-20-21-22 pts restantes en el hombro. Rem cuando la pieza mida 70-72-74-76-78-80 cm. MANGA: Tejida en redondo. Mon 48-48-54-54-60-60 pts con 1 hilo de cada calidad en ag de doble punta tamaño 4 mm. Tejer 1 vta de derecho y continuar en resorte 3d/3r. Cuando la pieza mida 12 cm, cambiar a ag de doble punta tamaño 5 mm y continuar en pt jersey. Insertar un marcapuntos al inicio de la vta = centro debajo de la manga. Cuando la pieza mida 14 cm, aum 1 pt en cada lado del marcapuntos, repetir el aum a cada 8-5-6-4-4.5-3 cm un total de 5-7-6-8-7-9 veces = 58-62-66-70-74-78 pts. Cuando la pieza mida 49-48-46-45-44-42 cm (menos para las tallas más grandes debido a copete de manga más largo y a una mayor anchura de hombros) rem 8 pts al centro debajo de la manga y completar la pieza de ida y vuelta en la ag. Rem para el copete de la manga al inicio de cada hilera, en cada lado: 2 pts 3 veces y 1 pt 1-2-4-5-6-9 veces, después 2 pts en cada lado hasta que la pieza mida 56 cm, ahora rem 3 pts 1 vez en cada lado. Rem los pts restantes, la pieza mide aprox 57 cm para todas las tallas. TERMINACIÓN: Hacer las costuras de los hombros. CUELLO CHAL: El cuello es tejido de ida y vuelta en ag circular a partir del centro del frente. Levantar los pts con 1 hilo de cada calidad en ag circular tamaño 4 mm, a 1 pt del pt de orillo, de la manera sig: aprox 60 a 70 pts a partir de donde los pts fueron rem para el escote al centro del frente y a lo largo del lado derecho del escote, aprox 30 a 33 pts a lo largo de la línea del escote en la pieza de la espalda y 60 a 70 pts descendiendo a lo largo del otro lado del escote = aprox 150 a 173 pts. NOTA: No levantar pts en los 20-20-20-20-22-22 pts rem al centro del frente. Tejer 1 hilera de derecho por el LR y, al mismo tiempo, ajustar el número de pts a 167-173-179-185-191-197 pts. Tejer la hilera sig, de la manera sig, por el LD: 1 pt en pt musgo, * 3d, 3r *, repetir de *a* y terminar con 3d y 1 pt en pt musgo. Continuar en resorte de esta manera – AL MISMO TIEMPO insertar un marcapuntos después de 43 pts a partir de cada lado (= 81-87-93-99-105-111 pts entre los marcapuntos). Cuando el cuello mida 3 cm, aum 1 pt en cada una de las 13-14-15-16-17-18 secciones de pts reveses (visto por el LD) entre los marcapuntos, tejiendo 2r en el pt central = 180-187-194-201-208-215 pts. Cuando el cuello mida 5-5-5-6-6-6 cm, aum 1 pt en cada una de las 14-15-16-17-18-19 secciones de pts derechos (visto por el LD) entre los marcapuntos, tejiendo 2d en el pt central = 194-202-210-218-226-234 pts. Continuar con derecho sobre derecho y revés sobre revés hasta que el cuello mida aprox 6-6-6-7-7-7 cm (ajustar para que la hilera sig sea por el LD). Tejer los primeros 25 pts como antes, ahora deslizarlos a un gancho o seguro aux, tejer la hilera hasta que resten 25 pts y deslizar estos pts a un gancho o seguro aux. Continuar como antes en los pts restantes y, al mismo tiempo, deslizar 3 pts al final de cada hilera a los ganchos o seguros aux un total de 6 veces en cada lado (= un total de 43 pts en cada gancho o seguro aux). El cuello ahora mide 12-12-12-13-13-13 cm de ancho al centro de la espalda. En la hilera sig (= por el LR) tejer todos los pts del gancho o seguro aux en el lado derecho de la pieza de regreso a la ag (para evitar que se formen agujeros, levantar 1 pt cada vez que los pts fueron deslizados al gancho o seguro aux – es decir, 3 pts – y tejer este pt junto con el pt sig). En la hilera sig, tejer todos los pts del gancho o seguro aux en el lado izquierdo de la pieza de regreso a la ag de la misma manera = 194-202-210-218-226-234 pts. Tejer la hilera sig, por el LR, de la manera sig: Tejer derecho sobre derecho y revés sobre revés hasta que resten 24 pts, ahora mon 4 nuevos pts para el ojal de hebilla, continuar hasta que resten 15 pts, mon 4 nuevos pts para el ojal de hebilla, continuar hasta que resten 6 pts, mon 4 nuevos pts para el ojal de hebilla, tejer los pts restantes. En la hilera sig, rem todos los pts con derecho sobre derecho y revés sobre revés – rem los 4 pts de cada ojal de hebilla con pts derechos. CONTINUACIÓN DE LA TERMINACIÓN: Colocar las 2 partes del cuello, una por encima de la otra, con la parte de los ojales de hebilla por encima. Coser el cuello a los 20-20-20-20-22-22 pts rem al centro del frente – colocar la hilera en pt musgo del cuello sobre la hilera en pt musgo de la abertura y coser prolijamente. Montar las mangas y coser los botones en el cuello coincidiendo con los ojales de hebilla. |
|
 |
|
¿Terminaste este patrón?Entonces, etiqueta tus fotos con #dropspattern #autumnsunsetsweater o envíalas a la galería #dropsfan. ¿Necesitas ayuda con este patrón?Encontrarás 23 videos tutoriales, un espacio para comentarios/preguntas y más visitando la página del patrón en garnstudio.com © 1982-2026 DROPS Design A/S. Todos los derechos reservados. Este documento, incluyendo todas sus sub-secciones, está protegido por los derechos de autor (copyright). Lee más acerca de lo que puedes hacer con nuestros patrones en la parte de abajo de cada patrón de nuestro sitio. |


Con más de 40 años en el diseño de modelos de punto y de ganchillo, DROPS Design ofrece una de las más vastas colecciones de patrones gratuitos en el internet - traducidos en 17 idiomas. Al día de hoy, contamos con 324 catálogos y 12290 patrones - de los cuales 11685 están traducidos en español.
Nosotros trabajamos con mucho esmero para brindarte lo mejor que las labores de punto y ganchillo tienen para ofrecer,inspiración y consejos, así como hilos de magnífica calidad a precios increíbles! Te gustaría usar nuestros patrones para otro fin además del uso personal? Puedes leer acerca de lo que estás permitida a hacer en el texto de Copyright en la parte de abajo de todos nuestros patrones. Felices labores!
Escribe un comentario sobre DROPS 122-6
¡Nos encantaría saber qué piensas acerca de este patrón!
Si quieres escribir una pregunta referente al patrón, por favor asegúrate de elegir la categoría correcta en el formulario debajo, para acelerar el proceso de respuesta. Los campos obligatorios están marcados con un *.