
Categorías populares
¿Buscas un hilo?


Comentarios / Preguntas (71)
![]() Merete escribió:
Merete escribió:
Hvilke farger (fargekoder) er benyttet i genseren som barnet har på seg?
11.02.2026 - 22:04DROPS Design respondió:
Hei Merete, Drops Fabel nr 910 har utgått, men vi har andre spennende farger. Hvis du holder kursoren over bildet av hvert garn, får du vite hvordan det ser ut når det er ferdig strikket. Hilsen Drops Team.
12.02.2026 - 06:53
![]() Turid escribió:
Turid escribió:
Hvilke farger brukes i genseren som er i flere blåfarger, hvitt og beige? Kan jeg bruke garnet Drops Merino baby ull?
27.01.2026 - 14:12DROPS Design respondió:
Hei Turid. Det er farge 910 print - havbrus (tidligere sea mist, men fargenr er alltid det samme). Denne fargen er en utgående farge, så det er ikke alle som har denne fargen lengre. mvh DROPS Design
30.01.2026 - 06:59
![]() Michaela escribió:
Michaela escribió:
Hallo, muss ich die Raglanabnahmen nur in den Hinreihen(= Vorderseite)machen, oder auch in den Rückreihen? In einer Antwort auf eine französiche Frage(Mme Fuchs) steht: 8 Maschen in JEDER Reihe abnehmen. Aber hier steht :Jetzt von der Vorderseite an den 3 Markierungsfäden je 1 M. abn. und am Anfang/Schluss der Runde je 1 M. abn. (= 8 Abnahmen) – SIEHE TIPP ZUM ABNEHMEN!Bei jeder 2. R. total 10-12-11 (12-14) Mal und danach bei jeder R. 6-6-11 (12-12) Mal wiederholen.Danke für Ihre Hilfe
12.11.2025 - 20:28DROPS Design respondió:
Liebe Michaela, die Raglanabnahmen werden zuerst in jeder 2. Reihe (= in jeder Hinreihe) dann in jeder Reihe (bei Hin- sowie Rückreihen) gestrickt: Bei jeder 2. R. total 10-12-11 (12-14) Mal und danach bei jeder R. 6-6-11 (12-12) Mal wiederholen. Viel Spaß beim Stricken!
21.11.2025 - 15:26
![]() Cornelia escribió:
Cornelia escribió:
Wird die Länge bis zum Armloch vom Anschlag oder ab dem Bündchen gemessen?
22.09.2025 - 22:17DROPS Design respondió:
Liebe Cornelia, die Länge wird ab dem Anschlag gemessen.
26.10.2025 - 22:59
![]() Gail escribió:
Gail escribió:
Thanks. These shortened rows go over 4 rows. I started with 2 rows of cream colour as shown in pattern. My next 2 rows in shortened rows, according to pattern should be the blue wool. Confirming I do all shortened rows in one colour. Thanks.
25.08.2025 - 13:44DROPS Design respondió:
Dear Gail, the shortened rows are all worked in the same colour, the same one as the colour used in your last row; the stripes have been finished after the decreases. Happy knitting!
31.08.2025 - 19:21
![]() Gail escribió:
Gail escribió:
I can’t understand ‘work shortened rows mid back’ instructions. RS facing has me working from the front raglan opening, across front, over sleeve to back marker. Is this correct? Work 7 sts past. Turn. Slip 1st st kw. Is this stitch included in the ‘work14sts’? Have I started this shaping in correct place? I can’t picture the result. Thanks
20.08.2025 - 09:27DROPS Design respondió:
Dear Gail, you first work the first row until the mid-back marker and then start working the actual short rows. Work 7 sts past the marker, turn and slip 1 stitch knitwise, then work the remaining 13 sts (the 7 stitches before the mid-back marker and 7 sts past the mid-back marker). Each time you will work over the stitches from the previous short row and add new stitches after them, on each side. Happy knitting!
25.08.2025 - 12:45
![]() Albertien Parlevliet escribió:
Albertien Parlevliet escribió:
Ik zie op de foto meer verschillende kleuren bij hello stripes. In de beschrijving vind ik er maar 2 terug. 910: sea mist en 100: naturel. Klopt de beschrijving wel?
11.08.2025 - 16:59DROPS Design respondió:
Dag Albertien,
Dat klopt, want Fabel Zeemist is een meerkleurig garen met overgangen, vandaar dat je meer kleuren ziet.
18.08.2025 - 10:30
![]() Gail escribió:
Gail escribió:
Hopefully last question. When decreasing for raglan do I have to keep including the one alternate stitch colour as shown in pattern gris? Can I skip this and knit in correct colours, but continue the pattern in keeping with previous rows? Thanks
04.08.2025 - 06:10DROPS Design respondió:
Dear Gail, yes, as you decrease for the raglan you should continue working the alternate stitches. However, if you prefer how the stripes look like without the alternate stitches you can also skip these stitches and work normal stripes. Happy knitting!
05.08.2025 - 12:09
![]() Gail escribió:
Gail escribió:
Hooray! Thanks! This totally goes contrary to my knitting experiences. Suggest this could be included in pattern chart eg ‘from ws’, for dummies like me! Again thanks. Knitting 18 months. Little boy might be 3yo by the time he gets it haha! Gail
28.07.2025 - 00:06
![]() Gail escribió:
Gail escribió:
So I cast off underarms in new colour. I slipped this first row. I knitted the next row in same colour from raglan edge, casting off 3 sts and joining sleeves into knitting . This makes 2 rows. Now I have wrong side facing. Confirm this pls. I cast off 3 sts (raglan edge). This must be the row where the alternate stitch is included. So the wrong side is now the pattern side? I purl in main colour and purl the alternate st. I cannot see how else it is done. The instructions are confusing.
26.07.2025 - 10:26DROPS Design respondió:
Dear Gail, yes, this is correct. Remember that you work a row with alternate stitches every 5th row, which means that sometimes this row is worked from the right side and sometimes from the wrong side. In this case, the alternate stitch is worked in a wrong side row; the next time you work an alternate stitch (in the next stripe) you will be working it from the right side. Happy knitting!
27.07.2025 - 18:55
|
|||||||
Hello Stripes#hellostripessweater |
|||||||
 |
 |
||||||
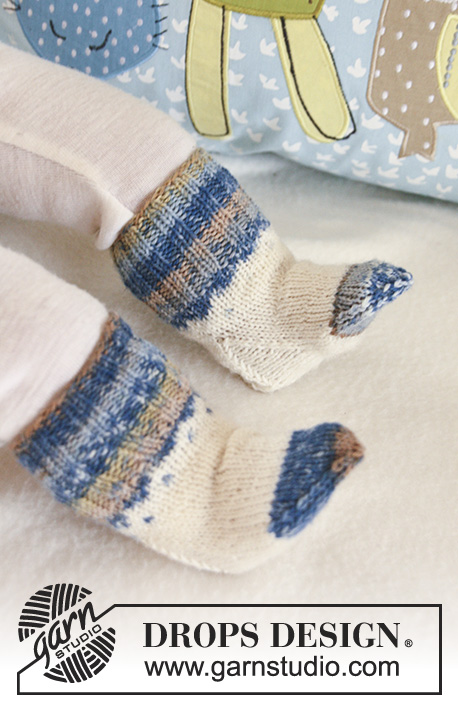
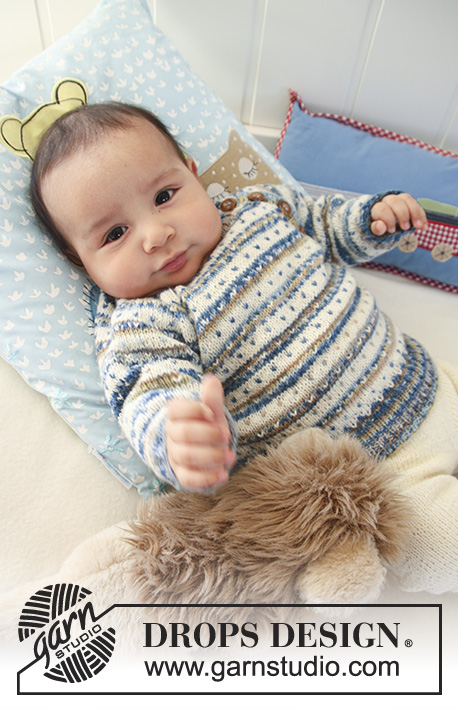
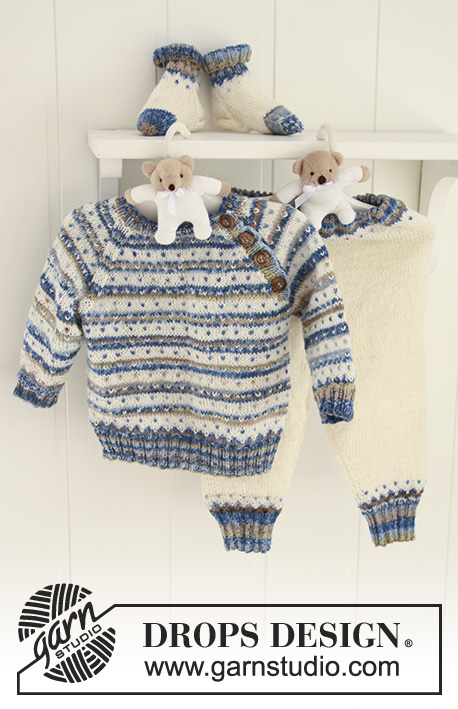
Conjunto de suéter de punto con franjas, puntos y raglán, pantalón y calcetas para bebé y niños en DROPS Fabel
DROPS Baby 19-3 |
|||||||
|
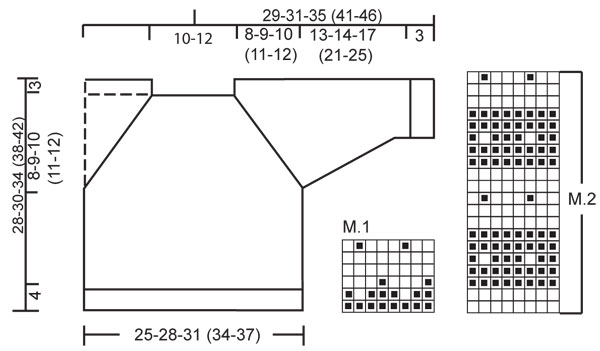
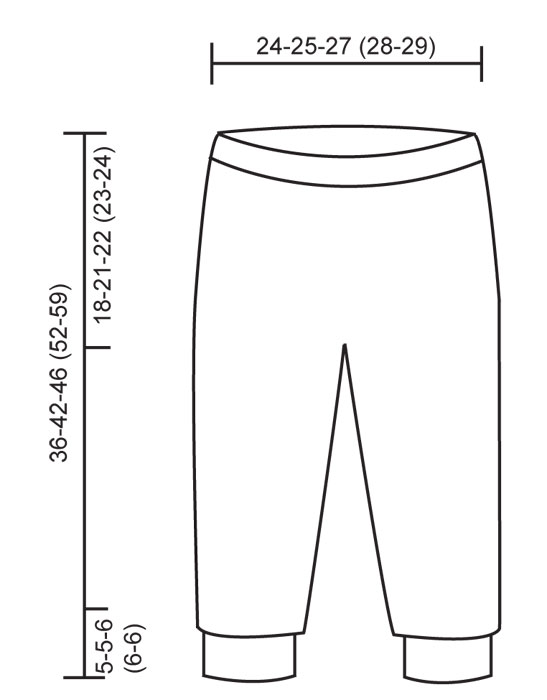
SUÉTER: PATRÓN: Ver diagrama M.1 y M.2. El patrón completo se teje en pt jersey. TIP PARA DISMINUCIÓN (aplica al raglán): POR EL LADO DERECHO (LD): Al inicio de la vta: 1 pt de orillo, desl 1 pt del derecho, 1d, pasar pt desl por encima. Al final de la vta (empezar cuando tenga 3 pts restantes): tejer 2 pjd, 1 pt de orillo. Para los otros 3 marcapuntos (MP) dism como sigue en cada unión entre manga y cuerpo (empezar 3 pts antes del MP): tejer 2 pjd, 2d (el MP queda entre estos 2 pts), desl 1 pt del derecho, 1d, pasar pt desl por encima. POR EL LADO REVÉS (LR): Al inicio de la vta: 1 pt de orillo, tejer 2 pjr. Al final de la vta (empezar cuando tenga 3 pts restantes): tejer 2 pjr por la hebra de atrás, 1 pt de orillo. Para los otros 3 MP dism como sigue en cada unión entre manga y cuerpo (empezar 3 pts antes del MP): tejer 2 pjr por la hebra de atrás, 2r (el MP queda entre estos 2 pts), 2 pjr. NOTA! Asegurarse que los pts quedan de la manera correcta vistos por el LD. ------------------------------------------------------ ------------------------------------------------------ SUÉTER: CUERPO: Se teje en redondo en ag circular. Mon 140-156-176 (192-212) pts en ag circular tamaño 2.5 mm con brisa del mar. Tejer 1 vta del derecho y cont en resorte, 2d/2r. Cuando el resorte mida 4 cm tejer 1 vta del derecho, AL MISMO TIEMPO dism 12-12-16 (16-20) pts distribuidos equitativamente = 128-144-160 (176-192) pts. Colocar un MP en cada lado = 64-72-80 (88-96) pts entre MP’s. Tejer M.1. Después de M.1 cont en M.2. RECUERDE MANTENER LA MISMA TENSIÓN DE TEJIDO DE LA MUESTRA! Cuando la pieza mida aprox 17-18-21 (24-27) cm – ajustar después de 1 franja en M.2 (es decir, después de 5 franjas en un color) – tejer la sig vta como sigue: rem 4 pts para la sisa, tejer 57-65-73 (81-89) pts (= pieza delantera), rem 7 pts para la sisa, tejer 57-65-73 (81-89) pts (= pieza de la espalda) y rem los últimos 3 pts para la sisa, cortar el hilo. Colocar un MP en los pts centrales en la pieza de la espalda (= centro posterior del cuello). Dejar la pieza a un lado y tejer las mangas. MANGA: Se teje en redondo en ag de doble punta. Mon 40-44-44 (48-52) pts en ag de doble punta tamaño 2.5 mm con brisa del mar. Tejer 1 vta del derecho y cont en resorte, 2d/2r. Cuando el resorte mida 3 cm tejer 1 vta del derecho, AL MISMO TIEMPO dism 4 pts distribuidos equitativamente = 36-40-40 (44-48) pts. Colocar un MP al inicio de la vta = centro debajo de la manga. Cont en M.1. Después de M.1 cont en M.2. AL MISMO TIEMPO cuando la pieza mida 6 cm aum 1 pt en cada lado del MP. Repetir el aum cada 4-4-4 (5-6) vtas un total de 8-8-12 (12-12) veces = 52-56-64 (68-72) pts – incorporar los pts aum al patrón conforme avanza en el tejido. Cuando la pieza mida aprox 16-17-20 (24-28) cm – ajustar a la misma vta en M.2 que en la pieza del cuerpo – rem 7 pts al centro debajo de la manga (= 4 pts después del MP al inicio de la vta y 3 pts antes del MP al final de la vta) = 45-49-57 (61-65) pts restantes en la ag. Cortar el hilo y dejar la pieza a un lado. Tejer la otra manga. CANESÚ: Desl las mangas a la misma ag circular que la pieza del cuerpo en los rem para las sisas = 204-228-260 (284-308) pts. Colocar un MP en todas las uniones entre mangas y cuerpo, excepto por el raglán izquierdo al frente (el suéter puesto). LEER TODA LA SECCIÓN SIGUIENTE ANTES DE CONTINUAR! Cont de ida y vuelta en ag desde el raglán izquierdo al frente. Cont en M.2 – asegurarse que las franjas en las mangas y cuerpo coincidan. Empezar dism 3 pts al inicio de las sig 2 vtas (= abertura del raglán). DISMINUCIÓN DEL RAGLÁN: A cont dism 1 pt por el LD en cada lado de los 3 MP’s, AL MISMO TIEMPO dism 1 pt al inicio y al final de la vta (= 8 dism por vta) – VER TIP PARA DISMINUCIÓN! Repetir la dism en vtas alternas un total de 10-12-11 (12-14) veces y luego en cada vta: 6-6-11 (12-12) veces. Después que todas las dism se han completado deberá tener 70-78-78 (86-94) pts restantes en la ag y la pieza deberá medir aprox 28-30-34 (38-42) cm desde la vta de montaje de pts hasta el hombro. A cont tejer vtas cortas en el centro posterior como sigue por el LD – cont en el último color y tejer vtas cortas en este color: tejer la vta hasta el MP del centro posterior, tejer 6-7-7 (8-9) pts después del MP y girar la pieza (para evitar que se forme un agujero desl el primer pt del derecho y apretar el hilo). Tejer 12-14-14 (16-18) pts y girar la pieza, Tejer 18-21-21 (24-27) pts y girar la pieza, Tejer 24-28-28 (32-36) pts y girar la pieza. A cont desl todos los pts a un gancho o seguro aux y tejer las orillas del raglán antes de la línea del escote. ORILLAS DEL RAGLÁN: Levantar aprox 24 a 32 pts (múltiplo de 4) dentro del pt de orillo a lo largo de la abertura del raglán en la manga en ag tamaño 2.5 mm con brisa del mar. Tejer resorte con 1 pt de orillo en pt musgo y 2d en cada lado visto por el LD. Cuando la orilla mida 2 cm rem con derecho sobre derecho y revés sobre revés. Repetir a lo largo de la abertura del raglán en la pieza delantera, pero después de 3 vtas hacer 3 ojales distribuidos equitativamente (el último ojal se hace en la línea del escote). 1 OJAL = rem 2 pts y mon 2 pts nuevos en la vta de retorno. CUELLO: Desl los pts del gancho o seguro aux de vuelta a la ag circular tamaño 2.5 mm y levantar 5 pts en cada borde delantero con brisa del mar = 80-88-88 (96-104) pts. Tejer resorte de ida y vuelta en la ag desde la abertura del raglán como sigue, visto por el LD: 1 pt de orillo en pt musgo, * 2d/2r *, repetir de *a* y terminar con 2d y 1 pt de orillo en pt musgo. AL MISMO TIEMPO después de 2 vtas hacer 1 ojal sobre los otros en la orilla del raglán. Rem pts con derecho sobre derecho y revés sobre revés cuando el cuello mida 2 cm. TERMINACIÓN: Coser las aberturas debajo de las mangas. Coser las orillas del raglán juntas abajo por la abertura hacia la manga. Coser los botones. ------------------------------------------------------ PANTALÓN: PATRÓN: Ver diagrama M.1 – el patrón se teje en pt jersey. TIP PARA DISMINUCIÓN: Dism como sigue 3 pts antes del marcapuntos (MP): tejer 2 pjd, 1d. Dism como sigue después del MP: 1d, desl 1 pt del derecho, 1d, pasar pt desl por encima. ------------------------------------------------------ ------------------------------------------------------ PANTALÓN: Se teje en redondo en la ag desde abajo hacia arriba. PIERNA: Mon FLOJOS 52-56-60 (64-68) pts en ag de doble punta tamaño 2.5 mm con brisa del mar. Colocar un MP al inicio de la vta = entrepierna. Tejer 1 vta del derecho y cont en resorte, 2d/2r en redondo por 5-5-6 (6-6) cm. Tejer 1 vta del derecho y cont en M.1. RECUERDE MANTENER LA MISMA TENSIÓN DE TEJIDO DE LA MUESTRA! Después de M.1 cont en blanco hueso y pt jersey. AL MISMO TIEMPO en la primera vta después de M.1 aum 1 pt en cada lado del MP. Repetir el aum cada 3-4-5 (8-12) vtas un total de 10-11-10 (9-8) veces = 72-78-80 (82-84) pts. Cuando la pieza mida 16-19-22 (27-33) cm (los aum están ahora completos) dividir la pieza en la entrepierna y completar la pieza de ida y vuelta en la ag (para facilitar desl ambas piernas en la misma ag circular más adelante). Mon 1 pt nuevo en cada lado para la costura = 74-80-82 (84-86) pts. Cuando la pieza mida 18-21-24 (29-35) cm rem 3 pts al inicio de las sig 2 vtas empezando por el LD = 68-74-76 (78-80) pts. Dejar la pieza a un lado y tejer la otra pierna. PANTALÓN: Desl las piernas en la misma ag circular tamaño 2.5 mm = 136-148-152 (156-160) pts – inicio de la vta = centro posterior. Colocar un MP en el delantero central. Cont en redondo en la ag con blanco hueso y pt jersey, AL MISMO TIEMPO dism 1 pt en cada lado del MP del delantero central – VER TIP PARA DISMINUCIÓN. Repetir la dism en vtas alternas un total de 5-8-7 (6-5) veces = 126-132-138 (144-150) pts. Cuando la pieza mida 32-38-42 (48-55) cm ajustar el número de pts en la vta a 124-132-140 (144-152) pts. A cont tejer vtas cortas en el centro posterior como sigue: Tejer 12 pts del inicio de la vta, girar la pieza (para evitar que se forme un agujero desl el primer pt del derecho y apretar el hilo). Tejer 24 pts y girar la pieza, tejer 36 pts y girar, tejer 48 pts y girar. Cont así tejiendo 12 pts más antes de cada giro otras 6-6-6 (8-8) veces. A cont tejer M.1 en todos los pts, pero tejer el patrón desde arriba hacia abajo en el diagrama. Después de M.1 cont en brisa del mar y pt jersey. Cuando la pieza mida 36-42-46 (52-59) cm tejer la sig vta así: * 2 pjd, 1 heb (lazada) *, repetir de *a* (= orilla de doblez). Tejer 2 cm pt jersey y rem los pts flojos. TERMINACIÓN: Coser juntas la abertura en el interior de cada pierna dentro de 1 pt de orillo. Coser juntas la abertura entre las piernas. Doblar la parte superior hacia el LR a lo largo de la orilla de doblez y asegurar hacia el LR, pero dejando una pequeña abertura para colocar el elástico. ------------------------------------------------------ CALCETA: PATRON: Ver diagrama M.1 – el patrón se teje en pt jersey. DISMINUCIONES DEL TALON: VUELTA 1 (= LD): Tejer la vta hasta tener 6-6-6 (7-8) pts restantes, desl el sig pt del derecho, 1d, pasar pt desl por encima, girar la pieza. VUELTA 2 (= LR): Tejer la vta hasta tener 6-6-6 (7-8) pts restantes, desl el sig pt del revés, 1r, pasar pt desl por encima, girar la pieza. VUELTA 3 (= LD): Tejer la vta hasta tener 5-5-5 (6-7) pts restantes, desl el sig pt del derecho, 1d, pasar pt desl por encima, girar la pieza. VUELTA 4 (= LR): Tejer la vta hasta tener 5-5-5 (6-7) pts restantes, desl el sig pt del revés, 1r, pasar pt desl por encima, girar la pieza. Cont dism así con 1 pt menos antes de cada dism hasta tener 8-10-10 (10-12) pts en la ag. TIP PARA DISMINUCIÓN: Dism como sigue antes del marcapuntos (MP): tejer 2 pjd. Dism como sigue después del MP: desl 1 pt del derecho, 1d, pasar pt desl por encima. ------------------------------------------------------ ------------------------------------------------------ CALCETA: Mon 48-52-52 (56-60) pts en ag de doble punta tamaño 2.5 mm con brisa del mar. Tejer resorte, 2d/2r por 5-6-6 (7-7) cm. Tejer 1 vta del derecho, AL MISMO TIEMPO dism 12 pts distribuidos equitativamente = 36-40-40 (44-48) pts. Cont en M.1. Después de M.1 cont en blanco hueso y pt jersey. Cuando la pieza mida 7-8-8 (9-9) cm dejar los primeros 18-20-20 (22-26) pts en la ag para el talón y desl los 18-20-20 (22-22) pts restantes en un gancho o seguro aux (= empeine). Tejer pt jersey de ida y vuelta en la ag en los pts del talón por 3-3.5-4 (4-4.5) cm – colocar 1 marcapuntos (MP). A cont tejer las DISMINUCIONES DEL TALON – VER ARRIBA! Después de las dism del talón levantar 8-9-10 (10-11) pts en cada lado del talón y desl los pts del gancho o seguro aux de vuelta en la ag = 42-48-50 (52-56) pts. Cont en redondo en pt jersey. AL MISMO TIEMPO en la primera vta dism 1 pt antes de los 18-20-20 (22-22) pts del empeine tejiendo 2 pjd, y dism 1 pt después de los 18-20-20 (22-22) pts en el empeine desl 1 pt del derecho, 1d, y pasando el pt desl por encima. Repetir la dism en vtas alternas un total de 3-6-7 (5-7) veces = 36-36-36 (42-42) pts. Cont hasta que la calceta mida 7-8-9 (10-12) cm desde el MP en el talón, cambiar a brisa del mar y cont en pt jersey. Cuando la calceta mida 8-9-10 (12-14) cm desde el MP en el talón colocar 1 nuevo MP en cada lado de la pieza (= 18-18-18 (21-21) pts en el empeine y parte inferior del pie entre MP’s). A cont dism 1 pt en cada lado de ambos MP’s – VER TIP PARA DISMINUCIÓN. Repetir la dism en cada vta un total de 7-7-7 (8-8) veces = 8-8-8 (10-10) pts restantes en la ag. Cortar el hilo, pasar a través de los pts restantes, apretar y asegurar. La calceta mide aprox 10-11-12 (14-16) cm. |
|||||||
Explicaciones del diagrama |
|||||||
|
|||||||
 |
|||||||
 |
|||||||
¿Terminaste este patrón?Entonces, etiqueta tus fotos con #dropspattern #hellostripessweater o envíalas a la galería #dropsfan. ¿Necesitas ayuda con este patrón?Encontrarás 25 videos tutoriales, un espacio para comentarios/preguntas y más visitando la página del patrón en garnstudio.com © 1982-2026 DROPS Design A/S. Todos los derechos reservados. Este documento, incluyendo todas sus sub-secciones, está protegido por los derechos de autor (copyright). Lee más acerca de lo que puedes hacer con nuestros patrones en la parte de abajo de cada patrón de nuestro sitio. |
|||||||


Con más de 40 años en el diseño de modelos de punto y de ganchillo, DROPS Design ofrece una de las más vastas colecciones de patrones gratuitos en el internet - traducidos en 17 idiomas. Al día de hoy, contamos con 324 catálogos y 12290 patrones - de los cuales 11673 están traducidos en español.
Nosotros trabajamos con mucho esmero para brindarte lo mejor que las labores de punto y ganchillo tienen para ofrecer,inspiración y consejos, así como hilos de magnífica calidad a precios increíbles! Te gustaría usar nuestros patrones para otro fin además del uso personal? Puedes leer acerca de lo que estás permitida a hacer en el texto de Copyright en la parte de abajo de todos nuestros patrones. Felices labores!
Escribe un comentario sobre DROPS Baby 19-3
¡Nos encantaría saber qué piensas acerca de este patrón!
Si quieres escribir una pregunta referente al patrón, por favor asegúrate de elegir la categoría correcta en el formulario debajo, para acelerar el proceso de respuesta. Los campos obligatorios están marcados con un *.