
Categorías populares
¿Buscas un hilo?


Comentarios / Preguntas (40)
![]() Nicolle escribió:
Nicolle escribió:
Hi, I was wondering how to do kitchener stitches according to the video tutorial that uses two rows both on knitting needles, when in my knitting the first original row is already off the needle? Then i am left with two pieces, one on the needle (the last row) and the one off the needle (first row) to graft together. Or is there another way of doing it? Thanks in advance, Nicolle
29.08.2024 - 10:01DROPS Design respondió:
Dear Nicolle, you have to make a mix of 2 techniques: grafting for the stitches on needle on one side and this technique for the stitches of the cast on edge. Happy knitting!
30.08.2024 - 07:46
![]() Moira escribió:
Moira escribió:
Hello, could you please help me understand the set of 16 stitches for M1. It says to knit on wrong side in the chart oh, but I don't understand that because I'm still on the right side? Could you please advise right from the start? (After cast on) Continue as follows from RS: 52-58-64 garter sts, 16-16-20 sts in M.1. Insert a marker after st no 42-48-54 from RS. Thank you, I LOVE Drops!
02.03.2021 - 17:07DROPS Design respondió:
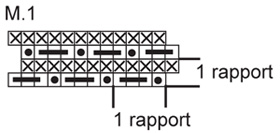
Dear Moira, on first row you are working from right side of sock: 52-58-64 sts in garter stitch, and 16 or 20 sts as shown in M.1,: *Work 3 sts in first st (= P1, YO, P1), P3 sts, psso 1st st then 2nd st over last st = 1 st remain*, repeat from *to* a total of 8 or 10 times. From WS knit all stitches (= the 16-20 sts of M.1) and the remaining sts (garter stitch). On next row from RS work 3rd row in M.1 over the last 16-20 sts: *P3 sts, psso 1st st then 2nd st over last st , (P1, YO, P1) in next st* repeat from *-* and knit remaining sts. Hope this will help, happy knitting!
03.03.2021 - 06:52
![]() Nicole escribió:
Nicole escribió:
Ich habe Probleme mit M1. Die erste Reihe habe ich gestrickt, wie angegeben von der Vorderseite. Die nächste Reihe ( also die Rückreihe) zeigt laut Diagramm (x im Kästchen) "re. Von der Vorderseite ". Mir ist unklar, wie ich diese Maschen stricken soll, weil ich mich doch auf der Rückseite befinde.
18.01.2021 - 15:20DROPS Design respondió:
Liebe Nicole, hier sollte es "recht bei den Rückreihen" sein, eine Korrektur erfolt so bald wie möglich. D.h. bei den Rückreihen (= Rückseite) stricken Sie alle Maschen in A.1 rechts. Viel Spaß beim stricken!
18.01.2021 - 15:27
![]() Diana escribió:
Diana escribió:
I have done a lot of patterns but l just can't figure it out. Is there a way you can explain the first paragraph a different or other way? I love the slippers and would like to make them. Thank you for any help.
16.10.2019 - 18:07DROPS Design respondió:
Dear Diana, work 4 rows with: 52-58-64 sts garter st, 16-16-20 sts as in M.1, on 5th row (= from RS), start decrease on each side of the marker for the heel. At the same time, you will work short rows for toe: every 4th row (= every other row from WS), work until 8-10-12 sts in garter st remain and turn (= short rows). Hope it helps, happy knitting!
17.10.2019 - 09:51
![]() Odeth escribió:
Odeth escribió:
El patrón no lo veo claro en la parte del talón gracias
21.09.2019 - 04:39DROPS Design respondió:
Hola Odeth. El talón lo formamos trabajando disminuciones (2 puntos juntos de derecho a cada lado del marcapuntos) un total de 10 veces.
17.10.2019 - 19:45
![]() Lyly escribió:
Lyly escribió:
Je ne comprends pas les explications concernant les rangs raccourcis de la pointe : au 6e rg, sur l\\\'env du travail, on ne tricote pas les 8 dernières mailles pour la taille S ? Combien de fois doit-on laisser ces mailles en attente ? Je ne comprends absolument pas comment faire la pointe du chausson.les rgs raccourcis se font sur l\\\'endroit ou l\\\'envers du travail ?
08.04.2019 - 23:30DROPS Design respondió:
Bonjour Lyly, les rangs raccourcis pour la pointe vont se tricoter en commençant sur l'envers: tricotez le rang jusqu'à ce qu'il reste 8 m (= pointe), tournez et tricotez le rang suivant sur l'endroit (diminuez sur l'endroit si besoin), tournez et tricotez le rang suivant sur toutes les mailles, tournez et tricotez le rang suivant sur toutes les mailles - n'oubliez pas les diminutions si besoin - continuez ainsi, les 8 m de la fin du rang ne sont simplement plus travaillées = rangs raccourcis; cf vidéo. Bon tricot!
09.04.2019 - 09:24
![]() Emmah escribió:
Emmah escribió:
Min socka har väldigt dålig passform (stor) från hälen och hela vägen upp på skaftet. Resten av socken sitter perfekt. Vad har jag gjort för fel?
26.12.2018 - 17:35DROPS Design respondió:
hei Emmah. Denne modellen er en del løsere rundt ankelen enn tradisjonelle sokker, du kan se det på bildet også om du ser etter. Så den skal være sånn. Om du gjerne vil ha den strammere kan du feks prøve å feste et bånd som du kan knyte rundt ankelen? God fornøyelse.
08.01.2019 - 14:44Erica escribió:
I\'m stuck again 😞 I\'m doing the middle size. Continue until piece measures 15cm. I\'ve done that but no idea how to do the next paragraph: work 38 garter st and 16 sts of m1 and increase for heel. I don\'t know which sue is the heel! I have 44sts of pattern and a separate 10sts of garter stitch for the toe...
13.12.2018 - 13:38DROPS Design respondió:
Dear Erica, when piece measures 15 cm from the last dec, work now: the first 38 sts seen from RS in garter st and the last 16 sts in M.1, now increase for heel on each side of the marker placed in the 38th st from RS. Happy knitting!
13.12.2018 - 14:40Erica escribió:
Im confused about how to p into same stitch. Pattern = p1, yo, p1 all in same stitch but my sts are decreasing. I did p1, yo and then I slipped the yo onto other needle and purled that. Where am I going wrong?!
07.12.2018 - 11:39DROPS Design respondió:
Dear Erica, y ou have to work the same stitch a total of 3 times, purl next stitch on the left needle without dropping this off the needle, make a YO on right needle, then purl the same stitch on left needle one more time and drop it from left needle = you should have now 3 sts on the right needle. The next 3 sts will be purled together = the number of stitches keep constant. Happy knitting!
07.12.2018 - 11:59
![]() Dufour Arlette escribió:
Dufour Arlette escribió:
Je reviens vers vous, je vous ai posée une question hier je tenais a vous dire qu'après avoir fait et refait j'ai trouvée ,je vous remercie Mme Dufour
27.09.2018 - 08:22
|
||||||||||
Cotton Patch#cottonpatchsocks |
||||||||||
 |
 |
|||||||||
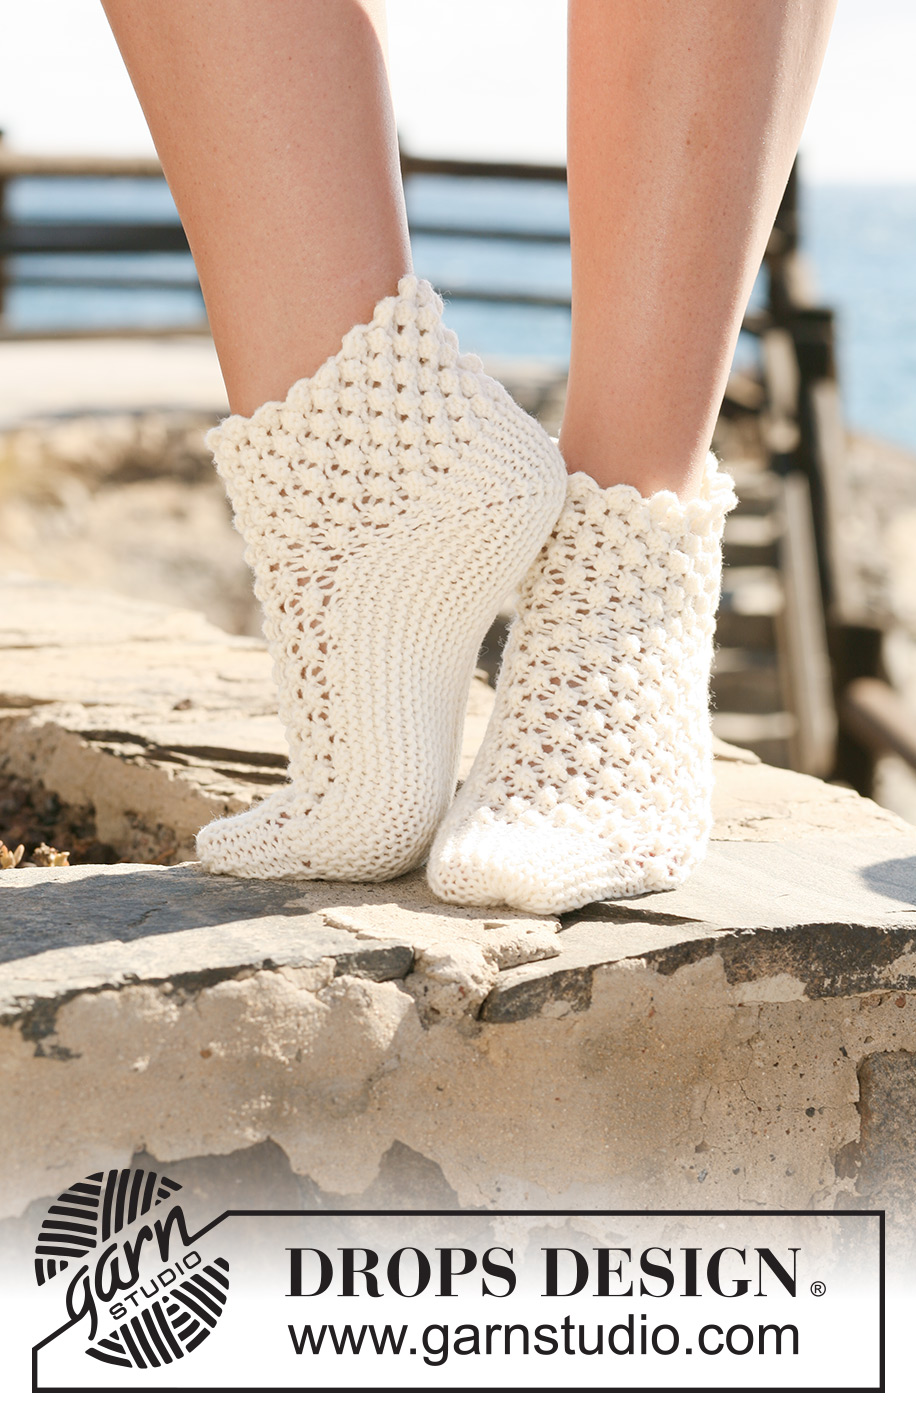
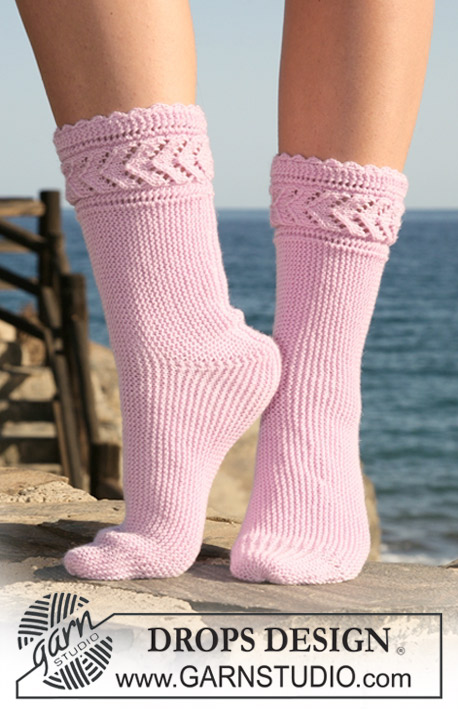
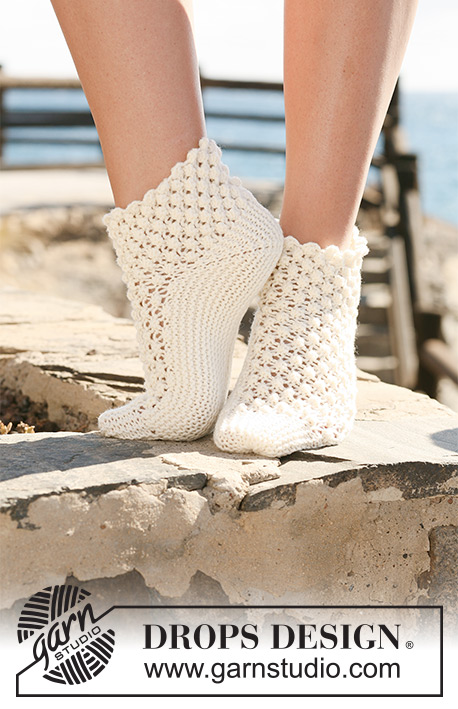
Calcetas DROPS tejidas de lado a lado en punto de moras con “Merino Extra Fine”. Números 35 – 43.
DROPS 119-32 |
||||||||||
|
PT MUSGO (de ida y vuelta en la ag): Tejer todas las vtas de derecho. TIP PARA LA ELABORACIÓN DEL TEJIDO: Al virar al centro de la pieza, deslizar el primer pt de derecho, tensar el hilo y tejer la vta de regreso (para evitar que se forme un agujero en la transición). PATRÓN: Ver diagrama M.1. El diagrama muestra el patrón por el LD. Primera vta = LD. TIP PARA LA TERMINACIÓN: Insertar un hilo en las hebras externas de los pts del lado de la punta del pie y dejar que este hilo siga a la pieza. Después será usado para fruncir la punta de la calceta. ------------------------------------------------------ CALCETA: Tejida de ida y vuelta en la ag a partir del centro de la parte de abajo del pie, después el empeine y de regreso al centro de la parte de abajo del pie. Al hacer las dism y aum para el talón también tejer en vueltas acortadas en los pts de la punta del pie, de la manera sig: En vtas alternas del lado de la punta del pie (es decir, en cada 4ª vta) virar cuando resten 8-10-12 pts y tejer la vta de regreso – ver TIP PARA LA ELABORACIÓN DEL TEJIDO! La punta del pie queda al inicio de la vta , vista por el LD. RECUERDE MANTENER LA MISMA TENSIÓN DE TEJIDO DE LA MUESTRA! Mon 68-74-84 pts en ag tamaño 4 mm con Merino Extra Fine. Continuar de la manera sig por el LD: 52-58-64 pts en pt musgo, los 16-16-20 pts sig en M.1. Insertar un marcapuntos (MP), por el LD, después del pt no. 42-48-54. Continuar en el patrón de esta manera y, AL MISMO TIEMPO, en la 5ª vta, dism para el talón de la manera sig (recuerde tejer las vueltas acortadas en los pts de la punta del pie): Tejer 2 pjd de cada lado del MP, en vtas alternas, un total de 10 veces = 48-54-64 pts. Continuar de la manera sig, por el LD (no tejer vueltas acortadas en los pts de la punta del pie): 8-10-12 pts en pt musgo (= punta del pie), M.1 en los pts restantes. Continuar de esta manera hasta que la pieza mida 13-15-17 cm a partir de la última dism – NOTA: medida al centro, encima de las dism. Ahora tejer 32-38-44 pts en pt musgo y 16-16-20 pts en M.1. Aum para el talón de la manera sig (tejer vueltas acortadas en los pts de la punta del pie): Insertar un MP, por el LD, después del pt no. 32-38-44. Aum 1 pt de cada lado del MP, en vtas alternas, un total de 10 veces – aum haciendo 1 HEB (lazada) y, en la vta sig, tejer las HEB retorcidas de derecho (es decir, tejer por atrás del pt en vez de adelante) y tejer los pts aum en pt musgo = 68-74-84 pts. Tejer 4 vtas en todos los pts con 52-58-64 pts en pt musgo y 16-16-20 pts en M.1. Deslizar todos los pts en un gancho o seguro aux. Tejer la otra calceta. TERMINACIÓN: Unir los pts del gancho o seguro aux y los pts de la vta de montaje usando la técnica de remallado. La costura quedará al centro de la parte de abajo del pie y a lo largo de la parte de atrás de la pierna. Fruncir las puntas de los pies – ver TIP PARA LA TERMINACIÓN – y asegurar el hilo. |
||||||||||
Explicaciones del diagrama |
||||||||||
|
||||||||||
 |
||||||||||
¿Terminaste este patrón?Entonces, etiqueta tus fotos con #dropspattern #cottonpatchsocks o envíalas a la galería #dropsfan. ¿Necesitas ayuda con este patrón?Encontrarás 17 videos tutoriales, un espacio para comentarios/preguntas y más visitando la página del patrón en garnstudio.com © 1982-2026 DROPS Design A/S. Todos los derechos reservados. Este documento, incluyendo todas sus sub-secciones, está protegido por los derechos de autor (copyright). Lee más acerca de lo que puedes hacer con nuestros patrones en la parte de abajo de cada patrón de nuestro sitio. |
||||||||||


Con más de 40 años en el diseño de modelos de punto y de ganchillo, DROPS Design ofrece una de las más vastas colecciones de patrones gratuitos en el internet - traducidos en 17 idiomas. Al día de hoy, contamos con 325 catálogos y 12298 patrones - de los cuales 11726 están traducidos en español.
Nosotros trabajamos con mucho esmero para brindarte lo mejor que las labores de punto y ganchillo tienen para ofrecer,inspiración y consejos, así como hilos de magnífica calidad a precios increíbles! Te gustaría usar nuestros patrones para otro fin además del uso personal? Puedes leer acerca de lo que estás permitida a hacer en el texto de Copyright en la parte de abajo de todos nuestros patrones. Felices labores!
Escribe un comentario sobre DROPS 119-32
¡Nos encantaría saber qué piensas acerca de este patrón!
Si quieres escribir una pregunta referente al patrón, por favor asegúrate de elegir la categoría correcta en el formulario debajo, para acelerar el proceso de respuesta. Los campos obligatorios están marcados con un *.