
Categorías populares
¿Buscas un hilo?


Comentarios / Preguntas (83)
![]() Cora Meijer-Lammerse escribió:
Cora Meijer-Lammerse escribió:
Hallo. Ik snap iets niet van de patroon tekening. Er staat dat het telpatroon steeds de goede kant weergeeft, betekent dat dat je de tetuggaande naalden gewoon breit zoals de steken zich voordoen? Er staat ook bij de uitleg dat een hokje aan de goede kant er recht is en aan de verkeerde kant averecht maar de verkeerde kant staat toch niet op het telpatroon? Ik snap dat dus niet
04.04.2017 - 15:42DROPS Design respondió:
Hoi Cora, Zowel de heengaande als de teruggaande naalden zijn weergegeven in het telpatroon. (Ik zal deze zin nog even toevoegen in het patroon, zodat het wat duidelijker is.) En alle steken zijn weergegeven gezien op de goede kant van het werk. De tweede (en alle andere oneven toeren) brei je dus in dit geval allemaal averecht op de verkeerde kant (zodat er recht op de goede kant ontstaat).
05.04.2017 - 10:49Glenna Blomquist escribió:
Is there a chart available? I can't figure out the front pieces - put on holder - but aren't you supposed to eventually bind them all off - why put on holder?
08.03.2017 - 15:22DROPS Design respondió:
Dear Mrs Blomquist, you put the sts on a st holder for neck, then you will work this sts again when working neck - see NECKLINE. Happy knitting!
08.03.2017 - 17:16
![]() Phyllis Smith escribió:
Phyllis Smith escribió:
Redid the back piece. I do not understand the process for the back piece once you begin the Dec..It says work stitches not fitting into pattern in stockinette st until they fit pattern. I do not understand this. I would think the pattern would still be the lacy pattern with the yo,sl,kttog, psso, yo,k3,yo.That is stockinette st since it is a krow, prow with the pattern. Is that what you mean??
19.08.2015 - 03:34DROPS Design respondió:
Dear Mrs Smith, when you bind off sts each side for armholes then dec for raglan, you work sts inside dec in stocking st instead of pattern (ie without any holes), so that you keep correct number of sts and have enough sts to work a full repeat in lace pattern. Happy knitting!
19.08.2015 - 09:37
![]() Phyllis Smith escribió:
Phyllis Smith escribió:
I am attempting to do 119-27. I have gone to two knit shoppes and having an awful time with the instructions. O have worked in the back piece and not even gotten to where dec are supposed to start and number of stitches are down below finished number. Don't know what I have done wrong. Very frustrating. Am ready to quit!!! Love the look of the shrug!!
11.08.2015 - 14:50DROPS Design respondió:
Dear Mrs Smith, for back piece, you first work on 59-107 sts (see size) in pattern with 1 edge st each side until piece measures 11-19 cm, then shape armholes: bind off 3 sts at the beg of next 2 rows and dec for raglan 1 st each side 2-9 times in total every other row then 7-6 times every 4th row: 35-71 sts remain. Happy knitting!
11.08.2015 - 16:06
![]() Robin Johnson escribió:
Robin Johnson escribió:
Also it seems like depending on where you start the neckline dec, you could have several rows at the top of the right front with only 1 stitch? Is this right? Thx!
26.08.2014 - 01:39DROPS Design respondió:
It is correct, you cast off in first size for neckline 3 sts 1 time then every other row from neckline (= every 4th row) 1 st 3 times then every 3rd row (= every 6th row) 1 st 2 times. Happy knitting!
26.08.2014 - 10:59
![]() Robin Johnson escribió:
Robin Johnson escribió:
Hi, on the response to my previous comment, did you mean I cast off 3 st instead of 9? That's the only way the math works.
26.08.2014 - 00:44DROPS Design respondió:
Dear Mrs Johnson, you are correct, you cast off 3 sts (not 9) for armhole.
26.08.2014 - 10:57
![]() Robin Johnson escribió:
Robin Johnson escribió:
For size small on the right front it seems like I will be done with all stitches before the decreasing and casting off is done. Starting at 29 st (for a small), please show me how all the dec add up.
20.08.2014 - 04:25DROPS Design respondió:
Dear Mrs Johnson, in first size starting with 29 sts, you cast off 9 sts on the side for armhole, then 9 sts for raglan on the side (1 st 2 times every other row + 1 st 7 times every 4th row) + for neckline : 9 sts on a st holder+ bind off 3 sts 1 time + 1 st 3 times every other row and 1 st 2 times every 3rd row. All sts have been decreased/bound off. Happy knnitting!
20.08.2014 - 12:26
![]() Robin Johnson escribió:
Robin Johnson escribió:
I'm having trouble with the Right Front instructions. Does "beginning at every row from mid-front" mean every other row, as in every right side row, or does it mean literally every row, i.e. right side and wrong side rows?
20.08.2014 - 02:07DROPS Design respondió:
Dear Mrs Johnson, it means you dec every other row, only on the rows starting from mid-front (= starting on the neckline side and working towards the side), ie at beg of row from RS for right front piece. Happy knitting!
20.08.2014 - 12:20
![]() Barbara Gilkison escribió:
Barbara Gilkison escribió:
Unable to print out any of your patterns . Please help .
02.06.2014 - 09:59DROPS Design respondió:
Dear mrs Gilkinson, click first on "Print:Pattern", check that your browser allows pop up windows since a new window will open, in that one, click on "Print the pattern". Happy knitting!
03.06.2014 - 10:24
![]() Tricia escribió:
Tricia escribió:
I am working on 119-27 and I have 63 stitches left instead of 47 at the end of the back piece. Will this matter, or do I need to start over?
18.05.2014 - 02:25DROPS Design respondió:
Dear Tricia, 47 sts apply to size L, 63 sts is between 2 largest sizes. On the basis of the requested tension, your back piece will be wider than expected for the choosen size and than the measures in the diagram. Happy knitting!
19.05.2014 - 08:52
|
|||||||
Marcia#marciabolero |
|||||||
 |
 |
||||||
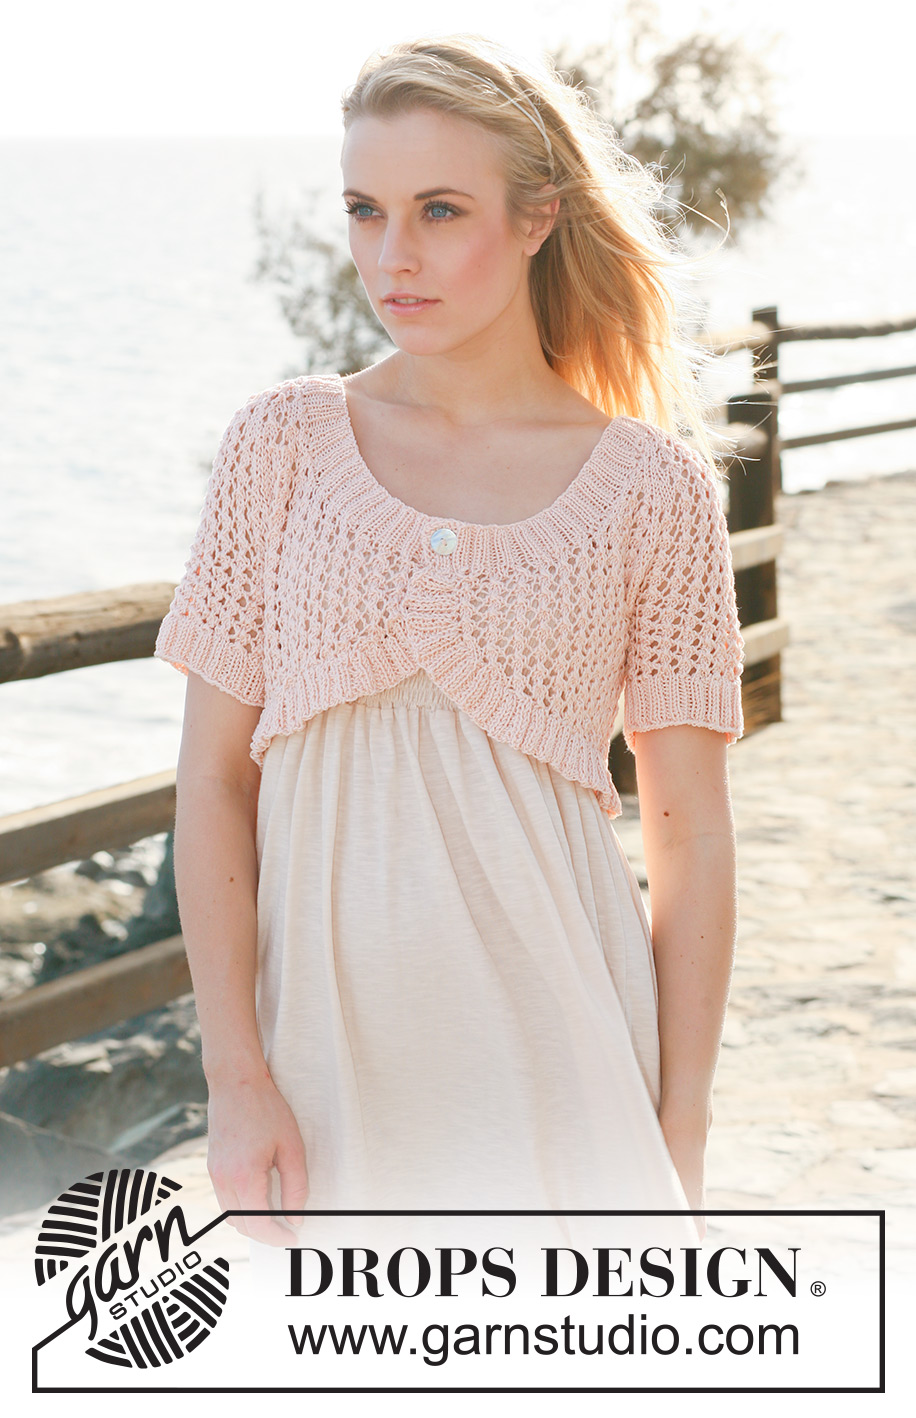
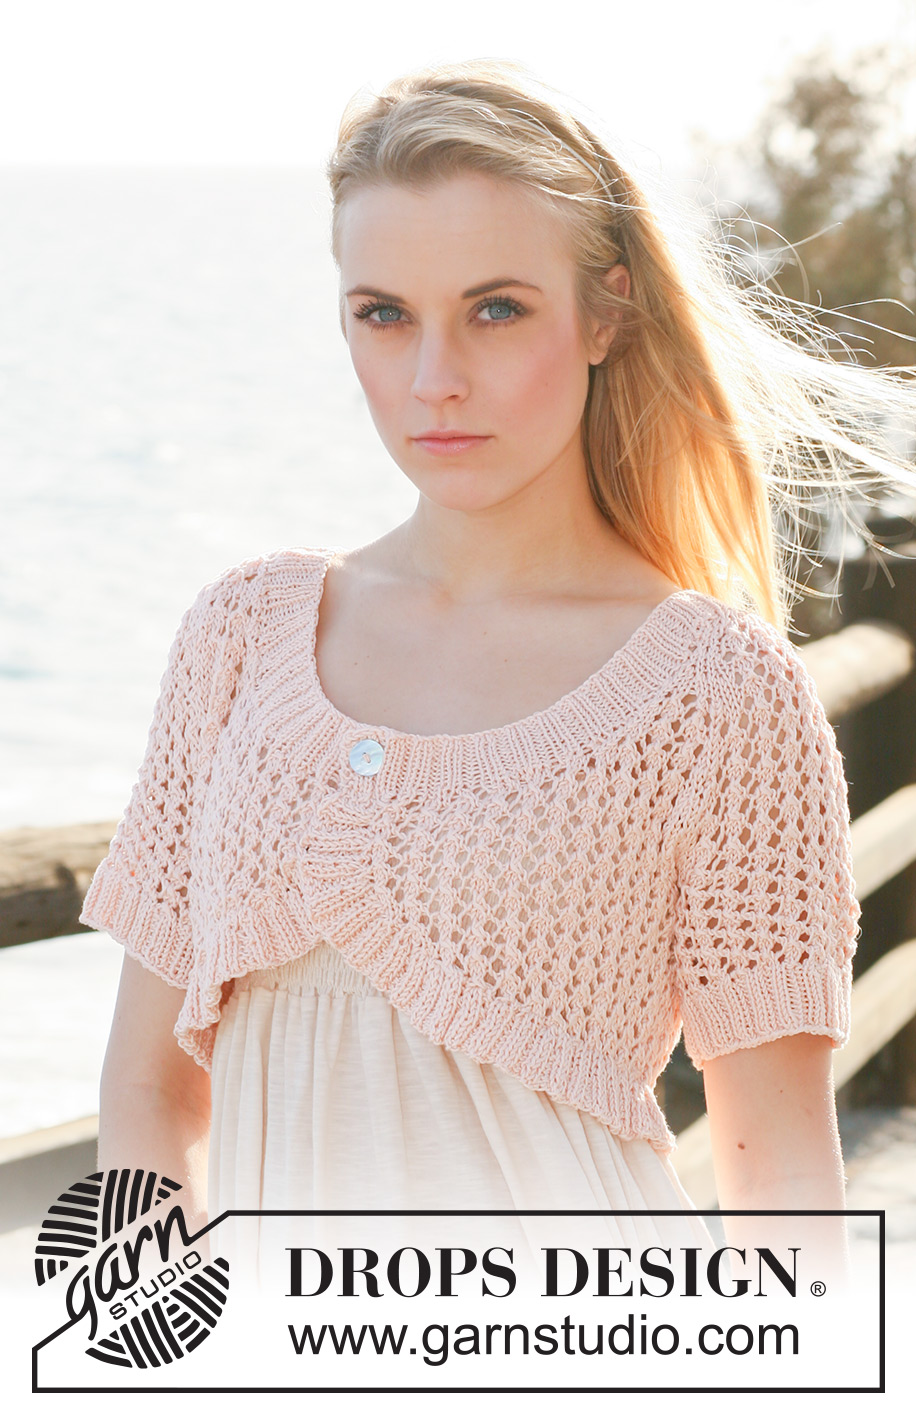
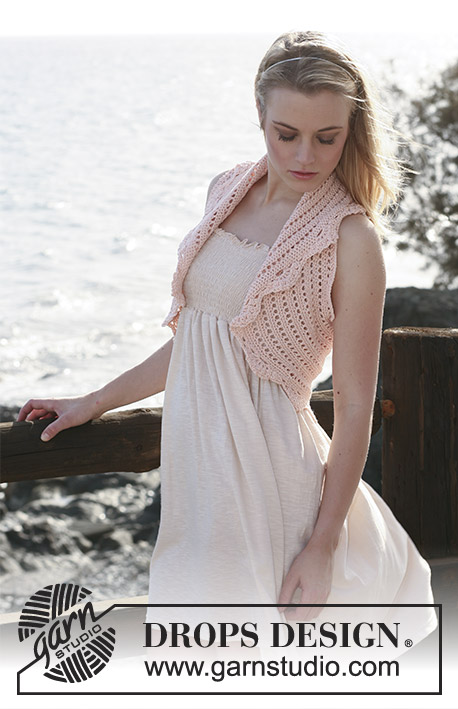
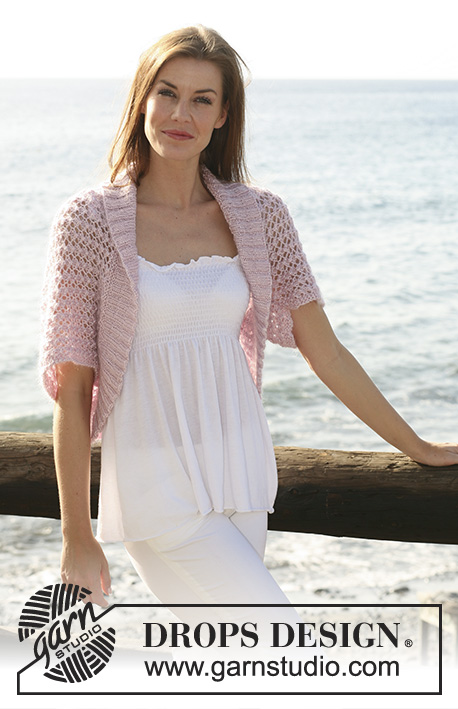
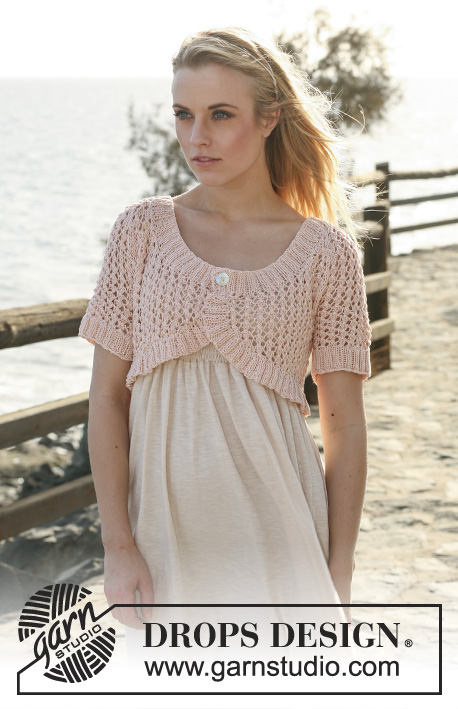
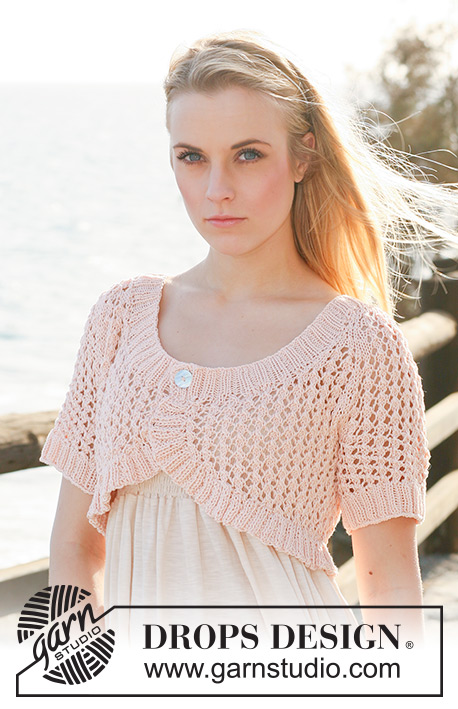
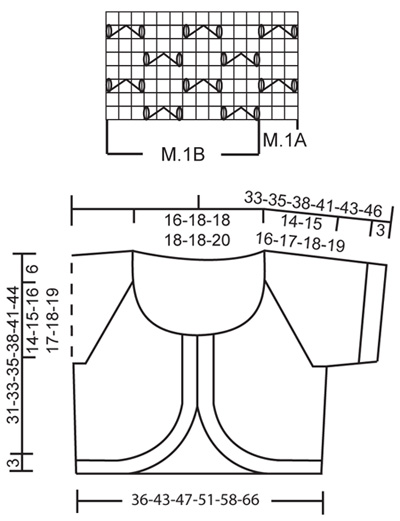
Bolero de punto DROPS con patrón de calados y manga raglán corta en “Muskat”. Talla XS/S a XXXL Diseño DROPS: Patrón No. R-562
DROPS 119-27 |
|||||||
|
PUNTO MUSGO (de ida y vuelta en ag): todas las vtas del derecho. PATRÓN: Ver diagrama M.1 – el diagrama muestra el patrón por el LD (primera vta = LD). TIP PARA DISMINUCIÓN (aplica al raglán): Dism 1 pt dentro de 1 pt musgo a lo largo del raglán: POR EL LD: Después de 1 pt musgo: desl 1 pt del derecho, 1d, pasar pt desl por encima. 2 pts antes de 1 pt musgo: tejer 2 pjd. POR EL LR: Después de 1 pt musgo: tejer 2 pjr 2 pts antes de 1 pt musgo: tejer 2 pjr por la hebra posterior del pt. ------------------------------------------------------ ------------------------------------------------------ BOLERO: ESPALDA: Mon 59-71-77-83-95-107 pts (incl 1 pt de orillo en cada lado) en ag tamaño 4 mm con Muskat. Tejer 1 vta del revés por el LR y tejer la sig vta por el LD así: 1 pt de orillo en PT MUSGO – ver arriba, M.1ª (= 3 pts), M.1B hasta tener 1 pt restante y terminar con 1 pt de orillo en PT MUSGO. Cont en el patrón así. Cuando la pieza mida 11-12-13-15-17-19 cm – ajustar para que la sig vta sea por el LD – rem 3 pts para la sisa al inicio de las 2 vtas siguientes. En la sig vta por el LD dism 1 pt en cada lado para el raglán – ver TIP PARA DISMINUCIÓN, y repetir la dism en vtas alternas un total de 2-7-6-5-10-9 veces y luego en cada 4ª vta un total de 7-5-6-7-5-6 veces = 35-41-47-53-59-71 pts – NOTA: Tejer los pts que no encajen dentro del patrón en pt jersey hasta que encajen dentro del mismo. Desl los pts a un gancho o seguro aux, la pieza mide aprox 25-27-29-32-35-38 cm. DELANTERO DERECHO: Mon 17-23-29-29-35-41 pts (incl 1 pt de orillo en cada lado) en ag tamaño 4 mm con Muskat. Tejer 1 vta del revés por el LR y tejer la vta sig por el LD así (= desde el delantero central): 1 pt de orillo en pt musgo, M.1ª (= 3 pts), M.1B hasta tener 1 pt restante y terminar con 1 pt de orillo en pt musgo. Cont en el patrón de esta manera, AL MISMO TIEMPO mon pts nuevos al final de cada vta por el LR (= hacia el delantero central) como sigue: 1 pt 2 veces y luego 2 pts un total de 5 veces = 29-35-41-41-47-53 pts – NOTA: tejer los pts aum que no encajen dentro del patrón en pt jersey hasta que encajen dentro del mismo, con 1 pt de orillo en pt musgo. Cuando la pieza mida 11-12-13-15-17-19 cm – ajustar para que la vta sig sea por el LR – rem 3 pts a un lado para la sisa. En la vta sig dism para el raglán como se describe para la pieza de la espalda. AL MISMO TIEMPO cuando la pieza mida 12-13-14-16-18-20 cm, desl 9 pts hacia el delantero central a un gancho o seguro aux para el cuello y rem para dar forma a la línea del escote al inicio de cada vta desde el delantero central: 3 pts 1-2-2-2-3-4 veces y 1 pt 0-0-9-8-7-13 veces, luego en vtas alternas desde el delantero central: 1 pt 3-3-2-3-4-1 veces y luego en cada 3ª vta desde el delantero central: 1 pt 2-2-0-0-0-0 veces (es decir, todos los pts han sido dism) – tejer los pts que no encajen dentro del patrón en pt jersey, hasta que encajen dentro del mismo nuevamente. DELANTERO IZQUIERDO: Como el delantero derecho pero a la inversa, es decir, tejer la 1ª vta por el LD desde el lateral hacia el delantero central, mon pts nuevos hacia el delantero central al final de cada vta por el LD (y no por el LR). Rem 3 pts para la sisa al inicio de vta por el LD y rem para la línea del escote al inicio de vta por el LR (y no por el LD). MANGA: Se teje de ida y vuelta en ag. Mon FLOJOS 74-78-78-82-82-86 pts (incl 1 pt de orillo en cada lado) en ag circular tamaño 3.5 mm con Muskat. Tejer 1 vta del revés por el LR y cont en pt resorte, 2d/2r, con 1 pt musgo en cada lado. Cuando el resorte mida 3 cm tejer 1 vta del revés por el LR, AL MISMO TIEMPO dism 18-16-16-14-14-12 pts distribuidos equitativamente = 56-62-62-68-68-74 pts. Cambiar a ag tamaño 4 mm. Cont en M.1B con 1 pt de orillo en cada lado (primera vta = LD). Cuando la pieza mida 7-7-9-11-12-13 cm – ajustar para que la vta sig sea por el LD y terminar en la misma vta en M.1 que en la pieza de la espalda, para que el patrón encaje cuando la pieza del cuerpo y manga se cosan juntos – rem 3 pts al inicio de las 2 vtas siguientes = 50-56-56-62-62-68 pts. En la vta sig por el LD dism 1 pt en cada lado para el raglán – ver TIP PARA DISMINUCIÓN, y repetir la dism en vtas alternas un total de 15-15-18-16-18-18 veces y luego en cada vta un total de 0-3-0-5-3-6 veces = 20 pts restantes en la ag para todas las tallas. Desl los pts a un gancho o seguro aux, la pieza mide aprox 21-22-25-28-30-32 cm. TERMINACIÓN: Coser las costuras del raglán dentro de 1 pt de orillo. ORILLA CON RESORTE: Levantar aprox 198-234-258-290-330-378 pts (= aprox 22 pts en 10 cm, el número de pts deberá ser múltiplo de 4 + 2) por el LD dentro de 1 pt de orillo a lo largo de la abertura del bolero (no levantar pts alrededor de la línea del escote) en ag circular tamaño 3.5 mm con Muskat – asegurarse de levantar suficientes pts en las piezas delanteras redondeadas. Tejer 1 vta del revés por el LR y cont en pt resorte de ida y vuelta en ag como sigue (primera vta = LD): 2 pts de orillo en pt musgo, * 2d, 2r *, repetir de *a* y terminar con 2d y 2 pts de orillo en pt musgo. Rem pts FLOJOS con derecho sobre derecho, revés sobre revés y pt musgo sobre pt musgo cuando el resorte mida 3 cm. LINEA DEL ESCOTE: Desl los pts de los ganchos o seguros aux de vuelta en la ag circular tamaño 3.5 mm, AL MISMO TIEMPO levantar aprox 40 a 55 pts a lo largo de la línea del escote por el LD en cada pieza delantera (también levantar pts en el resorte del delantero central, incl pts de los ganchos o seguros aux del delantero central) = aprox 155 a 221 pts en la ag. Tejer 1 vta del revés por el LR, AL MISMO TIEMPO dism distribuidos equitativamente a aprox 150-154-158-162-166-174 pts (número de pts múltiplo de 4 + 2). Cont en pt resorte como sigue (primera vta = LD): 2 pts de orillo en pt musgo, * 2d, 2r *, repetir de *a* y terminar con 2d y 2 pts de orillo en pt musgo. AL MISMO TIEMPO después de 1 cm hacer 1 ojal en el lado derecho de la pieza (visto por el LD) como sigue: rem el 4º pt desde el delantero central y mon 1 nuevo pt en la sig vta. Rem pts con derecho sobre derecho, revés sobre revés y pt musgo sobre pt musgo cuando el resorte mida 3 cm. Coser el botón. |
|||||||
Explicaciones del diagrama |
|||||||
|
|||||||
 |
|||||||
¿Terminaste este patrón?Entonces, etiqueta tus fotos con #dropspattern #marciabolero o envíalas a la galería #dropsfan. ¿Necesitas ayuda con este patrón?Encontrarás 18 videos tutoriales, un espacio para comentarios/preguntas y más visitando la página del patrón en garnstudio.com © 1982-2026 DROPS Design A/S. Todos los derechos reservados. Este documento, incluyendo todas sus sub-secciones, está protegido por los derechos de autor (copyright). Lee más acerca de lo que puedes hacer con nuestros patrones en la parte de abajo de cada patrón de nuestro sitio. |
|||||||


Con más de 40 años en el diseño de modelos de punto y de ganchillo, DROPS Design ofrece una de las más vastas colecciones de patrones gratuitos en el internet - traducidos en 17 idiomas. Al día de hoy, contamos con 324 catálogos y 12290 patrones - de los cuales 11675 están traducidos en español.
Nosotros trabajamos con mucho esmero para brindarte lo mejor que las labores de punto y ganchillo tienen para ofrecer,inspiración y consejos, así como hilos de magnífica calidad a precios increíbles! Te gustaría usar nuestros patrones para otro fin además del uso personal? Puedes leer acerca de lo que estás permitida a hacer en el texto de Copyright en la parte de abajo de todos nuestros patrones. Felices labores!
Escribe un comentario sobre DROPS 119-27
¡Nos encantaría saber qué piensas acerca de este patrón!
Si quieres escribir una pregunta referente al patrón, por favor asegúrate de elegir la categoría correcta en el formulario debajo, para acelerar el proceso de respuesta. Los campos obligatorios están marcados con un *.