
Categorías populares
¿Buscas un hilo?


Comentarios / Preguntas (99)
![]() Karin escribió:
Karin escribió:
Hej Ska nu lägga upp maskor till ärmen. Där står: lägg upp i slutet av varje v mot sidan 1-1-2(1-2) gr Förstår inte hur jag ska tänka här. Ser att ni tidigare svarat med att man ska öka med 4,6,8,17 men var kommer dessa siffror ifrån och sker den ökningen under 4 varv? Med vänlig hälsning, Karin
28.03.2018 - 22:07DROPS Design respondió:
Hej Karin, vi skriver lägg upp 4 masker 1-1-2(1-2)ggr - her vælger du det antal gange som den størrelse du strikker. God fornøjelse!
04.04.2018 - 13:32Claire Vaillancourt escribió:
At the end of the RT front piece instructions the " place a marker and measure from here "...is that for when doing the back
18.01.2018 - 20:19DROPS Design respondió:
Dear Mrs Vaillancourt, the next measurements will be done from this marker, this match the middle of shoulder, ie middle of piece between front and back piece. Happy knitting!
19.01.2018 - 10:48Carolina escribió:
Hola me parece faltó aclarar en el delantero derecho, luego de tejer 5 cm, dice disminuir, pero no aclara si es del lado de la manga o del borde. Creo es del lado de la manga no?? Gracias! Esto es solo un aporte!!
23.06.2017 - 01:01
![]() Lucia escribió:
Lucia escribió:
Questo modello è proprio bello! Ho seguito le istruzioni passo passo e non ho avuto problemi, anche se non sono espertissima di ferri e filati.
22.06.2017 - 00:25Jill Spring escribió:
I've printed the pattern but there are no sleeve instructions!
17.05.2017 - 22:11DROPS Design respondió:
Dear Mrs Spring, the sts for sleeves are cast on the side of right front piece and on the side of left front piece and then cast off on each side on back piece. Happy knitting!
18.05.2017 - 08:45
![]() Suzanne escribió:
Suzanne escribió:
When working the BACK PIECE, do you measure from the Mid-shoulder marker that you placed while working the Right Front Piece OR from the back neckline where you cast on extra stitches. THANK YOU!
21.03.2017 - 18:34DROPS Design respondió:
Dear Suzanne, you will measure from the marker added on front piece, ie 1 cm before putting piece aside. Happy knitting!
22.03.2017 - 09:15
![]() Suzanne Kagen escribió:
Suzanne Kagen escribió:
"When piece measures 22-24-27 (28-31) cm [8¾”-9½”-10 4/8” (11”-12¼”)] slip the first 9-10-11 (12-12) sts towards mid front on a stitch holder for neck. Bind off to shape the neckline at the beg of every row from neckline..." Probably a silly question, but do I work those "first stitches towards the mid front" in moss stitch and THEN slip them onto a holder? Or do I cut the yarn and re-attach the yarn to "Bind off to shape the neckline"?
14.03.2017 - 08:22DROPS Design respondió:
Dear Mrs Kagen, you can work them first to avoid cutting the yarn. Happy knitting!
14.03.2017 - 09:44
![]() Marlene Amaral Vayens escribió:
Marlene Amaral Vayens escribió:
I loved that jacket Pattern. Thank you for Share with Us. Merry Christmas.
26.12.2016 - 04:30
![]() Mar Valentijn escribió:
Mar Valentijn escribió:
Bij het printen van patronen vallen er regelmatig woorden weg aan het begin en einde van de zin. Weet u hoe ik dit kan oplossen op een andere manier dan de ontbrekende info erbij te schrijven. Overigens zijn de patronen prima. met groet.
18.10.2016 - 16:58DROPS Design respondió:
Hoi Mar. Wij hebben getest met verschillende browsers en alles print goed. Wij denken dat het aan jouw instellingen kan liggen. Ik weet helaas niet goed hoe je dat kan aanpassen.
28.11.2016 - 17:12Reut escribió:
Hi , I knitted the right part and now I want to knit the left part , but the result is not symmetrical ... how should I begin to knit the left side so the body of the garment will be the same ?
22.07.2016 - 16:09DROPS Design respondió:
Dear Mrs Reut, work left front piece reversed, ie from RS: 1 edge st, work in stocking st and finish with 12 sts in seed st. Dec at beg of row from RS (instead of end of row from RS) and cast on new sts for sleeve at the end of row from WS. Happy knitting!
25.07.2016 - 10:27
|
|
Miss Mossy#missmossyjacket |
|
|
|
|
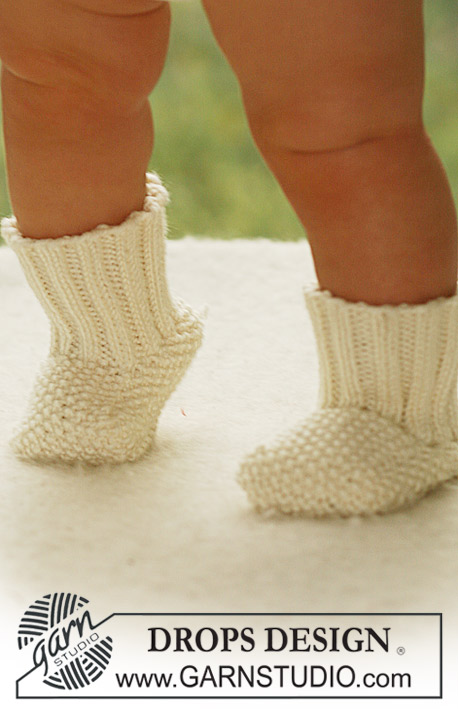
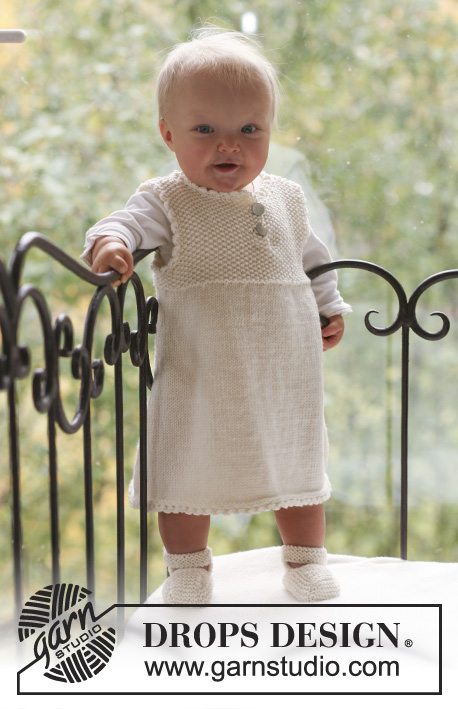
Conjunto de chaqueta y calcetas de punto en punto de arroz, para bebé y niños, en DROPS Merino Extra Fine
DROPS Baby 18-10 |
|
|
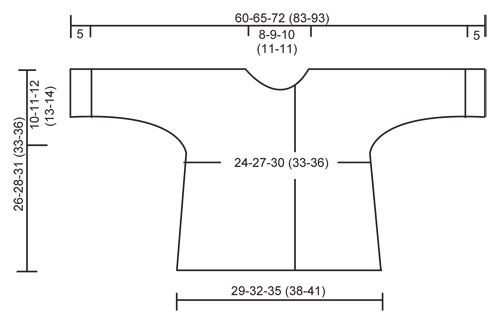
CHAQUETA: PT MUSGO (de ida y vuelta en la ag): Tejer todas las hileras de derecho. PT DE ARROZ: Hilera 1: * 1d, 1r *, repetir de *a*. Hilera 2: derecho sobre revés y revés sobre derecho. Repetir la hilera 2. OJALES: Hacer los ojales en el borde delantero derecho. 1 ojal = tejer juntos de derecho el 2º y el 3er pt a partir del centro del frente y hacer 1 HEB (lazada). Hacer los ojales cuando la pieza mida: TALLA 1/3 MESES: 11, 16 y 21 cm TALLA 6/9 MESES: 13, 18 y 23 cm TALLA 12/18 MESES: 16, 21 y 26 cm TALLA 2 AÑOS: 15, 21 y 27 cm TALLA 3/4 AÑOS: 18, 24 y 30 cm ------------------------------------------------------ CHAQUETA: Empezar con las piezas de los delanteros, mon pts para las mangas, y tejer la pieza de la espalda a partir de los hombros en dirección hacia abajo. DELANTERO DERECHO: Tejido de ida y vuelta en ag circular. Mon 36-39-42 (45-48) pts (incluye 1 pt de orillo en el lado y 12 pts del borde delantero del lado del centro del frente) en ag tamaño 4.5 mm con Merino Extra Fine. Tejer 4 hileras en pt musgo – VER ARRIBA. Tejer la hilera sig, de la manera sig, a partir del centro del frente: 12 pts del borde delantero en pt de arroz, 23-26-29 (32-35) pts en pt jersey y 1 pt de orillo en pt musgo. RECUERDE MANTENER LA MISMA TENSIÓN DE TEJIDO DE LA MUESTRA! Cuando la pieza mida 5 cm, dism 1 pt en el lado y repetir la dism a cada 2-2.5-3 (3-3.5) cm un total de 5 veces = 31-34-37 (40-43) pts. Recuerde los ojales en el borde delantero – VER ARRIBA. Cuando la pieza mida 16-17-19 (20-22) cm, mon pts para la manga al final de cada hilera, en el lado: 4 pts 1-1-2 (1-2) veces, 6 pts 1-1-1 (1-1) veces, 8 pts 1-1-1 (2-2) veces y 17-19-19 (23-26) pts 1 vez = 66-71-78 (89-99) pts. Continuar en pt jersey con 12 pts en pt de arroz en el borde delantero y 10 pts en pt de arroz en la parte de abajo de la manga. Cuando la pieza mida 22-24-27 (28-31) cm, deslizar los primeros 9-10-11 (12-12) pts del lado del centro del frente a un gancho o seguro aux para el escote. Rem para formar la línea del escote al inicio de cada hilera a partir del escote: 2 pts 1 vez y 1 pt 3 veces = 52-56-62 (72-82) pts restantes en el hombro/manga. Cuando la pieza mida 26-28-31 (33-36) cm, insertar un marcapuntos en la pieza (= centro del hombro). AHORA MEDIR LA PIEZA A PARTIR DE AQUÍ. Continuar por 1 cm y dejar la pieza a un lado. DELANTERO IZQUIERDO: Mon y tejer como la pieza del delantero derecho, pero en sentido inverso. No hacer ojales! ESPALDA: Tejer los pts de la pieza del delantero izquierdo de regreso a la ag, mon 16-18-20 (22-22) nuevos pts (= escote de la espalda) y tejer los pts de la pieza del delantero derecho de regreso a la ag = 120-130-144 (166-186) pts. Continuar en pt jersey con 10 pts en pt de arroz en cada lado (= orillas de las mangas). Cuando la pieza mida 7.5-8.5-8.5 (9.5-10) cm, rem los pts de las mangas al inicio de cada hilera, en cada lado, de la manera sig: 17-19-19 (23-26) pts 1 vez, 8 pts 1-1-1 (2-2) veces, 6 pts 1-1-1 (1-1) vez y 4 pts 1-1-2 (1-2) veces = 50-56-62 (68-74) pts restantes en la hilera. Continuar en pt jersey con 1 pt de orillo en pt musgo en cada lado. Cuando la pieza mida 13-13-14 (16-17) cm, aum 1 pt en cada lado a cada 2-2.5-3 (3-3.5) cm un total de 5 veces = 60-66-72 (78-84) pts. Cuando la pieza mida 25-27-30 (32-35) cm, tejer 4 hileras en pt musgo en todos los pts y rem. CUELLO: Levantar aprox 46 a 66 pts alrededor de la línea del escote (incl los pts en el gancho o seguro aux de los frentes) en ag tamaño 4.5 mm y tejer 3 hileras en pt musgo de ida y vuelta en la ag, rem. TERMINACIÓN: Hacer las costuras de las mangas y de los laterales a 1 pt del pt de orillo. Coser los botones coincidiendo con los ojales. Doblar las orillas de las mangas hacia el LD si necesario. ------------------------------------------------------ CALCETAS: Longitud del pie: 10-11-12 (14-16) cm. CALCETA: Tejida en redondo en ag de doble punta. Mon 40-44-48 (48-52) pts en ag de doble punta tamaño 3 mm con Merino Extra Fine. Tejer 1 vta de derecho y continuar en resorte, 2d/2r, por 6-7-7 (8-8) cm. Tejer 1 vta de derecho y, AL MISMO TIEMPO, dism 6 pts distribuidos equitativamente en la vta = 34-38-42 (42-46) pts. Ahora mantener los primeros 10-10-12 (12-14) pts en la ag (= empeine) y deslizar los 24-28-30 (30-32) pts restantes a un gancho o seguro aux. Tejer 3-3.5-4 (5-6) cm en pt de arroz – VER ARRIBA – en los pts del empeine. Ahora levantar 7-8-9 (12-14) pts en cada lado del empeine y deslizar los pts del gancho o seguro aux de regreso a la ag = 48-54-60 (66-74) pts. Continuar en pt de arroz en todos los pts por 1.5-2-2.5 (3-3.5) cm, y, después, tejer 1 vta de revés. Rem todos los pts, excepto los 10-10-12 (12-14) pts del centro del frente. Tejer 9-10-11 (13-14) cm en pt de arroz en estos pts para la suela y rem. Coser la suela a la calceta, orilla con orilla, para evitar que se forme una costura abultada. |
|
 |
|
¿Terminaste este patrón?Entonces, etiqueta tus fotos con #dropspattern #missmossyjacket o envíalas a la galería #dropsfan. ¿Necesitas ayuda con este patrón?Encontrarás 16 videos tutoriales, un espacio para comentarios/preguntas y más visitando la página del patrón en garnstudio.com © 1982-2026 DROPS Design A/S. Todos los derechos reservados. Este documento, incluyendo todas sus sub-secciones, está protegido por los derechos de autor (copyright). Lee más acerca de lo que puedes hacer con nuestros patrones en la parte de abajo de cada patrón de nuestro sitio. |


Con más de 40 años en el diseño de modelos de punto y de ganchillo, DROPS Design ofrece una de las más vastas colecciones de patrones gratuitos en el internet - traducidos en 17 idiomas. Al día de hoy, contamos con 324 catálogos y 12290 patrones - de los cuales 11685 están traducidos en español.
Nosotros trabajamos con mucho esmero para brindarte lo mejor que las labores de punto y ganchillo tienen para ofrecer,inspiración y consejos, así como hilos de magnífica calidad a precios increíbles! Te gustaría usar nuestros patrones para otro fin además del uso personal? Puedes leer acerca de lo que estás permitida a hacer en el texto de Copyright en la parte de abajo de todos nuestros patrones. Felices labores!
Escribe un comentario sobre DROPS Baby 18-10
¡Nos encantaría saber qué piensas acerca de este patrón!
Si quieres escribir una pregunta referente al patrón, por favor asegúrate de elegir la categoría correcta en el formulario debajo, para acelerar el proceso de respuesta. Los campos obligatorios están marcados con un *.