
Categorías populares
¿Buscas un hilo?


Comentarios / Preguntas (99)
![]() Ellen escribió:
Ellen escribió:
Dank je wel, helemaal duidelijk nu.
19.02.2026 - 21:15
![]() Ellen escribió:
Ellen escribió:
Ik heb maar 2 naalden gebreid over de gehele breedte van rugpand en de hoogte van 7,5 cm al bereikt, is dit wel oké.?
19.02.2026 - 14:55DROPS Design respondió:
Dag Ellen,
Je begint op het achterpand met het afkanten van de mouwsteken op een hoogte van 7½ vanaf de markeerdraad die 1 cm voor het einde van het rechter voorpand hebt geplaatst. Het antwoord op je vorige post klopte niet, ik keek per ongeluk bij een ander patroon, dus dat verwijder ik weer.
19.02.2026 - 20:25
![]() Ellen escribió:
Ellen escribió:
Ik moet bij 7,5 cm mouw af gaan kanten, wordt dan uiteinde/ mouwuitgang niet erg smal? Nog geen 4 cm. Waar handje door moet, bij kleinste maat.
19.02.2026 - 14:43DROPS Design respondió:
Dag Ellen,
Zie het antwoord op je volgende vraag
19.02.2026 - 20:16
![]() Lydia escribió:
Lydia escribió:
I am now at the back piece, do I work the sts from left front piece from the RS or WS back onto the needle?
04.02.2026 - 17:14DROPS Design respondió:
Hi Lydia, It doesn't matter whether you work from the right or wrong side as long as all the pieces are the same way. and you continue the pattern correctly on the front pieces. Regards, Drops Team.
05.02.2026 - 06:26
![]() Lydia escribió:
Lydia escribió:
I'm sorry if this is an obvious question, but should I slip (9) stitches onto a stitch holder for the left front piece too?
30.01.2026 - 17:21DROPS Design respondió:
Dear Lydia, yes, you should slip 9 stitches onto a stitch holder also for the left front piece. Happy knitting!
01.02.2026 - 20:26
![]() Lydia escribió:
Lydia escribió:
Neckline: "Pick up approx 46 to 66 stitches round neckline"- do I pick these up randomly from available stitches on fronts and back ?? Thank you in advance
29.01.2026 - 17:53DROPS Design respondió:
Hi, yes. In the next row you can adjust the number of stitches - the neckline should't be too loose or too tight. Happy knitting!
29.01.2026 - 20:14
![]() Penny Fisher escribió:
Penny Fisher escribió:
I have started knitting the Right Front piece. I am at about 11 cm and the work is not straight, The side with the moss stitch is longer than the garter stitch? I did a tension square before I started which was spot on. What has happened?
15.09.2025 - 23:02DROPS Design respondió:
Hi Penny, it will look fine after blocking. Happy knitting!
17.09.2025 - 09:21
![]() Cheryl Anderson escribió:
Cheryl Anderson escribió:
Hello! I need clarification as I begin the sleeves for this pattern. Directions: cast on sts for sleeve, at the end of every row towards the side: Question: Am I always casting on at the end of the right side only on the knitted side since I am beginning the row with the moss st? and then am I always casting on at the end of the left side on the purl side only because I am ending the edge on the purl side? Thank you so much Cheryl
25.04.2025 - 17:46DROPS Design respondió:
Dear Cheryl, the sleeves are worked only in one side for the front pieces, so you cast on sts only in one side (in the left front piece it will be in the opposite side). You cast on stitches on the side with the 1 edge stitch and not the one with the front band stitches, that is, on the rows where you start working the 12 front band stitches and cast on beside the 1 edge stitch. Happy knitting!
27.04.2025 - 12:05
![]() Cheryl escribió:
Cheryl escribió:
Hello, I am knitting both fronts of Miss Mossy on the same circular needle. I would like to know if I am understanding this direction correctly: "LEFT FRONT PIECE: Cast on and work like right front piece, but mirrored. " When I am knitting the right side of the sweater on the knitted side , I knit the moss stitch followed by the stockinette stitch. When I am knitting the left side on the knitted side, I knit the stockinette stitch followed by have moss stitch. Is this correct? Thank you!
13.04.2025 - 00:50DROPS Design respondió:
Dear Cheryl, yes, that's correct. Happy knitting!
14.04.2025 - 00:50
![]() Simona escribió:
Simona escribió:
Ciao, ma per la taglia 3-6 come mi devo regolare?
22.10.2024 - 18:03DROPS Design respondió:
Buonasera Simona, può adattare le spiegazioni alla taglia che le interessa. Buon lavoro!
25.10.2024 - 23:41
|
|
Miss Mossy#missmossyjacket |
|
|
|
|
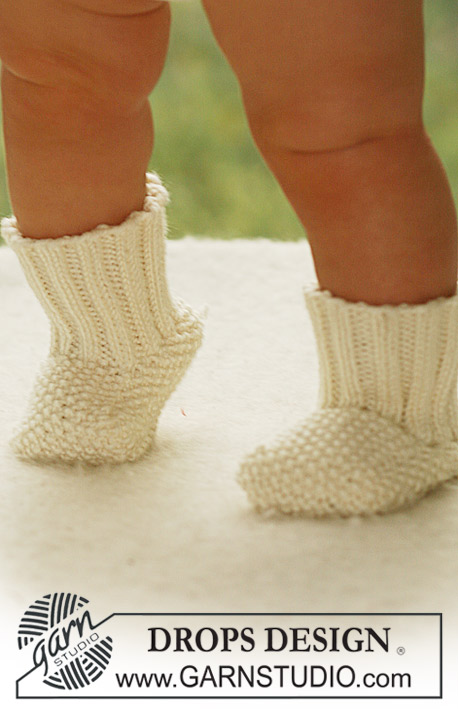
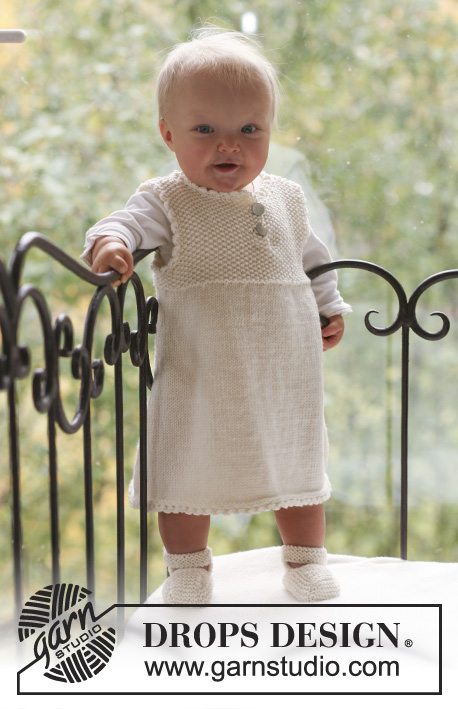
Conjunto de chaqueta y calcetas de punto en punto de arroz, para bebé y niños, en DROPS Merino Extra Fine
DROPS Baby 18-10 |
|
|
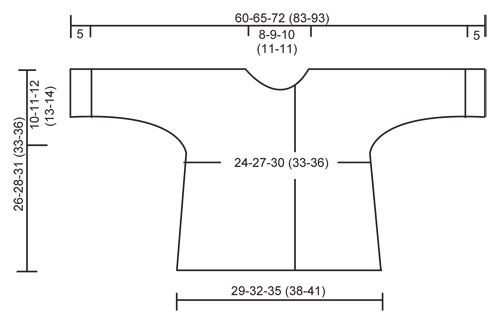
CHAQUETA: PT MUSGO (de ida y vuelta en la ag): Tejer todas las hileras de derecho. PT DE ARROZ: Hilera 1: * 1d, 1r *, repetir de *a*. Hilera 2: derecho sobre revés y revés sobre derecho. Repetir la hilera 2. OJALES: Hacer los ojales en el borde delantero derecho. 1 ojal = tejer juntos de derecho el 2º y el 3er pt a partir del centro del frente y hacer 1 HEB (lazada). Hacer los ojales cuando la pieza mida: TALLA 1/3 MESES: 11, 16 y 21 cm TALLA 6/9 MESES: 13, 18 y 23 cm TALLA 12/18 MESES: 16, 21 y 26 cm TALLA 2 AÑOS: 15, 21 y 27 cm TALLA 3/4 AÑOS: 18, 24 y 30 cm ------------------------------------------------------ CHAQUETA: Empezar con las piezas de los delanteros, mon pts para las mangas, y tejer la pieza de la espalda a partir de los hombros en dirección hacia abajo. DELANTERO DERECHO: Tejido de ida y vuelta en ag circular. Mon 36-39-42 (45-48) pts (incluye 1 pt de orillo en el lado y 12 pts del borde delantero del lado del centro del frente) en ag tamaño 4.5 mm con Merino Extra Fine. Tejer 4 hileras en pt musgo – VER ARRIBA. Tejer la hilera sig, de la manera sig, a partir del centro del frente: 12 pts del borde delantero en pt de arroz, 23-26-29 (32-35) pts en pt jersey y 1 pt de orillo en pt musgo. RECUERDE MANTENER LA MISMA TENSIÓN DE TEJIDO DE LA MUESTRA! Cuando la pieza mida 5 cm, dism 1 pt en el lado y repetir la dism a cada 2-2.5-3 (3-3.5) cm un total de 5 veces = 31-34-37 (40-43) pts. Recuerde los ojales en el borde delantero – VER ARRIBA. Cuando la pieza mida 16-17-19 (20-22) cm, mon pts para la manga al final de cada hilera, en el lado: 4 pts 1-1-2 (1-2) veces, 6 pts 1-1-1 (1-1) veces, 8 pts 1-1-1 (2-2) veces y 17-19-19 (23-26) pts 1 vez = 66-71-78 (89-99) pts. Continuar en pt jersey con 12 pts en pt de arroz en el borde delantero y 10 pts en pt de arroz en la parte de abajo de la manga. Cuando la pieza mida 22-24-27 (28-31) cm, deslizar los primeros 9-10-11 (12-12) pts del lado del centro del frente a un gancho o seguro aux para el escote. Rem para formar la línea del escote al inicio de cada hilera a partir del escote: 2 pts 1 vez y 1 pt 3 veces = 52-56-62 (72-82) pts restantes en el hombro/manga. Cuando la pieza mida 26-28-31 (33-36) cm, insertar un marcapuntos en la pieza (= centro del hombro). AHORA MEDIR LA PIEZA A PARTIR DE AQUÍ. Continuar por 1 cm y dejar la pieza a un lado. DELANTERO IZQUIERDO: Mon y tejer como la pieza del delantero derecho, pero en sentido inverso. No hacer ojales! ESPALDA: Tejer los pts de la pieza del delantero izquierdo de regreso a la ag, mon 16-18-20 (22-22) nuevos pts (= escote de la espalda) y tejer los pts de la pieza del delantero derecho de regreso a la ag = 120-130-144 (166-186) pts. Continuar en pt jersey con 10 pts en pt de arroz en cada lado (= orillas de las mangas). Cuando la pieza mida 7.5-8.5-8.5 (9.5-10) cm, rem los pts de las mangas al inicio de cada hilera, en cada lado, de la manera sig: 17-19-19 (23-26) pts 1 vez, 8 pts 1-1-1 (2-2) veces, 6 pts 1-1-1 (1-1) vez y 4 pts 1-1-2 (1-2) veces = 50-56-62 (68-74) pts restantes en la hilera. Continuar en pt jersey con 1 pt de orillo en pt musgo en cada lado. Cuando la pieza mida 13-13-14 (16-17) cm, aum 1 pt en cada lado a cada 2-2.5-3 (3-3.5) cm un total de 5 veces = 60-66-72 (78-84) pts. Cuando la pieza mida 25-27-30 (32-35) cm, tejer 4 hileras en pt musgo en todos los pts y rem. CUELLO: Levantar aprox 46 a 66 pts alrededor de la línea del escote (incl los pts en el gancho o seguro aux de los frentes) en ag tamaño 4.5 mm y tejer 3 hileras en pt musgo de ida y vuelta en la ag, rem. TERMINACIÓN: Hacer las costuras de las mangas y de los laterales a 1 pt del pt de orillo. Coser los botones coincidiendo con los ojales. Doblar las orillas de las mangas hacia el LD si necesario. ------------------------------------------------------ CALCETAS: Longitud del pie: 10-11-12 (14-16) cm. CALCETA: Tejida en redondo en ag de doble punta. Mon 40-44-48 (48-52) pts en ag de doble punta tamaño 3 mm con Merino Extra Fine. Tejer 1 vta de derecho y continuar en resorte, 2d/2r, por 6-7-7 (8-8) cm. Tejer 1 vta de derecho y, AL MISMO TIEMPO, dism 6 pts distribuidos equitativamente en la vta = 34-38-42 (42-46) pts. Ahora mantener los primeros 10-10-12 (12-14) pts en la ag (= empeine) y deslizar los 24-28-30 (30-32) pts restantes a un gancho o seguro aux. Tejer 3-3.5-4 (5-6) cm en pt de arroz – VER ARRIBA – en los pts del empeine. Ahora levantar 7-8-9 (12-14) pts en cada lado del empeine y deslizar los pts del gancho o seguro aux de regreso a la ag = 48-54-60 (66-74) pts. Continuar en pt de arroz en todos los pts por 1.5-2-2.5 (3-3.5) cm, y, después, tejer 1 vta de revés. Rem todos los pts, excepto los 10-10-12 (12-14) pts del centro del frente. Tejer 9-10-11 (13-14) cm en pt de arroz en estos pts para la suela y rem. Coser la suela a la calceta, orilla con orilla, para evitar que se forme una costura abultada. |
|
 |
|
¿Terminaste este patrón?Entonces, etiqueta tus fotos con #dropspattern #missmossyjacket o envíalas a la galería #dropsfan. ¿Necesitas ayuda con este patrón?Encontrarás 16 videos tutoriales, un espacio para comentarios/preguntas y más visitando la página del patrón en garnstudio.com © 1982-2026 DROPS Design A/S. Todos los derechos reservados. Este documento, incluyendo todas sus sub-secciones, está protegido por los derechos de autor (copyright). Lee más acerca de lo que puedes hacer con nuestros patrones en la parte de abajo de cada patrón de nuestro sitio. |


Con más de 40 años en el diseño de modelos de punto y de ganchillo, DROPS Design ofrece una de las más vastas colecciones de patrones gratuitos en el internet - traducidos en 17 idiomas. Al día de hoy, contamos con 324 catálogos y 12290 patrones - de los cuales 11685 están traducidos en español.
Nosotros trabajamos con mucho esmero para brindarte lo mejor que las labores de punto y ganchillo tienen para ofrecer,inspiración y consejos, así como hilos de magnífica calidad a precios increíbles! Te gustaría usar nuestros patrones para otro fin además del uso personal? Puedes leer acerca de lo que estás permitida a hacer en el texto de Copyright en la parte de abajo de todos nuestros patrones. Felices labores!
Escribe un comentario sobre DROPS Baby 18-10
¡Nos encantaría saber qué piensas acerca de este patrón!
Si quieres escribir una pregunta referente al patrón, por favor asegúrate de elegir la categoría correcta en el formulario debajo, para acelerar el proceso de respuesta. Los campos obligatorios están marcados con un *.