
Categorías populares
¿Buscas un hilo?


Comentarios / Preguntas (126)
![]() Marie Magnell escribió:
Marie Magnell escribió:
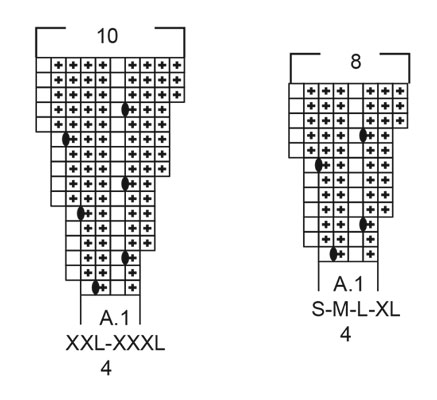
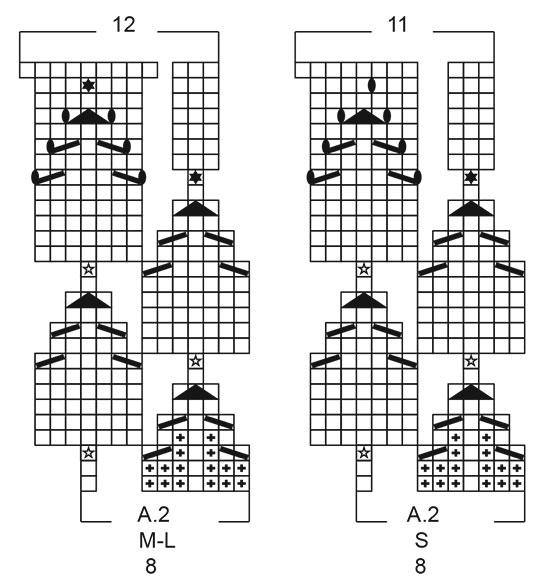
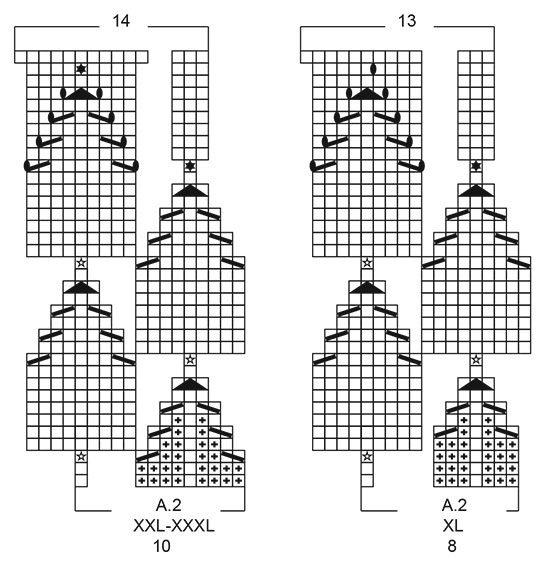
Stickar xxxl och vid A 2 rad 3, ska ' stjärnan 'stickas endast 4 ggr på hela detta varv? Vid rad 4 hur stickar jag denna stjärna med 9 maskor? Den ska ju stickas rät.
26.04.2025 - 08:47DROPS Design respondió:
Hej Marie, når du strikker masken med stjerne, så får du 9 nye masker som skal strikkes ret på næste pind :)
30.04.2025 - 14:29
![]() Mette Bodin escribió:
Mette Bodin escribió:
Spurgte den 16.04. Nu er hjernen begyndt at fungere, og jeg har fundet ud af opskriften. Undskyld ulejligheden.
18.04.2025 - 17:00
![]() Mette Bodin escribió:
Mette Bodin escribió:
Strikker str L. I diagram A.2 efter pind 8 har jeg 208 masker. Pind 9 ender med 12 masker ved udt 7 m og 5 m. 12 masker går ikke op i 208 masker, men giver 17,33 mønsterstrik. her er noget jeg slet ikke forstår-
16.04.2025 - 16:33DROPS Design respondió:
Hei Mette. Om du setter maskemarkører mellom hvert diagram har du en bedre oversikt. Du strikker 9. rad over 8. rad hele omgangen rundt og det økes med 4 masker per gang du strikker A.2. Så når omgangen er ferdig strikket a 26 rapporter av A.2 x 4 økte masker = 104 masker + 208 masker = 312 masker, som står i oppskriften. Du må ikke tenkte at pinne 9 ender med 12 masker, du må tenkte at du strikker 9. pinne over 8 masker og når 9. pinne er ferdig /10. pinne skal strikkes er det 12 masker. mvh DROPS Design
28.04.2025 - 12:03
![]() Jan escribió:
Jan escribió:
I’m a sock knitter but now venturing into knitwear. Knitting size M A1… I’ve knitted around row 1 and done the yarn over increases, on the next round the pattern says to ‘twist’ the yarn over to avoid a large hole. Not sure how you twist that stitch as it falls between two purl stitches.
14.04.2025 - 22:20DROPS Design respondió:
Hi Jan, The yarn overs are twisted by working through the back loop. Happy Easter!
16.04.2025 - 12:13
![]() Anne-Karin Lihaug Grimstad escribió:
Anne-Karin Lihaug Grimstad escribió:
Hvorfor har jeg 100 m mer enn jeg skal ha når A2 er ferdig
27.03.2025 - 11:16DROPS Design respondió:
Hej Anne-Karin, følger du diagrammet for din størrelse? Hvilken størrelse strikker du? Hvor mange masker har du når du starter diagrammet?
27.03.2025 - 14:09
![]() Kirsten Schou escribió:
Kirsten Schou escribió:
Hvordan laver jeg starten på trøjen, hvor den starter med 3vrang 1 ret 3vrang og så er der et hul og1ret hvad skal jeg strikke i "hullet" venlig hilsen Kirsten Schou
18.03.2025 - 15:44DROPS Design respondió:
Hei Kristen. Du strikker de maskene du ser i diagrammet. Der det er "hull" er det ingen masker. Om du ser på 3. rad (A.2) og masken med stjerne ikonet, så økes det med 6 masker og da fylles "hullet". Se gjerne på hjelpevideoen til blusen: Hvordan strikkes diagram A.2 til DROPS 222-32 og DROPS 223-2 – Del 1 og Hvordan strikkes diagram A.2 til DROPS 222-32 og DROPS 223-2 – Del 2. DU finner videoene til høyre eller under bildene. mvh DROPS Design
24.03.2025 - 10:06
![]() Gullevi Ljungström escribió:
Gullevi Ljungström escribió:
Var laddar jag ner mönstret
11.03.2025 - 11:21DROPS Design respondió:
Hej Gullevi, det ligger her, det er bare at scrolle lidt længere ned :)
14.03.2025 - 12:08
![]() Ute Mehnert escribió:
Ute Mehnert escribió:
Ich verstehe das Diagramm A2 nicht, bezüglich der 8 Maschen, wobei der Rapport 11 Maschen beträgt. Ich bitte um Hilfe Lg Ute
21.02.2025 - 17:40DROPS Design respondió:
Liebe Frau Mehnert, vielleicht können diese beide Videos helfen? Wir zeigen, wie man das Diagram A.2 strickt: Runde 1-9 und Runde 10-28. Viel Spaß beim Stricken!
24.02.2025 - 07:37
![]() Hazel Wilson escribió:
Hazel Wilson escribió:
I don't see any free patterns! It goes to a link that does not show any pattern.
24.08.2024 - 21:40DROPS Design respondió:
Dear Hazel, all of our patterns are free! You can find this one right here in this page; remember to select pattern right under the title of the model to see the full pattern instructions. When you select "FREE PATTERNS" at the top of the page, it should display several pattern types to choose from. Happy knitting!
25.08.2024 - 23:04
![]() Pollie escribió:
Pollie escribió:
Ik begrijp niet goed welke scheiding er wordt bedoelt bij het lijf, er staat 3 cm na de scheiding, is dat de scheiding waar 12 steken zijn opgezet en dan die markeerdraad?
04.08.2024 - 15:57
|
|||||||||||||||||||||||||
Swing by Spring Top#swingbyspringtop |
|||||||||||||||||||||||||
 |
 |
||||||||||||||||||||||||
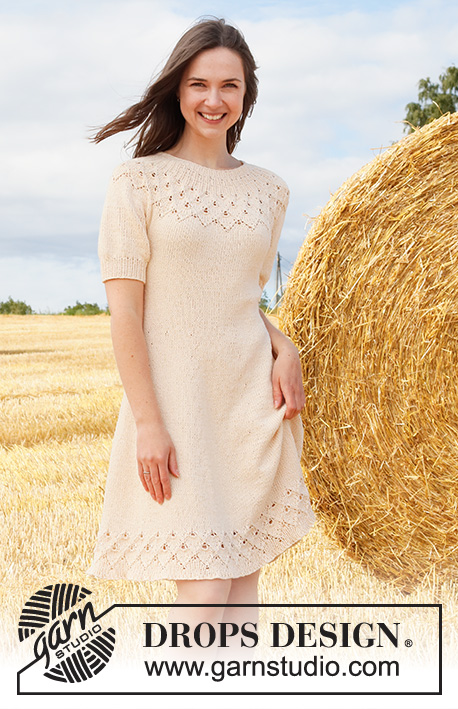
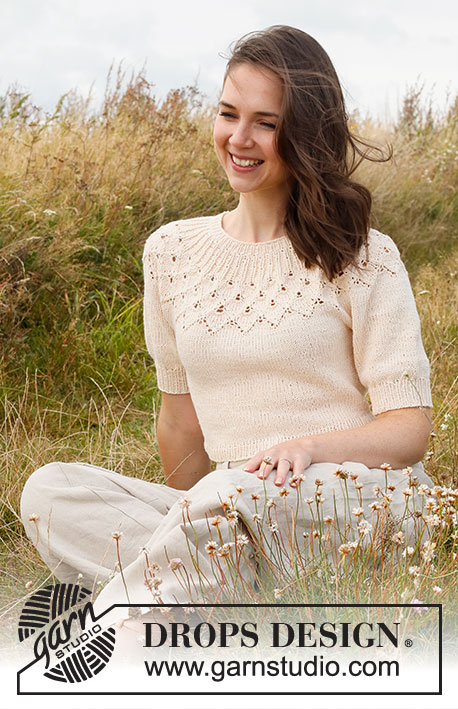
Jersey a punto en DROPS Belle. La labor está realizada de arriba abajo con el canesú redondo, el patrón de calados y mangas cortas en forma puff. Talla: S - XXXL
DROPS 222-32 |
|||||||||||||||||||||||||
|
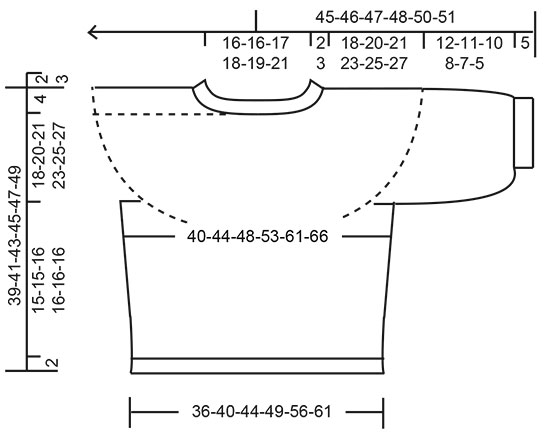
EXPLICACIONES PARA REALIZAR LA LABOR: ------------------------------------------------------- PATRÓN: Ver los diagramas A.1 y A.2. Elegir el diagrama para la talla correspondiente. TIP PARA LAS DISMINUCIONES (aplicar a los lados del cuerpo): Disminuir 1 punto a cada lado del marcapuntos como sigue: Trabajar hasta que queden 3 puntos antes del marcapuntos y trabajar 2 puntos juntos de derecho, 2 derechos (el marcapuntos está entre estos 2 puntos), deslizar 1 puntos como de derecho, 1 derecho, pasar el punto deslizado sobre el punto trabajado. TIP PARA EL REMATE: Para evitar que el borde de remate quede tenso se puede cerrar con una aguja de mayor tamaño. Si el borde sigue tenso, hacer 1 hebra después de aprox. cada 4º punto, y al mismo tiempo cerrar (las hebras se cierran como puntos normales). ------------------------------------------------------- COMENZAR LA LABOR AQUÍ: ------------------------------------------------------- JERSEY - RESUMEN DE LA LABOR: La cenefa del escote y el canesú se trabajan en redondo desde el centro de la espalda, de arriba abajo. Dividir el canesú para el cuerpo y las mangas. El cuerpo se trabaja en redondo con una aguja circular, de arriba abajo. Las mangas se trabajan en redondo con agujas de doble punta/una aguja circular corta, de arriba abajo. CENEFA DEL ESCOTE: Montar 100-100-104-108-112-120 puntos con una aguja circular de 3 mm con Belle. Trabajar 1 vuelta de derecho. Después trabajar el elástico = 1 derecho/1 revés. Cuando el elástico mida 2-2-3-3-3-3 cm, cambiar a una aguja circular de 4 mm. Insertar 1 marcapuntos al inicio de la vuelta en el centro de la espalda, medir el canesú desde el marcapuntos! CANESÚ: Trabajar A.1 en redondo (= 25-25-26-27-28-30 repeticiones de 4 puntos). Después de completar A.1, hay 200-200-208-216-280-300 puntos en la aguja. La labor mide ahora 4-4-4-4-6-6 cm desde el marcapuntos. Ahora trabajar A.2 en redondo (= 25-25-26-27-28-30 repeticiones de 8-8-8-8-10-10 puntos). RECORDAR MANTENER LA TENSIÓN DEL TEJIDO! Después de completar A.2, hay 275-300-312-351-392-420 puntos en la aguja. La labor mide aprox. 14-14-14-17-19-19 cm desde el marcapuntos (es decir, 16-16-17-20-22-22 cm desde el borde de montaje). Trabajar en punto jersey hasta que la labor mida 18-20-21-23-25-27 cm desde el marcapuntos. Ahora dividir la labor para el cuerpo y las mangas. Trabajar la siguiente vuelta como sigue: 38-42-44-50-58-63 derechos (= ½ espalda), colocar los siguientes 62-66-68-76-80-84 puntos en un gancho auxiliar para la manga, montar 8-8-12-12-12-12 puntos nuevos en la aguja (= en el lado bajo la manga), 75-84-88-99-116-126 derechos (= delantero), colocar los siguientes 62-66-68-76-80-84 puntos en un gancho auxiliar para la manga, montar 8-8-12-12-12-12 puntos nuevos en la aguja (= en el lado bajo la manga), trabajar de derecho los últimos 38-42-44-50-58-63 puntos (= ½ espalda). Finalizar el cuerpo y las mangas por separado. AHORA MEDIR LA LABOR DESDE AQUÍ! CUERPO: = 167-184-200-223-256-276 puntos. Insertar 1 marcapuntos en el centro de los 8-8-12-12-12-12 puntos nuevos bajo cada manga (= en el lado del cuerpo). Ahora hay 83-92-100-111-128-138 puntos para el delantero y 84-92-100-112-128-138 puntos para la espalda. Permitir a los marcapuntos seguir la labor hacia delante; se usarán al disminuir en los lados. Trabajar en punto jersey en redondo. Cuando la labor mida 3 cm desde la división, disminuir 1 punto a cada lado de cada marcapuntos - leer TIP PARA LAS DISMINUCIONES (= 4 puntos disminuidos). Disminuir de esta manera cada 2 cm un total de 4-4-4-4-5-5 veces = 151-168-184-207-236-256 puntos. Trabajar en punto jersey en redondo hasta que la labor mida 15-15-16-16-16-16 cm desde la división - o hasta la medida deseada (quedan aprox. 2 cm hasta el largo final). Trabajar 1 vuelta de derecho y al mismo tiempo aumentar 23-26-28-31-36-38 puntos repartidos = 174-194-212-238-272-294 puntos. Cambiar a una aguja circular de 3 mm. Trabajar el elástico (1 derecho/1 revés) en redondo 2 cm. Cerrar con derecho sobre derecho y revés sobre revés - leer TIP PARA EL REMATE. El jersey mide aprox. 39-41-43-45-47-49 cm desde el hombro hacia abajo. MANGAS: Deslizar los 62-66-68-76-80-84 puntos desde el gancho auxiliar a un lado de la labor con agujas de doble punta/ una aguja circular corta de 4 mm, y recoger 1 punto en cada uno de los 8-8-12-12-12-12 puntos nuevos montados en el lado bajo la manga = 70-74-80-88-92-96 puntos. Trabajar en punto jersey en redondo hasta que la manga mida 12-11-10-8-7-5 cm desde la división (quedan aprox. 5 cm hasta el largo final, probarse el jersey y trabajar hasta la medida deseada). Trabajar 1 vuelta de derecho, al mismo tiempo disminuir 16-16-14-14-14-14 puntos repartidos = 54-58-66-74-78-82 puntos Cambiar a agujas de doble punta de 3 mm. Trabajar el elástico en redondo = 1 derecho/1 revés 5 cm. Cerrar con derecho sobre derecho y revés sobre revés - recordar TIP PARA EL REMATE! La manga mide aprox. 17-16-15-13-12-10 cm desde la división. Trabajar la otra manga de la misma manera. |
|||||||||||||||||||||||||
Explicaciones del diagrama |
|||||||||||||||||||||||||
|
|||||||||||||||||||||||||
 |
|||||||||||||||||||||||||
 |
|||||||||||||||||||||||||
 |
|||||||||||||||||||||||||
 |
|||||||||||||||||||||||||
¿Terminaste este patrón?Entonces, etiqueta tus fotos con #dropspattern #swingbyspringtop o envíalas a la galería #dropsfan. ¿Necesitas ayuda con este patrón?Encontrarás 31 videos tutoriales, un espacio para comentarios/preguntas y más visitando la página del patrón en garnstudio.com © 1982-2026 DROPS Design A/S. Todos los derechos reservados. Este documento, incluyendo todas sus sub-secciones, está protegido por los derechos de autor (copyright). Lee más acerca de lo que puedes hacer con nuestros patrones en la parte de abajo de cada patrón de nuestro sitio. |
|||||||||||||||||||||||||


Con más de 40 años en el diseño de modelos de punto y de ganchillo, DROPS Design ofrece una de las más vastas colecciones de patrones gratuitos en el internet - traducidos en 17 idiomas. Al día de hoy, contamos con 324 catálogos y 12290 patrones - de los cuales 11685 están traducidos en español.
Nosotros trabajamos con mucho esmero para brindarte lo mejor que las labores de punto y ganchillo tienen para ofrecer,inspiración y consejos, así como hilos de magnífica calidad a precios increíbles! Te gustaría usar nuestros patrones para otro fin además del uso personal? Puedes leer acerca de lo que estás permitida a hacer en el texto de Copyright en la parte de abajo de todos nuestros patrones. Felices labores!
Escribe un comentario sobre DROPS 222-32
¡Nos encantaría saber qué piensas acerca de este patrón!
Si quieres escribir una pregunta referente al patrón, por favor asegúrate de elegir la categoría correcta en el formulario debajo, para acelerar el proceso de respuesta. Los campos obligatorios están marcados con un *.