
Looking for a yarn?


Comments / Questions (23)
![]() Dele wrote:
Dele wrote:
Bonjour, Pour le pull délicate dance, quand j'ai fais les trois rangs d'augmentations du raglans ( en tous 6rangs avec l'envers). Comment j'augmente ensuite? Tous les rangs endroits ou un rang sur deux endroits? Jusqu'à ce que j'arrive à la fin de l'encolure ? Merci
13.10.2025 - 16:09
![]() Dele wrote:
Dele wrote:
Bonjour, Pour le pull délicate dance, quand j'ai fais les trois rangs d'augmentations du raglans ( en tous 6rangs avec l'envers). Comment j'augmente ensuite? Tous les rangs endroits ou un rang sur deux endroits? Jusqu'à ce que j'arrive à la fin de l'encolure ? Merci
13.10.2025 - 16:08DROPS Design answered:
cf. réponse ci-dessous.
15.10.2025 - 08:44
![]() Dele wrote:
Dele wrote:
Bonjour, Lorsque j'ai fait les trois augmentations du raglan( 6 rangs) Est ce que je continue à augmenter tous les rangs endroits jusqu' à ce que j'ai rejoint la fin de l'encolure et que je joint l'ouvrage en rond?
12.10.2025 - 14:37DROPS Design answered:
Bonjour Mme Dele, quand vous avez augmenté 3 fois tous les 2 rangs (6 rangs au total), vous tricotez en suivant les rangs /tours 1 à 4 (vous augmentez 8 m au rang/tour1 et 4 m seulement au rang/tour 3); en même temps, vous augmentez pour l'encolure 6 x tous les 6 rangs, et, quand ces augmentations sont terminées, vous tricotez en rond comme indiqué à la fin de ENCOLURE V. Vous continuez ensuite à augmenter pour le raglan comme avant, mais cette fois ci en rond. Bon tricot!
15.10.2025 - 08:22
![]() Inge wrote:
Inge wrote:
Goeiedag, moeten de biezen apart gebreid worden en dan later aan de hals gezet worden? Of kunnen ze ook direct aan de pas gebreid worden? Groetjes, Inge
09.10.2025 - 15:52DROPS Design answered:
Dag Inge,
De biezen worden eerst apart gebreid. Als je klaar bent met de linker bies dan zet je steken op aan het eind van de naald, terwijl je de bies nog op de naald hebt staan en na het opzetten van steken brei je de steken over de rechter voorbies. Je hebt dan dus 2 losse flapjes waar steken tussen zitten. Aan het einde naai je deze flapjes vast aan het achterpand.
09.10.2025 - 20:56
![]() Tania wrote:
Tania wrote:
Ho dimenticato di dire che il colore che sceglierei è il marrone cioccolato per entrambi i filati
06.10.2025 - 22:03DROPS Design answered:
Buonasera Tania, provi a sostituire Flora con un altro filato del gruppo A. Buon lavoro!
11.10.2025 - 19:15
![]() Tania wrote:
Tania wrote:
Buonasera, vorrei realizzare questo modello ma nella combinazione colori (dei due filati proposti) non trovo quelli di mio gradimento. Potrei sostituire il Flora con il Merino Extrafine e mantenere l'altro filato Brushed Alpaca Silk? Con questa eventuale combinazione la lavorazione potrebbe risultare più sostenuta? Grazie per l'attenzione Tania Berardi
06.10.2025 - 22:01DROPS Design answered:
Buonasera Tania, Merino Extra Fine appartiene ad un gruppo filati diverso di Flora, ed è più grosso come filato. Potrebbe provare con Baby Merino. Buon lavoro!
11.10.2025 - 19:15
![]() Dele wrote:
Dele wrote:
Bonjour Quand j'ai construit les deux bordures avec l'empiècement encolure dos et raglan est ce que je continue TOUTES les mailles en jersey ou je différencie les bordures et continue à les tricoter comme au démarrage ? Merci
01.10.2025 - 14:45DROPS Design answered:
Bonjour Mme Dele, lorsque vous avez toutes les mailles de l'empiècement (68 à 74 m - cf taille), vous tricotez en jersey avec les 4 mailles de bordure des devants de chaque côté comme avant jusqu'à la fin de l'encolure, autrement dit, les 4 mailles de la bordure du devant droit et les 4 mailles de la bordure du devant gauche vont se tricoter comme avant tant que vous tricotez en allers et retours. Bon tricot!
01.10.2025 - 16:55
![]() Sing wrote:
Sing wrote:
V-HALS: Hej I forbindelse med udtagning til Hals, står der at der skal tages ud indenfor kantmaske. Er kantmaske den første af de 4 masker i forkanten? Således at udtagningsmasken bliver en ny maske i de 4 forkantsmasker og sidste maske integreres i forsiden? På forhånd tak for svar.
20.09.2025 - 16:21DROPS Design answered:
Hi Sing, you increase for the V-neck 1 stitch inside the bands on each side (it means before and after these 4 stitches). Happy knitting!
25.09.2025 - 08:01
![]() Martine wrote:
Martine wrote:
Bonjour. Sur le patron du modèle je ne comprends pas les mesures du bas du pull. Pour la taille M 53 cm pour taille L 57 cm de pour taille XL 53 cm. N'y a t'il pas une erreur ? J'hésite entre la taille L ou XL pour un tour de poitrine de 108 cm. Que me conseillez-vous ? Je vais essayer de commencer le travail, le début est difficile à comprendre. Merci pour votre réponse.
01.09.2025 - 14:37DROPS Design answered:
Bonjour Martine, effectivement il y a une erreur dans le schéma, en taille XL, on a 188 m pour le dos & le devant soit environ 63 cm de large (et non 53). Je transfère à nos stylistes pour correction, merci. Bon tricot!
02.09.2025 - 17:11
![]() Maria Ines wrote:
Maria Ines wrote:
Hay un video de los bordes, por favor ? Gracias !
11.08.2025 - 01:35DROPS Design answered:
Hola Maria Ines, el borde se trabaja según la técnica I-cord. En este video puedes ver cómo se trabajan los primeros 2 puntos de las cenefas, mientras que el resto de los puntos de la cenefa se trabajan en punto jersey.
19.08.2025 - 20:49
|
|
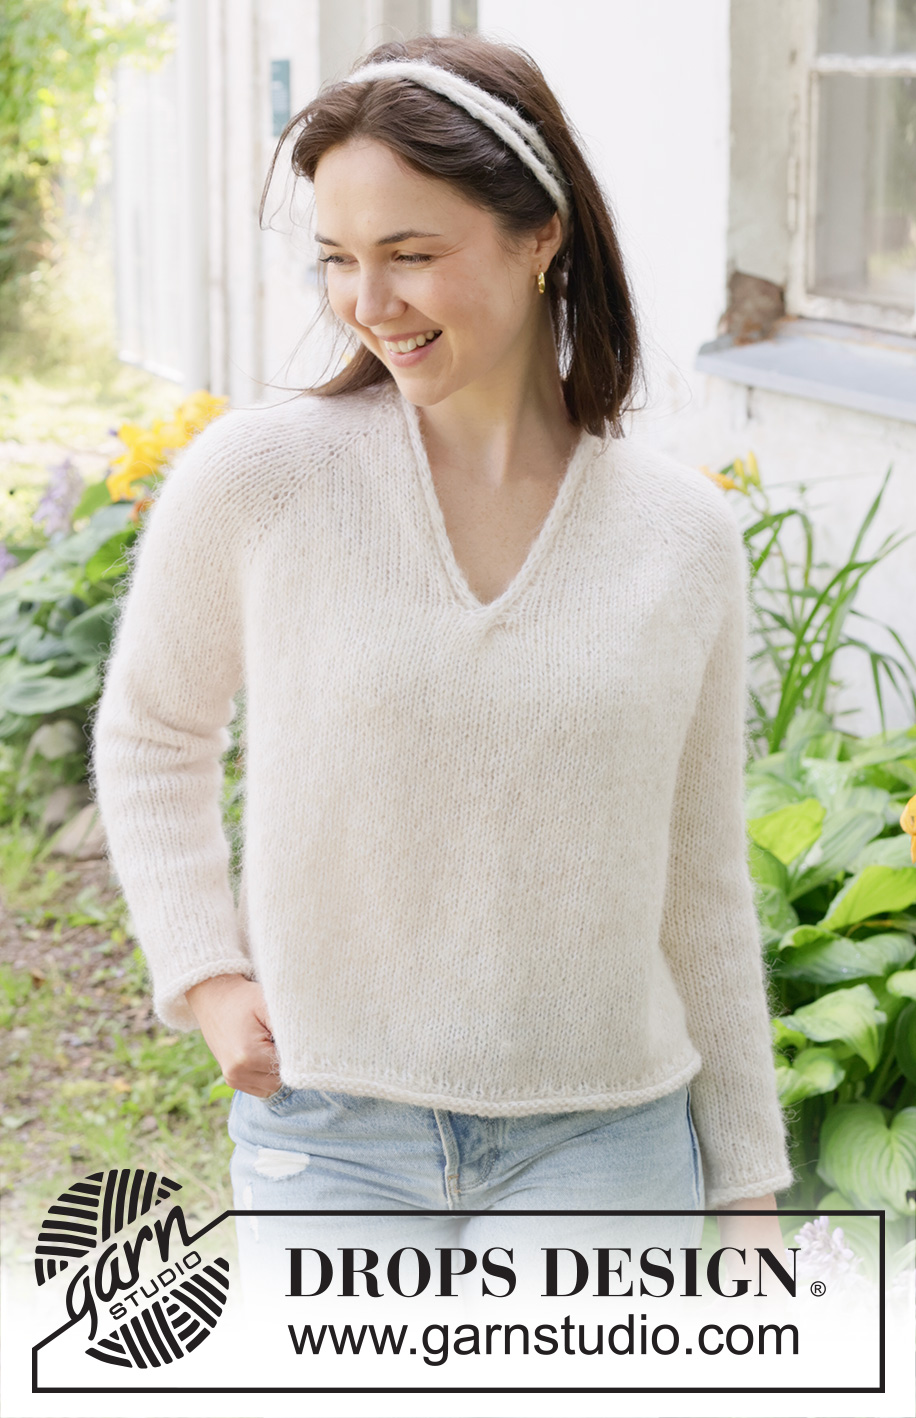
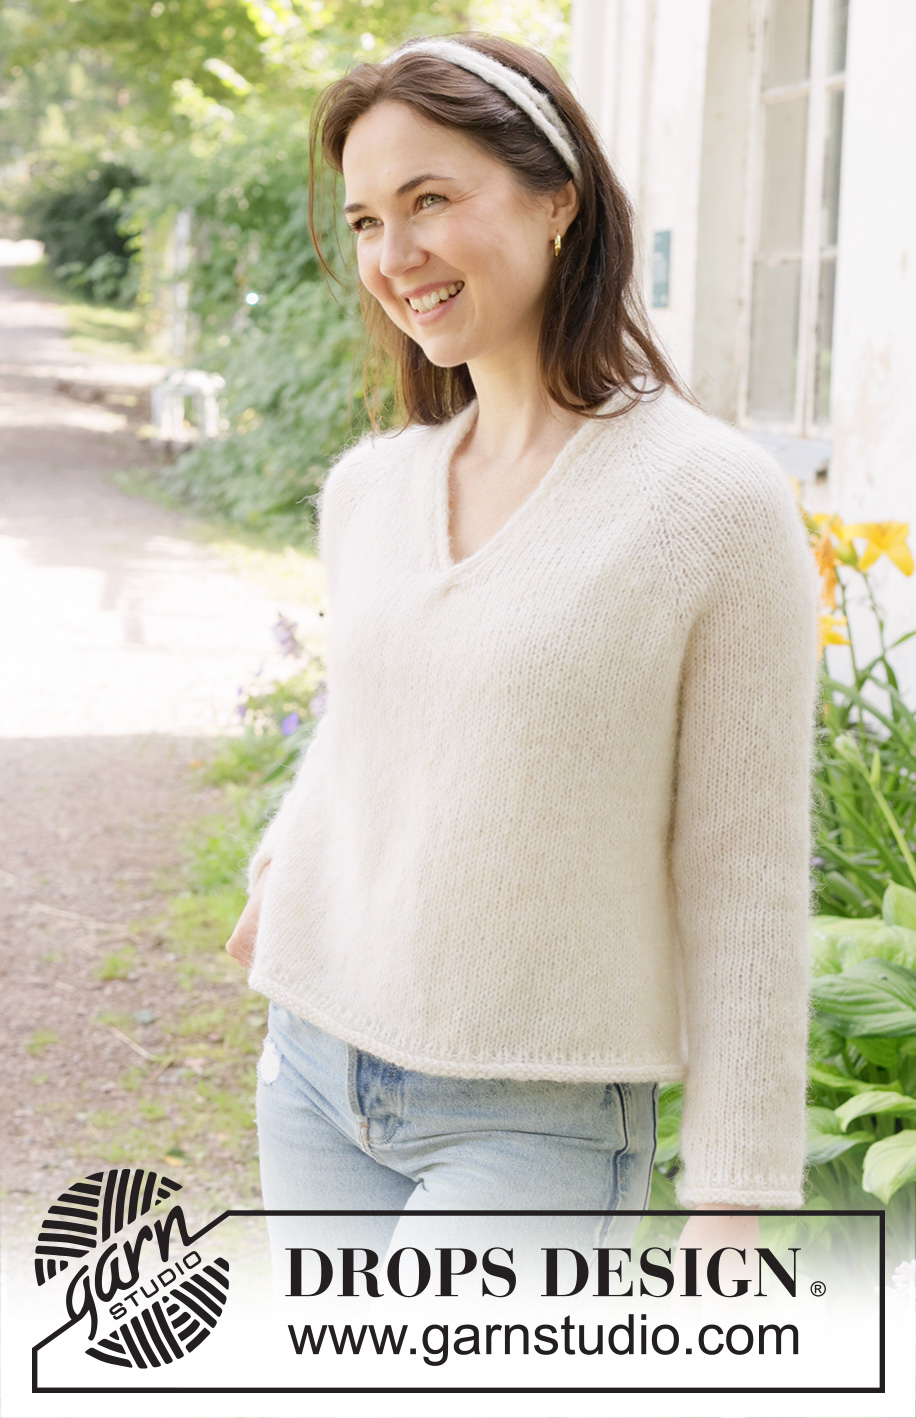
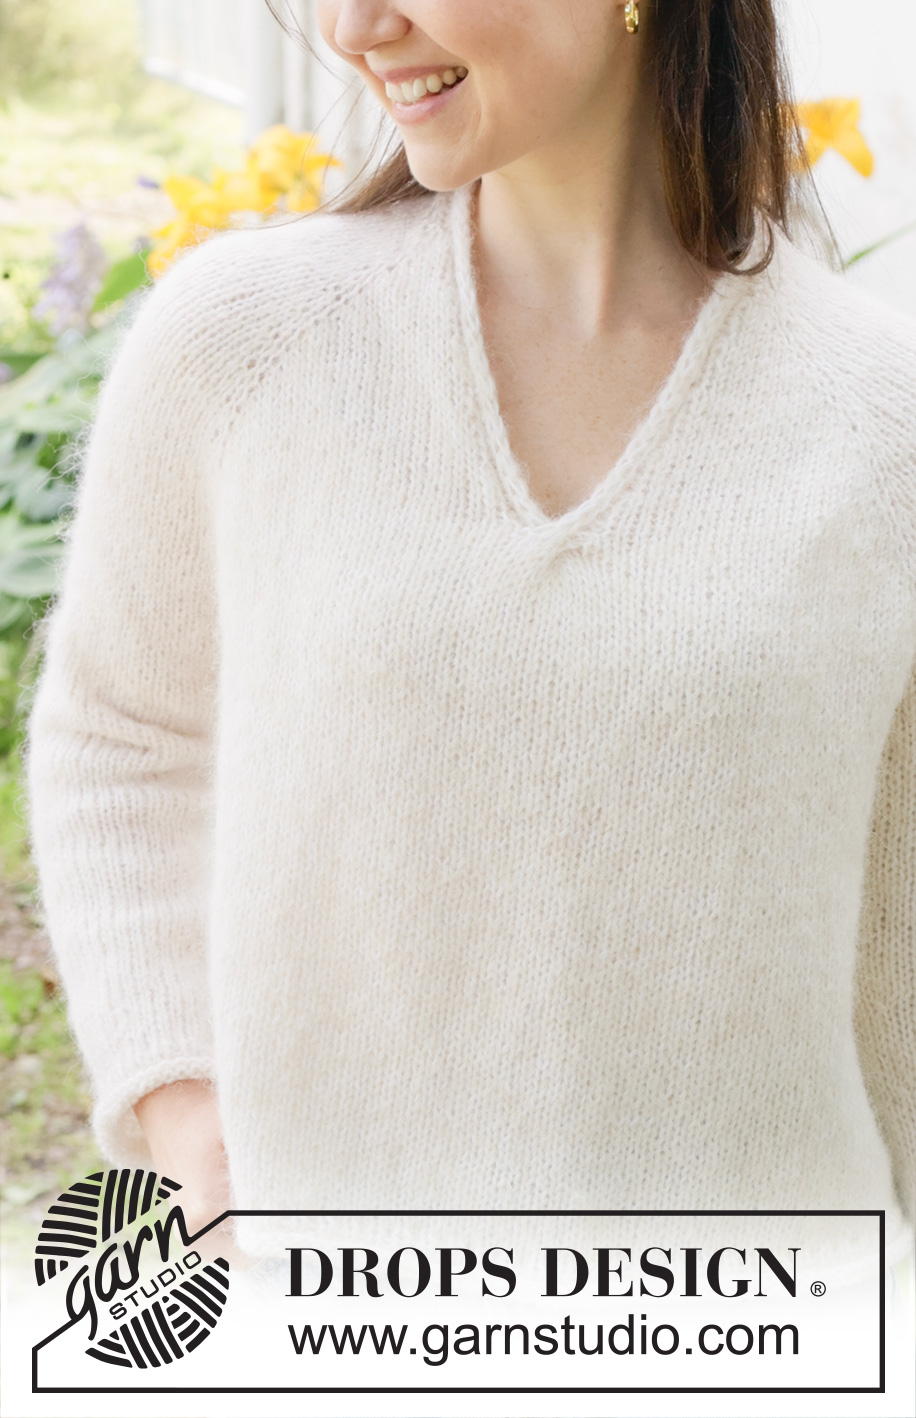
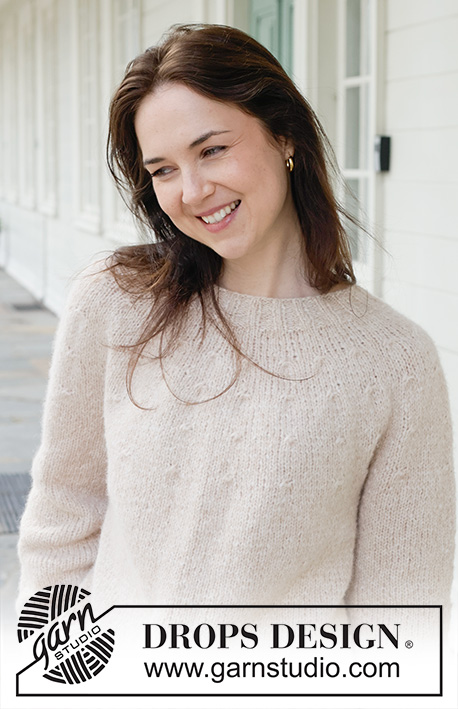
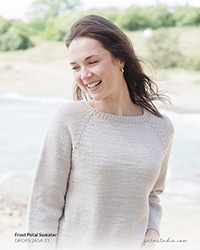
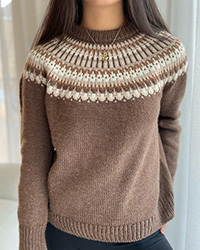
Delicate Dance#delicatedancesweater |
|
 |
 |
Knitted jumper in DROPS Brushed Alpaca Silk and DROPS Flora. The piece is worked top down with raglan, V-neck, rolled edges and I-cord. Sizes S - XXXL.
DROPS 258-13 |
|
|
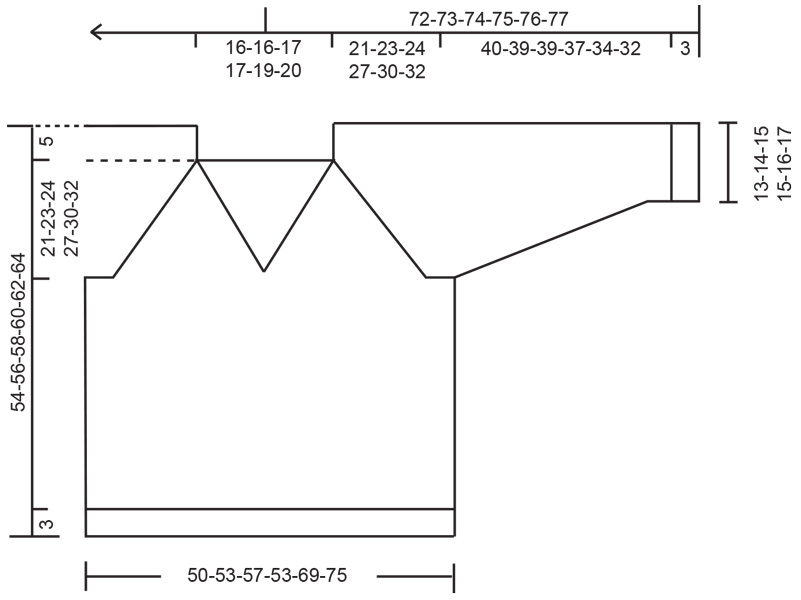
------------------------------------------------------- EXPLANATIONS FOR THE PATTERN: ------------------------------------------------------ RAGLAN: Increase 1 stitch by working 1 yarn over, which is worked twisted on the next row/round to avoid a hole. V-NECK: Increase 1 stitch by working 1 yarn over, which is worked twisted on the next row to avoid a hole. DECREASE TIP (mid-under sleeves): Decrease 1 stitch on each side of the marker-thread as follows: Work until there are 3 stitches left before the marker-thread, knit 2 together, knit 2 (marker-thread sits between these 2 stitches), slip 1 stitch knit-wise, knit 1 and pass the slipped stitch over the knitted stitch. ------------------------------------------------------- START THE PIECE HERE: ------------------------------------------------------- JUMPER – SHORT OVERVIEW OF THE PIECE. The pattern uses both long and short needles; start with the length which fits the number of stitches and change when necessary. The bands are worked first, then stitches are cast on between them for the yoke, which is worked back and forth, top down from mid front until the V-neck is finished. Then the yoke is continued in the round. When the yoke is finished, it is divided for body and the sleeves. The body is continued in the round, while the sleeves wait. The sleeves are worked in the round, top down. RIGHT BAND: Cast on 4 stitches with circular needle size 5.5 mm, 1 strand DROPS Brushed Alpaca Silk and 1 strand DROPS Flora (2 strands). RIGHT SIDE: Purl 2, slip 1 stitch purl-wise with strand in front, knit 1. WRONG SIDE: Slip 1 stitch purl-wise with strand in front, knit 3. Repeat these 2 rows until the band measures 19-19-20-20-20-21 cm, finishing after a row from the wrong side. Cut the strand and lay the piece to one side. LEFT BAND: Cast on 4 stitches with circular needle size 5.5 mm, 1 strand DROPS Brushed Alpaca Silk and 1 strand DROPS Flora (2 strands). RIGHT SIDE: Slip 1 stitch purl-wise with strand in front, knit 1, purl 2. WRONG SIDE: Knit 2, slip 1 stitch purl-wise with strand in front, knit 1. Repeat these 2 rows until the band measures 19-19-20-20-20-21 cm, finishing after a row from the wrong side. Now cast on stitches for the yoke between the bands as described below. YOKE: Work the left band as before, then cast on 60-60-62-62-64-66 stitches, work the right band as before (from the right side) = 68-68-70-70-72-74 stitches. Purl 1 row from the wrong side with 4 band stitches on each side. Insert 4 markers without working the stitches as follows: Count 5 stitches (= front piece), insert 1 marker in the next stitch, count 16 stitches (= sleeve), insert 1 marker in the next stitch, count 22-22-24-24-26-28 stitches (= back piece), insert 1 marker in the next stitch, count 16 stitches (= sleeve), insert 1 marker in the next stitch, there are 5 stitches left after the last marker (= front piece). Work stocking stitch back and forth with 4 band-stitches as before on each side. AT THE SAME TIME increase for both RAGLAN and the V-NECK – read descriptions above. Read both sections below before continuing. Remember to maintain the knitting tension. V-NECK: Start to increase for the V-neck on the first row from the right side, then every 6th row 6-6-7-7-8-9 times, increasing 1 stitch inside the bands on each side. When the V-neck is finished, work 1 row from the wrong side, then join the jumper mid-front from the right side as follows: Knit until there are 4 stitches left on the row, place these 4 stitches on a cable needle held behind the piece, knit the first 4 stitches on the second front piece, insert 1 marker on the needle (beginning of round), knit the stitches from the cable needle. Continue with stocking stitch in the round and finish the increases for raglan. RAGLAN: ROW 1 (right side): Work stocking stitch and the bands as before. Increase on each side of each marker-stitch (8 increased stitches). ROW 2 (wrong side): Work stocking stitch and bands as before. Work ROWS 1 and 2 a total of 3-3-6-7-4-4 times (6-6-12-14-8-8 worked rows). Then increase as follows: NOTE! When the jumper has been joined mid-front and is continued in the round, finish the increases for raglan as described below): ROW/ROUND 1 (right side): Increase on each side of each marker-stitch (8 increased stitches). ROW/ROUND 2 (wrong side): Work stocking stitch and bands as before. ROW/ROUND 3 (right side): Increase only on the front and back pieces, i.e., before marker-stitches 1 and 3 and after marker-stitches 2 and 4 – do not increase on the sleeves (= 4 increased stitches). ROW/ROUND 4 (wrong side): Work stocking stitch and bands as before. Work ROWS/ROUNDS 1 to 4 a total of 9-10-9-10-13-14 times (= 36-40-36-40-52-56 rows worked; you have increased 9-10-9-10-13-14 times on the sleeves and 18-20-18-20-26-28 times on the front and back pieces). All increases for raglan and the V-neck are finished. You have increased a total of 12-13-15-17-17-18 times on the sleeves and 21-23-24-27-30-32 times on the front and back pieces. There are 212-224-240-260-276-292 stitches. The yoke measures approx. 21-23-24-27-30-32 cm from the cast-on edge mid-back. Now divide for the body and sleeves. DIVIDE FOR BODY AND SLEEVES: Start from mid-front, knit 33-35-37-40-44-47 (= front piece), place the next 40-42-46-50-50-52 stitches on 1 thread for the sleeve, cast on 8-10-12-14-16-18 stitches (under sleeve), knit 66-70-74-80-88-94 (= back piece), place the next 40-42-46-50-50-52 stitches on 1 thread for the sleeve, cast on 8-10-12-14-16-18 stitches (under sleeve), knit 33-35-37-40-44-47 (= front piece). The body and sleeves are finished separately. BODY: = 148-160-172-188-208-224 stitches. Continue with stocking stitch in the round until the piece measures 46-48-50-52-54-56 cm from the cast-on edge mid-back. Now work a rolled edge as follows: Work 2 rounds of rib (knit 1, purl 1), then knit 4 rounds. Cast off a little loosley. The jumper measures approx. 49-51-53-55-57-59 cm from the cast-on edge mid-back and 54-56-58-60-62-64 cm from top of shoulder. SLEEVES: Place the 40-42-46-50-50-52 sleeve-stitches from one thread on double pointed needles/circular needle size 5.5 mm and knit up 1 stitch in each of the 8-10-12-14-16-18 stitches cast on under the sleeve = 48-52-58-64-66-70 stitches. Insert a marker-thread in the middle of the stitches under the sleeve. Start at the marker-thread and work stocking stitch in the round. When the sleeve measures 3 cm, decrease 2 stitches under the sleeve – read DECREASE TIP. Decrease like this every 10-8-5½-3½-3½-2½ cm a total of 4-5-7-9-9-10 times = 40-42-44-46-48-50 stitches. Continue working until the sleeve measures 40-39-39-37-34-30 cm from the division. There is 3 cm left to finished length. Work 2 rounds of rib (knit 1, purl 1). Knit 4 rounds. Cast off a little loosely. The sleeve measures approx. 43-42-42-40-37-35 cm. ASSEMBLY: Sew the bands together mid-back and sew the bands to the neckline. |
|
|
|
Have you finished this pattern?Tag your pictures with #dropspattern #delicatedancesweater or submit them to the #dropsfan gallery. Do you need help with this pattern?You'll find 28 tutorial videos, a Comments/Questions area and more by visiting the pattern on garnstudio.com. © 1982-2025 DROPS Design A/S. We reserve all rights. This document, including all its sub-sections, has copyrights. Read more about what you can do with our patterns at the bottom of each pattern on our site. |
|

With over 40 years in knitting and crochet design, DROPS Design offers one of the most extensive collections of free patterns on the internet - translated to 17 languages. As of today we count 319 catalogues and 12029 patterns translated into English (UK/cm).
We work hard to bring you the best knitting and crochet have to offer, inspiration and advice as well as great quality yarns at incredible prices! Would you like to use our patterns for other than personal use? You can read what you are allowed to do in the Copyright text at the bottom of all our patterns. Happy crafting!
Post a comment to pattern DROPS 258-13
We would love to hear what you have to say about this pattern!
If you want to leave a question, please make sure you select the correct category in the form below, to speed up the answering process. Required fields are marked *.