
Popular categories
Looking for a yarn?


Comments / Questions (70)
![]() Jane Evans wrote:
Jane Evans wrote:
Me again.. sorry! I've done the yoke and separated the shoulders onto stitch holders. But now it tells me to cut the yarn? So do I then move all the stitches for the back on to one needle and start the next row? Thanks
10.10.2022 - 22:33DROPS Design answered:
Hi Jane, You are working just the back piece stitches, which are on the circular needle (the front piece stitches are either left on the needle and not worked or you can place them on a thread if that is easier). Work back and forth over the back piece, starting from the right side. Happy knitting!
11.10.2022 - 06:57
![]() Jane Evans wrote:
Jane Evans wrote:
Hi. Thanks for thr answer... but I've done it all vertically once... just not sure how to out stitches properly to make sure I increase at the right place? Thanks!
05.10.2022 - 23:44DROPS Design answered:
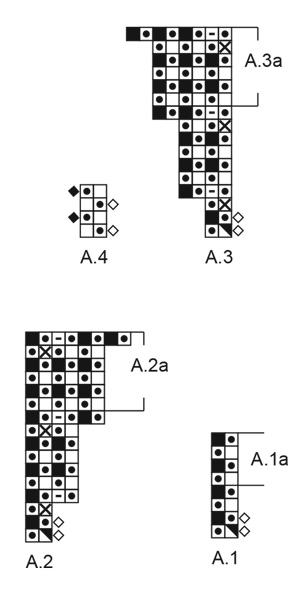
Dear Mrs Evans, maybe this video could help you, we are showing how to work the diagrams A.1, A.2 and A.3 and this one how to continue working the diagrams. Hope it can help, happy knitting!
06.10.2022 - 08:30
![]() Jane Evans wrote:
Jane Evans wrote:
Please help! I'm stuck on the yoke. I've followed the chart for the first time and now about to start again, but just not sure where the increases should be. I'm really struggling. It was easy when I could count stitches between the increases, but now I'm stuck!
30.09.2022 - 15:50DROPS Design answered:
Dear Jane, if you are referring to A.1a, it's just a shortened version of A.1 and it doesn't affect the increases, which are worked exactly as before (in A.2 and A.3); A.2 and A.3 are still being worked until you complete them vertically, After working A.1 once vertically, continue working A.1a over A.1, and repeat as many times as necessary until A.2 and A.3 have been completed vertically. Happy knitting!
03.10.2022 - 01:27
![]() Sabine wrote:
Sabine wrote:
Vielen Dank für die schnelle Antwort, aber sie beantwortet meine Frage nicht wirklich. Für die Passe stricke ich 10 Reihen A.2 (A.1 und A.3 natürlich auch parallel), dann 8 Mal A.2a. Das sind 58 Reihen (10+8×6), das ergibt laut Maschenprobe über 18 cm. Wenn dann noch die 9 cm Halsblende dazu kommen, bin ich schon bei 27 cm. Kann es sein, dass die Halsblende nicht mitgerechnet wird und es heißen müsste, weiter A.1a stricken bis die Arbeit "ab Markierung" eine Länge von 24 cm hat?
04.03.2022 - 12:21DROPS Design answered:
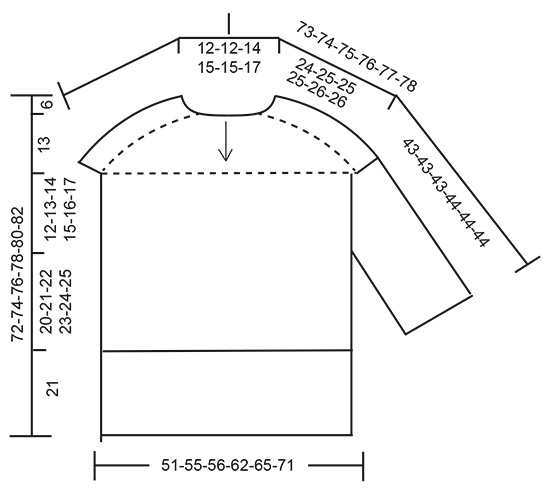
Liebe Sabine, schauen Sie mal die Maßskizze, dort am Schulter finden Sie diese 24 cm = vom Hals bis Verteilung. Viel Spaß beim stricken!
04.03.2022 - 16:05
![]() Sabine wrote:
Sabine wrote:
Ich stricke in xs und habe ein Problem bei der Passe. Wenn ich A.1a und A.2a 8 Mal in der Höhe gestrickt habe, ist die Arbeit viel länger als angegeben. Die 24 cm erreiche ich schon nach 5 Mal. Die Maschenprobe passt ungefähr. Wird ab Maschenanschlag gemessen oder ab Markierung?
04.03.2022 - 09:01DROPS Design answered:
Liebe Sabine, was meinen Sie mit "ungefähr"? Ihre Maschenprobe muss stimmen, damit die Höhe auch wie in der Maßskizze stimmen - hier lesen Sie mehr. Die 24 cm werden dann entlang der Schulter gemessen. Viel Spaß beim stricken!
04.03.2022 - 11:25
![]() Elin Lønne wrote:
Elin Lønne wrote:
Ved start på bærestykket: Første maske på A1, A2, og A3 skal strikkes med enkel rettmaske. Er det feil? Skal man begynne på omg 3?
24.02.2022 - 09:36DROPS Design answered:
Hei Elin. Forsett slik at patentmønstret stemmer overens, fra halskant til bærestykke. mvh DROPS Design
28.02.2022 - 13:28
![]() Elin Lønne wrote:
Elin Lønne wrote:
Når jeg øker blir det feil på venstre side front (A3)og høyre side bak(A3) . Økningen går ikke langs skulderen, men rett ned. Hva er feil?
24.02.2022 - 09:33
![]() Elin Lønne wrote:
Elin Lønne wrote:
(DROPS 217-14)Har strikket hele bærestykket feil, så prøver igjen, men jeg skjønner ikke hvor jeg har feilet( Økningen på venstre front og høyre bak, går FEIL vei) Lurer også på: hvor på diagrammet starter man etter å ha strikket ferdig halsen? 1. omg er jo med enkel rettmaske. Det skal man vel ikke? Begynne rett på omgang 3? Håper på snarlig svar, mister jo håret av dette :-)
24.02.2022 - 08:52DROPS Design answered:
Hei Elin. Har du sett hjelpevideoene til denne genseren? Av egen erfaring ble bruken av maskemarkører en stor hjelp. Lett å øke i feil maske (= økningene går feil vei), men med å markere hvilken maske det skal økes i etter hver omgang gikk det fint. Når du er ferdig med halskanten, 9 cm, fortsetter du med A.1 og da slik det er forklart i oppskriften, (strikk A.1 over de første 6-6-6-8-8-8 maskene, A.2, A.1 over 14 masker, A.3, A.1 over 10-10-12-14-14-16 masker, A.2 over 2 masker, A.1 over 14 masker, A.3 over 2 masker, og A.1 over de siste 4-4-6-6-6-8 maskene. Når A.1 er strikket 1 gang i høyden, gjentas A.1a videre i høyden). mvh DROPS Design
28.02.2022 - 13:26
![]() Liselotte wrote:
Liselotte wrote:
Tak for svar nedenfor. Men man strikker jo omslagene væk efter at man har strikket/slået masker op jf. beskrivelsen: “På næste omgang strikkes der således: *strik 1 maske ret, strik omslaget og næste maske vrang sammen*, gentag fra *-* “ Så er der jo ingen omslag til at fortsætte i A1 på næste pind. Det forstår jeg altså ikke. Håber i kan hjælpe. Mange tak og venlig hilsen Liselotte
12.02.2022 - 14:12
![]() Liselotte wrote:
Liselotte wrote:
Jeg har problemer med ærmet. I 3 sidste linje skriver i “Fortsæt rundt over alle masker efter A.1a.” men jeg har jo ingen omslag på de første 14 og de sidste 16 masker? Kun på dem i midten fra bærestykket, hvor jeg har strikket patent? Jeg strikker str. M. Kan i hjælpe? Mange tak
06.02.2022 - 21:41DROPS Design answered:
Hej Liselotte, jo samtidigt som du strikkede masker op på hver side, lavede du også omslag efter hver 2.maske, det er de omslag du strikker sammen med ret masken. God fornøjelse!
09.02.2022 - 10:07
|
||||||||||||||||||||||||||||
Slippery Slopes Sweater#slipperyslopessweater |
||||||||||||||||||||||||||||
 |
 |
|||||||||||||||||||||||||||
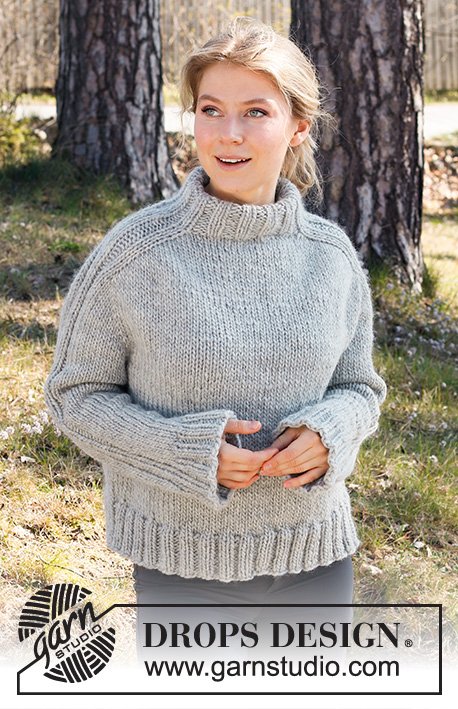
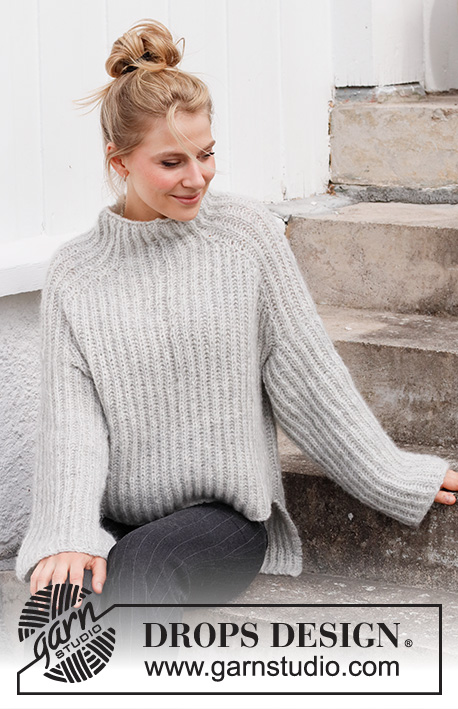
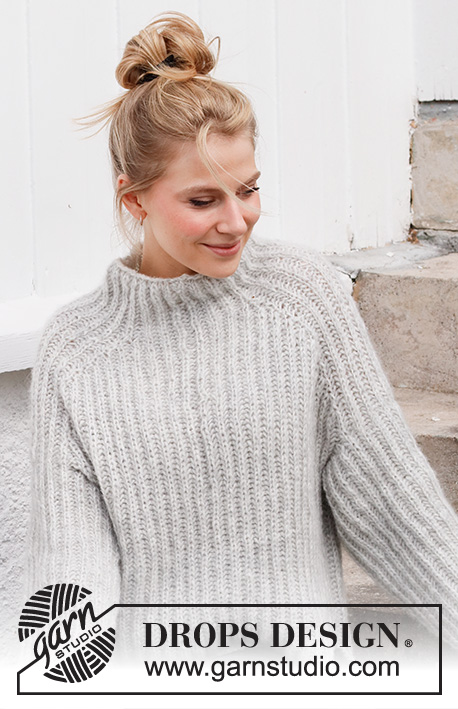
Knitted jumper with English rib in DROPS Air. Worked top down with saddle shoulder. Size XS–XXL.
DROPS 217-14 |
||||||||||||||||||||||||||||
|
------------------------------------------------------- EXPLANATION FOR THE PATTERN: ------------------------------------------------------- GARTER STITCH (back and forth): Knit all rows. 1 ridge vertically = knit 2 rows. PATTERN: See diagrams A.1 to A.4 (worked in English rib). DECREASE TIP (evenly): To calculate how to decrease evenly, use the total number of stitches on needle (e.g. 62 stitches) and divide stitches by number of decreases to be done (e.g. 10) = 6,2. In this example decrease by purling approx. every 5th and 6th stitch together. ------------------------------------------------------- START THE PIECE HERE: ------------------------------------------------------- JUMPER - SHORT OVERVIEW OF THE PIECE: Work neck edge and yoke in the round on circular needle from mid back, top down. Increase stitches for shoulder on yoke before dividing the piece, and work front and back piece separately until finished measurements. Front piece is shorter than back piece. Work the sleeves at the end. NECK EDGE: Cast on 66-66-70-74-74-78 stitches on circular needle size 6 mm with Air. Purl 1 round and decrease 10 stitches evenly – read DECREASE TIP = 56-56-60-64-64-68 stitches. Switch to circular needle size 7 mm. Work A.1 over all stitches. Continue until piece measures 9 cm. Insert 1 marker here, measure piece from here. YOKE: Work pattern as follows: Work A.1 (= 2 stitches) over the first 6-6-6-8-8-8 stitches (= half back piece), A.2 (= 2 stitches), A.1 over 14 stitches, A.3 (= 2 stitches) (= shoulder), A.1 over 10-10-12-14-14-16 stitches (= front piece), A.2 over 2 stitches, A.1 over 14 stitches, A.3 over 2 stitches (= shoulder), and A.1 over the last 4-4-6-6-6-8 stitches (= half back piece). REMEMBER THE KNITTING TENSION! When A.1 has been worked 1 time vertically, repeat A.1a vertically. When A.2 and A.3 have been worked 1 time vertically, repeat A.2a and A.3a vertically, i.e. continue increases every 6th round, work the increased stitches in English rib. When A.2a and A.3a have been worked 8-9-9-10-11-12 times vertically in total, there are 136-144-148-160-168-180 stitches on needle. Work A.1a over all stitches until piece measures 24-25-25-25-26-26 cm on the longest (i.e. measured along the shoulder), adjust so that next round is a purl round. Now divide piece into front and back piece and cast off shoulder stitches as follows: Work 26-28-28-32-34-36 stitches in English rib, 1 stitch in GARTER STITCH – read explanation above (= half back piece), slip the next 15 stitches on a stitch holder (work them first), work 1 stitch in garter stitch, work 51-55-57-63-67-73 stitches in English rib, 1 stitch in garter stitch (= front piece), slip the next 15 stitches on a stitch holder (work them first), work 1 stitch in garter stitch and work English rib over the last 25-27-29-31-33-37 stitches (= half back piece). Cut the yarn. Let the stitches on front piece sit on needle. BACK PIECE: = 53-57-59-65-69-75 stitches. Work as follows from right side: Work 1 stitch in garter stitch, A.4 (= 2 stitches) until 1 stitch remains (i.e. English rib begins and ends with 1 purl English rib stitch), and finish with 1 stitch in garter stitch. Continue pattern back and forth. When piece measures 12-13-14-15-16-17 cm from division, insert 1 marker thread in each side, marks armholes. When piece measures 66-68-70-72-74-76 cm from the marker in the neck, cast off by knitting, cast off yarn overs as separate stitches (this is done to avoid a tight cast-off edge). FRONT PIECE: Work the 53-57-59-65-69-75 stitches on front piece as on back piece, but cast off when piece measures 45-47-49-51-53-55 cm from marker in the neck (front piece is approx.. 21 cm shorter than back piece). ASSEMBLY: Begin at the marker thread in the side and sew back and front piece together, from marker thread, and approx. 20-21-22-23-24-25 cm downwards. Bottom 20 cm = vent. LEFT SLEEVE: Begin in the side of front piece, at the marker thread, and pick up from right side as follows: Pick up 1 stitch, * make 1 yarn over, pick up 1 stitch, pick up 1 stitch *, repeat from *-* 6-6-7-7-8-8 times in total, slip the 15 stitches from stitch holder back on left needle, and work English rib over these (this is a round that is knitted), pick up 1 stitch from back piece, * make 1 yarn over, pick up 1 stitch, pick up 1 stitch *, repeat from *-* 6-6-7-7-8-8 times in total down towards marker thread in the side on back piece, make 1 yarn over, pick up 1 stitch = 42-42-46-46-50-50 stitches (yarn overs are not counted as separate stitches). On next round work as follows: * Knit 1, purl yarn over and next stitch together *, repeat from *-* over the next 12-12-14-14-16-16 stitches, knit 1, work English rib over the 15 stitches as before (purl this round), * knit 1, purl yarn over and next stitch together *, repeat from *-* over the next 14-14-16-16-18-18 stitches. Continue working in the round over all stitches according to A.1a: When sleeve measures 43-43-43-44-44-44 cm, cast off by knitting, cast off yarn overs as separate stitches (this is done to avoid a tight cast-off edge). RIGHT SLEEVE: Pick up stitches as on left sleeve, but begin on back piece and pick up stitches from right side up towards stitches on stitch holder. |
||||||||||||||||||||||||||||
Diagram explanations |
||||||||||||||||||||||||||||
|
||||||||||||||||||||||||||||
 |
||||||||||||||||||||||||||||
 |
||||||||||||||||||||||||||||
Have you finished this pattern?Tag your pictures with #dropspattern #slipperyslopessweater or submit them to the #dropsfan gallery. Do you need help with this pattern?You'll find 21 tutorial videos, a Comments/Questions area and more by visiting the pattern on garnstudio.com. © 1982-2026 DROPS Design A/S. We reserve all rights. This document, including all its sub-sections, has copyrights. Read more about what you can do with our patterns at the bottom of each pattern on our site. |
||||||||||||||||||||||||||||


With over 40 years in knitting and crochet design, DROPS Design offers one of the most extensive collections of free patterns on the internet - translated to 17 languages. As of today we count 324 catalogues and 12290 patterns translated into English (UK/cm).
We work hard to bring you the best knitting and crochet have to offer, inspiration and advice as well as great quality yarns at incredible prices! Would you like to use our patterns for other than personal use? You can read what you are allowed to do in the Copyright text at the bottom of all our patterns. Happy crafting!
Post a comment to pattern DROPS 217-14
We would love to hear what you have to say about this pattern!
If you want to leave a question, please make sure you select the correct category in the form below, to speed up the answering process. Required fields are marked *.