
Popular categories
Looking for a yarn?


Comments / Questions (167)
![]() Delia wrote:
Delia wrote:
Buongiorno, ho qualche difficoltà con A3, dopo averlo finito in altezza e ricominciato dal basso, il motivo non corrisponde, devo ripartire da A1 e A2?
24.03.2026 - 07:02DROPS Design answered:
Buonasera Delia, dopo aver lavorato A.3, deve continuare sempre con A.3. Buon lavoro!
25.03.2026 - 08:37
![]() Delia wrote:
Delia wrote:
Buonasera, ho qualche difficoltà con A3, dopo averlo finito in altezza e ricominciato dal basso, il motivo non corrisponde, devo ripartire da A1 e A2?
24.03.2026 - 00:48DROPS Design answered:
Buonasera Delia, no, deve ripartire con A.3. Buon lavoro!
04.04.2026 - 18:17
![]() Cristina wrote:
Cristina wrote:
I'm having difficulty with A3. I've concluded that the increases are the first yarn over after the raglan stitches. But it's not clear what it means to increase like A1 and A2 while doing A3. Does that mean only the YO (and the correspondent knit next row), or more? because as I go along A3 I'm "missing" more and more stitches after the YO to match the scheme of A1. So before A3 should I do YO (first row), then YO+1 (third row), YO+2 (fifth row), YO+3 (seventh row), YO+4 (ninth row) ?
14.03.2026 - 17:45DROPS Design answered:
Dear Cristina, you can insert a marker before A.3A and after A.3C so that you will know how to work the new stitches before / after, ie work the new stitches before A.3A as at the beg of A.1 before and work the new stitches after A.3C as you worked at the end of A.1 before (ie yarn overs and all new stitches created). Happy knitting!
16.03.2026 - 09:06
![]() Eva wrote:
Eva wrote:
Jeg får ikke mønsteret til å stemme når jeg begynner på A. 4 etter å ha delt i bol og ermer, og lagt opp 7 masker i hver side.
09.03.2026 - 17:52
![]() Jade wrote:
Jade wrote:
I am stucking in A3, please tell me how many stitches are increased after each 2 rows of A3? I work in size M and after done A1, A2 I got 192 sts, but when I did first round of A3, there's no increased stitch, and then when I did 2nd round of A3, the chart didn't match, there's still 1 st left.
18.02.2026 - 17:58
![]() Marion wrote:
Marion wrote:
Wo befinden sich die Raglanmaschen?
14.02.2026 - 13:03
![]() Marion wrote:
Marion wrote:
Hallo. Ich habe jetzt a 1 und a 2 in die Höhe gestrickt. Jetzt steht a 3 stricken und die Zunahmen von a1 und a2 weiterarbeiten? Wie ist das gemeint wenn ich jetzt aber a3 stricke?
14.02.2026 - 11:13
![]() Sofie Neirynck wrote:
Sofie Neirynck wrote:
Hallo, velen stellen dezelfde vraag, het antwoord blijft voor mij echter onduidelijk... bij het starten van de 2e rij van A3 zijn er 2 steken teveel... kan u heel precies, steek voor steek de 2e rij van A3 beschrijven aub ? (u antwoordt telkens dat je de meerderingen van A1/A2 moet blijven maken, vandaar de 2 steken meer. Maar het patroon A3 toont niet wat er met die gemeerderde steken moet gebeuren, het blijft een gewone rechthoek...) Dank voor uw hulp.
13.02.2026 - 10:05DROPS Design answered:
Dag Sofie,
In de eerste rij van A.3 blijven de steken gelijk. Je meerdert namelijk 4 steken door 4 omslagen te maken, maar je mindert bij de zwarte driehoeken ook elk 2 steken. In de tweede naald brei je de vakjes met de bolletjes erin averecht en de andere vakjes brei je recht. Dus 2 recht, 7 averecht, 3 recht, 7 averecht, 2 recht.
15.02.2026 - 14:58
![]() Coline wrote:
Coline wrote:
Bonjour, Je ne comprends pas très bien comment réaliser les augmentations de A3... En lisant les commentaires, j'ai compris qu'il fallait augmenter après A3.a et A3.c mais le nombre d'augmentations ne correspond pas au nombre de mailles que je devrai alors avoir à la fin de A3 (il me reste 80 mailles à tricoter pour arriver à 272 mailles mais je dois augmenter 25 fois.. 80 n'est pas divisible par 25 ????) Merci pour l'éclairement ;)
02.02.2026 - 22:51DROPS Design answered:
Bonjour Coline, lorsque vous avez terminé A.1 et A.2, vous continuez à augmenter comme avant au début/à la fin de A.2 tout en tricotant le diagramme A.3; vous augmentez ainsi tous les 2 tours comme avant, vous avez juste davantage de mailles du point fantaisie à chaque fois. En taille S, vous augmentez 25 fois 8 m tous les 2 tours, soit: 72+(25x8)=272 mailles. Bon tricot!
03.02.2026 - 17:42
![]() Lisbeth wrote:
Lisbeth wrote:
Jeg kan ikke finde ud af at starte på diagrammet til A1 (L-XL-XXL-XXXL) 1 glat m. (ok. ) Skal jeg starte med slå om, en ret, slå om, og så 3 ret, inden jeg tager løs af som ret og strikker 2 ret sammen, og trækker den løse over? Jeg kan ikke få det til at give 31 masker som der står i opskriften. Jeg har kigget på alle videoernes forsidebilleder, men synes ikke der var en der passede..... På forhånd tak for hjælpen.
12.01.2026 - 22:44DROPS Design answered:
Hei Lisbeth. Strikk 1 maske gl strikk, strikke deretter A.1 over 31 masker (det er da minsket med 6 masker og økte med 8 masker, derav en ekstra maske i hver side av diagrammet som du ser på neste pinne). mvh DROPS Design
29.01.2026 - 10:28
|
||||||||||||||||
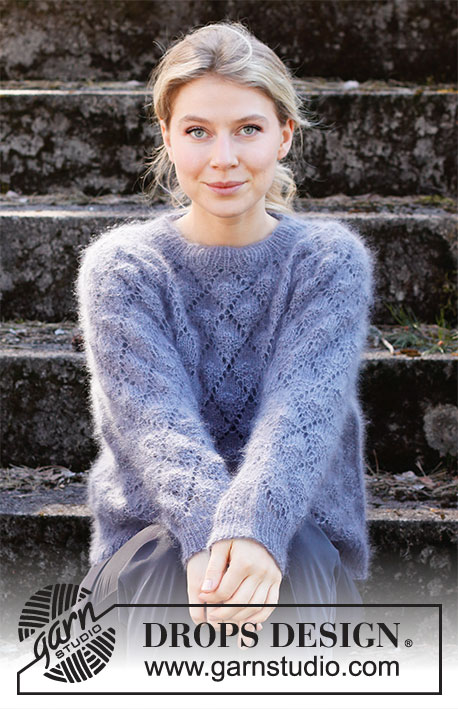
Frosted Leaves#frostedleavessweater |
||||||||||||||||
 |
 |
|||||||||||||||
Knitted jumper in 1 strand DROPS Brushed Alpaca Silk or 2 strands DROPS Kid-Silk. The piece is worked top down with raglan and lace pattern. Sizes S - XXXL.
DROPS 216-3 |
||||||||||||||||
|
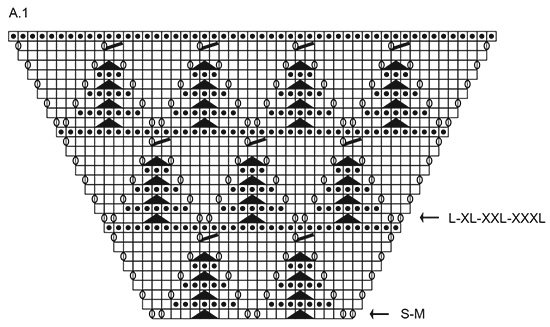
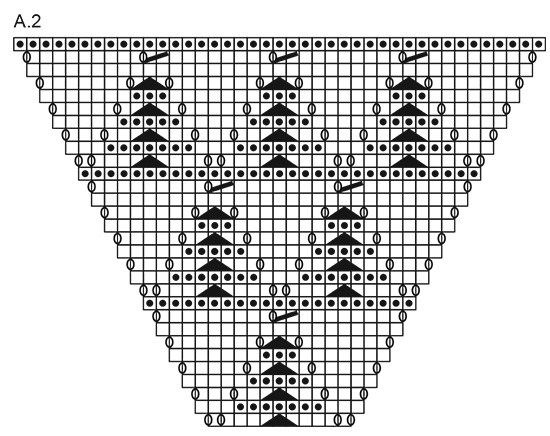
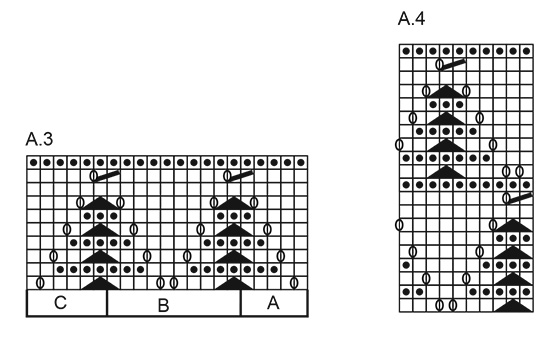
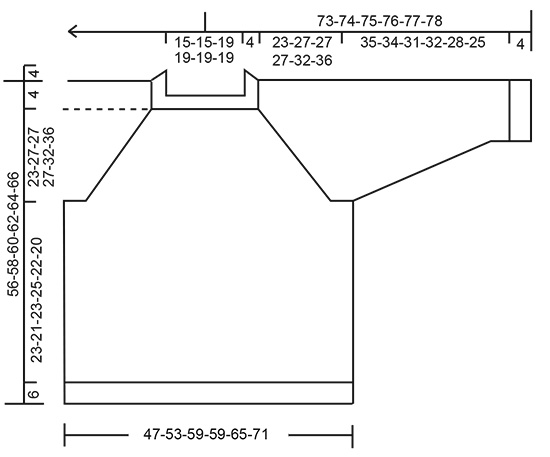
------------------------------------------------------- EXPLANATIONS FOR THE PATTERN: ------------------------------------------------------- PATTERN: See diagrams A.1 to A.4 DECREASE TIP-1 (evenly spaced): To work out how to decrease evenly, count the total number of stitches on needle (e.g. 48 stitches) and divide by number of decreases to be made (e.g. 8) = 6. In this example decrease by knitting each 5th and 6th stitch together. DECREASE TIP-2 (for sleeves): Decrease 1 stitch on either side of the marker thread as follows: Work until there are 3 stitches left before the marker thread, knit 2 together, knit 2 (marker thread sits between these 2 stitches), slip 1 stitch as if to knit, knit 1 and pass the slipped stitch over the knitted stitch (= 2 stitches decreased). CASTING-OFF TIP: To avoid the cast-off edge being tight you can cast off with a larger size needle. If the edge is still tight, make 1 yarn over after approx. each 4th stitch at the same time as casting off; the yarn overs are cast off as normal stitches. ------------------------------------------------------- START THE PIECE HERE: ------------------------------------------------------- JUMPER – SHORT OVERVIEW OF THE PIECE: The neck and yoke are worked in the round with circular needle, top down. The yoke is divided for body and sleeves and the body continued in the round with circular needle. The rounds start at the transition between sleeve and back piece. The sleeves are worked in the round with short circular needle/double pointed needles, top down. The piece is worked with 1 strand Brushed Alpaca Silk or 2 strands Kid-Silk. NECK: Cast on 72-72-92-92-92-92 stitches with circular needle size 4 mm and 1 strand Bruched Alpaca Silk or 2 strands Kid-Silk. Knit 1 round. Then work rib (knit 1, purl 1) for 4 cm. Insert 1 marker at the beginning of the round. The yoke will be measured from this marker. Change to circular needle size 5 mm and work the yoke as described below. REMEMBER THE KNITTING TENSION! YOKE: On the next round work pattern as follows: Work 1 stitch in stocking stitch, A.1 (= 21-21-31-31-31-31 stitches, see start-arrow for your size), 2 stitches in stocking stitch, A.2 (= 11 stitches), 2 stitches in stocking stitch, A.1 (= 21-21-31-31-31-31 stitches, see start-arrow for your size), 2 stitches in stocking stitch, A.2 (= 11 stitches) and 1 stitch in stocking stitch. Continue this pattern; all increases are drawn into the diagrams. 8 stitches are increased every 2nd round. When A.1 and A.2 have been worked 1 time in height, continue with A.3. Work A.3 A over the first 5 stitches, repeat A.3 B until there are 6 stitches left on the row and work A.3 C over the last 6 stitches. Each time A.3 has been worked 1 time in height there is room for 1 more repeat of A.3 B in width. Continue the increases as shown in A.1 and A.2. Increase every 2nd round a total of 25-30-30-30-35-40 times = 272-312-332-332-372-412 stitches. The piece measures approx. 23-27-27-27-32-36 cm from the marker thread. Now divide the yoke for body and sleeves as follows (continue the pattern as before; you should be on the last round in a repeat of A.3, where all stitches are purled): Work 73-83-93-93-103-113 stitches (= back piece), place the next 63-73-73-73-83-93 stitches on 1 thread for the sleeve, cast on 7 new stitches on the needle (= in side under sleeve), work 73-83-93-93-103-113 stitches as before (= front piece), place the next 63-73-73-73-83-93 stitches on 1 thread for the sleeve and cast on 7 new stitches on the needle (= in side under sleeve). Body and sleeves are finished separately. Cut the strand. BODY: = 160-180-200-200-220-240 stitches. Start 3 stitches before the 7 new stitches cast on in the side and work A.4 over all stitches; make sure the pattern matches the pattern on the yoke. Continue working until the piece measures 23-21-23-25-22-20 cm from the division (there is approx. 6 cm left to finished length; you can try the jumper on and work to desired length). Change to circular needle size 4 mm and work rib (knit 1, purl 1) for 6 cm. Cast off with knit over knit and purl over purl – read CASTING-OFF TIP! The jumper measures approx. 56-58-60-62-64-66 cm from the shoulder down. SLEEVES: Place the 63-73-73-73-83-93 stitches from the thread on the one side of the piece on short circular needle/double pointed needles size 5 mm and knit up 1 stitch in each of the 7 stitches cast on under the sleeve = 70-80-80-80-90-100 stitches. Insert a marker thread in the middle of the 7 stitches under the sleeve. Allow the thread to follow your work onwards; it will be used when decreasing under the sleeve. Cut the strand and start working 3 stitches before the new stitches under the sleeve and continue the pattern in the round according to A.4; make sure the pattern matches the pattern on the yoke. When the sleeve measures 3 cm from the division in all sizes, decrease 2 stitches mid under the sleeve – read DECREASE TIP-2. Decrease like this every 3-2-1½-2-1-1 cm a total of 11-15-15-13-17-21 times = 48-50-50-54-56-58 stitches. The stitches which do not fit into the pattern when decreasing are worked in stocking stitch. Continue working until the sleeve measures 35-34-31-32-28-25 cm from the division (there is approx. 4 cm left to finished length; you can try the jumper on and work to desired length). NOTE: Shorter measurements in larger sizes due to wider neck and longer yoke. Knit 1 round where you decrease 8 stitches evenly spaced – read DECREASE TIP-1 = 40-42-42-46-48-50 stitches. Change to double pointed needles size 4 mm and work rib (knit 1, purl 1) for 4 cm. Cast off with knit over knit and purl over purl – remember CASTING-OFF TIP! The sleeve measures approx. 39-38-35-36-32-29 cm from the division. Work the other sleeve in the same way. |
||||||||||||||||
Diagram explanations |
||||||||||||||||
|
||||||||||||||||
 |
||||||||||||||||
 |
||||||||||||||||
 |
||||||||||||||||
 |
||||||||||||||||
Have you finished this pattern?Tag your pictures with #dropspattern #frostedleavessweater or submit them to the #dropsfan gallery. Do you need help with this pattern?You'll find 25 tutorial videos, a Comments/Questions area and more by visiting the pattern on garnstudio.com. © 1982-2026 DROPS Design A/S. We reserve all rights. This document, including all its sub-sections, has copyrights. Read more about what you can do with our patterns at the bottom of each pattern on our site. |
||||||||||||||||


With over 40 years in knitting and crochet design, DROPS Design offers one of the most extensive collections of free patterns on the internet - translated to 17 languages. As of today we count 324 catalogues and 12284 patterns translated into English (UK/cm).
We work hard to bring you the best knitting and crochet have to offer, inspiration and advice as well as great quality yarns at incredible prices! Would you like to use our patterns for other than personal use? You can read what you are allowed to do in the Copyright text at the bottom of all our patterns. Happy crafting!
Post a comment to pattern DROPS 216-3
We would love to hear what you have to say about this pattern!
If you want to leave a question, please make sure you select the correct category in the form below, to speed up the answering process. Required fields are marked *.