
Popular categories
Looking for a yarn?


Comments / Questions (57)
![]() Patricia Olivia Fuchs wrote:
Patricia Olivia Fuchs wrote:
Wissen Sie, was total toll wäre? Wenn sie eine schriftliche Anleitung erstellen könnten, wie man einen Pullover mit Sattelschulter selbst berechnen kann. Welche Maße muss man wissen, um selbst berechnen zu können, wie und wo man welche Zunahmen macht? Es gibt dazu nirgends im Netz etwas zu finden. Klar kann man stur der Anleitung folgen, aber es wäre echt schön, wenn man fähig wäre, Modelle die nicht ganz passen, selbst abzuändern. Ist so etwas denn geplant oder bereits vorhanden?
28.02.2023 - 12:13DROPS Design answered:
Liebe Frau Fuchs, hier finden Sie alle unsere Modellen, die mit Sattelschulter gestrickt werden, es sind dabei verschieden Maschenprobe, Größe (Babies, Kinder, Männer, Frauen) und Schnitte, vielleicht kann es Ihnen weiterhelfen. Viel Spaß beim stricken!
28.02.2023 - 13:31
![]() Rebecka Eriksson wrote:
Rebecka Eriksson wrote:
Hej, jag undrar om rundstickorna ska vara 40 eller 80 cm lång, båda måtten står i beskrivningen. Tack!
28.01.2023 - 20:55DROPS Design answered:
Hei Rebecka Du trenger begge lengdene, både 40 cm og 80 cm. Du starter med 40 cm og når du har nok masker/økt masker, kan du bytte til 80 cm. mvh DROPS Design
30.01.2023 - 11:59
![]() Ann wrote:
Ann wrote:
Are sleeve and yoke increases done in Increase Tip-1 or Increase Tip-2?
11.10.2022 - 21:00DROPS Design answered:
Hi Ann, The yoke and sleeves are increased using the instructions in Increase tip-2. Happy knitting!
12.10.2022 - 07:00
![]() Filip Buczyński wrote:
Filip Buczyński wrote:
Hello! Would it be okay if I just use Merino Extra Fine yarn instead of Lima?
31.01.2022 - 15:27DROPS Design answered:
Hi Filip, yes, it is the same group of yarns. Please check exact amount of yarn nedded using our yarn converter HERE . Happy knitting!
31.01.2022 - 15:48
![]() Sara wrote:
Sara wrote:
Hello! When do you change from 16" needles to 32" needles? Thank you!
22.01.2022 - 19:20DROPS Design answered:
Dear Sara, you start working in the round with the shorter needles. When you start feeling uncomfortable when working, due to the high amount of stitches, you change to the longer needles. Happy knitting!
23.01.2022 - 20:37
![]() Yvonne Bourdillon wrote:
Yvonne Bourdillon wrote:
What are the chest measurements that correspond to S,M,L etc?
19.01.2022 - 16:06DROPS Design answered:
Dear Mrs Bourdillon, all measurements in chart are taken flat from side to side and are given in cm (convert into inches here). This lesson will help you to find the matching size. Happy knitting!
19.01.2022 - 17:16
![]() Sadelsulderøkning wrote:
Sadelsulderøkning wrote:
Ja. Ja det er str xl. Jeg lurer fælt på hvorfor står det 9 cm fra hals? Er ikke ferdig med å øke enda.Har 13 ganger igjen. Så det vil bli kanskje over 15 cm når jeg er ferdig med å øke. Håper på å få god forklarer. På forhånd takk
10.01.2022 - 19:35DROPS Design answered:
Hej, vi forstår desværre ikke dit spørgsmål... men se skitsen nederst i opskriften, den kan sikkert svare på en del af dit spørgsmål og sørg for at du har 20 masker i bredden og 26 pinde i højden på 10 x 10 cm. God fornøjelse!
17.01.2022 - 10:40
![]() Daniela wrote:
Daniela wrote:
Salve, negli aumenti per le maniche, quando c'è scritto "aumentare in questo modo ogni due giri" significa che bisogna fare un giro normale e uno con aumenti oppure due giri normali e il terzo con aumenti? Grazie
18.09.2021 - 01:44DROPS Design answered:
Buongiorno Daniela, ogni 2 giri, significa 1 giro con aumenti e 1 giro senza. Buon lavoro!
20.09.2021 - 09:43
![]() Lara wrote:
Lara wrote:
Buonasera, per gli aumenti-2, la maglia ritorta inclinata a destra come si fa? Grazie per l'aiuto.
02.09.2021 - 18:06DROPS Design answered:
Buonasera Lara, è un aumento sollevato: deve seguire semplicemente le istruzioni riportate. Buon lavoro!
02.09.2021 - 19:11
![]() Grandet wrote:
Grandet wrote:
Bonjour, Dans votre réponse à Pascale, vous mentionnez la technique des rangs raccourcis. Cette idée me plaît beaucoup. Peut-on alors se baser sur vos calculs de mailles où il faut tout repenser ? Merci de votre gentille réponse. Eugénie
04.04.2021 - 18:39DROPS Design answered:
Bonjour Mme Grandet, nous sommes désolés, dans la réponse citée il est dit que l'on ne peut pas en tricoter dans ce type de modèle. Bon tricot!
06.04.2021 - 13:50
|
|||||||||||||
Glacier Waters#glacierwaters |
|||||||||||||
 |
 |
||||||||||||
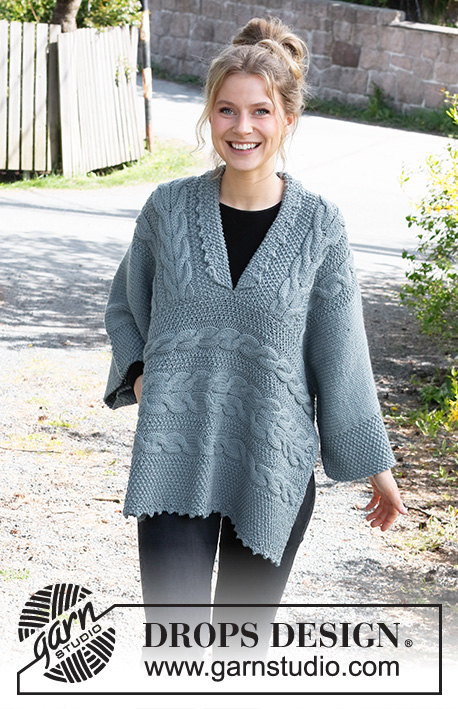
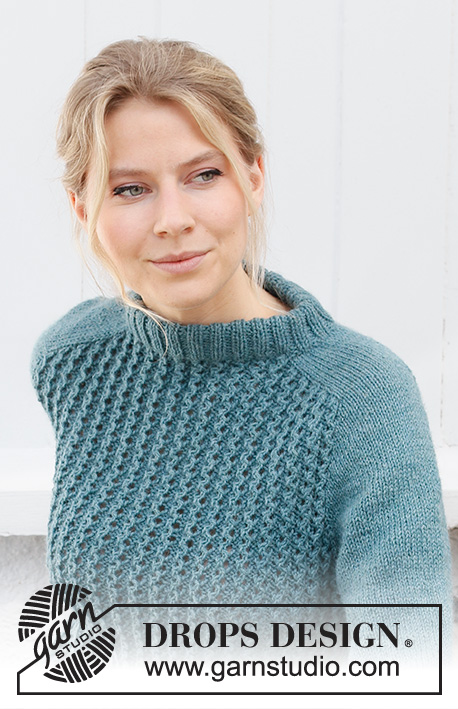
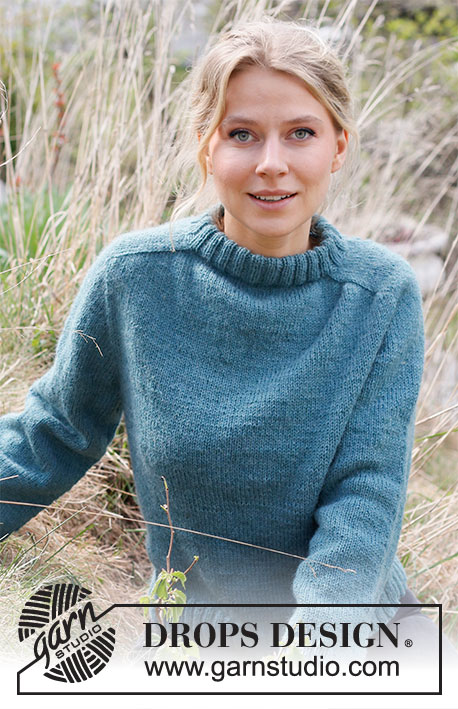
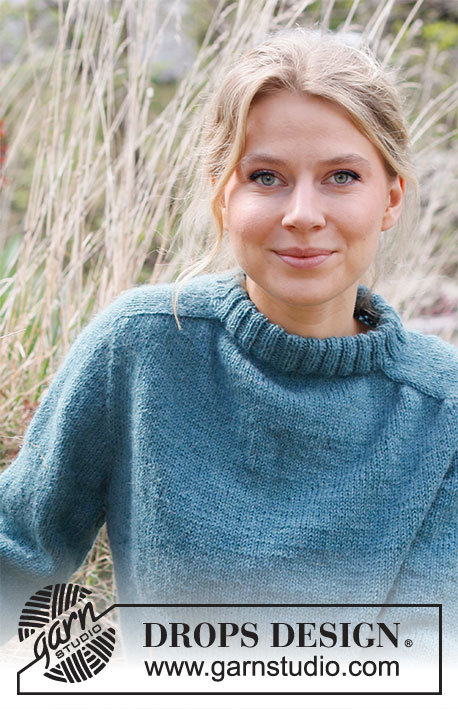
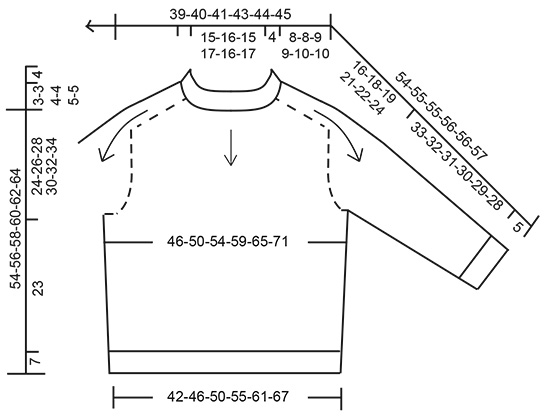
Knitted jumper with saddle shoulders in DROPS Lima or DROPS Soft Tweed. The piece is worked top down. Sizes S - XXXL.
DROPS 216-9 |
|||||||||||||
|
------------------------------------------------------- EXPLANATIONS FOR THE PATTERN: ------------------------------------------------------- INCREASE TIP-1 (evenly spaced): To work out how to increase evenly, count the total number of stitches on the needle (e.g. 96 stitches) and divide by the number of increases to be made (e.g. 12) = 8. In this example, increase by making 1 yarn over after each 8th stitch. On the next round work the yarn overs twisted to avoid holes. INCREASE TIP-2: BEFORE MARKER: The new stitch will be twisted, leaning towards the right. Use left needle to pick up strand between 2 stitches from the row below, pick up strand from behind and knit stitch in front loop. AFTER MARKER: The new stitch will be twisted, leaning towards the left. Use left needle to pick up strand between 2 stitches from the row below, pick up strand from the front and knit stitch in back loop. DECREASE TIP (for body and sleeves): Decrease 1 stitch on either side of the marker thread as follows: Work until there are 3 stitches left before the marker thread, knit 2 together, knit 2 (marker thread sits between these 2 stitches), slip 1 stitch as if to knit, knit 1 and pass the slipped stitch over the knitted stitch. CASTING-OFF TIP: To avoid the cast-off edge being tight you can cast off with a larger size needle. If the edge is still tight, make 1 yarn over after approx. each 4th stitch at the same time as casting off; the yarn overs are cast off as normal stitches. ------------------------------------------------------- START THE PIECE HERE: ------------------------------------------------------- JUMPER – SHORT OVERVIEW OF THE PIECE: The neck and yoke are worked in the round with circular needle, top down. Stiches are increased for the shoulders, then for the sleeves. The yoke is divided for body and sleeves and the body is continued in the round with circular needle. The sleeves are worked with double pointed needles, top down. NECK: Cast on 92-96-100-108-112-116 stitches with circular needle size 3.5 mm and Lima. Knit 1 round. Then work rib (= knit 2. purl 2) in the round for 8½ cm. Knit 1 round where you increase 12-12-20-20-24-28 stitches evenly spaced – read INCREASE TIP-1 = 104-108-120-128-136-144 stitches. Change to circular needle size 4.5 mm. Insert a marker at the beginning of the round (mid-back). THE PIECE IS NOW MEASURED FROM HERE! YOKE: Insert 4 markers in the piece, without working the stitches and between the stitches, as follows: Count 18-19-20-22-22-24 stitches (= half back piece), insert marker 1, count 16-16-20-20-24-24 stitches (= shoulder), insert marker 2, count 36-38-40-44-44-48 stitches (= front piece), insert marker 3, count 16-16-20-20-24-24 stitches (= shoulder), insert marker 4, there are 18-19-20-22-22-24 stitches left after the last marker (= half back piece). SADDLE SHOULDER INCREASE: Continue with stocking stitch and increase on the shoulders as follows: Increase 1 stitch BEFORE markers 1 and 3 and AFTER markers 2 and 4 – read INCREASE TIP-2 (=4 stitches increased); there are increases on back piece and front piece, number of shoulder stitches remain the same. The increased stitches are worked in stocking stitch. Increase like this every round a total of 21-21-24-24-26-26 times = 188-192-216-224-240-248 stitches. The piece measures approx. 8-8-9-9-10-10 cm from the marker on the neck. REMEMBER THE KNITTING TENSION! SLEEVE INCREASES: Now increase for the sleeves as follows: Increase 1 stitch AFTER markers 1 and 3 and BEFORE markers 2 and 4 (= 4 stitches increased). There are only increases on shoulder stitches and number of stitches on front piece and back piece remains the same. Number of shoulder stitches increases. Increase like this every 2nd round a total of 17-18-18-17-17-17 times = 256-264-288-292-308-316 stitches. The piece measures approx. 21-22-23-22-23-23 cm from the neck. If your measurements are shorter, continue with stocking stitch without increasing until the piece measures 21-22-23-22-23-23 cm. YOKE INCREASE: Now increase 1 stitch on each side of all markers as follows: Work until there is 1 stitch left before markers 1 and 3, increase 1 stitch BEFORE these markers, work 1 stitch, move the marker onto the right needle and increase 1 stitch AFTER these markers. Work to markers 2 and 4, increase 1 stitch BEFORE these markers, move the marker onto the right needle, work 1 stitch and increase 1 stitch AFTER these markers – remember INCREASE TIP-2 (= a total of 8 stitches increased). Increase like this every 2nd round a total of 4-5-6-10-11-14 times = 288-304-336-372-396-428 stitches. When all the increases are finished, the piece measures approx. 24-26-28-30-32-34 cm from the neck. Divide the piece for body and sleeves on the next round as follows: Work the first 42-45-49-54-59-65 stitches (half back piece), place the next 60-62-70-78-80-84 stitches on a thread for the sleeve, cast on 8-10-10-10-12-12 stitches under the sleeve, work 84-90-98-108-118-130 stitches (= front piece), place the next 60-62-70-78-80-84 stitches on a thread for the sleeve, cast on 8-10-10-10-12-12 stitches under the sleeve, work the last 42-45-49-54-59-65 stitches (= half back piece). Body and sleeves are finished separately. BODY: = 184-200-216-236-260-284 stitches. Insert 1 marker in the middle of the 8-10-10-10-12-12 stitches cast on under each sleeve; these will be used when decreasing in the sides. Work stocking stitch in the round. When the piece measures 4 cm from the division, decrease 1 stitch on each side of both markers – read DECREASE TIP (= 4 stitches decreased). Decrease like this every 5 cm a total of 4 times = 168-184-200-220-244-268 stitches. When the piece measures 23 cm from the division, knit 1 round where you increase 40 stitches evenly spaced = 208-224-240-260-284-308 stitches. Change to circular needle size 3.5 mm and work rib (= knit 2, purl 2) for 7 cm. Cast off with knit over knit and purl over purl – read CASTING OFF TIP! SLEEVE: Place the 60-62-70-78-80-84 stitches from the thread on the one side of the piece on double pointed needles size 4.5 mm and knit up 1 stitch in each of the 8-10-10-10-12-12 stitches cast on under the sleeve = 68-72-80-88-92-96 stitches. Insert a marker thread in the middle of the 8-10-10-10-12-12 stitches under the sleeve; you will decrease stitches either side of this marker. Work stocking stitch in the round. When the piece measures 3 cm from the division, decrease 1 stitch on each side of the marker thread – remember DECREASE TIP. Decrease like this every 6-5-3-2-2-1½ cm a total of 5-6-9-12-13-14 times = 58-60-62-64-66-68 stitches. Continue working until the sleeve measures 33-32-31-30-29-28 cm from the division. Knit 1 round where you increase 18-16-18-16-18-16 stitches evenly spaced = 76-76-80-80-84-84 stitches. Change to double pointed needles size 3.5 mm and work rib (= knit 2, purl 2) for 5 cm. Cast off with knit over knit and purl over purl – remember CASTING-OFF TIP. Work the other sleeve in the same way. ASSEMBLY: Fold the neck to the inside and sew down. To avoid the neck being tight and rolling outwards, it is important that the seam is elastic. |
|||||||||||||
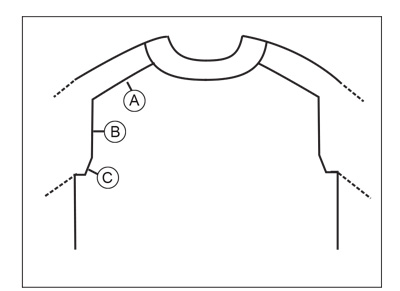
Diagram explanations |
|||||||||||||
|
|||||||||||||
 |
|||||||||||||
 |
|||||||||||||
Have you finished this pattern?Tag your pictures with #dropspattern #glacierwaters or submit them to the #dropsfan gallery. Do you need help with this pattern?You'll find 24 tutorial videos, a Comments/Questions area and more by visiting the pattern on garnstudio.com. © 1982-2026 DROPS Design A/S. We reserve all rights. This document, including all its sub-sections, has copyrights. Read more about what you can do with our patterns at the bottom of each pattern on our site. |
|||||||||||||


With over 40 years in knitting and crochet design, DROPS Design offers one of the most extensive collections of free patterns on the internet - translated to 17 languages. As of today we count 324 catalogues and 12291 patterns translated into English (UK/cm).
We work hard to bring you the best knitting and crochet have to offer, inspiration and advice as well as great quality yarns at incredible prices! Would you like to use our patterns for other than personal use? You can read what you are allowed to do in the Copyright text at the bottom of all our patterns. Happy crafting!
Post a comment to pattern DROPS 216-9
We would love to hear what you have to say about this pattern!
If you want to leave a question, please make sure you select the correct category in the form below, to speed up the answering process. Required fields are marked *.