
Popular categories
Looking for a yarn?


Comments / Questions (136)
![]() Jolande Hoogendonk wrote:
Jolande Hoogendonk wrote:
Ik heb 150 gram drops alpaca silk gekocht voor maat 40. Dat zijn 6 bolletjes van 25 gram. Maar ik heb er maar 3 nodig. Zijn jullie misschien uitgegaan van bolletjes van 50 gram? Ik heb er nu helaas 3 over.
21.07.2020 - 22:42
![]() Tinna Rasmussen wrote:
Tinna Rasmussen wrote:
Kan ikke Se diagram A.1 I dette mønster drops 210-18 ??
15.07.2020 - 12:37DROPS Design answered:
Hej Tinna, diagrammerne ligger til højre for måleskitsen, nederst i opskriften. God fornøjelse!
28.07.2020 - 13:04
![]() Emelie wrote:
Emelie wrote:
I mönstret står det: ” Lägg upp 137-153-163-177-195-217 maskor (inklusive 5 framkantsmaskor i varje sida mot mitt fram) på rundsticka 4 med Brushed Alpaca Silk.” Menar ni att framkantsmaskorna ska läggas till utöver det antal maskor som står eller omfattas de i det antal maskor som står?
02.07.2020 - 20:59DROPS Design answered:
Hej Emelie. Det är det antalet maskor som står där som du ska lägga upp, dvs framkantsmaskorna omfattas i det antal maskor som står. Mvh DROPS Design
03.07.2020 - 09:40
![]() Gøril wrote:
Gøril wrote:
Hei! Strikker denne i str m. Ved økning i sidene blir det feil i mønsteret. Jeg øker med kast på hver side av merkemasken. Når jeg strikker disse maskene gårdet ikke opp i mønsteret. Hva gjør jeg feil? Har tatt opp flere ganger.
20.05.2020 - 15:31DROPS Design answered:
Hej Gøril, du følger mønsteret så det stemmer over maskerne på for og bagstykke som tidligere, men de nye masker strikkes ind i mønsteret efterhånden, de vil ikke stemme rundt, men ind til mærket i siden. God fornøjelse!
27.05.2020 - 14:13
![]() Elisabeth wrote:
Elisabeth wrote:
Ik wil dit patroon graag met rechte breipennen breien en niét met een rondbreinaald. Kan dat?
24.04.2020 - 15:26
![]() KIM wrote:
KIM wrote:
Thanks your pattern. I finished my cardigan size S and change the length a little bit. Very nice cardigan
24.04.2020 - 05:39
![]() Diana wrote:
Diana wrote:
Please advise if the right side is smooth and wrong is textured, not sure I followed the pattern properly.
20.04.2020 - 16:54DROPS Design answered:
Dear Diana, from the right side you should see (1 stitch in stocking stitch(= knit 1), 1 stitch in garter stitch) and from the wrong side (1 stitch in reversed stocking stitch (= purl 1), 1 stitch in garter stitch) as 1st and 2nd stitch in A.1A, seen from RS. Happy knitting!
21.04.2020 - 09:20
![]() KIM wrote:
KIM wrote:
Not sure about the buttonholds for size S: 2, 8½, 15, 21½, 28 and 35 cm The last buttonhold is on the neck, however, the neck for size S will be ~ 41 cm?
10.04.2020 - 07:05DROPS Design answered:
Dear Kim, we start the neck with 32 cm. Therefore, at 35 cm the last buttonhole is in the neck edge. 41 cm is the total measurement from the shoulder (which is higher than the neck). Happy knitting!
12.04.2020 - 19:34
![]() Sonia wrote:
Sonia wrote:
El resorte: "* 1 derecho, 2 reveses *, tejer de *a*[...] Continuar este resorte durante 4 cm", ¿ se interpreta con que todas las vueltas, después de los 5 puntos musgo comienzan así : 1 derecho, 2 reveses? No me queda el mismo dibujo que se ve en la foto. ¿Es una error del patrón?
07.04.2020 - 13:01DROPS Design answered:
Hola Sonia. El elástico es * 1 derecho, 1 revés *, tejer de *a* hasta que resten 6 puntos en la hilera, tejer 1 derecho y terminar con 5 puntos del borde delantero en punto musgo. Puedes especificar, donde tienes el problema?
23.04.2020 - 20:41
![]() Maj Banner wrote:
Maj Banner wrote:
Hei..på bolen står det at du skal strikke videre uten økninger til arbeidet måler 27cm..det er etter at du har økt masker i sidene 5 ganger..det kan da ikke være riktig? Jeg strikker str S.. kan dere hjelpe? På forhånd takk..Maj Banner..Runcorn..England..:)
04.04.2020 - 10:37DROPS Design answered:
Hei Maj. Du har strikket vrangborden 4 cm, så strikker du 1 cm før du begynner med økningene., altså 1 økning ved 5 cm, 2. økning ved 10 cm, 3. økning ved 15 cm, 4. økning ved 20 cm og 5. og siste økning ved 25 cm. Strikk videre uten økninger til arbeidet måler 26 cm. Nå felles det av til ermehull. God Fornøyelse!
20.04.2020 - 11:20
|
|||||||
City Streets#citystreetscardigan |
|||||||
 |
 |
||||||
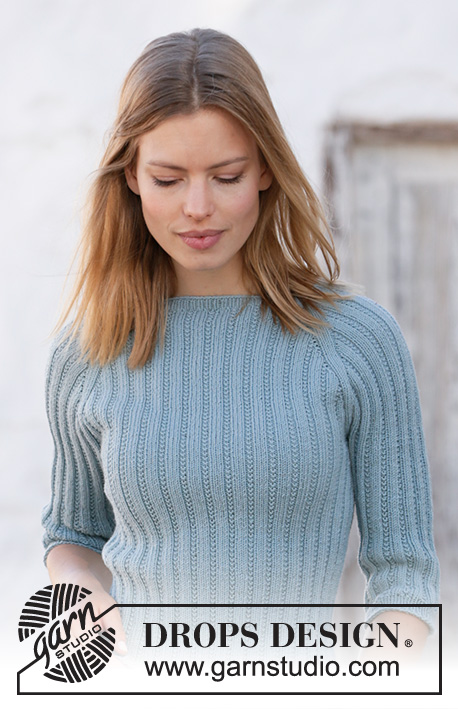
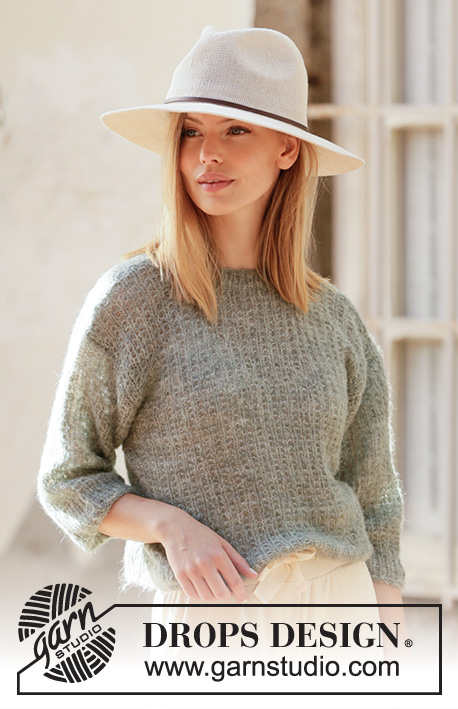
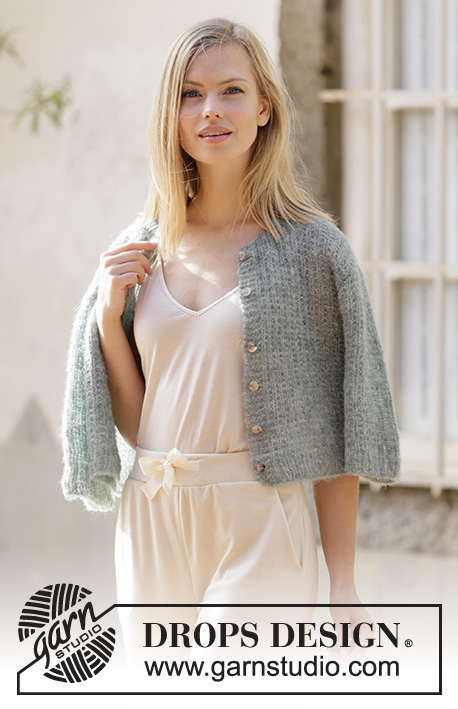
Knitted jacket in DROPS Brushed Alpaca Silk. The piece is worked with textured pattern and short sleeves. Sizes XS - XXL.
DROPS 210-18 |
|||||||
|
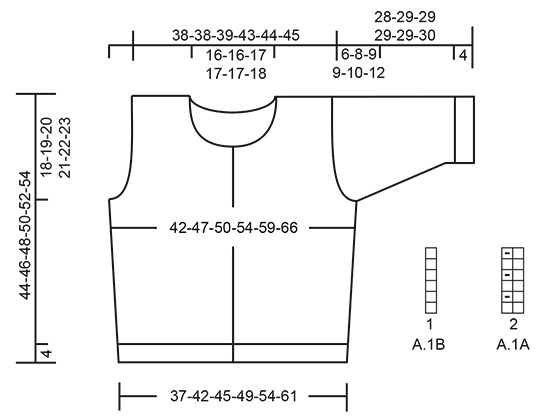
------------------------------------------------------- EXPLANATIONS FOR THE PATTERN: ------------------------------------------------------- RIDGE/GARTER STITCH (worked back and forth): Knit all rows. 1 ridge in height = Knit 2 rows. PATTERN: See diagram A.1. The diagram shows all rows in the pattern seen from the right side. INCREASE TIP (for sides of body and mid under sleeves): All increases are worked from the right side! Work as far as the stitch with the marker, make 1 yarn over, work the stitch with the marker in garter stitch as before, 1 yarn over (= 2 stitches increased at marker). On the next row/round work the yarn overs twisted to avoid holes. The new stitches are worked into A.1 as you go. BUTTONHOLES: Work buttonholes on the right band. 1 BUTTONHOLE = start from the right side and knit together the 3rd and 4th stitch from the edge then make 1 yarn over. On the next row (wrong side) knit the yarn over = hole. Work buttonholes when the piece measures: XS: 2, 8, 14½, 20½, 27 and 34 cm S: 2, 8½, 15, 21½, 28 and 35 cm M: 2, 9, 16, 23, 30 and 36 cm L: 2, 9, 16, 23, 30 and 38 cm XL: 2, 9, 16½, 23½, 31 and 39 cm XXL: 2, 9½, 17, 24½, 32 and 40 cm NOTE: The last buttonhole is worked on the neck. ------------------------------------------------------- START THE PIECE HERE: ------------------------------------------------------- JACKET – SHORT OVERVIEW OF THE PIECE: The body is worked back and forth with circular needle, bottom up as far as the armholes. You then cast off for armholes and the back and front pieces are finished separately back and forth. The sleeves are worked in the round with double pointed needles/short circular needle, bottom up to the beginning of the sleeve cap. Then the sleeve cap is worked back and forth with circular needle to finish. The piece is sewn together at the shoulders and the sleeves are sewn in. The neck is worked in rib to finish. BODY: Cast on 137-153-163-177-195-217 stitches (including 5 band stitches on each side towards mid front) with circular needle size 4 mm and Brushed Alpaca Silk. Purl 1 row (= wrong side). The next row is worked as follows from the right side: Work 5 band stitches in GARTER STITCH – read description above, * knit 1, purl 1 *, work from *-* until there are 6 stitches left on the row, knit 1 and finish with 5 band stitches in garter stitch. Continue this rib for 4 cm – remember BUTTONHOLES on the right band – read description above. When the rib is finished, change to circular needle size 5 mm. Insert 1 marker in the 37th-41st-43rd-47th-51st-57th stitch in from each side (i.e. in a purled stitch seen from the right side). There are 63-71-77-83-93-103 stitches on the back piece between the stitches with markers. The markers should follow upwards in the piece; they will be used when increasing in the sides of the body. The next row is worked as follows from the right side: Work 5 band stitches in garter stitch, A.1A until there are 6 stitches left on the row, A.1B (= 1 stitch) and finish with 5 band stitches in garter stitch. Continue this pattern. REMEMBER THE KNITTING TENSION! When the piece measures 5 cm, increase 1 stitch on each side of both markers – read INCREASE TIP (= 4 stitches increased). Increase like this every 5-5-6-6-6-7 cm a total of 4 times on each side = 153-169-179-193-211-233 stitches. Continue working without further increases until the piece measures 26-27-28-29-30-31 cm. Now cast off for the armholes on the next row as follows: Work 38-41-43-47-51-57 stitches as before (= front piece), cast off 5-7-7-7-7-7 stitches for the armhole (stitch with marker in the middle of these 5-7-7-7-7-7 stitches), work 67-73-79-85-95-105 stitches as before, cast off 5-7-7-7-7-7 stitches for the armhole and then work the remaining 38-41-43-47-51-57 stitches as before (= front piece). Finish the back and front pieces separately as described below. BACK PIECE: = 67-73-79-85-95-105 stitches. Continue A.1 back and forth as before and cast off for the armholes at the beginning of each row on each side as follows: Cast off 3 stitches 0-0-0-0-1-1 times, 2 stitches 0-1-2-2-2-3 times and 1 stitch 1-2-2-2-3-5 times = 65-65-67-73-75-77 stitches left. When the piece measures 41-43-45-47-49-51 cm, cast off the middle 23-23-25-25-25-27 stitches for the neck and each shoulder is finished separately. Continue A.1 and cast off 2 stitches on the next row from the neck = 19-19-19-22-23-23 stitches left on shoulder. Work until there is 1 row left before the piece measures 44-46-48-50-52-54 cm. Knit 1 row from the wrong side. Then cast off with knit from the right side. Work the other shoulder in the same way. RIGHT FRONT PIECE: = 38-41-43-47-51-57 stitches. Continue A.1 back and forth as before with 5 band stitches in garter stitch towards mid front. AT THE SAME TIME cast off for the armhole at the beginning of each row from the side as follows: Cast off 3 stitches 0-0-0-0-1-1 time, 2 stitches 0-1-2-2-2-3 times and 1 stitch 1-2-2-2-3-5 times. AT THE SAME TIME when the piece measures 32-33-34-36-37-38 cm, place the outermost 8-8-8-8-8-9 stitches towards mid front on 1 thread for the neck; to avoid cutting the strand work the stitches before placing them on the thread. Continue A.1 and cast off at the beginning of each row from the neck as follows: Cast off 2 stitches 3 times and 1 stitch 4-4-4-5-4-5 times. After all the decreases for armhole and neck have been finished there are 19-19-19-22-23-23 stitches left on the shoulder. Work until there is 1 row left before the piece measures 44-46-48-50-52-54 cm. Knit 1 row from the wrong side then loosely cast off with knit from the right side. LEFT FRONT PIECE: = 38-41-43-47-51-57 stitches. Continue A.1 back and forth as before with 5 band stitches in garter stitch towards mid front. AT THE SAME TIME cast off for the armhole at the beginning of each row from the side as follows: Cast off 3 stitches 0-0-0-0-1-1 time, 2 stitches 0-1-2-2-2-3 times and 1 stitch 1-2-2-2-3-5 times. AT THE SAME TIME when the piece measures 32-33-34-36-37-38 cm, place the outermost 8-8-8-8-8-9 stitches mid front on 1 thread for the neck. Continue A.1 and cast off for the neck at the beginning of each row from the neck as follows: Cast off 2 stitches 3 times and 1 stitch 4-4-4-5-4-5 times. After all the decreases for armhole and neck have been finished there are 19-19-19-22-23-23 stitches left on the shoulder. Work until there is 1 row left before the piece measures 44-46-48-50-52-54 cm. Knit 1 row from the wrong side. Then loosely cast off with knit from the right side. SLEEVE: Cast on 42-46-46-50-52-54 stitches with double pointed needles size 4 mm and Brushed Alpaca Silk. Knit 1 round then work rib in the round (= knit 1/ purl 1) for 4 cm. Change to double pointed needles size 5 mm and insert a marker in the last stitch on the round (= 1 purled stitch). Work A.1A in the round with knit over knit and garter stitch over purl. When the piece measures 6-6-6-6-8-8 cm, increase 1 stitch on each side of the stitch with the marker – read INCREASE TIP. Increase like this every 2½-2½-1½-1½-1-1 cm a total of 6-6-8-8-10-10 times = 54-58-62-66-72-74 stitches. Continue working until the sleeve measures 22-21-20-20-19-18 cm but finish the round when there are still 2-3-3-3-3-3 stitches left before the stitch with the marker. NOTE: Shorter measurements in larger sizes due to broader shoulders and longer sleeve cap. On the next round cast off the first 7 stitches, then continue with pattern as before to the end of the round. Now work the sleeve cap back and forth with circular needle as follows: Continue A.1 as before and cast off for the sleeve cap at the beginning of each row on both sides as follows: Cast off 2 stitches 2-3-3-3-3-3 times on each side and 1 stitch 1-2-2-2-2-4 times on each side. Then cast off 2 stitches on each side until the sleeve measures 27-28-28-28-28-29 cm. Cast off 3 stitches 1 time on each side and then cast off the remaining stitches. The sleeve measures approx. 28-29-29-29-29-30 cm from the top down. Work the other sleeve in the same way. ASSEMBLY: Sew the shoulder seams inside the cast-off edge. Sew in the sleeves, inside the 1 edge stitch. NECK: Knit up from the right side approx. 83 to 99 stitches around the neck (including the stitches from the threads in front) with circular needle size 4 mm and Brushed Alpaca Silk. Start from the wrong side and work as follows: 5 band stitches in garter stitch, * purl 1, knit 1 *, work from *-* until there are 6 stitches left on the row, purl 1 and finish with 5 band stitches in garter stitch. Continue this rib with knit over knit, purl over purl and garter stitch over garter stitch; remember to work the last buttonhole in the neck. Work until the neck measures 3½ to 4 cm. Cast off with knit over knit, purl over purl and garter stitch over garter stitch. ASSEMBLY: Sew the buttons onto the left band. |
|||||||
Diagram explanations |
|||||||
|
|||||||
 |
|||||||
Have you finished this pattern?Tag your pictures with #dropspattern #citystreetscardigan or submit them to the #dropsfan gallery. Do you need help with this pattern?You'll find 25 tutorial videos, a Comments/Questions area and more by visiting the pattern on garnstudio.com. © 1982-2026 DROPS Design A/S. We reserve all rights. This document, including all its sub-sections, has copyrights. Read more about what you can do with our patterns at the bottom of each pattern on our site. |
|||||||


With over 40 years in knitting and crochet design, DROPS Design offers one of the most extensive collections of free patterns on the internet - translated to 17 languages. As of today we count 324 catalogues and 12290 patterns translated into English (UK/cm).
We work hard to bring you the best knitting and crochet have to offer, inspiration and advice as well as great quality yarns at incredible prices! Would you like to use our patterns for other than personal use? You can read what you are allowed to do in the Copyright text at the bottom of all our patterns. Happy crafting!
Post a comment to pattern DROPS 210-18
We would love to hear what you have to say about this pattern!
If you want to leave a question, please make sure you select the correct category in the form below, to speed up the answering process. Required fields are marked *.