
Popular categories
Looking for a yarn?


Comments / Questions (20)
![]() Julianna Szymonek wrote:
Julianna Szymonek wrote:
Dzień dobry, na której stronie robótki mają być wykonane dziurki na guziki?
28.11.2024 - 23:46DROPS Design answered:
Witaj Julianno, dziurki na guziki wykonujemy na prawej stronie robótki, na końcu rzędu. Pozdrawiamy!
29.11.2024 - 08:44
![]() Leo Spack wrote:
Leo Spack wrote:
Für die Knöpfe soll man Perlmutt, graviert Nr. 525 nehmen. Die scheint es nicht mehr zu geben... Welche Grösse haben diese Knöpfe?
23.11.2024 - 13:49DROPS Design answered:
Lieber Herr Spack, diese Knöpfe hatten einen Durchmesser von 15 cmm. Viel Spaß beim Stricken!
25.11.2024 - 08:12
![]() Margo wrote:
Margo wrote:
Wat is het doel/nut van een 2e draad meenemen in breipatroon omslagdoek? Alvast dank
02.12.2023 - 22:58
![]() Lidwine wrote:
Lidwine wrote:
Bonjour je met du taille L Combient de mail
12.09.2023 - 21:58DROPS Design answered:
Bonjour Lidwine, si vous choisissez la taille L, vous devrez suivre la 2ème taille pour le bonnet pour un tour de tête d'environ 58/60 cm (le bonnet lui-même fera environ 52 cm pour pouvoir s'étirer joliment et bien tenir sur la tête); et, pour les gants (L/XL) pour environ 21 cm de circonférence de main. Bon tricot!
13.09.2023 - 08:28
![]() Małgorzata wrote:
Małgorzata wrote:
Dziękuję za odpowiedź, już rozpracowałam wzór wychodzi ślicznie, pozdrawiam
24.08.2020 - 18:24DROPS Design answered:
Super, koniecznie podziel się z nami efektem swojej pracy na facebooku, w naszej grupie Drops Workshop, albo dodaj link do galerii dropsfan. Pozdrawiamy!
25.08.2020 - 15:44
![]() Małgorzata wrote:
Małgorzata wrote:
Przepraszam, chodzi rozpoczęcie szala, początek jest dla mnie niezrozumiale opisany, dziękuję i pozdrawiam
23.08.2020 - 17:37DROPS Design answered:
Witaj Małgosiu! Jak odczytywać schematy w robótce na drutach znajdziesz TUTAJ. Szal ma niesymetryczny wzór z obu stron, zobacz zdjęcie. Zaczynasz go od szyi, a dodając oczka będzie się „rozkładał” na boki, ostatni rząd to rząd z największą liczbą oczek na dole (2 boki o tej samej długości w trójkącie). Mam nadzieję, że pomogłam. Jeśli nie napisz dokładnie czego nie rozumiesz (który fragment wzoru), to postaram się pomóc. Pozdrawiamy!
24.08.2020 - 14:51
![]() Małgorzata wrote:
Małgorzata wrote:
Witam, jak dokładnie rozpocząć robótkę? Dziękuję
23.08.2020 - 17:35DROPS Design answered:
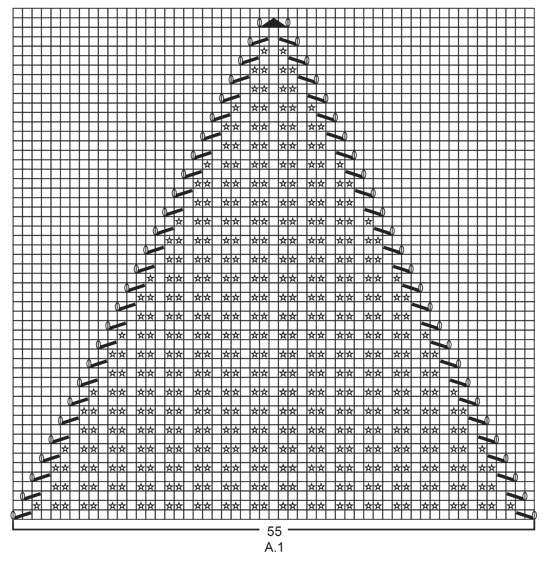
Witaj! Na drutach z żyłką nr 3,5 nabrać 7 oczek 2 nitkami włóczki Nord. Umieścić 1 nitkę marker w 4-te oczko (= oczko środkowe) i przesuwać ją w miarę postępu robótki. Przerabiać kolejny rząd następująco: 2 o. ściegiem francuskim – patrz powyżej, schemat A.2A ponad następnym oczkiem, schemat A.2B ponad następnym oczkiem (= oczko środkowe – będzie przerabiane na prawo na prawej stronie, a na lewo na lewej stronie), schemat A.2C ponad następnym oczkiem i zakończyć przerabiając 2 oczka ściegiem francuskim = 11 o. Usunąć jedną nitkę marker i kończyć szal tylko 1 nitką Nord i dalej przerabiać schematy A.2A i A.2C z każdej strony oczka środkowego (A.2B).
24.08.2020 - 14:45
![]() Carol Lenard wrote:
Carol Lenard wrote:
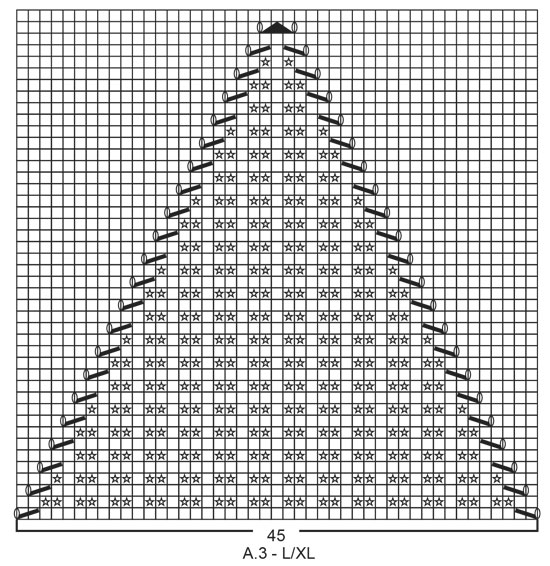
Business ready 204-55. how many stitch for small s/m of chart A3 s/m.The first symbol of chart A3 s/m on line one mean.
19.01.2020 - 00:04DROPS Design answered:
Dear Mrs Lenard, on first row in A.3 size S/M you start with 1 YO, knit 2 together, and finish with slip 1, k1, psso, 1 YO. Happy knitting!
20.01.2020 - 10:32
![]() Carol Lenard wrote:
Carol Lenard wrote:
I can't find the pattern for drop 204.55.show the pattern
18.01.2020 - 04:35DROPS Design answered:
Dear Carol, the pattern 204-55 is here, and you can find the diagrams for each pattern at the bottom of the page, below the written instructions. Happy Knitting!
19.01.2020 - 00:48
![]() Carol Lenard wrote:
Carol Lenard wrote:
I can't find the pattern for drop 204.55.show the pattern
18.01.2020 - 04:27DROPS Design answered:
Dear Carol, the pattern 204-55 is here, and you can find the diagrams for each pattern at the bottom of the page, below the written instructions. Happy Knitting!
19.01.2020 - 00:48
|
|||||||||||||||||||||||||
Business Ready#businessreadyset |
|||||||||||||||||||||||||
 |
 |
||||||||||||||||||||||||
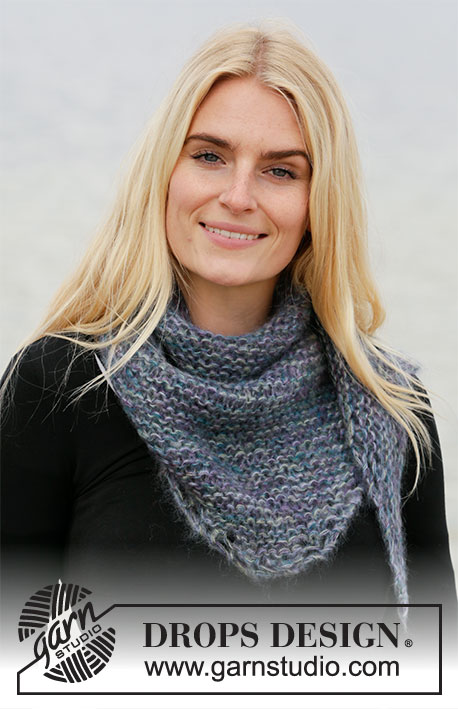
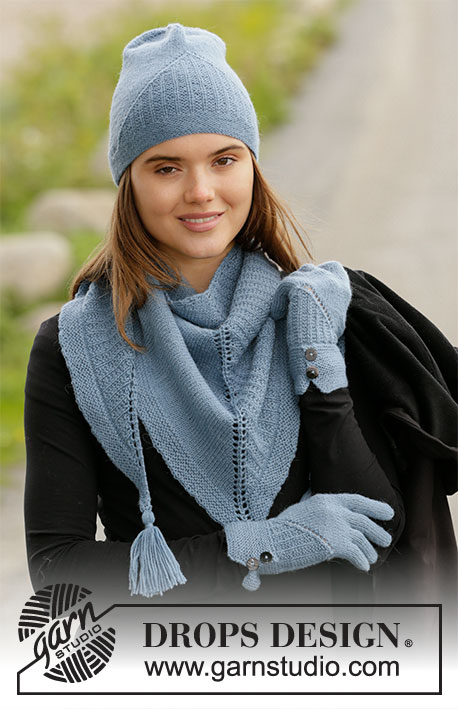
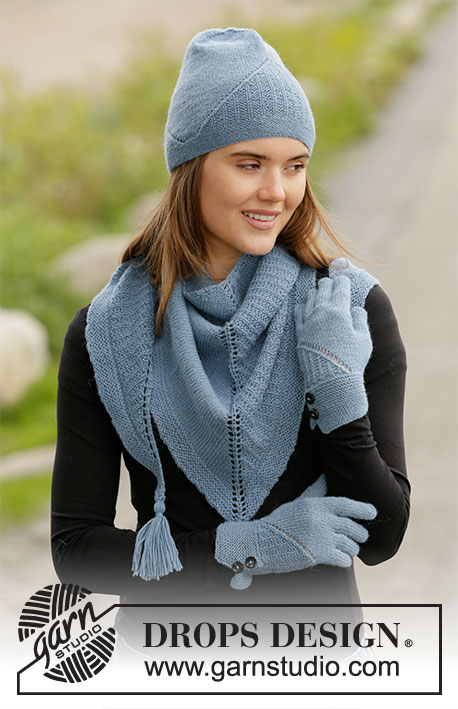
Knitted hat, shawl and gloves in DROPS Nord. The whole set is worked with textured pattern and lace pattern.
DROPS 204-55 |
|||||||||||||||||||||||||
|
------------------------------------------------------- EXPLANATIONS FOR THE PATTERN: ------------------------------------------------------- RIDGE/GARTER STITCH (worked in the round): 1 ridge in height = 2 rounds; Knit 1 round and purl 1 round. RIDGE/GARTER STITCH (worked back and forth): Knit all rows. 1 ridge in height = Knit 2 rows. PATTERN: Hat: See diagram A.1. Shawl: See diagrams A.2A, A.2B and A.2C. Gloves: See diagram A.3. Choose diagram for your size. The diagrams show all rows in the pattern seen from the right side! DECREASE TIP (for hat): Decrease as follows after the marker thread: Knit the first stitch after the marker thread, slip 1 stitch as if to knit, knit 1 and pass the slipped stitch over the knitted stitch (= 1 stitch decreased). Decrease as follows before the marker thread: Work until there are 3 stitches left before the marker thread, knit 2 together, knit 1 (= 1 stitch decreased). CASTING-OFF TIP (elastic casting off – for shawl). Cast off with knit from the right side as follows: Knit 2, * insert the left needle into the 2 stitches on the right needle, from left to right and knit them together, knit 1 *, work from *-* until there is 1 stitch left on the right needle. Cut the strand and pull it through the last stitch. Casting off like this will give you an elastic edge. BUTTONHOLES (for gloves): Left glove: Work until there are 3 stitches left on the row, make 1 yarn over, knit 2 together and finish with knit 1. On the next row knit the yarn over to leave a hole. Right glove: Knit 1, knit 2 twisted together, make 1 yarn over and knit to end of row. On the next row knit the yarn over to leave a hole. INCREASE TIP (for thumb-gusset on gloves): Start before the stitch with the marker, make 1 yarn over, knit 1 (= stitch with marker), 1 yarn over (= 2 stitches increased). On the next round knit the yarn overs twisted to avoid holes. On the next increase work in the same way on each side of the stitch with the marker. ------------------------------------------------------- START THE PIECE HERE: ------------------------------------------------------- HAT – SHORT OVERVIEW OF THE PIECE: The piece is worked in the round with short circular needle, bottom up. Change to double pointed needles when necessary. HAT: Cast on 116-124 stitches with circular needle size 3 mm and Nord. Work GARTER STITCH – read description above, in the round for 3 cm – finish after a knitted round. The next round is worked as follows: Work 3-7 stitches in stocking stitch, work A.1 (= 55 stitches), 3-7 stitches in stocking stitch and A.1 (= 55 stitches). Continue this pattern. REMEMBER THE KNITTING TENSION! When A.1 has been completed, continue with stocking stitch in the round until the piece measures 19-21 cm. Now insert 4 marker threads in the piece as follows: Knit 1, * insert 1 marker thread before the next stitch, knit 29-31 *, work from *-* a total of 3 times, insert 1 marker thread before the next stitch and knit the remaining 28-30 stitches. On the next round decrease 1 stitch on each side of all 4 marker threads – read DECREASE TIP (= 8 stitches decreased). Decrease like this every 2nd round a total of 8 times and then every round a total of 4 times = 20-28 stitches left. On the next round knit all stitches together 2 and 2 = 10-14 stitches left. Cut the strand, pull it through the remaining stitches, tighten and fasten well. The hat measures approx. 25-27 cm from the top down. ------------------------------------------------------- SHAWL - SHORT OVERVIEW OF THE PIECE: To make room for all the stitches the piece is worked back and forth using circular needle and is worked from the top down. SHAWL: Cast on 7 stitches with short circular needle size 3.5 mm and 2 strands Nord. Insert 1 marker thread in the 4th stitch on the row (= mid-stitch) and allow it to follow your work onwards. Work as follows: 2 edge stitches in GARTER STITCH – read description above, A.2A over 1 stitch, A.2B over 1 stitch (= mid-stitch), A.2C over 1 stitch and finish with 2 edge stitches in garter stitch = 11 stitches on the row. Remove one of the strands and work the rest of the shawl with 1 strand Nord as follows: Continue with A.2A and A.2C on each side of the mid-stitch (A.2B). When the diagrams have been worked 1 time in height there are 41 stitches on the needle (20 stitches on each side of the mid-stitch). Continue the increases in the same way as before, with stocking stitch before the mid-stitch, textured pattern after the mid-stitch and 2 edge stitches in garter stitch on each side. REMEMBER THE KNITTING TENSION! When the piece measures approx. 40 cm down the mid-stitch – adjust so the next row is worked from the right side, work 2 rows of stocking stitch over all stitches (apart from the 2 edge stitches in garter stitch) and with increases as before. Then work garter stitch back and forth over all stitches AT THE SAME TIME as increases on each side and on both sides of the mid-stitch continue as before. When the garter stitch edge measures 3 cm down the mid-stitch cast off with knit from the right side – read CASTING-OFF TIP! TASSEL: Sew a tassel on each side of the shawl. 1 tassel = cut 30 strands of Nord, of length 22 cm. Fold the strands double with 2 strands of approx. 10 cm in the fold (these are used to fasten the tassel to the shawl). Wind 1 strand several times around the tassel, approx. 1½ cm from the top and tie a strong knot. Sew the tassel onto one side of the shawl. Make 1 more tassel and sew onto the other side. ------------------------------------------------------- GLOVES - SHORT OVERVIEW OF THE PIECE: The cuffs are worked first, back and forth with circular needle, bottom up. Then the stitches are divided on double pointed needles and the glove is finished in the round. LEFT GLOVE: Cast on 52-58 stitches with circular needle size 2.5 mm and Nord. Work GARTER STITCH back and forth – read description above. When the piece measures 3 and 5 cm, work BUTTONHOLES at the end of the row – read description above. When the piece measures 6 cm insert 1 marker thread after the first 28-31 stitches on the row (seen from the right side = 24-27 stitches after the marker thread). Cut the strand. THE PIECE IS NOW MEASURED FROM HERE! Divide the stitches on 4 double pointed needles so the beginning of the round is at the marker thread (= inside of hand). Work in the round from the marker thread as follows: Knit 20-23 stitches, place the 4 stitches which were the first 4 stitches on the row when you were working back and forth, under the next 4 stitches and knit these stitches together 2 and 2, then knit to end of round = 48-54 stitches. Knit 1 round. The next round is worked as follows: Knit 6-5 stitches, work A.3 (= 37-45 stitches), knit 5-4 stitches. Continue this pattern. REMEMBER THE KNITTING TENSION! When the piece measures 1-2 cm from the marker thread, insert 1 marker in the last stitch on the round. On the next round increase for the thumb-gusset on each side of the stitch with the marker – read INCREASE TIP. Increase like this every 3rd round a total of 5-6 times = 11-13 thumb-gusset stitches and a total of 58-66 stitches on the round. Continue working until the piece measures 6-7 cm from the marker thread. On the next round place the 11-13 thumb-gusset stitches + 1 stitch on each side of these stitches on a thread (= 13-15 stitches on the thread) and cast on 3 new stitches over the stitches on the thread = 48-54 stitches. Continue in the round as before. When the piece measures 11-13 cm from the marker thread, place the first 19-21 stitches on back of hand on a thread, keep the next 11-12 stitches on the needle and place the last 18-21 stitches on inside of hand on another thread. PINKY: = 11-12 stitches, cast on 1 new stitch towards the stitches on the threads = 12-13 stitches. Work stocking stitch in the round for 5½-6½ cm (or to desired length), then knit all stitches together 2 and 2. Cut the strand, pull it through the remaining stitches, tighten and fasten well. HAND: Place the stitches from the threads back on the needles and knit up 2 stitches towards the pinky = 39-44 stitches. Work 2 rounds of stocking stitch. Keep the 2 new stitches knitted up towards the little finger + 6-6 stitches on back of hand and 5-6 stitches on inside of hand on the needles. Place the other 26-30 stitches back on their threads (= 13-15 stitches on back of hand and 13-15 stitches on inside of hand). RING FINGER: = 13-14 stitches, cast on 1 new stitch towards the stitches on the threads = 14-15 stitches. Work stocking stitch in the round for approx. 7-8 cm (or to desired length), then knit all stitches together 2 and 2. Cut the strand, pull it through the remaining stitches, tighten and fasten well. MIDDLE FINGER: Place the next 6-7 stitches from each thread back on the needles and knit up 2 stitches towards the ring finger and cast on 1 new stitch towards the stitches on the threads = 15-17 stitches. Work stocking stitch in the round for approx. 7½-8½ cm (or to desired length), then knit all stitches together 2 and 2. Cut the strand, pull it through the remaining stitches, tighten and fasten well. INDEX FINGER: Place the remaining 14-16 stitches from each thread back on the needles and knit up 2 stitches towards the middle finger = 16-18 stitches. Work stocking stitch in the round for approx. 6½-7½ cm (or to desired length), then knit all stitches together 2 and 2. Cut the strand, pull it through the remaining stitches, tighten and fasten well. THUMB: Place the stitches from the thumb-gusset back on the needles and knit up 3 stitches along the edge behind the thumb = 16-18 stitches. Work stocking stitch in the round for approx.5½-6 cm (or to desired length), then knit all stitches together 2 and 2. Cut the strand, pull it through the remaining stitches, tighten and fasten well. RIGHT GLOVE: Cast on 52-58 stitches with circular needle size 2.5 mm and Nord and work garter stitch back and forth. When the piece measures 3 and 5 cm, work BUTTONHOLES at the end of the row – read description above. When the piece measures 6 cm insert 1 marker thread after the first 24-27 stitches on the row (seen from the right side = 28-31 stitches after the marker thread). Cut the strand. Divide the stitches on 4 double pointed needles so the beginning of the round is at the marker thread (= inside of hand). Work in the round from the marker thread as follows: Knit 20-23 stitches, place the 4 stitches which were the last 4 stitches on the row when you were working back and forth under the next 4 stitches and knit these stitches together 2 and 2, then knit to end of round = 48-54 stitches. Knit 1 round. The next round is worked as follows: Knit 5-4 stitches, work A.3 (= 37-45 stitches), knit 6-5 stitches. Continue this pattern. When the piece measures 1-2 cm from the marker thread insert 1 marker in the first stitch on the round. On the next round increase for the thumb-gusset on each side of the stitch with the marker, in the same way as on the left glove. Increase like this every 3rd round a total of 5-6 times = 11-13 thumb-gusset stitches and a total of 58-66 stitches on the round. Continue working until the piece measures 6-7 cm from the marker thread. On the next round place the 11-13 thumb-gusset stitches + 1 stitch on each side of these stitches on a thread (= 13-15 stitches on the thread) and cast on 3 new stitches over the stitches on the thread = 48-54 stitches. Continue in the round as before. When the piece measures 11-13 cm from the marker thread place the first 18-21 stitches on the inside of the hand on 1 thread, keep the next 11-12 stitches on the needle and place the last 19-21 stitches on back of hand on a thread. Finish the hand and fingers in the same way as on the left glove. |
|||||||||||||||||||||||||
Diagram explanations |
|||||||||||||||||||||||||
|
|||||||||||||||||||||||||
 |
|||||||||||||||||||||||||
 |
|||||||||||||||||||||||||
 |
|||||||||||||||||||||||||
Have you finished this pattern?Tag your pictures with #dropspattern #businessreadyset or submit them to the #dropsfan gallery. Do you need help with this pattern?You'll find 31 tutorial videos, a Comments/Questions area and more by visiting the pattern on garnstudio.com. © 1982-2026 DROPS Design A/S. We reserve all rights. This document, including all its sub-sections, has copyrights. Read more about what you can do with our patterns at the bottom of each pattern on our site. |
|||||||||||||||||||||||||


With over 40 years in knitting and crochet design, DROPS Design offers one of the most extensive collections of free patterns on the internet - translated to 17 languages. As of today we count 325 catalogues and 12298 patterns translated into English (UK/cm).
We work hard to bring you the best knitting and crochet have to offer, inspiration and advice as well as great quality yarns at incredible prices! Would you like to use our patterns for other than personal use? You can read what you are allowed to do in the Copyright text at the bottom of all our patterns. Happy crafting!
Post a comment to pattern DROPS 204-55
We would love to hear what you have to say about this pattern!
If you want to leave a question, please make sure you select the correct category in the form below, to speed up the answering process. Required fields are marked *.