Comments / Questions (47)
![]() Maureen wrote:
Maureen wrote:
For those of us who don't understand the diagrams, how about doing it old-fashioned way and printing instructions. I was going t o make this sweater until I saw there were no written instructions
12.06.2019 - 01:02DROPS Design answered:
Dear Maureen, you will find here how to read diagrams - remember to follow the written pattern at the same time. Happy crocheting!
12.06.2019 - 07:41
![]() Kristine wrote:
Kristine wrote:
KORTE SAMENVATTING VAN HET WERK: in de rondte als een achthoek achthoek moet ZESHOEK zijn zie versie English : in the round as a hexagon
07.06.2019 - 11:41
![]() Mil wrote:
Mil wrote:
I have made 2 of these for myself and have the yarn to make a 3rd as they are so comfy. Because it starts from the underarm it's very easy to make minor adjustments for non-standard sizes. Now making one in Bomull-Lin for my daughter-in-law for the summer and will be making them for my granddaughters too. Best pattern I've ever come across, thank you.
23.04.2019 - 16:01
![]() Tanya Rinaudo wrote:
Tanya Rinaudo wrote:
You need to make the site easier to access, and make the pattern easy to find. I having been trying to find the instructions for the past half hour and have now given up in frustration. I was looking forward to making this as it really does look lovely.
14.04.2019 - 02:02
![]() Betty wrote:
Betty wrote:
Podrian traducirlo al Español ?? Gracias...
12.04.2019 - 19:58DROPS Design answered:
Hola Betty. Este modelo está publicado en castellano. Aquí tienes el link: https://www.garnstudio.com/pattern.php?id=8889&cid=23. Para cambiar de idioma haz click en el rectángulo bajo las fotos .
29.04.2019 - 20:44
![]() Ina wrote:
Ina wrote:
Hej, virkar denna men undrar hur jag mäter. Det står fortsätt till 28 cm från mitten ut. Ut till den raka biten eller ut till spetsen på hörnet? Diagram A2 och A3.
29.03.2019 - 11:18DROPS Design answered:
Hei Ina. Det måles rett ut til siden, ikke diagonalt ut til hjørnet. God fornøyelse
05.04.2019 - 14:36
![]() Rachelle Loyer wrote:
Rachelle Loyer wrote:
Allo la gang!, J'aimerais beaucoup comprendre le diagramme, car il est dit de répéter 6 x le a3 en largeur, sauf que moi j'arrive à 7. Qu'est-ce que je fais de pas correcte. Au secours, je veux tellement réaliser ce projet. Merci de votre aide Rachelle Loyer
12.03.2019 - 14:31DROPS Design answered:
Bonjour Mme Loyer, quand vous crochetez A.1, vous devez avoir 6 fois 2 brides séparées par 4 mailles en l'air (= 6 arceaux de 4 mailles en l'air). Vous crochetez ensuite A.3 (en commençant les tours par A.2 = 3 ml): 3 brides, 3 ml, 3 brides, 1 ml dans chacun des 6 arceaux = 6 fois A.3 au total en rond. Bon crochet!
12.03.2019 - 14:47
![]() Monique wrote:
Monique wrote:
Er staat in het begin...in de rondte haken als een 8hoek...maar moet dat niet 6hoek zijn? Groetjes monique
30.12.2018 - 10:29
![]() Susanne Van Schaik wrote:
Susanne Van Schaik wrote:
Hi, Ik vind dit echt een prachtig ontwerp, maar helaas begrijp ik niet veel van de beschrijving. Is het mogelijk een beter beschreven versie te krijgen? De schema's zijn moeilijk te volgen. Zo snap ik niet waarom schema A2 een diagonale lijn is.
18.11.2018 - 11:42DROPS Design answered:
Dag Susanne,
We proberen de patronen zo te beschrijven dat ze voor iedereen zo duidelijk mogelijk zijn. Mocht je er niet uit komen, dan kan je altijd vragen stellen op dit forum of naar de winkel gaan waar je het garen hebt gekocht, zodat je daar hulp kunt krijgen. A.2 laat zien hoe de toer begint en eindigt en wordt aanvullend op A.3. A.3 wordt 6 keer in de breedte herhaald (Het begin van A.3 zit a.h.w. onder de oksel).
19.11.2018 - 07:45
![]() Karen wrote:
Karen wrote:
Hallo, sind das wirklich 4 Luftmaschen zwischen den einzelnen Stäbchen im Muster? Original: "Stb - 4 Lm - Stb - 4 Lm..." In der nächsten Runde/Reihe kommen dann "3 Stb um die 4 Lm" aber das wirkt nicht so wie im Foto. Ich habe es mit "2 Lm - Stb" und "3 Stb um die 2 Lm" versucht und das passt besser. Oder vielleicht auch 3 Lm. Ist da ein Fehler im Muster? Im Norwegischen ist das Muster auch mit 4 Lm angegeben. Danke für die Hilfe. Drops ist großartig!
16.11.2018 - 11:50DROPS Design answered:
Liebe Karen, um das Lochmuster zu erhalten, wird man 3 Lm in den Ecken häkeln, aber in jede 2. Runde 4 Lm zwischen den einzelnen Stb/Ecken häkeln (bei A.1 hat man auch 4 Lm. Stimmt Ihre Maschenprobe? Sie müsse 4 x 4.b in der Breite = 10 cm haben. Viel Spaß beim häkeln!
16.11.2018 - 13:46
Granny Glam#grannyglamjacket |
|||||||||||||||||||||||||||||||
 |
 |
||||||||||||||||||||||||||||||
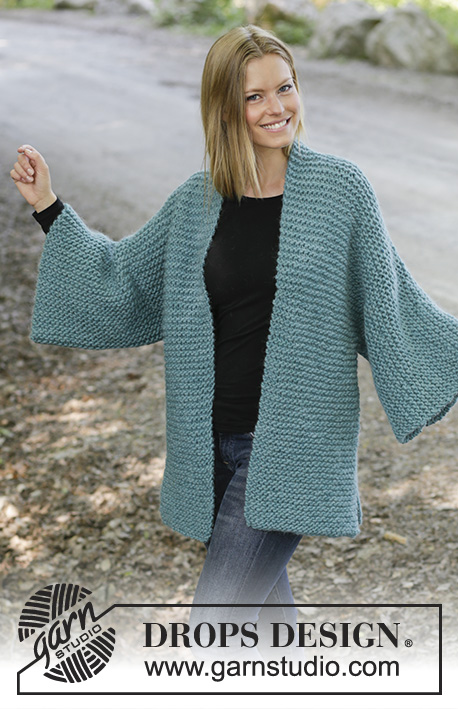
Crocheted kimono in DROPS Big Delight. Piece is crocheted with treble crochet groups and lace pattern. Size: S - XXXL
DROPS 196-33 |
|||||||||||||||||||||||||||||||
|
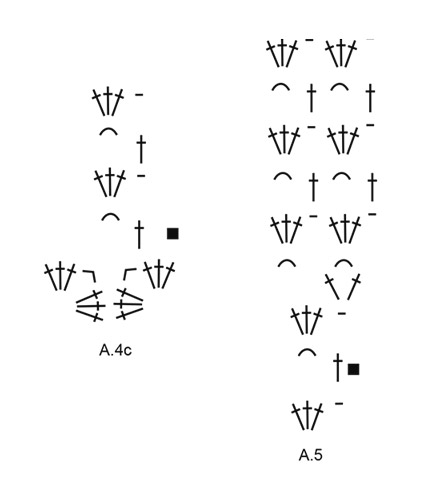
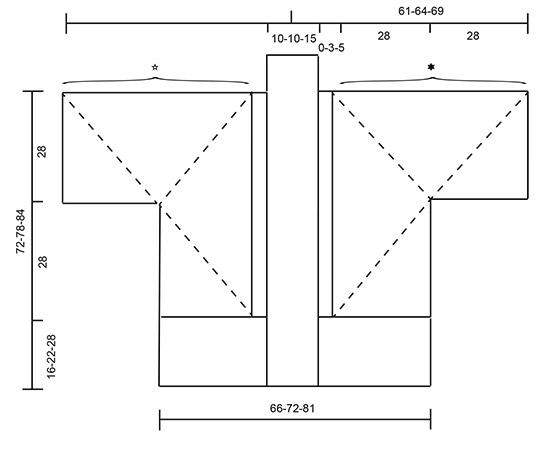
EXPLANATION FOR THE PATTERN: ---------------------------------------------------------- PATTERN: See diagrams A.1 to A.5. ---------------------------------------------------------- START THE PIECE HERE: ---------------------------------------------------------- KIMONO - SHORT SUMMARY OF PIECE: Worked in parts. First work right front and back piece in the round as a hexagon. Then work shoulder and sleeve seam together before continuing back and forth towards mid back. Then work left front and back piece the same way before continuing back and forth down the body. Then work the shawl collar and bands. KIMONO: RIGHT FRONT AND BACK PIECE: Begin with hook size 5.5 mm and Big Delight and work pattern according to diagram A.1. When entire A.1 has been worked, continue as follows: A.2 (shows how round begins and ends and replaces first treble crochet on round), A.3 6 times in total on round. REMEMBER THE CROCHET TENSION! Continue in the round like this until A.2 and A.3 are done. Then repeat the last 2 rounds in A.2 and A.3 until piece measures 28 cm from the centre and outwards (i.e. every time the 2 last rounds have been worked, there is room for 2 treble crochet groups more between each of the 6 corners on hexagon) – adjust to finish after a round with 3 treble crochets + 1 chain stitch. Cut the yarn. The hexagon now forms first part of right sleeve, shoulder and front and back piece: Centre of A.1 = mid under sleeve. Fold right front and back piece so that right side is against right side and all corners meet another corner - chart: The dotted lines shows where increase on hexagon is and hexagon is folded under sleeves and in side seam. Now work shoulder and sleeve seam together through both layers from wrong side as follows: Begin at the bottom of sleeve and work 1 double crochet around chain space in corner, * 4 chain stitches, 1 double crochet around next chain space *, work from *-* up to shoulder, but finish with 1 double crochet in chain space in corner. Fasten off. Now work pattern in the different sizes as follows: SIZE S-M: Now work back and forth on back piece as follows: Begin in corner at the bottom of body on back piece, work pattern back and forth towards mid back from wrong side as follows: Work A.4a, A.4b up to next corner before crochet together mid on top of shoulder, work A.4e around chain space in the corner. Turn and work back and forth until diagrams have been worked vertically (= 4 rows). SIZE L/XL AND XXL/XXXL: Begin in corner at the bottom of body on back piece and work pattern back and forth over the shoulder and down towards the corner on front piece from wrong side as follows: Work A.4a, A.4b up to crochet together mid on top of shoulder, work A.4c over crochet together on shoulder and continue with A.4b as before down to next corner, work A.4e around chain space in corner. Turn and work back 2nd row in A.4 (= a total of 2 rows from hexagon edge). Size L/XL is now done. In size XXL/XXXL work 2 rows vertically (= a total of 4 rows from hexagon edge). Do not cut the yarn. Now work back and forth on back piece as follows: Turn and work A.4a, A.4b up to chain stitch in A.4c on shoulder, work A.4d around chain stitch, turn and work back and forth until 4-6 rows has been worked vertically on the back piece (= a total of 6-10 row from the hexagon edge). Cut the yarn. LEFT FRONT AND BACK PIECE: Work the same way as right front and back piece. Work together shoulder and sleeve seam - see black star on chart! NOTE: When working back and forth, make sure that row with treble crochets is worked from right side and row with chain spaces is worked from wrong side! I.e. when working back and forth begin at the bottom of body on front piece instead of back piece. ASSEMBLY: Work back pieces together mid back as follows: Place the 2 part with right side against right side and work through both layers from wrong side as follows: Work 1 double crochet at the bottom of corner, * work 4 chain stitches, 1 double crochet around next chain stitch *, work from *-* up to the neck on kimono, and finish with 1 double crochet in last stitch on row. Fasten off. EDGE AT THE BOTTOM OF BODY: NOW MEASURE PIECE FROM HERE! Now work an edge at the bottom of kimono as follows: Begin at the bottom in the corner on right front piece and work from wrong side as follows: Work A.4a, A.4b until next corner (= on back piece), continue with 6-8-10 repetitions of A.4b over parts worked back and forth towards mid back, then work A.4b until corner at the front on left front piece, finish with A.4e. Continue back and forth like this until entire piece measures approx. 16-22-28 cm. Fasten off. BAND AND SHAWL COLLAR: Begin at the bottom in the corner towards mid front on left front piece and work from wrong side as follows: Work A.4a in the corner, work A.4b up along edge at the bottom of kimono and skip approx. 2½ cm for every repetition (= approx. 6-9-11 repetitions), continue with A.4b up to shoulder, work A.5 7-7-9 times in total along edge at the neck and continue with A.4b down along edge on right front piece the same way, finish with A.4d at the bottom on right front piece. Work back and forth like this until entire A.5 has been worked vertically. When A.4a, A.4b and A.4d have been worked vertically, repeat the last 2 rows in diagrams. Fasten off. |
|||||||||||||||||||||||||||||||
Diagram explanations |
|||||||||||||||||||||||||||||||
|
|||||||||||||||||||||||||||||||
 |
|||||||||||||||||||||||||||||||
 |
|||||||||||||||||||||||||||||||
 |
|||||||||||||||||||||||||||||||
 |
|||||||||||||||||||||||||||||||
Have you finished this pattern?Tag your pictures with #dropspattern #grannyglamjacket or submit them to the #dropsfan gallery. Do you need help with this pattern?You'll find 6 tutorial videos, a Comments/Questions area and more by visiting the pattern on garnstudio.com. © 1982-2026 DROPS Design A/S. We reserve all rights. This document, including all its sub-sections, has copyrights. Read more about what you can do with our patterns at the bottom of each pattern on our site. |
|||||||||||||||||||||||||||||||


Post a comment to pattern DROPS 196-33
We would love to hear what you have to say about this pattern!
If you want to leave a question, please make sure you select the correct category in the form below, to speed up the answering process. Required fields are marked *.