
Popular categories
Looking for a yarn?


Comments / Questions (50)
![]() Regina wrote:
Regina wrote:
Hallo, ich bin jetzt mit dem Vorder- und Rückenteil fertig und habe die Ärmelnähte geschlossen. Es soll jetzt mit A4a und A4b weiter gehäkelt werden. Wird das Diagramm in der Breite, also 3 Stäbchen, 1 Feste Masche usw also A4a und b nebeneinander oder wird in der Höhe, ?3Feste M 4 Luftmaschen usw. gelesen? Dankeschön
17.04.2026 - 15:06DROPS Design answered:
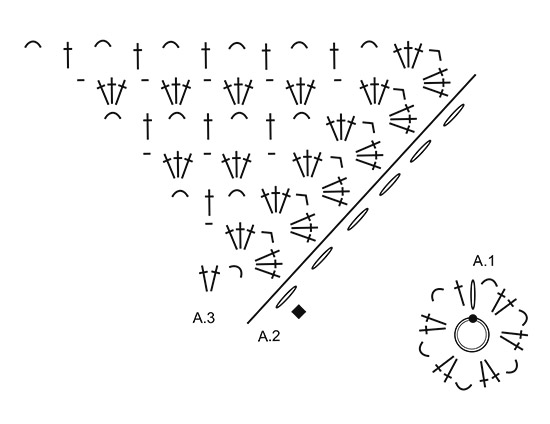
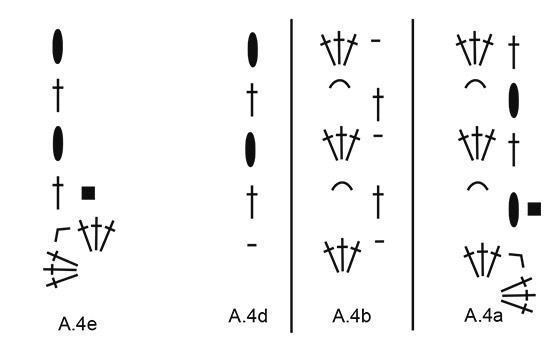
Liebe Regina, die 1. Reihe A.4 ist di mit dem schwarzen Quadrat, die untere zeigt die Reihe wo man häkeln wird, so mit A.4a bei einer Hinreihe anfangen = 3 Lm, dann A.4b wiederholen (= 1 Stb um die Luftmasche, 4 Lm) und mit A.4d enden = 1 Stb um die Lm. Wenden und die Rückreihe so häkeln A.4c (= 3 Lm), A.4b (= 3 Stb um die 3 Lm, 1 Lm) wiederholen und mit A.4a (=3 Stb um die 3 Lm, 1 Stb in die 3. Lm am Anfang von der vorigen Reihe). Wenden und diese 2 Reihe so wiederholen. Viel Spaß beim Häkeln!
20.04.2026 - 08:08
![]() Belén wrote:
Belén wrote:
Existe un vídeo tutorial para poder hacerlo ?
16.04.2026 - 21:29DROPS Design answered:
Hola Belén, no hay un video-tutorial completo de este patrón; todos los videos relevantes para trabajar este patrón se encuentran en el apartado "Videos" en la parte superior del patrón.
26.04.2026 - 20:02
![]() Kelly wrote:
Kelly wrote:
Someone on Etsy is trying to sell this pattern as theirs.
18.02.2026 - 20:02
![]() Cindy wrote:
Cindy wrote:
Is there a written complete pattern? Or a way I can translate or even learn how to read the diagram pattern?
21.12.2025 - 22:08DROPS Design answered:
Hi, Cindy, you can find help understanding diagrams under DROPS Lessons > Pattern basics > How to read crochet diagrams. Happy crocheting!
22.12.2025 - 12:24
![]() Neelam wrote:
Neelam wrote:
I like to love new patterns..
06.12.2025 - 21:23
![]() Gabi wrote:
Gabi wrote:
Hallo nachdem ich nun die Ärmel- und Schulternähte auf Links geschlossen habe, muss ich danach das Häkelstück wieder auf Rechts (schöne Seite) drehen um fortzufahren? Über eine Antwort würde ich mich freuen und verbleibe bis dahin mit besten Grüßen
09.07.2025 - 18:06DROPS Design answered:
Liebe Gabi, ja genau, der Rand unten Am Rumpfteil sowie Blenden und Schalkragen beginnen mit einer Hinreihe. Viel Spaß beim Häkeln!
23.07.2025 - 12:44
![]() Vero Canelo wrote:
Vero Canelo wrote:
Realmente hermoso, lo estoy tejiendo y solo me falta el borde frontal. las instrucciones son claras y muy precisas, no hay forma de errar. Verdaderamente estupendo diseño y muy adictivo😍
21.01.2025 - 05:38
![]() AnnetteMirbach wrote:
AnnetteMirbach wrote:
Hallo, Ich möchte sehr gerne diese Jacke häkeln, habe aber Probleme mit Muster A.3! Könnten Sie mir bitte die 1.Reihe vollständig aufschreiben....vielen Dank im Voraus! Mfg A.Mirbach
02.11.2024 - 11:40DROPS Design answered:
Liebe Frau Mirbach, am Ende A.1 haben Sie 6 Luftmaschenbogen, in jedem häkeln Sie: 3 Stäbchen, 3 Luftmaschen, 3 Stäbchen, dann 1 Luftmasche so insgesamt 6 Mal. Viel Spaß beim häkeln!
04.11.2024 - 08:10
![]() Deborah wrote:
Deborah wrote:
Ik begrijp hier niks van: Dus iedere keer als de 2 laatste toeren zijn gehaakt, is er ruimte voor nog 2 stokjesgroepen tussen elk van de 6 hoeken op het zeskant). Hoe moet ik dit voor me zien?
11.10.2024 - 16:21DROPS Design answered:
Dag Deborah,
Als je gewoon het patroon voor het vierkant blijft volgen en de hoeken haakt zoals aangegeven in het telpatroon, dan zul je zien dat het aantal stokjesgroepen aan de zijkanten van het vierkant automatisch meer wordt.
12.10.2024 - 09:00
![]() Karina wrote:
Karina wrote:
Prachtig vest! Heb het linker en rechterpand gehaakt en de schoudernaad is dicht. Maar nu? De beschrijving is niet duidelijk. Ik moet nu aan de onderzijde van middenachter beginnen, haak ik dan over de schoudernaad op het voorpand tot middenvoor? Als ik dat op het linker en rechterpand doe, is er toch geen horizontale halsopening achter? Verder begrijp ik het wel. Denk ik.
02.10.2024 - 10:06
|
|||||||||||||||||||||||||||||||
Granny Glam#grannyglamjacket |
|||||||||||||||||||||||||||||||
 |
 |
||||||||||||||||||||||||||||||
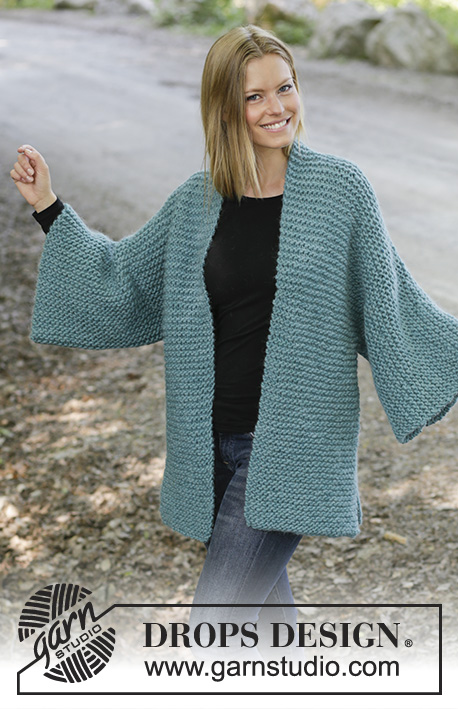
Crocheted kimono in DROPS Big Delight. Piece is crocheted with treble crochet groups and lace pattern. Size: S - XXXL
DROPS 196-33 |
|||||||||||||||||||||||||||||||
|
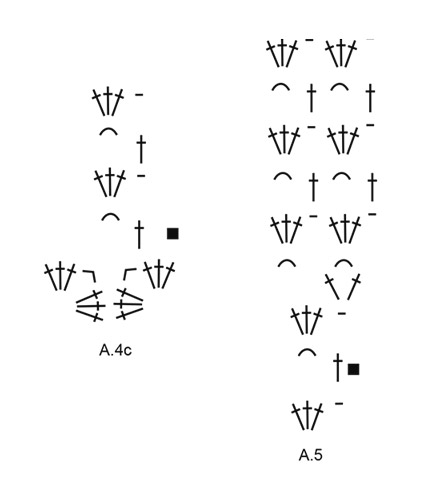
EXPLANATION FOR THE PATTERN: ---------------------------------------------------------- PATTERN: See diagrams A.1 to A.5. ---------------------------------------------------------- START THE PIECE HERE: ---------------------------------------------------------- KIMONO - SHORT SUMMARY OF PIECE: Worked in parts. First work right front and back piece in the round as a hexagon. Then work shoulder and sleeve seam together before continuing back and forth towards mid back. Then work left front and back piece the same way before continuing back and forth down the body. Then work the shawl collar and bands. KIMONO: RIGHT FRONT AND BACK PIECE: Begin with hook size 5.5 mm and Big Delight and work pattern according to diagram A.1. When entire A.1 has been worked, continue as follows: A.2 (shows how round begins and ends and replaces first treble crochet on round), A.3 6 times in total on round. REMEMBER THE CROCHET TENSION! Continue in the round like this until A.2 and A.3 are done. Then repeat the last 2 rounds in A.2 and A.3 until piece measures 28 cm from the centre and outwards (i.e. every time the 2 last rounds have been worked, there is room for 2 treble crochet groups more between each of the 6 corners on hexagon) – adjust to finish after a round with 3 treble crochets + 1 chain stitch. Cut the yarn. The hexagon now forms first part of right sleeve, shoulder and front and back piece: Centre of A.1 = mid under sleeve. Fold right front and back piece so that right side is against right side and all corners meet another corner - chart: The dotted lines shows where increase on hexagon is and hexagon is folded under sleeves and in side seam. Now work shoulder and sleeve seam together through both layers from wrong side as follows: Begin at the bottom of sleeve and work 1 double crochet around chain space in corner, * 4 chain stitches, 1 double crochet around next chain space *, work from *-* up to shoulder, but finish with 1 double crochet in chain space in corner. Fasten off. Now work pattern in the different sizes as follows: SIZE S-M: Now work back and forth on back piece as follows: Begin in corner at the bottom of body on back piece, work pattern back and forth towards mid back from wrong side as follows: Work A.4a, A.4b up to next corner before crochet together mid on top of shoulder, work A.4e around chain space in the corner. Turn and work back and forth until diagrams have been worked vertically (= 4 rows). SIZE L/XL AND XXL/XXXL: Begin in corner at the bottom of body on back piece and work pattern back and forth over the shoulder and down towards the corner on front piece from wrong side as follows: Work A.4a, A.4b up to crochet together mid on top of shoulder, work A.4c over crochet together on shoulder and continue with A.4b as before down to next corner, work A.4e around chain space in corner. Turn and work back 2nd row in A.4 (= a total of 2 rows from hexagon edge). Size L/XL is now done. In size XXL/XXXL work 2 rows vertically (= a total of 4 rows from hexagon edge). Do not cut the yarn. Now work back and forth on back piece as follows: Turn and work A.4a, A.4b up to chain stitch in A.4c on shoulder, work A.4d around chain stitch, turn and work back and forth until 4-6 rows has been worked vertically on the back piece (= a total of 6-10 row from the hexagon edge). Cut the yarn. LEFT FRONT AND BACK PIECE: Work the same way as right front and back piece. Work together shoulder and sleeve seam - see black star on chart! NOTE: When working back and forth, make sure that row with treble crochets is worked from right side and row with chain spaces is worked from wrong side! I.e. when working back and forth begin at the bottom of body on front piece instead of back piece. ASSEMBLY: Work back pieces together mid back as follows: Place the 2 part with right side against right side and work through both layers from wrong side as follows: Work 1 double crochet at the bottom of corner, * work 4 chain stitches, 1 double crochet around next chain stitch *, work from *-* up to the neck on kimono, and finish with 1 double crochet in last stitch on row. Fasten off. EDGE AT THE BOTTOM OF BODY: NOW MEASURE PIECE FROM HERE! Now work an edge at the bottom of kimono as follows: Begin at the bottom in the corner on right front piece and work from wrong side as follows: Work A.4a, A.4b until next corner (= on back piece), continue with 6-8-10 repetitions of A.4b over parts worked back and forth towards mid back, then work A.4b until corner at the front on left front piece, finish with A.4e. Continue back and forth like this until entire piece measures approx. 16-22-28 cm. Fasten off. BAND AND SHAWL COLLAR: Begin at the bottom in the corner towards mid front on left front piece and work from wrong side as follows: Work A.4a in the corner, work A.4b up along edge at the bottom of kimono and skip approx. 2½ cm for every repetition (= approx. 6-9-11 repetitions), continue with A.4b up to shoulder, work A.5 7-7-9 times in total along edge at the neck and continue with A.4b down along edge on right front piece the same way, finish with A.4d at the bottom on right front piece. Work back and forth like this until entire A.5 has been worked vertically. When A.4a, A.4b and A.4d have been worked vertically, repeat the last 2 rows in diagrams. Fasten off. |
|||||||||||||||||||||||||||||||
Diagram explanations |
|||||||||||||||||||||||||||||||
|
|||||||||||||||||||||||||||||||
 |
|||||||||||||||||||||||||||||||
 |
|||||||||||||||||||||||||||||||
 |
|||||||||||||||||||||||||||||||
 |
|||||||||||||||||||||||||||||||
Have you finished this pattern?Tag your pictures with #dropspattern #grannyglamjacket or submit them to the #dropsfan gallery. Do you need help with this pattern?You'll find 6 tutorial videos, a Comments/Questions area and more by visiting the pattern on garnstudio.com. © 1982-2026 DROPS Design A/S. We reserve all rights. This document, including all its sub-sections, has copyrights. Read more about what you can do with our patterns at the bottom of each pattern on our site. |
|||||||||||||||||||||||||||||||


With over 40 years in knitting and crochet design, DROPS Design offers one of the most extensive collections of free patterns on the internet - translated to 17 languages. As of today we count 324 catalogues and 12290 patterns translated into English (UK/cm).
We work hard to bring you the best knitting and crochet have to offer, inspiration and advice as well as great quality yarns at incredible prices! Would you like to use our patterns for other than personal use? You can read what you are allowed to do in the Copyright text at the bottom of all our patterns. Happy crafting!
Post a comment to pattern DROPS 196-33
We would love to hear what you have to say about this pattern!
If you want to leave a question, please make sure you select the correct category in the form below, to speed up the answering process. Required fields are marked *.