
Popular categories
Looking for a yarn?


Comments / Questions (33)
![]() Iwona Knitter wrote:
Iwona Knitter wrote:
Hallo. Ichwollte mich für die Anwort sehr bedanken. Leider habe ich mich verschrieben. Es ging tatsächlich um Vorderteil. Da verstehe ich die Abnahme und Zunahme bei dem V-Ausschnitt und Ärmel. SG Iwona
02.02.2019 - 17:59DROPS Design answered:
Liebe Iwona, bei dem Rechten Schulter nehmen Sie zuerst Maschen für den Armausschnitt ab (=6-7-8 x je nach der Grösse), dann stricken Sie wie zuvor mit Ab- und Zunahme damit die Maschenanzahl immergleich wird. Dann stricken Sie die verkürzten Reihen damit die Schulter "gerade" sind. Viel Spaß beim stricken!
04.02.2019 - 11:44
![]() Iwona Knitter wrote:
Iwona Knitter wrote:
Was ich nicht verstehe sind die Abnahme und Zunahme bei Rückenteil: V-Ausschnitt und Ärmel. Kann mir das jemand einfacher erklären?
31.01.2019 - 17:18DROPS Design answered:
Liebe Frau Knitter, beim Rückenteil gibt es keine Abnahme/Zunahme wie beim Vorderteil: Sie stricken im Muster, dann werden diei Maschen für den Halsausschnitt abgekettet und jede Schulter separat gestrickt. Viel Spaß beim stricken!
01.02.2019 - 08:28
![]() Moutchiquett wrote:
Moutchiquett wrote:
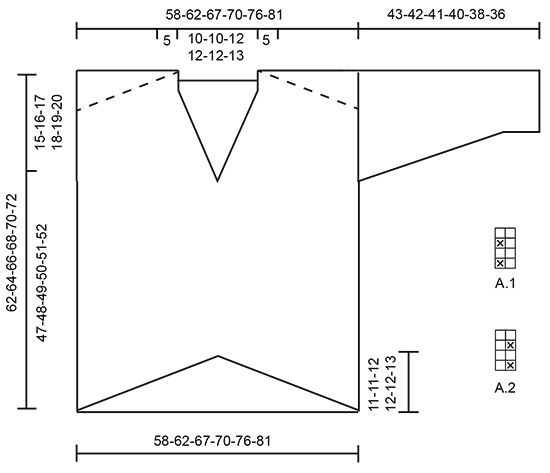
Bonjour Le croquis montre une ligne oblique en pointillés au niveau des épaules : que signifie-t-elle ? La couture épaule est-elle déportée vers l'arrière ? Ou reste-t-elle bien positionnée sur le dessus de l'épaule ? Je ne comprend décidément pas le montage de ce pull ...Je vous remercie de préciser.
29.01.2019 - 15:12DROPS Design answered:
Bonjour Mme Moutchiquett, ces lignes en pointillés correspondent aux épaules du devant, comme on augmente au milieu du devant, le bas se trouve en forme d'accent circonflexe, et on fait des rangs raccourcis sur les épaules pour qu'elles soient droites, le dos se tricote "normalement", les épaules seront ensuite droites. Quand les 2 pièces seront tricotées et assemblées, vous pourrez voir le résultat, comme sur la photo. Bon tricot!
30.01.2019 - 07:59
![]() Moutchiquett wrote:
Moutchiquett wrote:
HAUTEUR DU DEVANT : les explis indiquent 62 à 72 cm de hauteur totale au côté, le schéma montre une épaule en oblique et une hauteur de 62 à 72 sur la ligne d'épaule avec une partie qui part derrière.Bien que mes mesures aient été bonnes depuis le début, je me retrouve avec 72 cm de hauteur totale après les rangs raccourcis: y-a-t-il un pli à 62/72 cm? Les explications manquent de clarté, merci de préciser !
20.01.2019 - 16:07DROPS Design answered:
Bonjour Mme Moutchiquett, en taille S, le pull doit mesurer 62 cm de hauteur totale le long du côté (côté emmanchure). les rangs raccourcis sont tricotés à partir du côté emmanchure à 35 cm (séparation des 2 devants) + 12 cm de hauteur totale (début du décalage du motif) + le décalage et les rangs raccourcis (sur 19 rangs au total soit environ 15 cm) = 62 cm de hauteur totale. Bon tricot!
21.01.2019 - 12:03
![]() Cathy wrote:
Cathy wrote:
Bonjour Pour réaliser les épaules, que veut dire "rangs raccourcis" et "serrer le fil" ? Merci
13.01.2019 - 11:47DROPS Design answered:
Bonjour Cathy, on tricote des rangs raccourcis quand on ne tricote qu'une seule partie des mailles - cette vidéo montre cojmment tricoter des rangs raccourcis, et comment serrer le fil au niveau du rang suivant. Bon tricot!
14.01.2019 - 11:26
![]() BOLLE Hélène wrote:
BOLLE Hélène wrote:
Même problème que AREVALO Nicole, comment se tricotent les points fantaisies je ne comprends pas A1/ A2 ? Ok pour les jetées mais comment fait on le point texturé ?
05.01.2019 - 19:24DROPS Design answered:
Bonjour Mme Bolle, A.1 se tricote ainsi sur 2 m: Rang1 (sur l'endroit): 1 m end, 1 m env - rang2 (sur l'envers): 2 m env. Répétez ces 2 rangs. A.2: Rang1 (sur l'endroit): 1 m env, 1 m end) - Rang 2 (sur l'envers): 2 m env. Répétez ces 2 rangs. Bon tricot!
07.01.2019 - 10:44
![]() Chris Borg wrote:
Chris Borg wrote:
Det står att man ska börja med ett varv avigt från avigsidan. Sedan följa mönstret. Efter första varvet mönster så är jag återigen på avigsidan. men det står att jag på nästa varv ska öka och minska, men alla ökningar ska ske från rätsidan, hur funkar det?
05.12.2018 - 20:50
![]() AREVALO Nicole wrote:
AREVALO Nicole wrote:
Bonjour je voudrai réalisé le modèle 195/25 mais je ne vois pas le diagramme du point fantaisie ! et que veut dire A.1/A.2 ?
03.12.2018 - 15:21DROPS Design answered:
Bonjour Mme Arevalo, les diagrammes A.1 et A.2 se trouvent à la fin des explications, juste à droite du schéma, sous la manche. Bon tricot!
03.12.2018 - 16:19
![]() AREVALO Nicole wrote:
AREVALO Nicole wrote:
Que veut dire A1 A2 ? ET JE VOUDRAIS VOIR LE DIAGRAMME DU POINT FANTAISIE car je suis perdue sans cela; Merci de votre réponse
03.12.2018 - 15:18DROPS Design answered:
Bonjour Mme Arevalo, A.1 et A.2 correspondent aux diagrammes du point fantaisie. A.1 et A.2 se tricotent tous les deux sur 2 mailles et 4 rangs. Commencez en bas à droite sur l'endroit et lisez les diagrammes de droite à gauche sur l'endroit et de gauche à droite sur l'envers. Bon tricot!
03.12.2018 - 16:18
![]() Sandra wrote:
Sandra wrote:
Salve avrei bisogno di un vostro chiarimento: nella spegazione al punto spalla destra diminuire 1 maglia verso il lato, cosa si intende per lato? È già prevista una diminuzione nello scalfo. Grazie per la risposta. Sandra
12.11.2018 - 18:40
|
|||||||
Mellow Monday#mellowmondaysweater |
|||||||
 |
 |
||||||
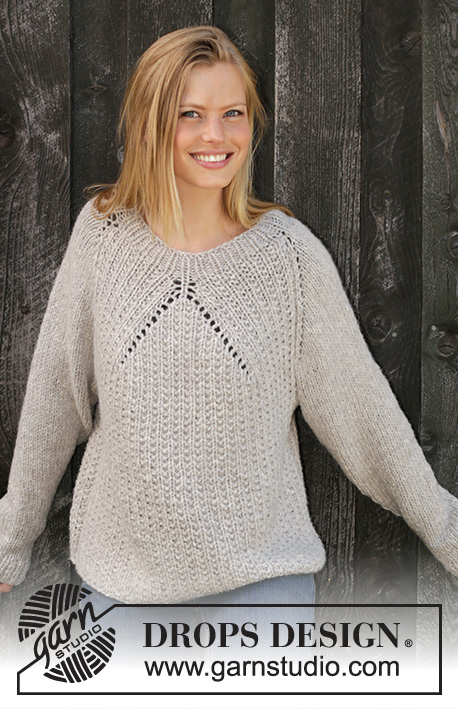
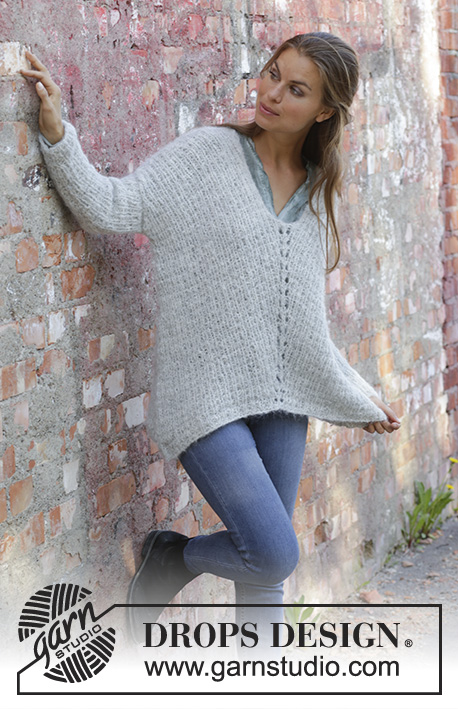
Knitted jumper in DROPS Melody. The piece is worked with texture and displacement on front piece. Sizes S - XXXL.
DROPS 195-25 |
|||||||
|
EXPLANATIONS FOR THE PATTERN: ------------------------------------------------------- RIDGE/GARTER STITCH (worked back and forth): 1 ridge = Knit 2 rows. PATTERN: See diagrams A.1 and A.2. The diagrams show all rows in the pattern seen from the right side. INCREASE TIP-1: All increases are made from the right side! Work as far as the mid-stitch, make 1 yarn over, knit mid-stitch, make 1 yarn over. On the next row purl the yarn overs to leave holes. Then work the new stitches in texture (A.1/A.2). INCREASE TIP-2: All increases are made from the right side! Increase 1 stitch by making 1 yarn over. On the next row knit the yarn over twisted to avoid a hole. Then work the new stitch in garter stitch. DECREASE TIP-1: All decreases are made from the right side! Decrease 1 stitch after the 1 edge stitch in garter stitch as follows: Knit 2 together. Decrease 1 stitch before the 1 edge stitch in garter stitch as follows: Work until there are 3 stitches left on row, slip 1 stitch as if to knit, knit 1 and pass the slipped stitch over the knitted stitch. DECREASE TIP-2: To work out how to decrease evenly, count the total number of stitches on needle (e.g. 35 stitches) and divide by the number of decreases to be made (e.g. 3) = 11.6. In this example, decrease by alternately knitting together each 10th and 11th stitch and each 11th and 12th stitch (approx.). ------------------------------------------------------- START THE PIECE HERE: ------------------------------------------------------- JUMPER - SHORT OVERVIEW OF THE PIECE: The piece is worked back and forth in sections with circular needle and sewn together to finish. Front and back pieces are worked bottom up. Sleeves are worked top down. FRONT PIECE: Cast on 83-87-95-99-107-115 stitches with circular needle size 7 mm and Melody. Purl 1 row from the wrong side. Insert a marker thread in the middle stitch on the row (= mid-stitch); there are 41-43-47-49-53-57 stitches on each side of the marker thread. The marker thread follows your work upwards. Work pattern from the right side as follows: 1 edge stitch in GARTER STITCH - see description above, work A.1 as far as mid-stitch, knit 1 (= mid-stitch, which is knitted from right side and purled from wrong side to finished length), work A.2 until there is 1 stitch left on row, 1 edge stitch in garter stitch. Continue pattern back and forth, AT THE SAME TIME on the next row decrease 1 stitch inside the 1 edge stitch in garter stitch in each side and increase 1 stitch on each side of the mid-stitch - read DECREASE TIP-1 and INCREASE TIP-1. Decrease and increase every 4th row onwards. REMEMBER THE KNITTING TENSION! When the piece measures 35-36-35-36-37-37 cm measured along the side, work the next row from the right side as follows: Work pattern as before as far as the mid-stitch and place these stitches on a thread (= 41-43-47-49-53-57 stitches for left shoulder). Cast off the next stitch (= mid-stitch) = 41-43-47-49-53-57 stitches on right shoulder. Insert a marker thread in each side of the piece. THE PIECE IS NOW MEASURED FROM HERE! RIGHT SHOULDER: = 41-43-47-49-53-57 stitches. Work pattern as before with 1 edge stitch in garter stitch in each side and continue to decrease inside the 1 edge stitch in garter stitch towards the armhole every 4th row 6-6-7-7-7-8 times = 35-37-40-42-46-49 stitches, AT THE SAME TIME when the piece measures 12-13-14-15-16-17 cm increase 1 stitch inside the 1 edge stitch in garter stitch towards the neck – read INCREASE TIP-2 and decrease 1 stitch inside the 1 edge stitch in garter stitch towards the side. Increase and decrease every 2nd row a total of 5 times (number of stitches remains the same). Now work short rows – adjust so that the next row is worked from the wrong side as follows: ROW 1 (wrong side): Work pattern as before until there are 6 stitches left on row, tighten strand. ROW 2 (right side): Turn and work back. ROW 3: Work pattern until there are 4 more stitches left than the previous time (= 10 stitches), tighten strand. ROW 4: Turn and work back. Repeat rows 3 and 4 and turn when there are 4 more stitches left than the previous time 4-4-4-6-6-7 more times (= a total of 5-5-5-7-7-8 times) and then when there are 3-3-3-3-5-5 more stitches left than the previous time 3-3-4-2-2-2 times. Work 1 row back from the wrong side over all stitches, where you decrease 3-2-3-3-3-4 stitches evenly on row – read DECREASE TIP-2 = 32-35-37-39-43-45 stitches. Cast off with knit from the wrong side. The piece measures approx. 62-64-66-68-70-72 cm from the shoulder down, measured along the side. LEFT SHOULDER: = 41-43-47-49-53-57 stitches. Work pattern as before with 1 edge stitch in garter stitch in each side and continue to decrease inside the 1 edge stitch in garter stitch towards the armhole every 4th row 6-6-7-7-7-8 times = 35-37-40-42-46-49 stitches, AT THE SAME TIME when the piece measures 12-13-14-15-16-17 cm increase 1 stitch inside the 1 edge stitch in garter stitch towards the neck – read INCREASE TIP-2 and decrease 1 stitch inside the 1 edge stitch in garter stitch towards the side. Increase and decrease like this every 2nd row a total of 5 times (number of stitches stays the same). Now work short rows – adjust so that the next row is worked from the right side as follows: ROW 1 (right side): Work pattern as before until there are 6 stitches left on row, tighten strand. ROW 2 (wrong side): Turn and work back. ROW 3. Work pattern until there are 4 more stitches left than the previous time (= 10 stitches), tighten strand. ROW 4: Turn and work back. Repeat rows 3 and 4 and turn when there are 4 more stitches left than the previous time 4-4-4-6-6-7 more times (= a total of 5-5-5-7-7-8 times) and then when there are 3-3-3-3-5-5 more stitches left than the previous time 3-3-4-2-2-2 times. Work 1 row back from the right side over all stitches where you decrease 3-2-3-3-3-4 stitches evenly on row – remember DECREASE TIP-2 = 32-35-37-39-43-45 stitches. Cast off with knit from the wrong side. The piece measures approx. 62-64-66-68-70-72 cm from the shoulder down, measured along the side. BACK PIECE: Cast on 77-83-89-93-101-107 stitches with circular needle size 7 mm and Melody. Purl 1 row from the wrong side. Then work pattern as follows from the right side: 1 edge stitch in garter stitch, work A.1 until there are 2 stitches left on the row, work the first stitch in A.1, 1 edge stitch in garter stitch. Continue like this back and forth until the piece measures 47-48-49-50-51-52 cm. Now insert a marker thread in each side of the piece (mark armholes and are used later when assembling). Continue until the piece measures 58-60-62-64-66-68 cm. Now work garter stitch over the middle 25-25-27-27-27-29 stitches on the row. When you have worked 2 ridges over these stitches, cast off the middle 13-13-15-15-15-17 stitches for neck (there are now 6 stitches in garter stitch on each side of the neck) and each shoulder is finished separately = 32-35-37-39-43-45 stitches on each shoulder. Continue with pattern, 6 stitches in garter stitch towards neck and 1 edge stitch in garter stitch towards armhole until the piece measures 61-63-65-67-69-71 cm. Work 1 ridge over all stitches and cast off with knit. If the cast-off edge is tight you can make 1 yarn over after each 4th stitch. The yarn overs are cast off as normal stitches. Work the other shoulder in the same way. The piece measures approx. 62-64-66-68-70-72 cm from the shoulder down measured along the side. SLEEVE: Cast on 41-43-47-49-51-55 stitches with circular needle size 7 mm and Melody. Work pattern as follows: 1 edge stitch in garter stitch, A.1 until there are 2 stitches left on row, work first stitch in A.1, 1 edge stitch in garter stitch. Continue this pattern back and forth. When the piece measures 4 cm decrease 1 stitch inside the 1 edge stitch in garter stitch in each side – remember DECREASE TIP-1. Decrease like this every 14th-12th-10th-8th-7th-5th row a total of 5-6-7-7-8-9 times = 31-31-33-35-35-37 stitches. Continue until the sleeve measures 43-42-41-40-38-36 cm. Cast off with knit over knit and purl over purl. Work the other sleeve in the same way. ASSEMBLY: Sew shoulder seams with grafting stitches. Insert a marker thread in the front piece 15-16-17-18-19-20 cm from the shoulder and down in each side (mark armholes). Sew sleeves to body between the marker threads on front and back pieces – sew inside the 1 edge stitch on body and inside the cast-on edge on sleeves. Sew sleeve and side seams in one go inside the 1 edge stitch. Repeat on other side. |
|||||||
Diagram explanations |
|||||||
|
|||||||
 |
|||||||
Have you finished this pattern?Tag your pictures with #dropspattern #mellowmondaysweater or submit them to the #dropsfan gallery. Do you need help with this pattern?You'll find 22 tutorial videos, a Comments/Questions area and more by visiting the pattern on garnstudio.com. © 1982-2026 DROPS Design A/S. We reserve all rights. This document, including all its sub-sections, has copyrights. Read more about what you can do with our patterns at the bottom of each pattern on our site. |
|||||||


With over 40 years in knitting and crochet design, DROPS Design offers one of the most extensive collections of free patterns on the internet - translated to 17 languages. As of today we count 324 catalogues and 12290 patterns translated into English (UK/cm).
We work hard to bring you the best knitting and crochet have to offer, inspiration and advice as well as great quality yarns at incredible prices! Would you like to use our patterns for other than personal use? You can read what you are allowed to do in the Copyright text at the bottom of all our patterns. Happy crafting!
Post a comment to pattern DROPS 195-25
We would love to hear what you have to say about this pattern!
If you want to leave a question, please make sure you select the correct category in the form below, to speed up the answering process. Required fields are marked *.