
Popular categories
Looking for a yarn?


Comments / Questions (33)
![]() Agnieszka wrote:
Agnieszka wrote:
Witam. Wg opisu, w pierwszej fazie ramienia powinnam zamykać oczka od strony pachy. Po osiągnięciu 12 cm, oczka mają być zamykane zarówno od strony pachy jak i dekoltu. Wynika z tego, że początek pachy jest o 12 cm obniżona względem początku dekoltu, podczas gdy na rysunku początek pachy jest dokładnie na tym samym poziomie co początek dekoltu. Dodatkowo na zdjęciu dekolt rozpoczyna się w momencie zamknięcia oczka środkowego przodu a nie po 12 cm.
27.04.2026 - 20:31
![]() Elisa wrote:
Elisa wrote:
Faccio riferimento alla diminuzione al inizio del ferro, questo mi sfasa la costa, perché faccendo la diminuzione, non comincio sulla stessa maglia. Grazie ancora!
01.02.2026 - 22:40
![]() Elisa wrote:
Elisa wrote:
Salve gentile team! Io capisco lo schema A1 e A 2, Ma mi confonde il fatto della diminuzione della maglia, quello mi sfasa lo schema, ringrazierei un suggerimento.
30.01.2026 - 21:09DROPS Design answered:
Buonasera Elisa, a quale diminuzione sta facendo riferimento? Buon lavoro!
31.01.2026 - 20:36
![]() Claudia wrote:
Claudia wrote:
Hallo, fehlt in der Beschreibung das Diagramm? Ich kann hier nur die Erklärung für das Diagramm finden.
18.01.2024 - 20:58
![]() Patricia wrote:
Patricia wrote:
Hallo liebes drops team Ich habe die rechte Schulter gestricht wie geschrieben, nur leider scheint was schief gelaufen zu sein, denn durch die verkürzten reien ist die abschluss kante an der Ärmel Seite höher als am Halsausschnitt, ist das so gewollt oder genau anders rum wie es sein sollte? LG Patricia
02.02.2023 - 00:33DROPS Design answered:
Liebe Patricia, sollte Ihre Maschenprobe auch in der Höhe stimmen und wenn Sie die Anleitung genau gefolgt haben (dh mit allen Ab- und Zunahmen und verkürzten Reihen), dann sollte es schon ok sein. Im Zweifelsfall zeigen Sie Ihr Strickstück Ihr Wollladen (auch ein Foto können Sie per E-Mail schicken), so kann man Ihnen dort am besten helfen. Viel Spaß beim stricken!
02.02.2023 - 09:46
![]() Elin Låby wrote:
Elin Låby wrote:
Vad betyder det att man ska strama tråden? (höger och vänster axel)
26.11.2022 - 16:08DROPS Design answered:
Hej Elin, du trækker bare lidt i tråden du strikker med, så den ikke bliver for løs :)
30.11.2022 - 14:34
![]() Inge wrote:
Inge wrote:
Hallo, ich verstehe die Zahlenkombinationen bei den verkürzten Reihen nicht. bedeuten diese, dass ich immer vom Rand aus mehr Maschen stilllegen muss, also 6, 10, 14, 18, usw? und was bedeuten die Zahlen in den Klammern? und was defeuted die Anweisung: „wenn noch 3-3-3-3-5-5 Maschen mehr übrig sind, als beim letzten Mal“ + der Folgesatz ????? das ist sehr verwirrend, den Teil der Anleitung verstehe ich gar nicht mehr. Vielen lieben dank für die Aufklärung 😉,
17.01.2021 - 11:04DROPS Design answered:
Liebe Inge, genauso werden die verkürzten Reihen gestrickt: es soll am Ende der Reihen bleiben: zuerst 6, dann 10, dann 14, 18..; noch 4 -6 oder 7 Mal (= ingesamt 5, 7 oder 8 Mal), je nach der Größe. Dann stricken Sie bis 3 oder 5 M mehr als davor bleibt (= dh jetzt nicht mehr 4 M weniger stricken sonder entweder 3 order 5 je nach der Größe). Viel Spaß beim stricken!
18.01.2021 - 11:27
![]() Inge wrote:
Inge wrote:
Hallo Drops Team, toller Pulli, wunderbares Muster, nur etwas schwierige Anleitung 😉. Ich bin an der rechten Schulter und muss an einer „Rückreihe“ verkürzte Reihen anfagen. Was definiert die Rückreihe? an welcher Seite Hals oder Armausschnitt soll der Effekt der verkürzung sein? vielen Dank
07.01.2021 - 21:16DROPS Design answered:
Liebe Inge, eine Rückreihe wird von der Inneseite/Rückseite gestrickt - beim rechten Schulter Vorderteil sind die Rückreihe von Armausschnitt bis Hals (Hinreihen sind vom Hals bis Armausschnitt gestrickt). Viel Spaß beim stricken!
08.01.2021 - 07:33
![]() Frieda wrote:
Frieda wrote:
Hallo liebes Drops Team, leider ist mir - trotz der Tips nicht klar geworden, wie ich die rechte Schulter stricke. Beim Halsausschnitt nimmt man doch ab, nicht zu...wie beschrieben. Und für welchen Armausschnitt muss ich abnehmen- auf der Abbildung kann ich davon nichts erkennen. Es fällt mir schwer die Anleitung zu verstehen. vielen Dank
30.12.2020 - 23:19DROPS Design answered:
Liebe Frieda, dieses Modell hat einen ungewöhnlichen Form, deshalb muss man hier stricken, genauso wie beschrieben, damit der Halsausschnitt schön aussieht (den haben ich selber gestrickt und er ist wirklich schön geworden), stricken Sie mit Zunahmen und Abnahmen sowie verkürzten Reihen genauso wie erklärt. Viel Spaß beim stricken!
04.01.2021 - 13:17
![]() Danièle Berry wrote:
Danièle Berry wrote:
Pouvez vous me confirmer que le devant est commencé par le côté. car je ne comprends pas les explications du devant qui dit de diminuer de chaque côté. alors que pour le bas du pull je dois diminuer et pour les épaules je dois augmenter, Pouvez-vous m'aider
26.11.2020 - 14:13DROPS Design answered:
Bonjour Mme Berry, le devant se tricote de bas en haut, vous décalez les côtes de chaque côté en diminuant 1 m de chaque côté et en augmentant au milieu - Quand vous tricotez les épaules, suivez bien les indications qui vont vous permettre de conserver le côté encolure "droit" (cf photo) tout en formant l'emmanchure de chaque côté). C'est une construction un peu moins conventionnelle mais vous verrez le résultat se former en suivant bien les indications. Bon tricot
26.11.2020 - 16:51
|
|||||||
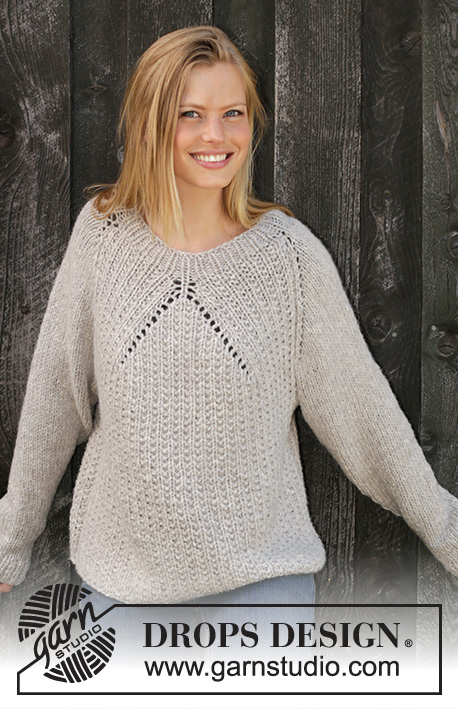
Mellow Monday#mellowmondaysweater |
|||||||
 |
 |
||||||
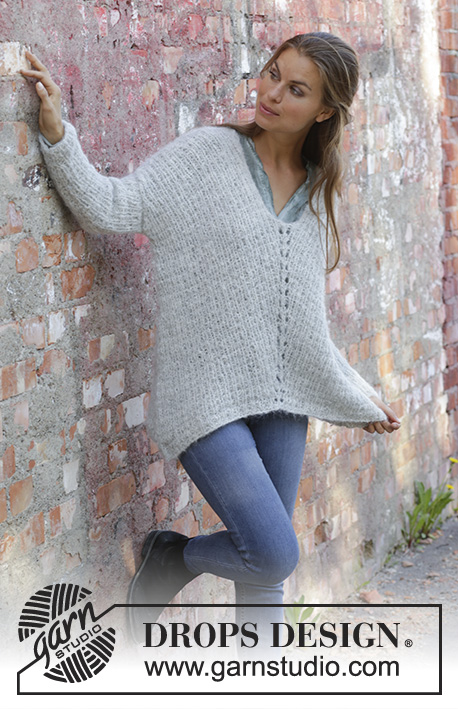
Knitted jumper in DROPS Melody. The piece is worked with texture and displacement on front piece. Sizes S - XXXL.
DROPS 195-25 |
|||||||
|
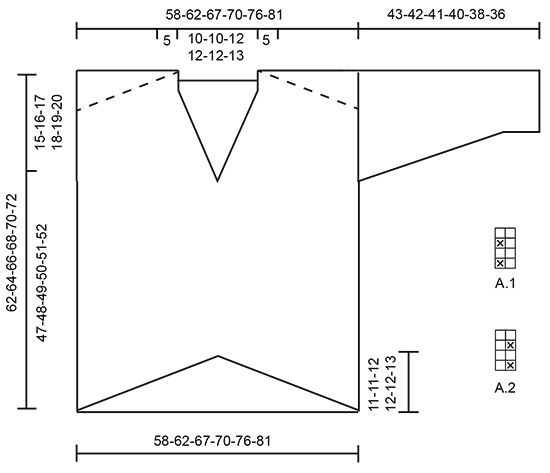
EXPLANATIONS FOR THE PATTERN: ------------------------------------------------------- RIDGE/GARTER STITCH (worked back and forth): 1 ridge = Knit 2 rows. PATTERN: See diagrams A.1 and A.2. The diagrams show all rows in the pattern seen from the right side. INCREASE TIP-1: All increases are made from the right side! Work as far as the mid-stitch, make 1 yarn over, knit mid-stitch, make 1 yarn over. On the next row purl the yarn overs to leave holes. Then work the new stitches in texture (A.1/A.2). INCREASE TIP-2: All increases are made from the right side! Increase 1 stitch by making 1 yarn over. On the next row knit the yarn over twisted to avoid a hole. Then work the new stitch in garter stitch. DECREASE TIP-1: All decreases are made from the right side! Decrease 1 stitch after the 1 edge stitch in garter stitch as follows: Knit 2 together. Decrease 1 stitch before the 1 edge stitch in garter stitch as follows: Work until there are 3 stitches left on row, slip 1 stitch as if to knit, knit 1 and pass the slipped stitch over the knitted stitch. DECREASE TIP-2: To work out how to decrease evenly, count the total number of stitches on needle (e.g. 35 stitches) and divide by the number of decreases to be made (e.g. 3) = 11.6. In this example, decrease by alternately knitting together each 10th and 11th stitch and each 11th and 12th stitch (approx.). ------------------------------------------------------- START THE PIECE HERE: ------------------------------------------------------- JUMPER - SHORT OVERVIEW OF THE PIECE: The piece is worked back and forth in sections with circular needle and sewn together to finish. Front and back pieces are worked bottom up. Sleeves are worked top down. FRONT PIECE: Cast on 83-87-95-99-107-115 stitches with circular needle size 7 mm and Melody. Purl 1 row from the wrong side. Insert a marker thread in the middle stitch on the row (= mid-stitch); there are 41-43-47-49-53-57 stitches on each side of the marker thread. The marker thread follows your work upwards. Work pattern from the right side as follows: 1 edge stitch in GARTER STITCH - see description above, work A.1 as far as mid-stitch, knit 1 (= mid-stitch, which is knitted from right side and purled from wrong side to finished length), work A.2 until there is 1 stitch left on row, 1 edge stitch in garter stitch. Continue pattern back and forth, AT THE SAME TIME on the next row decrease 1 stitch inside the 1 edge stitch in garter stitch in each side and increase 1 stitch on each side of the mid-stitch - read DECREASE TIP-1 and INCREASE TIP-1. Decrease and increase every 4th row onwards. REMEMBER THE KNITTING TENSION! When the piece measures 35-36-35-36-37-37 cm measured along the side, work the next row from the right side as follows: Work pattern as before as far as the mid-stitch and place these stitches on a thread (= 41-43-47-49-53-57 stitches for left shoulder). Cast off the next stitch (= mid-stitch) = 41-43-47-49-53-57 stitches on right shoulder. Insert a marker thread in each side of the piece. THE PIECE IS NOW MEASURED FROM HERE! RIGHT SHOULDER: = 41-43-47-49-53-57 stitches. Work pattern as before with 1 edge stitch in garter stitch in each side and continue to decrease inside the 1 edge stitch in garter stitch towards the armhole every 4th row 6-6-7-7-7-8 times = 35-37-40-42-46-49 stitches, AT THE SAME TIME when the piece measures 12-13-14-15-16-17 cm increase 1 stitch inside the 1 edge stitch in garter stitch towards the neck – read INCREASE TIP-2 and decrease 1 stitch inside the 1 edge stitch in garter stitch towards the side. Increase and decrease every 2nd row a total of 5 times (number of stitches remains the same). Now work short rows – adjust so that the next row is worked from the wrong side as follows: ROW 1 (wrong side): Work pattern as before until there are 6 stitches left on row, tighten strand. ROW 2 (right side): Turn and work back. ROW 3: Work pattern until there are 4 more stitches left than the previous time (= 10 stitches), tighten strand. ROW 4: Turn and work back. Repeat rows 3 and 4 and turn when there are 4 more stitches left than the previous time 4-4-4-6-6-7 more times (= a total of 5-5-5-7-7-8 times) and then when there are 3-3-3-3-5-5 more stitches left than the previous time 3-3-4-2-2-2 times. Work 1 row back from the wrong side over all stitches, where you decrease 3-2-3-3-3-4 stitches evenly on row – read DECREASE TIP-2 = 32-35-37-39-43-45 stitches. Cast off with knit from the wrong side. The piece measures approx. 62-64-66-68-70-72 cm from the shoulder down, measured along the side. LEFT SHOULDER: = 41-43-47-49-53-57 stitches. Work pattern as before with 1 edge stitch in garter stitch in each side and continue to decrease inside the 1 edge stitch in garter stitch towards the armhole every 4th row 6-6-7-7-7-8 times = 35-37-40-42-46-49 stitches, AT THE SAME TIME when the piece measures 12-13-14-15-16-17 cm increase 1 stitch inside the 1 edge stitch in garter stitch towards the neck – read INCREASE TIP-2 and decrease 1 stitch inside the 1 edge stitch in garter stitch towards the side. Increase and decrease like this every 2nd row a total of 5 times (number of stitches stays the same). Now work short rows – adjust so that the next row is worked from the right side as follows: ROW 1 (right side): Work pattern as before until there are 6 stitches left on row, tighten strand. ROW 2 (wrong side): Turn and work back. ROW 3. Work pattern until there are 4 more stitches left than the previous time (= 10 stitches), tighten strand. ROW 4: Turn and work back. Repeat rows 3 and 4 and turn when there are 4 more stitches left than the previous time 4-4-4-6-6-7 more times (= a total of 5-5-5-7-7-8 times) and then when there are 3-3-3-3-5-5 more stitches left than the previous time 3-3-4-2-2-2 times. Work 1 row back from the right side over all stitches where you decrease 3-2-3-3-3-4 stitches evenly on row – remember DECREASE TIP-2 = 32-35-37-39-43-45 stitches. Cast off with knit from the wrong side. The piece measures approx. 62-64-66-68-70-72 cm from the shoulder down, measured along the side. BACK PIECE: Cast on 77-83-89-93-101-107 stitches with circular needle size 7 mm and Melody. Purl 1 row from the wrong side. Then work pattern as follows from the right side: 1 edge stitch in garter stitch, work A.1 until there are 2 stitches left on the row, work the first stitch in A.1, 1 edge stitch in garter stitch. Continue like this back and forth until the piece measures 47-48-49-50-51-52 cm. Now insert a marker thread in each side of the piece (mark armholes and are used later when assembling). Continue until the piece measures 58-60-62-64-66-68 cm. Now work garter stitch over the middle 25-25-27-27-27-29 stitches on the row. When you have worked 2 ridges over these stitches, cast off the middle 13-13-15-15-15-17 stitches for neck (there are now 6 stitches in garter stitch on each side of the neck) and each shoulder is finished separately = 32-35-37-39-43-45 stitches on each shoulder. Continue with pattern, 6 stitches in garter stitch towards neck and 1 edge stitch in garter stitch towards armhole until the piece measures 61-63-65-67-69-71 cm. Work 1 ridge over all stitches and cast off with knit. If the cast-off edge is tight you can make 1 yarn over after each 4th stitch. The yarn overs are cast off as normal stitches. Work the other shoulder in the same way. The piece measures approx. 62-64-66-68-70-72 cm from the shoulder down measured along the side. SLEEVE: Cast on 41-43-47-49-51-55 stitches with circular needle size 7 mm and Melody. Work pattern as follows: 1 edge stitch in garter stitch, A.1 until there are 2 stitches left on row, work first stitch in A.1, 1 edge stitch in garter stitch. Continue this pattern back and forth. When the piece measures 4 cm decrease 1 stitch inside the 1 edge stitch in garter stitch in each side – remember DECREASE TIP-1. Decrease like this every 14th-12th-10th-8th-7th-5th row a total of 5-6-7-7-8-9 times = 31-31-33-35-35-37 stitches. Continue until the sleeve measures 43-42-41-40-38-36 cm. Cast off with knit over knit and purl over purl. Work the other sleeve in the same way. ASSEMBLY: Sew shoulder seams with grafting stitches. Insert a marker thread in the front piece 15-16-17-18-19-20 cm from the shoulder and down in each side (mark armholes). Sew sleeves to body between the marker threads on front and back pieces – sew inside the 1 edge stitch on body and inside the cast-on edge on sleeves. Sew sleeve and side seams in one go inside the 1 edge stitch. Repeat on other side. |
|||||||
Diagram explanations |
|||||||
|
|||||||
 |
|||||||
Have you finished this pattern?Tag your pictures with #dropspattern #mellowmondaysweater or submit them to the #dropsfan gallery. Do you need help with this pattern?You'll find 22 tutorial videos, a Comments/Questions area and more by visiting the pattern on garnstudio.com. © 1982-2026 DROPS Design A/S. We reserve all rights. This document, including all its sub-sections, has copyrights. Read more about what you can do with our patterns at the bottom of each pattern on our site. |
|||||||


With over 40 years in knitting and crochet design, DROPS Design offers one of the most extensive collections of free patterns on the internet - translated to 17 languages. As of today we count 324 catalogues and 12290 patterns translated into English (UK/cm).
We work hard to bring you the best knitting and crochet have to offer, inspiration and advice as well as great quality yarns at incredible prices! Would you like to use our patterns for other than personal use? You can read what you are allowed to do in the Copyright text at the bottom of all our patterns. Happy crafting!
Post a comment to pattern DROPS 195-25
We would love to hear what you have to say about this pattern!
If you want to leave a question, please make sure you select the correct category in the form below, to speed up the answering process. Required fields are marked *.