
Popular categories
Looking for a yarn?


Comments / Questions (10)
![]() Sylvie wrote:
Sylvie wrote:
Dans les vidéos aide, on voit comment assembler les carrés avec des mailles coulées, en les plaçant côte à côte. Mais dans les instructions, on doit placer les carrés envers contre envers et assembler avec des mailles serrées, dans une séquence plutôt complexe... Est-ce que ces 2 méthodes peuvent être faites? Puis-je assembler avec des mailles coulées, comme dans le pull 241-16 Garden square sweater?
03.10.2023 - 03:59DROPS Design answered:
Bonjour Sylvie, tout à fait, il existe différentes façons d'assembler les carrés entre eux, choisissez la technique que vous préférez pour le résultat que vous souhaitez. Bon assemblage!
03.10.2023 - 08:17
![]() Corrie wrote:
Corrie wrote:
Omdat ik het kleed op een vliesdeken wil naaien zou ik het afwerken graag zonder lussen willen doen maar gewoon een vaste rand hebben jullie daar ook een stekenverhouding voor of is het gewoon in iedere steek een vaste haken Alvast Bedankt Corrie
09.04.2023 - 08:21DROPS Design answered:
Dag Corrie,
Je kan inderdaad een vaste in iedere vaste haken. Je zou dan uit moeten komen. Let erop dat je de vasten niet te strak haakt om te voorkomen dat het gaat trekken.
12.04.2023 - 20:16
![]() Andrea Kruiskamp wrote:
Andrea Kruiskamp wrote:
Met deze nog een vraag, ik ben inmiddels bij vierkant 11 heb zoals in het patroon staat de kleurwisselingen met dubbele draad gedaan, zoals ik heb begrepen vorige kleur en nieuwe kleur de eerste 3 lossen samen. Eigenlijk vind ik dit niet mooi en als ik de afbeelding van de deken goed bekijk zie ik dat dat niet zo is gedaan. (Bij mijn werk zie je dus bij aanvang nieuwe toer 2 kleuren) Graag verneem hoe het nu eigenlijk moet? Omdat het inderdaad op de instructie video anders wordt gedaan.
22.07.2018 - 18:46DROPS Design answered:
Dag Andrea, Bij het wisselen van kleur haak je niet de 3 lossen samen (want dan komen de kleuren inderdaad door elkaar en dat is niet mooi) maar je haakt de laatste doorhaling van de lus van kleur 1 alvast met kleur 2. (De tip voor het wisselen van garen is niet specifiek voor verschillende kleuren bedoelt maar voor het wegwerken van garen)
19.09.2018 - 21:00
![]() Mieke wrote:
Mieke wrote:
Andrea Kruiskamp en beantwoorder van haar vraag; hoewel ik een ervaren haakster ben en net als Andrea katoen voor de vakantie heb gekocht om deze deken te haken loop ook ik tegen het omkeren aan. Ik heb dat nooit eerder gedaan, op het filmpje van de granny square gebeurt het wel en in de beschrijving onder het filmpje staat dit ook beschreven. Als je de detailfoto vergroot zie je dat er wel na elke toer gekeerd is (voor de ervaren kijken) Misschien handig voor het draadjes wegwerken?
12.07.2018 - 21:28Marij wrote:
Is katoenen garen voor een plaid niet aan de zware kant?
12.07.2018 - 15:18DROPS Design answered:
Dag Marij, Het wordt inderdaad een vrij zwaar kleed. Als je hem wat lichter wilt hebben zou je een wolvariant, bijvoorbeeld DROPS Alaska of DROPS Nepal, kunnen gebruiken (garencategorie C)
16.07.2018 - 13:04
![]() Andrea Kruiskamp wrote:
Andrea Kruiskamp wrote:
Mevrouw, heb het patroon en de garens etc gekocht bij de Hobbydoos. Nu had ik verwacht een geschreven patroon te ontvangen. Aangezien er alleen een telpatroon bij is geleverd en ik pas begin met haken en geen ervaring heb met een telpatroon, vraag ik mij af of je het haakwerk bij elke nieuwe toer moet keren.
04.07.2018 - 16:51DROPS Design answered:
Dag Andrea, Nee, je hoeft het werk niet te keren, du je haakt steeds in de rondte aan de goede kant (In onze patronen staat het aangegeven als je het werk moet keren aan het eind van de toer). Je begint iedere toer met 3 lossen en eindidt met een halve vaste in de derde losse van de vorige toer.
05.07.2018 - 14:33
![]() Bullet Force wrote:
Bullet Force wrote:
Heklet pledd med bestemor-ruter.
15.05.2018 - 09:59Marit Louise Jordhoy wrote:
Hei hvor mange ruter skal det være av hver fargekombinasjoner?
18.04.2018 - 01:26DROPS Design answered:
Hej Marit, det hekles 3 ruter av hver fargekombinasjon - god fornøjelse! :)
26.04.2018 - 16:35
![]() MICAELA wrote:
MICAELA wrote:
E' un piacere per gli occhi, rasserenante
03.01.2018 - 18:32
![]() Mariarita wrote:
Mariarita wrote:
Garnstudio ha il pregio di presentare sempre modelli diversi,senza tempo perche' non seguono la moda,ma la propongono.Grazie e serene festivita'.
18.12.2017 - 15:54
|
|||||||||||||||||||
Sandy's Love#sandysloveblanket |
|||||||||||||||||||
 |
 |
||||||||||||||||||
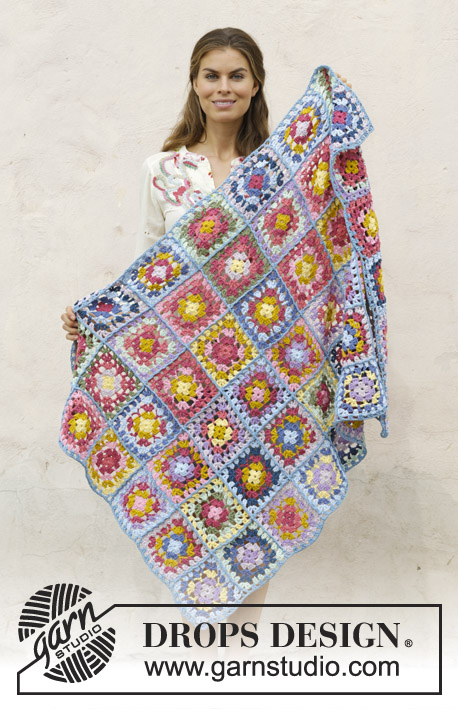
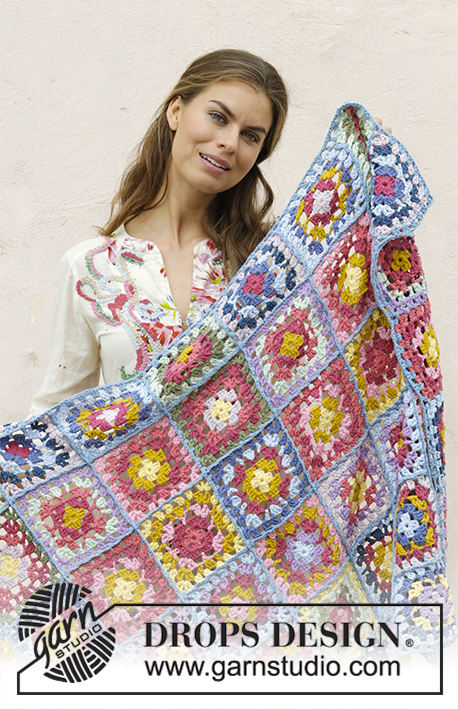
Crocheted blanket with granny squares. Piece is crocheted in DROPS Paris.
DROPS 189-2 |
|||||||||||||||||||
|
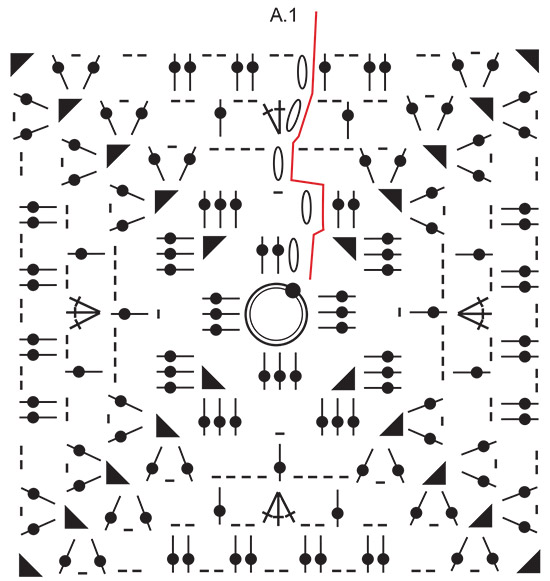
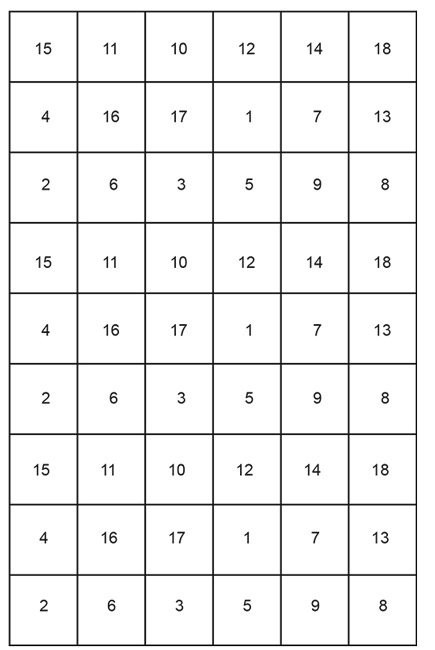
INFORMATION FOR PATTERN: PATTERN: See diagram A.1. COLOUR COMBINATION (applies to crochet squares): SQUARE 1: ROUND 1: light wash ROUND 2: light purple ROUND 3: heather ROUND 4: mustard ROUND 5: medium pink SQUARE 2: ROUND 1: powder pink ROUND 2: heather ROUND 3: mustard ROUND 4: grey blue ROUND 5: light wash SQUARE 3: ROUND 1: raspberry ROUND 2: heather ROUND 3: medium pink ROUND 4: mustard ROUND 5: vanilla SQUARE 4: ROUND 1: mustard ROUND 2: raspberry ROUND 3: heather ROUND 4: moss green ROUND 5: light mint green SQUARE 5: ROUND 1: medium pink ROUND 2: mustard ROUND 3: heather ROUND 4: light purple ROUND 5: light wash SQUARE 6: ROUND 1: vanilla ROUND 2: mustard ROUND 3: heather ROUND 4: raspberry ROUND 5: medium pink SQUARE 7: ROUND 1: medium pink ROUND 2: heather ROUND 3: moss green ROUND 4: light mint green ROUND 5: vanilla SQUARE 8: ROUND 1: powder pink ROUND 2: light purple ROUND 3: vanilla ROUND 4: grey blue ROUND 5: light wash SQUARE 9: ROUND 1: light wash ROUND 2: grey blue ROUND 3: mustard ROUND 4: heather ROUND 5: powder pink SQUARE 10: ROUND 1: vanilla ROUND 2: mustard ROUND 3: medium pink ROUND 4: heather ROUND 5: raspberry SQUARE 11: ROUND 1: mustard ROUND 2: heather ROUND 3: raspberry ROUND 4: light mint green ROUND 5: light purple SQUARE 12: ROUND 1: mustard ROUND 2: vanilla ROUND 3: raspberry ROUND 4: light purple ROUND 5: powder pink SQUARE 13: ROUND 1: light purple ROUND 2: powder pink ROUND 3: grey blue ROUND 4: petrol ROUND 5: light mint green SQUARE 14: ROUND 1: vanilla ROUND 2: mustard ROUND 3: heather ROUND 4: petrol ROUND 5: light wash SQUARE 15: ROUND 1: heather ROUND 2: grey blue ROUND 3: light wash ROUND 4: petrol ROUND 5: powder pink SQUARE 16: ROUND 1: vanilla ROUND 2: powder pink ROUND 3: raspberry ROUND 4: heather ROUND 5: moss green SQUARE 17: ROUND 1: vanilla ROUND 2: mustard ROUND 3: heather ROUND 4: light wash ROUND 5: grey blue SQUARE 18: ROUND 1: heather ROUND 2: raspberry ROUND 3: mustard ROUND 4: light purple ROUND 5: powder pink YARN CHANGE TIP: To avoid fastening many strands the yarn ends can be fastened from the beginning of round along the way as follows: ROUND 1: Place cast-on strand together with chain stitch ring and work around this the entire round, then cut the cast-on yarn. ROUNDS 2-5: Work the first 3 chain stitches with double yarn of the new colour (yarn end + yarn from ball), then continue with 1 strand from the ball, the yarn end can be cut. At the end of each round, the yarn end from this round must be fastened, i.e. on every square there are 5 strands to fasten. ---------------------------------------------------------- BLANKET: The blanket consists of 54 squares. work all squares first, then work them together and work an edge around the entire blanket at the end. CROCHET SQUARE: Begin with hook size 4.5 mm and Paris and work PATTERN according to diagram A.1. Switch colour on every round and work 3 squares of every COLOUR COMBINATION - see explanation above = 54 squares. REMEMBER THE CROCHET TENSION! 1 square measures approx. 13 x 13 cm. Fasten the strands while working - read YARN CHANGE TIP. ASSEMBLY: Place squares with correct square number as shown in illustration/chart (6 squares in width and 9 squares in length). Square number on illustration/chart refers to crochet squares with same number explained below COLOUR COMBINATION. Work squares together in rows alongside, then work the rows together across. Work them together as follows: Place 2 squares together wrong side against wrong side. Work around both layers with colour 101, light blue: ** 1 double crochet around corner, * 3 chain stitches, skip the next 2 double crochets, work 1 double crochet in next chain space *. Work from *-* until and with corner (= 6 chain spaces) and work 2 chain stitches (= transition to the next 2 squares) **. Repeat from **-** along the entire row and finish with 1 double crochet around the last corners. Fasten off. Work like this until all rows have been worked together along. Then work the rows together the same way across. EDGE: Work an edge around the entire blanket with colour 101, light blue. Start working in a corner on the blanket. Fasten the strand with 1 slip stitch around the chain stitches on the corner and work as follows: 3 chain stitches (replaces 1 treble crochet), 1 chain stitch, 1 treble crochet, 3 chain stitches, 1 treble crochet, 1 chain stitch, 1 treble crochet, 2 chain stitches = 1st corner. Then work as follows along the side: ** Skip 2 treble crochets, * 2 treble crochets around the chain-space, 2 chain stitches, skip 2 treble crochets *, work from *-* 5 times, 1 treble crochet around the chain-space in the corner of the square, 2 chain stitches, 1 treble crochet around the corner of next square **, work from **-** until 2nd corner of blanket. Around the corner work: 1 treble crochet, 1 chain stitch, 1 treble crochet, 3 chain stitches, 1 treble crochet, 1 chain stitch, 1 treble crochet and 2 chain stitches. Work from **-** until the 3rd corner of blanket, work around the corner as before. Work from **-** until the 4th corner of the blanket, work around the corner as before. Work from **-** until the 1st corner and finish with 1 slip stitch in 3rd chain stitch on at the start of the round. |
|||||||||||||||||||
Diagram explanations |
|||||||||||||||||||
|
|||||||||||||||||||
 |
|||||||||||||||||||
 |
|||||||||||||||||||
Have you finished this pattern?Tag your pictures with #dropspattern #sandysloveblanket or submit them to the #dropsfan gallery. Do you need help with this pattern?You'll find 10 tutorial videos, a Comments/Questions area and more by visiting the pattern on garnstudio.com. © 1982-2026 DROPS Design A/S. We reserve all rights. This document, including all its sub-sections, has copyrights. Read more about what you can do with our patterns at the bottom of each pattern on our site. |
|||||||||||||||||||


With over 40 years in knitting and crochet design, DROPS Design offers one of the most extensive collections of free patterns on the internet - translated to 17 languages. As of today we count 324 catalogues and 12290 patterns translated into English (UK/cm).
We work hard to bring you the best knitting and crochet have to offer, inspiration and advice as well as great quality yarns at incredible prices! Would you like to use our patterns for other than personal use? You can read what you are allowed to do in the Copyright text at the bottom of all our patterns. Happy crafting!
Post a comment to pattern DROPS 189-2
We would love to hear what you have to say about this pattern!
If you want to leave a question, please make sure you select the correct category in the form below, to speed up the answering process. Required fields are marked *.