
Popular categories
Looking for a yarn?


Comments / Questions (26)
![]() Elena Iglesias Fernández wrote:
Elena Iglesias Fernández wrote:
Buenas tardes. No entiendo lo de la aguja circular. ¿No puedo hacerlo con dos agujas? Muchas gracias.
07.05.2024 - 18:27
![]() Elena Iglesias Fernández wrote:
Elena Iglesias Fernández wrote:
Buenas tardes. No entiendo lo de la aguja circular. ¿No puedo hacerlo con dos agujas? Muchas gracias.
07.05.2024 - 18:24
![]() Kirsten wrote:
Kirsten wrote:
Hallo, Ich lese es richtig und die Nadel Nr.20 bedeutet Nadelstärke 20mm?
26.10.2023 - 16:45DROPS Design answered:
Liebe Kirsten, richtig, diese Decke wird mit 2 Fäden DROPS Snow und Nadeln Nr 20 / 20 mm gestrickt. Viel Spaß beim stricken!
27.10.2023 - 08:18
![]() Fausta Gina Cavaletto wrote:
Fausta Gina Cavaletto wrote:
Non ho capito quante maglie x fare una larghezza di cm. 100 e vorrei usare ferri diritti grazie
04.10.2023 - 19:31DROPS Design answered:
Buonasera Fausta, se vuole modificare la larghezza, deve fare un campione e lavorare in base a quello. Buon lavoro!
05.10.2023 - 21:54
![]() SAINT JALM wrote:
SAINT JALM wrote:
S\'il vous plait, Quelle est la hauteur des rayures? Merci
05.03.2023 - 14:34DROPS Design answered:
Bonjour Mme Saint Jalm, chaque rayure consiste en 2 rangs point de riz, retrouvez les couleurs à utiliser sous RAYURES. Bon tricot!
06.03.2023 - 09:57
![]() Dorka wrote:
Dorka wrote:
Hallo, ich bin mir anhand der Anleitung leider nicht sicher ob man in jeder Reihe BEIDE Fäden abschneiden muss oder nur den Faden den man wechselt.
17.09.2022 - 07:59DROPS Design answered:
Liebe Dorka, der Faden wird jeweils abgeschnitten und zwar, wird man vor jeder und nach jeder Streifen 25 cm für die Fransen stehen lassen - siehe FARBWECHSEL am Anfang der Anleitung. Viel Spaß beim stricken!
19.09.2022 - 09:16
![]() Anette wrote:
Anette wrote:
Jag undrar om om följande; Arbetet är stickat i 2 trådar DROPS Eskimo, är det att man använder 2 st garnnystan samtidigt? Om man stickar den i enfärgad ska jag beställa 23 st garnnystan? 1150 gr/50 gr= 23 nystan.
04.11.2020 - 13:17DROPS Design answered:
Hej Annette, ja det stemmer, husk at overholde strikkefastheden så du ikke strikker for stramt :)
04.11.2020 - 14:36
![]() Tula Strand wrote:
Tula Strand wrote:
Kan mønsteret strikkes med en tråd polaris? Hvor mange nøster/gram vil det gå med polaris? Samme pinne som med to tråder eskimo?
09.10.2020 - 02:09DROPS Design answered:
Hej Tula. Ja du kan sticka denna med 1 tråd DROPS Polaris. Se bara till att få den stickfasthet som uppges i oppskriften. Du får räkna ut hur många meter garn du behöver för att göra den, du kan läsa mer om detta här. Lycka till!
09.10.2020 - 06:27
![]() Linda Allen wrote:
Linda Allen wrote:
How can I purchase the yarn and design for this blanket? Any UK shops sell it?
21.06.2020 - 10:27DROPS Design answered:
Dear Linda, pattern for this blanket is free and you can choose from several languages (see menu under the main photo) - you can print this pattern directly from our site. For yarn you can find a DROPS store here . Happy knitting!
21.06.2020 - 13:17
![]() Floriana wrote:
Floriana wrote:
Buona giornata, con quale numero di ferri posso sostituire il ferro circolare? Grazie
22.04.2020 - 12:27DROPS Design answered:
Buongiorno Floriana. Può provare con ferri dritti della stessa misura di quelli suggeriti nel modello. Scelga comunque la misura che le consente di ottenere lo stesso campione indicato. Buon lavoro!
22.04.2020 - 15:15
|
|
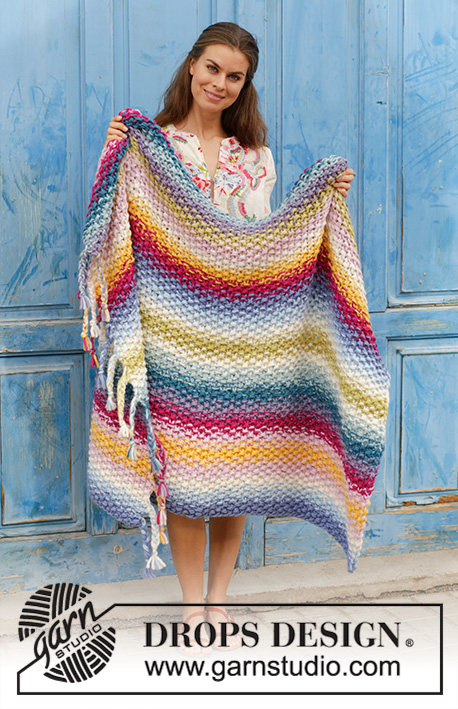
Jalisco#jaliscoblanket |
|
 |
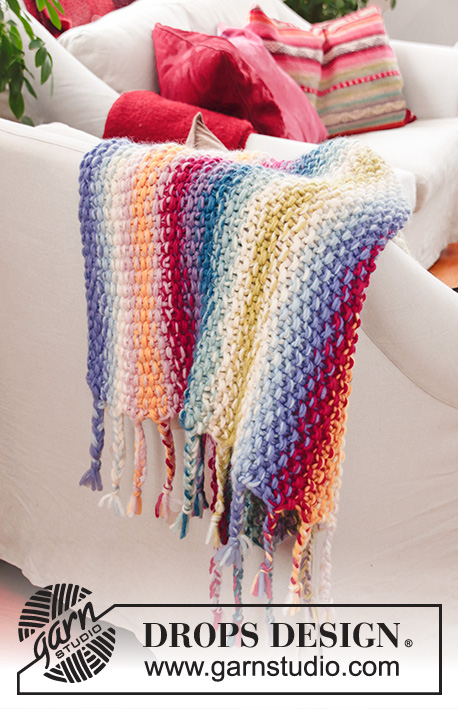 |
Knitted rainbow blanket with moss stitch, stripes and fringe. The piece is worked in 2 strands DROPS Snow.
DROPS 189-1 |
|
|
INFORMATION FOR THE PATTERN: MOSS STITCH: ROW 1: * knit 1, purl 1 *, repeat from *-*. ROW 2: knit over purl and purl over knit. Repeat ROW 2 onwards. STRAND CHANGE: Every time you change colours after a stripe, leave 25 cm of yarn end, which will then be used to make the fringe. It is therefore important to leave a long end at both the beginning and end of each stripe. If you change balls in the middle of a stripe, you can splice the ends together to avoid having to fasten the ends. Divide the outermost 10 cm at the end of the new and old strand, dampen and twist them together between your hands (= lightly felted strands). STRIPE PATTERN: Work 2 rows moss stitch on each stripe. The stripes are in the following colours: STRIPE 1: 2 strands light blue STRIPE 2: 1 strand light blue + 1 pastel blue STRIPE 3: 2 strands pastel blue STRIPE 4: 1 strand pastel blue + 1 strand off white STRIPE 5: 2 strands off white STRIPE 6: 1 strand off white + 1 strand pastel pink STRIPE 7: 2 strands pastel pink STRIPE 8: 1 strand pastel pink + 1 strand yellow STRIPE 9: 2 strands yellow STRIPE 10: 1 strand yellow + 1 strand pastel pink STRIPE 11: 2 strands pastel pink STRIPE 12: 1 strand pastel pink + 1 strand hot pink STRIPE 13: 2 strands hot pink STRIPE 14: 1 strand hot pink + 1 strand medium purple STRIPE 15: 2 strands medium purple STRIPE 16: 1 strand medium purple + 1 strand petrol STRIPE 17: 2 strands petrol STRIPE 18: 1 strand petrol + 1 strand aquamarine STRIPE 19: 2 strands aquamarine STRIPE 20: 1 strand aquamarine + 1 strand off white STRIPE 21: 2 strands off white STRIPE 22: 1 strand off white + 1 strand lime STRIPE 23: 2 strands lime STRIPE 24: 1 strand lime + 1 strand off white STRIPE 25: 2 strands off white STRIPE 26: 1 strand off white + 1 strand pastel blue STRIPE 27: 2 strands pastel blue STRIPE 28: 1 strand pastel blue + 1 strand light blue STRIPE 29: 2 strands light blue STRIPE 30: 1 strand light blue + 1 strand hot pink STRIPE 31: 2 strands hot pink STRIPE 32: 1 strand hot pink + 1 strand yellow STRIPE 33: 2 strands yellow STRIPE 34: 1 strand yellow + 1 strand off white STRIPE 35: 2 strands off white STRIPE 36: 1 strand off white + 1 strand pastel pink STRIPE 37: 2 strands pastel pink STRIPE 38: 1 strand pastel pink + 1 strand lime STRIPE 39: 2 strands lime STRIPE 40: 1 strand lime + 1 strand medium purple STRIPE 41: 2 strands medium purple STRIPE 42: 1 strand medium purple + 1 strand aquamarine STRIPE 43: 2 strands aquamarine STRIPE 44: 1 strand aquamarine + 1 strand petrol STRIPE 45: 2 strands petrol STRIPE 46: 1 strand petrol + 1 strand hot pink STRIPE 47: 2 strands hot pink STRIPE 48: 1 strand hot pink + 1 strand pastel pink STRIPE 49: 2 strands pastel pink ---------------------------------------------------------- BLANKET: The piece is worked back and forth with circular needle, to give you room for all the stitches. Cast on 78 stitches with circular needle size 20 mm and 2 strands light blue, leave a strand end of 25 cm (these will be used to make the fringe later). Then work MOSS STITCH and STRIPES - see description above and read STRAND CHANGE. When stripe 49 has been completed, cut both strands (so there will be enough strands for the fringe). Change to 1 new strand pastel pink and 1 strand pastel blue and loosely cast off with knit from the right side. Cut the strands and fasten them at this end of the piece. You now have a total of 102 strands of 25 cm on the other side of the piece for the fringe. FRINGE: The strands in the side are plaited together. Start in the one end; tie the strands together 2 and 2 along the whole side with double knots. Then use 6 strands in each plait. Lay the strands in 3 groups of 2 strands and plait them loosely together. When the plait measures approx. 14 cm, tie a knot in the end. Plait all strands in this way (= 17 plaits) and then trim the ends so that they are all the same length. |
|
Have you finished this pattern?Tag your pictures with #dropspattern #jaliscoblanket or submit them to the #dropsfan gallery. Do you need help with this pattern?You'll find 9 tutorial videos, a Comments/Questions area and more by visiting the pattern on garnstudio.com. © 1982-2025 DROPS Design A/S. We reserve all rights. This document, including all its sub-sections, has copyrights. Read more about what you can do with our patterns at the bottom of each pattern on our site. |
|


With over 40 years in knitting and crochet design, DROPS Design offers one of the most extensive collections of free patterns on the internet - translated to 17 languages. As of today we count 314 catalogues and 11821 patterns translated into English (UK/cm).
We work hard to bring you the best knitting and crochet have to offer, inspiration and advice as well as great quality yarns at incredible prices! Would you like to use our patterns for other than personal use? You can read what you are allowed to do in the Copyright text at the bottom of all our patterns. Happy crafting!
Post a comment to pattern DROPS 189-1
We would love to hear what you have to say about this pattern!
If you want to leave a question, please make sure you select the correct category in the form below, to speed up the answering process. Required fields are marked *.