
Popular categories
Looking for a yarn?


Comments / Questions (45)
![]() Angela Dijsselbloem wrote:
Angela Dijsselbloem wrote:
Hallo, ik heb deze sjaal gebreid op nld 3 met Katia jaipur. Precies het patroon gevolgd, maar in de golven zie je bijna de gaten niet en de gaatjes daarboven zijn ook veel compacter. Hier lijkt het begin horizon taal te lopen, bij mij blijft het een punt. Heel jammer, want nu heeft het niet de uitstraling die ik ervan verwacht had. Ik heb het patroon voorgelegd aan dames die veel kennis hebben en ook zij zeggen dat ik het patroon goed uitgevoerd heb maar niet overeen komt met de foto.
11.07.2018 - 12:26
![]() Emma wrote:
Emma wrote:
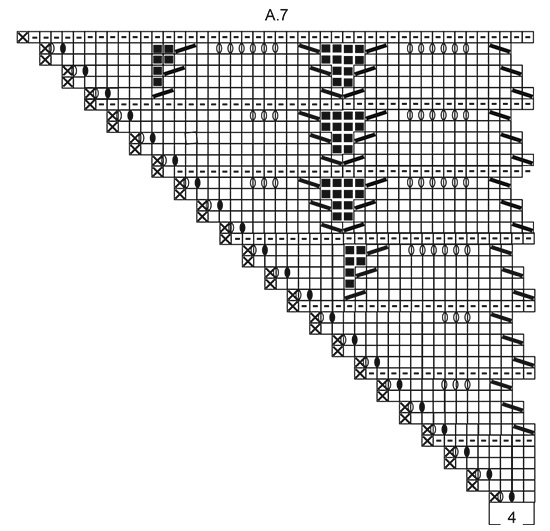
Hei! Puuttuukohan piirroksista A.3 ja A.7 riviltä 11 yhdet lisäykset? En saa silmukkamäärä täsmäämään.
05.07.2018 - 20:51
![]() Mireille wrote:
Mireille wrote:
Bonjour , je ne comprends pas bien le début du tricot je m explique le patron A1et A2 se font à partir des 4 mailles, cela je le comprends. Ce sont les augmentations (54) donc 2augmentations de chaque côté deA1 et A2 donc les augmentations se font sur l endroit donc sur 12 rangs donc on a ajouter 48 mailles dans A1et A2 et il faut ajouter 5 mailles de chaque côté de la mailles central je n arrive pas dans le décompte des 54 augmentations . Merci de m idée
21.05.2018 - 15:45DROPS Design answered:
Bonjour Mireille, on augmente tous les 2 rangs: 2 m au début de A.1 et 2 m au début de A.2 (= 2 x 12 m x 2 diagrammes = 48 augmentations au total) et 1 m à la fin de A.1 et 1 m à la fin de A.2 (= 1 m de chaque côté de la m centrale soit 2 x 12 m = 24 augmentations au total). On avait 9 m + 48 + 24 = 81 m. Bon tricot!
22.05.2018 - 09:39
![]() Lene Hansen wrote:
Lene Hansen wrote:
Jeg er ikke helt sikker på hvad I mener med denne formulering? = lav et omslag mellem 2 masker, på næste pind strikkes det første omslag vrang og det sidste slippes ned Skal jeg slippe omslag nr. 2? således der "kun" tages tre masker ud?
08.05.2018 - 18:34DROPS Design answered:
Hej Lene, Du skal lave 2 omslag mellem to masker, (det er nu rettet) det første omslag strikkes vrang og det sidste slippes af pinden, så der bliver et hul. God fornøjelse!
09.05.2018 - 13:07
![]() Wil Zegers wrote:
Wil Zegers wrote:
Dank je wel voor de uitleg 👍
30.04.2018 - 20:00
![]() Will Zegers wrote:
Will Zegers wrote:
Moet ik na A1 en A2 elke nld aan de goede kant meerderen en in welke nld worden de gaatjes gebreid. Na hoeveel nld heb ik 54 x gemeerderd
26.04.2018 - 21:25DROPS Design answered:
Hallo Wil, De meerderingen zijn al verwerkt in A.1 en A.2. Ik heb het even voor je uitgerekend: Na 4,5 herhalingen van A.1 en A.2 in totaal heb je 54 keer gemeerderd (12 keer per 1 herhaling in de hoogte) en heb je 333 steken op de naald.
29.04.2018 - 19:03
![]() Will Zegers wrote:
Will Zegers wrote:
Ik heb patroona1 en A2 gebreid, nu moet ik verder gaan in patroon A1 en A2 met de meerderingen. Is het de bedoeling dat elke nld aan de goede kant meerder en wanneer brei dan de nld met gaatjes.
26.04.2018 - 21:21DROPS Design answered:
Hallo Wil, Zie het antwoord op je andere vraag; je gaat inderdaad gewoon verder met het herhalen van A.1 en A.2
29.04.2018 - 19:04
![]() Véronique Palanché wrote:
Véronique Palanché wrote:
Bonjour Je n'arrive pas bien à lire le bord des diagrammes. Y-a-t'il un double jeté après la maille endroit (ou avant à la fin du rang) ? Merci pour votre aide.
25.04.2018 - 14:45DROPS Design answered:
Bonjour Mme Palanché, tous les rangs sur l'endroit dans A.1 et A.3 on commence par 1 m end, 1 double jeté, 1 m end, 1 jeté et on termine tous les rangs sur l'endroit dans A.2 et A.7 par 1 jeté, 1 m end, 1 double jeté, 1 m end. Bon tricot!
25.04.2018 - 15:06
![]() Jolivot Anne wrote:
Jolivot Anne wrote:
Bonjour ,je suis bien le diagramme A1 et A2 du début ,mais la vague ne se forme pas est ce qu'il ne faut pas faire un rang endroit sur l'envers tout les 6 rgs comme les autres diagrammes ? Merci
05.04.2018 - 20:01DROPS Design answered:
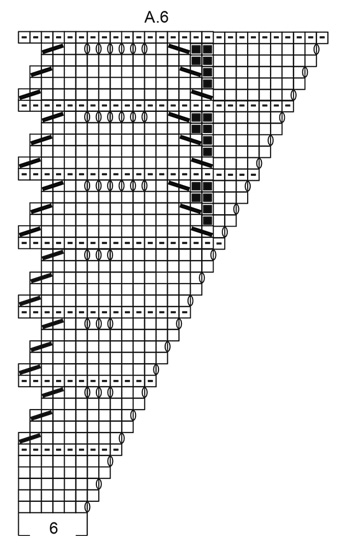
Bonjour Mme Jolivot, le châle se tricote de haut en bas, c'est-à-dire que l'on commence par la partie jersey ajourée jusqu'à ce qu'il y ait 333 m et ensuite, on va tricoter la bordure au point de vagues en faisant A.3, A.4, A.5, A.6 et A.7 (dans l'ordre indiqué). Bon tricot!
06.04.2018 - 08:40
![]() Kerstin wrote:
Kerstin wrote:
"keine Masche" (diese Masche überspringen) heißt für mich, ich ich lege die Masche von der linken Nadel auf die rechte Nadel ohne zu stricken, führe dabei den Faden hinten einfach weiter und stricke dann einfach weiter?
29.03.2018 - 13:22DROPS Design answered:
Liebe Kerstin, "Keine Masche" im diagram heißt diese Masche wurde abgenommen, es gibt hier keine Masche mehr, nur die leere Kästchen oder die mit Abnahmen stricken. Viel Spaß beim stricken!
06.04.2018 - 08:51
|
|||||||||||||||||||||||||
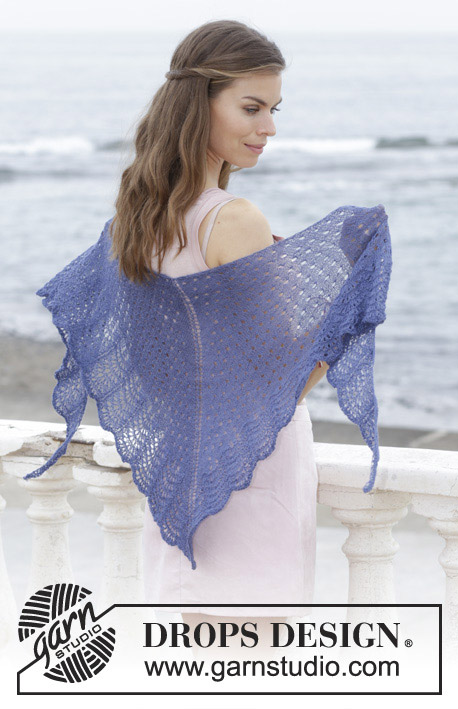
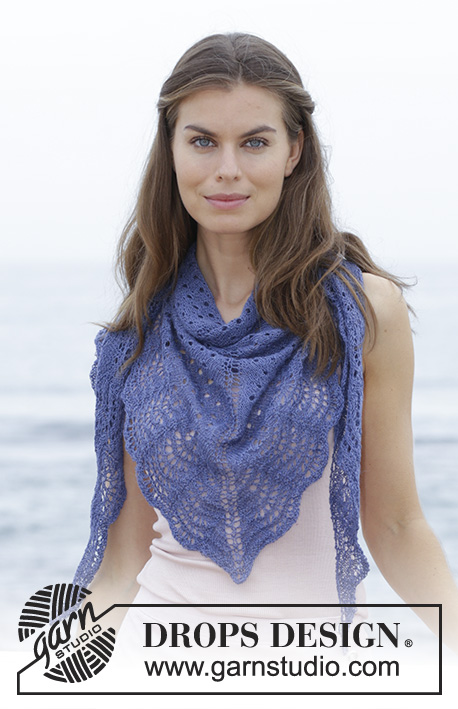
High Tide#hightideshawl |
|||||||||||||||||||||||||
 |
 |
||||||||||||||||||||||||
Knitted shawl with lace and wave pattern. The piece is worked top down in DROPS Lace.
DROPS 186-26 |
|||||||||||||||||||||||||
|
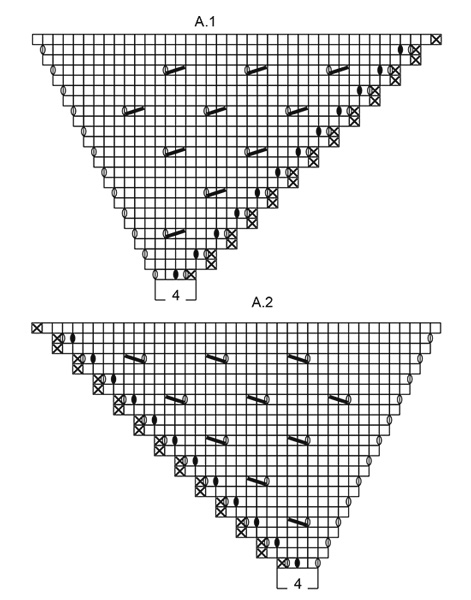
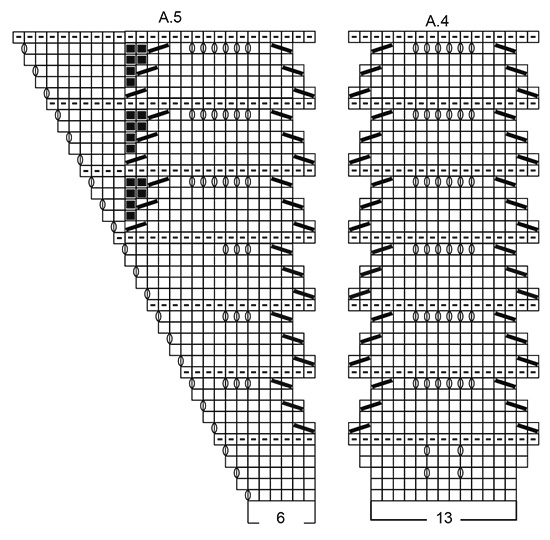
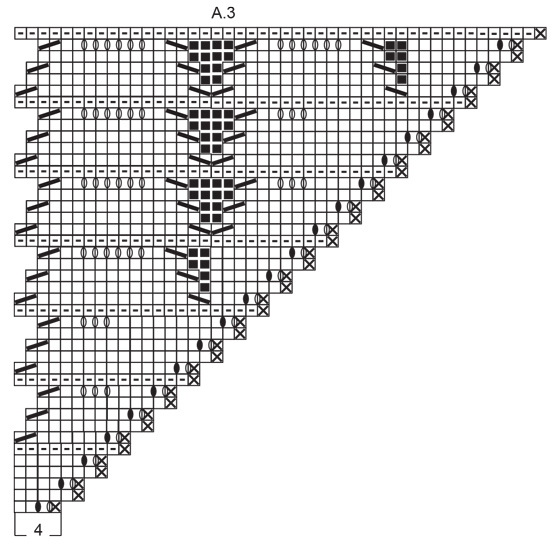
INFORMATION FOR THE PATTERN: RIDGE/GARTER STITCH (worked back and forth): 1 ridge = Knit 2 rows. PATTERN: See diagrams A.1 to A.7. The diagrams show all the rows in the pattern seen from the right side. CASTING OFF TIP To avoid the cast-off edge being tight you can make yarn overs at the same time as you cast off. Make yarn overs above all the yarn overs from the previous row with yarn overs; the yarn overs are then cast off as normal stitches. Make sure you do not tighten the strand. If the cast-off edge is still tight, you can use a larger needle size to cast off. SHAPING: If you are using another yarn from yarn group A, the shawl will not need to be stretched when finished; but dampen it and lay it flat in the right shape. Allow it to dry. Repeat this process each time the shawl is washed. ---------------------------------------------------------- SHAWL: The piece is worked back and forth with circular needle to give enough room for all the stitches. It is worked top down. Cast on 5 stitches with circular needle size 3 mm and Lace. Now work the next 2 rows as follows: ROW 1 (= right side): Work 1 edge stitch in GARTER STITCH - see description above, 1 yarn over, 1 stitch in stocking stitch, 1 yarn over, 1 stitch in stocking stitch, 1 yarn over, 1 stitch in stocking stitch, 1 yarn over and 1 edge stitch in garter stitch. ROW 2 (= wrong side): 2 edge stitches in garter stitch, purl until there are 2 stitches left and 2 edge stitches in garter stitch = 9 stitches on the needle. Then work according to diagrams A.1 and A.2 as follows: Work diagram A.1 over the first 4 stitches, 1 stitch in stocking stitch (= mid-stitch - this is worked in stocking stitch throughout the whole piece), work A.2 over the last 4 stitches. Continue working like this according to A.1 and A.2 until the diagrams have been worked 1 time in height = 81 stitches on the needle. READ THE WHOLE OF THE NEXT SECTION BEFORE CONTINUING! Now you will continue with pattern and increases in the same way as in A1 and A.2. You are increasing 2 stitches at the beginning and end of the row and increasing on each side of the mid-stitch. The row of holes is worked in the same way; it is important to make sure the rows of holes are above each other (as before) and that there are at least 5 stitches stocking stitch on each side of the mid-stitch. Work like this until you have increased a total of 54 times and there are 333 stitches on the needle (= 166 stitches on each side of the mid-stitch). Now continue as follows on the next row from the right side: Work diagram A.3 over 4 stitches, repeat diagram A.4 over the next 156 stitches (= 12 repeats in width), work A.5 over 6 stitches, 1 stitch in stocking stitch (= mid-stitch), A.6 over 6 stitches, repeat diagram A.4 over the next 156 stitches (= 12 repeats in width), work A.7 over the last 4 stitches. Work the diagrams like this 1 time in height = 555 stitches on the needle. Work 2 ridges. READ CASTING OFF TIP and cast off with knit on the next row. Cut and fasten the strand. STRETCHING: Place the shawl in luke-warm water until it is thoroughly wet. Press the water carefully out of the shawl - do not twist the garment, then roll the shawl in a towel and press to remove even more water - the shawl should just be damp. If you have used another yarn from yarn group A, read SHAPING above. Lay the shawl on a floor rug or mattress - pull it gently into shape and use pins to fasten it down. Allow the shawl to dry. Repeat the process each time the shawl is washed. |
|||||||||||||||||||||||||
Diagram explanations |
|||||||||||||||||||||||||
|
|||||||||||||||||||||||||
 |
|||||||||||||||||||||||||
 |
|||||||||||||||||||||||||
 |
|||||||||||||||||||||||||
 |
|||||||||||||||||||||||||
 |
|||||||||||||||||||||||||
Have you finished this pattern?Tag your pictures with #dropspattern #hightideshawl or submit them to the #dropsfan gallery. Do you need help with this pattern?You'll find 17 tutorial videos, a Comments/Questions area and more by visiting the pattern on garnstudio.com. © 1982-2026 DROPS Design A/S. We reserve all rights. This document, including all its sub-sections, has copyrights. Read more about what you can do with our patterns at the bottom of each pattern on our site. |
|||||||||||||||||||||||||


With over 40 years in knitting and crochet design, DROPS Design offers one of the most extensive collections of free patterns on the internet - translated to 17 languages. As of today we count 324 catalogues and 12290 patterns translated into English (UK/cm).
We work hard to bring you the best knitting and crochet have to offer, inspiration and advice as well as great quality yarns at incredible prices! Would you like to use our patterns for other than personal use? You can read what you are allowed to do in the Copyright text at the bottom of all our patterns. Happy crafting!
Post a comment to pattern DROPS 186-26
We would love to hear what you have to say about this pattern!
If you want to leave a question, please make sure you select the correct category in the form below, to speed up the answering process. Required fields are marked *.