Comments / Questions (45)
![]() Maibrit Christiansen wrote:
Maibrit Christiansen wrote:
Jeg er startet på dette meget smukke sjal 5 gange og allerede når jeg kommer til 4 eller 5 pind har jeg 2 masker for lidt på pinden i forhold til diagrammet (A1). Hvor tror I at det går galt for mig? Håber at Ikan hjælpe mig så jeg kan strikke dette smukke sjal til min mor mår hun til sommer bliver 90 år.
01.02.2021 - 12:55DROPS Design answered:
Hei Maibrit. Skriv ut oppskriften, deretter kan du telle kastene på hver rad og så skrive ned hvor mange masker inkl kast du skal ha etter hver rad. Du starter med 5 masker. På 1. og 2. rad skal du ha 9 masker = A.1 (4 masker og 3 kast) + midtmasken + A.2 (4 masker og 3 kast)= 7+1+7=15 masker. Det økes ikke på 2. rad. 3. rad= A.1 (7 masker + 3 kast) +1 midtmaske + A.2 (7 masker +3 kast) = 10+1+10= 21 masker. Det økes ikke på 4. rad. 5. rad = A.1 (10 masker + 4 kast - 2 rett sammen= 12 masker) + 1 midtmaske + A.2 (10 masker + 4 kast - 2 rett sammen= 12 masker) = 12+1+12 = 25 masker osv. mvh DROPS design
01.02.2021 - 15:54
![]() Gabriele wrote:
Gabriele wrote:
Wenn ich mir das foto so ansehe dann fängt dieses schultertuch unten mit dem wellenmuster an. ich habe jetzt a1 und a2 gestrickt, dass ist nur lochmuster
15.11.2020 - 13:11DROPS Design answered:
Liebe Gabriele, das Tuch wird von oben nach unten gestrickt, dh zuerst stricken Sie das Lochmuster und nehmen für das gewünschte Form in jede 2. Reihe (= siehe Diagram) zu und zum Schluss stricken Sie das Wellenmuster (immer noch mit Zunahmen wie zuvor). Viel Spaß beim stricken!
16.11.2020 - 10:22
![]() VH wrote:
VH wrote:
Olisi hyvä saada piirrokset ja merkkien selitykset myös suomenkieliseen ohjeeseen. Kiitos!
17.05.2020 - 14:04DROPS Design answered:
Hei, nyt piirrokset aukeavat!
19.05.2020 - 14:23
![]() Choisnet wrote:
Choisnet wrote:
Bonjour je viens de finir A1 et A2 vous dites continuez comme avant, en augmentation, qu'est ce qui change en fait ?( Regardez bien le 4ème et le 5ème symbole de la légende. ) où sont-ils ? dés le début on augmente, alors après on augmente plus ou pareille ? merci pour votre aide.
05.03.2020 - 09:53DROPS Design answered:
Bonjour Mme Choisnet, vous continuer à augmenter 2 mailles en début de rang sur l'endroit + 2 mailles en fin de rang sur l'endroit + 1 m de chaque côté de la m centrale comme avant (=6 augm. par rang sur l'endroit) et tricotez les motifs ajourés comme avant également de sorte qu'ils soient toujours alignés comme dans A.1 et A.2. Bon tricot!
05.03.2020 - 10:46
![]() Moni wrote:
Moni wrote:
Bonjour, est il possible de faire le motif de bordure 2 fois au lieu d'une pour agrandir le châle. Merci
13.02.2020 - 13:12DROPS Design answered:
Bonjour Moni, fort probablement, il vous faudra juste plus de laine - attention à ne pas en manquer avant la longueur souhaitée. Bon tricot!
14.02.2020 - 08:00
![]() Hervé wrote:
Hervé wrote:
Bonjour, il est noté qu'on augmente 2 mailles au début et en fin de rang et on augmente de chaque côté de la maille centrale. Or si on fait un double jeté en tricotant le premier jeté et en laissant tomber le second, cela fait une augmentation et pas 2. Je ne comprends pas comment on obtient 2 augmentations. Merci pour cette éclairage. IH
16.11.2019 - 14:01DROPS Design answered:
Bonjour Mme Hervé, dans A.1 et A.2, on a plusieurs jetés, par ex au 1er rang de A.1, on va tricoter: 1 m end, 1 double jeté (= 1 augmentation = jour), 1 m end, 1 jeté (1 augmentation tricotée torse = pas de trou), 2 m end, 1 double jeté (= avant la maille centrale). Et en sens inverse pour A.2. Regardez bien le 4ème et le 5ème symbole de la légende. Bon tricot!
18.11.2019 - 09:06
![]() Pernille wrote:
Pernille wrote:
Hei igjen, Men hva med ruten med en strek i? Den er i A4. Og takk for det raske svaret!
28.05.2019 - 07:49DROPS Design answered:
Hei Pernille. Strikk kastet etter diagrammet, altså der symboler over strikkes rett fra vrangen strikkes kastet rett fra vrangen. Vi skal få endret forklaringen i symbolforklaringen så dette blir tydeligere. God fornøyelse
28.05.2019 - 09:01
![]() Pernille wrote:
Pernille wrote:
Hei. Spørsmål til diagram A4: De radene hvor man skal strikke rett fra vrangen, når man kommer til det doble kastet hvor man tidligere har strikket det første vrangt og sluppet deg andre ned, skal det første kastet være vrangt fortsatt eller skal det nå strikkes rett? Beklager kronglete formulering, håper spørsmålet gir mening.
27.05.2019 - 22:26DROPS Design answered:
Hei Pernille, I A.4 er det ingen masker som skal strikkes rett fra vrangen. Alle ruter uten tegn er rett fra retten og vrang fra vrangen. God fornøyelse!
28.05.2019 - 07:29
![]() Kerstin Brückner wrote:
Kerstin Brückner wrote:
Sind im Diagramm alle Reihen, auch die Rückreihen, gezeichnet?
05.04.2019 - 16:04DROPS Design answered:
Liebe Frau Brückner, ja genau, hier lesen Sie mehr über Diagramme. Viel Spaß beim stricken!
05.04.2019 - 16:17
![]() Anne-Marie Bernard wrote:
Anne-Marie Bernard wrote:
Bonjour, je viens de découvrir votre site et je suis émerveillée par nombre de modèles dont le châle "High Tide". C'est en commençant à tricoter avec un reste de laine que j'ai compris le design sophistiqué. Je vais prochainement vous commander la laine pour le réaliser comme le modèle.
21.02.2019 - 11:38
High Tide#hightideshawl |
|||||||||||||||||||||||||
 |
 |
||||||||||||||||||||||||
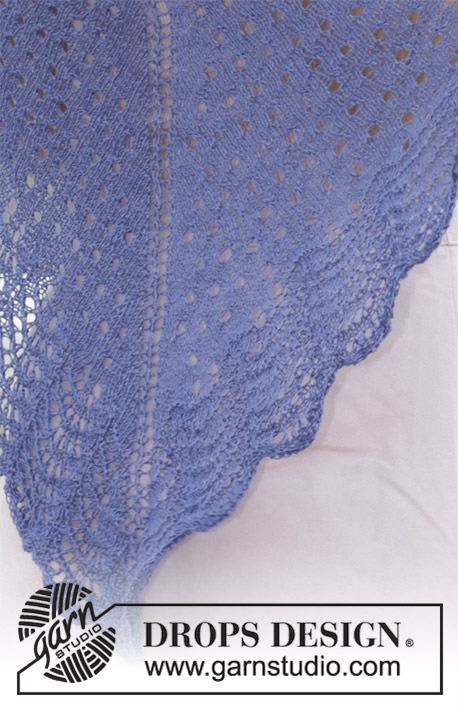
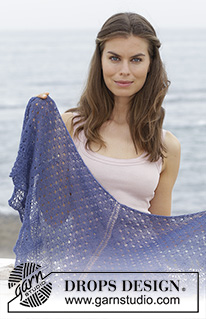
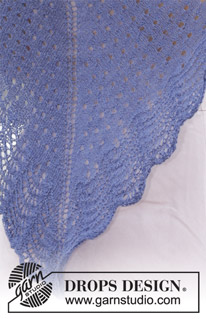
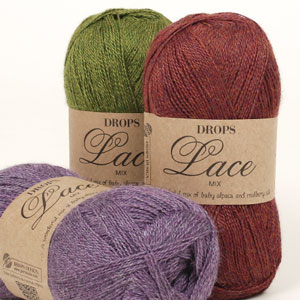
Knitted shawl with lace and wave pattern. The piece is worked top down in DROPS Lace.
DROPS 186-26 |
|||||||||||||||||||||||||
|
INFORMATION FOR THE PATTERN: RIDGE/GARTER STITCH (worked back and forth): 1 ridge = Knit 2 rows. PATTERN: See diagrams A.1 to A.7. The diagrams show all the rows in the pattern seen from the right side. CASTING OFF TIP To avoid the cast-off edge being tight you can make yarn overs at the same time as you cast off. Make yarn overs above all the yarn overs from the previous row with yarn overs; the yarn overs are then cast off as normal stitches. Make sure you do not tighten the strand. If the cast-off edge is still tight, you can use a larger needle size to cast off. SHAPING: If you are using another yarn from yarn group A, the shawl will not need to be stretched when finished; but dampen it and lay it flat in the right shape. Allow it to dry. Repeat this process each time the shawl is washed. ---------------------------------------------------------- SHAWL: The piece is worked back and forth with circular needle to give enough room for all the stitches. It is worked top down. Cast on 5 stitches with circular needle size 3 mm and Lace. Now work the next 2 rows as follows: ROW 1 (= right side): Work 1 edge stitch in GARTER STITCH - see description above, 1 yarn over, 1 stitch in stocking stitch, 1 yarn over, 1 stitch in stocking stitch, 1 yarn over, 1 stitch in stocking stitch, 1 yarn over and 1 edge stitch in garter stitch. ROW 2 (= wrong side): 2 edge stitches in garter stitch, purl until there are 2 stitches left and 2 edge stitches in garter stitch = 9 stitches on the needle. Then work according to diagrams A.1 and A.2 as follows: Work diagram A.1 over the first 4 stitches, 1 stitch in stocking stitch (= mid-stitch - this is worked in stocking stitch throughout the whole piece), work A.2 over the last 4 stitches. Continue working like this according to A.1 and A.2 until the diagrams have been worked 1 time in height = 81 stitches on the needle. READ THE WHOLE OF THE NEXT SECTION BEFORE CONTINUING! Now you will continue with pattern and increases in the same way as in A1 and A.2. You are increasing 2 stitches at the beginning and end of the row and increasing on each side of the mid-stitch. The row of holes is worked in the same way; it is important to make sure the rows of holes are above each other (as before) and that there are at least 5 stitches stocking stitch on each side of the mid-stitch. Work like this until you have increased a total of 54 times and there are 333 stitches on the needle (= 166 stitches on each side of the mid-stitch). Now continue as follows on the next row from the right side: Work diagram A.3 over 4 stitches, repeat diagram A.4 over the next 156 stitches (= 12 repeats in width), work A.5 over 6 stitches, 1 stitch in stocking stitch (= mid-stitch), A.6 over 6 stitches, repeat diagram A.4 over the next 156 stitches (= 12 repeats in width), work A.7 over the last 4 stitches. Work the diagrams like this 1 time in height = 555 stitches on the needle. Work 2 ridges. READ CASTING OFF TIP and cast off with knit on the next row. Cut and fasten the strand. STRETCHING: Place the shawl in luke-warm water until it is thoroughly wet. Press the water carefully out of the shawl - do not twist the garment, then roll the shawl in a towel and press to remove even more water - the shawl should just be damp. If you have used another yarn from yarn group A, read SHAPING above. Lay the shawl on a floor rug or mattress - pull it gently into shape and use pins to fasten it down. Allow the shawl to dry. Repeat the process each time the shawl is washed. |
|||||||||||||||||||||||||
Diagram explanations |
|||||||||||||||||||||||||
|
|||||||||||||||||||||||||
 |
|||||||||||||||||||||||||
 |
|||||||||||||||||||||||||
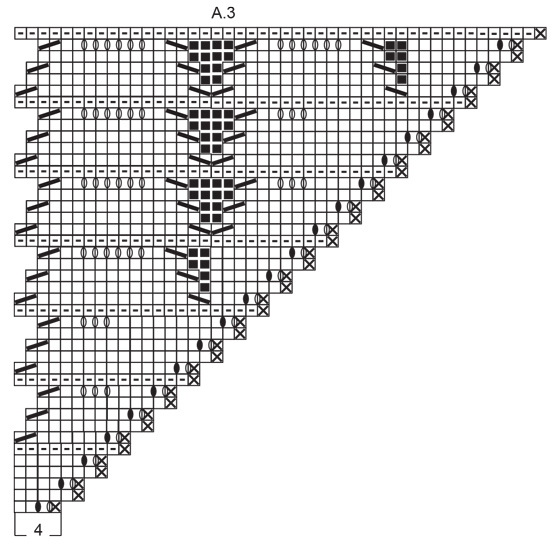 |
|||||||||||||||||||||||||
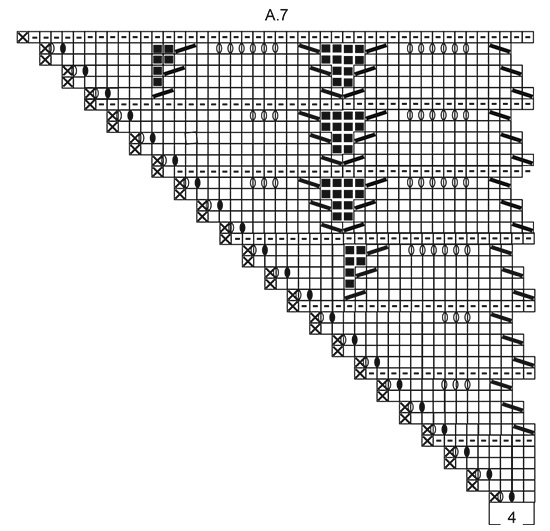 |
|||||||||||||||||||||||||
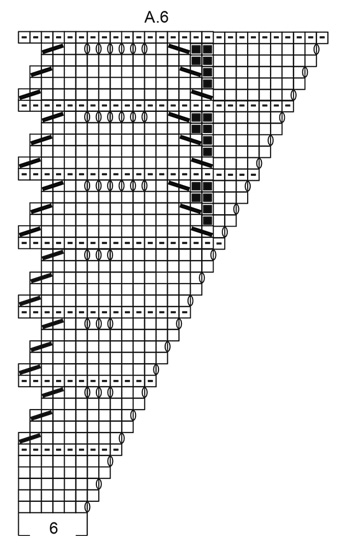 |
|||||||||||||||||||||||||
Have you finished this pattern?Tag your pictures with #dropspattern #hightideshawl or submit them to the #dropsfan gallery. Do you need help with this pattern?You'll find 17 tutorial videos, a Comments/Questions area and more by visiting the pattern on garnstudio.com. © 1982-2025 DROPS Design A/S. We reserve all rights. This document, including all its sub-sections, has copyrights. Read more about what you can do with our patterns at the bottom of each pattern on our site. |
|||||||||||||||||||||||||










Post a comment to pattern DROPS 186-26
We would love to hear what you have to say about this pattern!
If you want to leave a question, please make sure you select the correct category in the form below, to speed up the answering process. Required fields are marked *.