
Popular categories
Looking for a yarn?


Comments / Questions (20)
![]() Marianne wrote:
Marianne wrote:
Bonjour, Ayant une grande taille : Tour de poitrine 140 cm idem tour de hanche. Combien dois-je monter de mailles. Je ne comprends pas bien votre calcul dessin 99cm. Merci pour ce complément d’information.
22.01.2026 - 07:36DROPS Design answered:
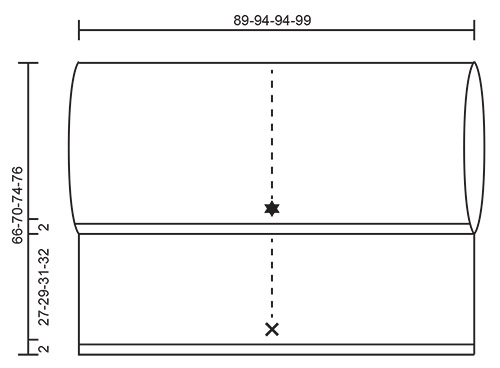
Bonjour Marianne, les 99 cm en haut correspondent à la largeur totale d'un bord de manche à l'autre - retrouvez ici comment choisir sa taille; vous pouvez aussi vous comparer les différentes tailles des modèles de ce catalogue pour vous aider à choisir. Bon tricot!
23.01.2026 - 09:32
![]() Greta Storvik wrote:
Greta Storvik wrote:
Hei. Er det greit å strikke denne vesten uten mønsteret, men bruke oppskriften. Altså strikke bare rett? Mvh Greta Storvik
15.10.2025 - 16:02DROPS Design answered:
Hi Greta, why not? Please give it a try! Happy knitting!
16.10.2025 - 10:00
![]() Natalie wrote:
Natalie wrote:
Wenn der Rechteck gefaltet wird wo ist dann der Halsausschnitt?Die Strickanleitung und Skizze schon garnicht, ist zu verstehen.Hätte gerne mir das Teil gestrickt. Werde sehr dankbar für Hilfe.
20.04.2024 - 23:09DROPS Design answered:
Liebe Nathalie, wenn die Arbeit gefaltet ist sind die Löcher beidseitig, oben, für die Arme, die ganze Länge der Arbeit wird für das Rückenteil sein und die obere Seite wird am Hals sein (die abgekettenen Maschen) - der Kreuz liegt unten beim Rücken (Anschlagskante). Viel Spaß beim fertigstellen!
22.04.2024 - 09:16
![]() Astrid wrote:
Astrid wrote:
Ich kann mir gar nicht vorstellen, wie dieses Modell "funktioniert". Müsste nach oben nicht das Strickstück breiter werden, damit im Nacken nicht eine große Spannung entsteht beim Tragen. Und wäre es nicht angemessen, beim Abketten mit Umschlag abzuketten, damit die obere Kante wirklich locker genug ist? Ich stelle meine Fragen lieber, bevor ich mit der Arbeit beginne. Vielen Dank
21.01.2024 - 11:43DROPS Design answered:
Liebe Astrid, es wird nur wie einem langen Rechteck gestrickt, das obere Teil wird dann nach unten gefaltet - siehe Maßskizze - um die Armlöcher beidseitig zu enstehen. Viel Spaß beim stricken!
22.01.2024 - 10:05
![]() Joke Rikken wrote:
Joke Rikken wrote:
Waar staat in het patroon hoe je de hals moet breien, ik begrijp van het patroon dat het 1 rechte lap is. Voor mij is de tekening niet duidelijk hoe ik het moet vouwen....
14.06.2023 - 17:53DROPS Design answered:
Dag Joke,
Het is inderdaad een rechte lap en op het eind vouw je de korte kant een stukje naar beneden en naai je een kleinstukje vast om armsgaten te creëren. Je hoeft dus geen aparte hals te breien. De hals ontstaat doordat op die plek a.h.w. meer stof van de lap zit.
14.06.2023 - 18:12
![]() Elaine wrote:
Elaine wrote:
Can you confirm that the sample pictured in the photos is longer than the length specified in the directions? How many diamonds (repeats of rows 1-12) are necessary to achieve the length in the photo (before folding for the armholes)? Thank you very much!
24.08.2022 - 21:14DROPS Design answered:
Dear Elaine, the written pattern and chart are both matching the vest on the picture - The armholes are marked with a marker after piece measures 29-31-33-34 cm / 11½"-12 1/4"-13"-13½'' - the number of diamonds will depend on your tension in height - see under ASSEMBLY how to sew piece together. Happy knitting!
25.08.2022 - 09:14
![]() Sandra Van Der Veen wrote:
Sandra Van Der Veen wrote:
Kan je dit patroon ook op gewone breinaalden breien
14.02.2022 - 11:02DROPS Design answered:
Dag Sandra,
Het werk wordt heen en weer gebreid, dus op zich zou het met rechte naalden kunnen, alleen heb je heel veel steken op de naalden, dus dat is de reden dat je met de rondbreinaald moet breien, anders past het niet.
17.02.2022 - 11:16
![]() Maria De Fátima Sousa Ferreira Amorim wrote:
Maria De Fátima Sousa Ferreira Amorim wrote:
Boa tarde estou tentada a fazer este colete para a minha nora, so que ela é baixinha, 1,57cm altura posso adaptar a peça ? se sim como? é que o tamanho S M dá para 1,70 de altura como a fotografia. e já esta a fazer-me confusão a dobragem da peça para formar o colete . se me ajudarem vou fazer a encomenda do fio e agulhas. já não é a primeira vez que trabalho convosco. obrigada
09.10.2020 - 14:36DROPS Design answered:
Boa tarde, Muito embora não possamos ajudá-la em relação a alterações aos nossos modelos, talvez a melhor forma será encurtar o comprimento total, e dividi-lo por 2 para que fique adaptado à sua nora. Pode sempre tirar a medida de uma peça que já tenha para obter a altura desejada. Bons tricôs!
09.10.2020 - 15:47
![]() Isabelle wrote:
Isabelle wrote:
Je ne sais pas comment faire au 1er rang lorsque j"arrive au 2 jete l'une a cote de l"autre. sur la meme maille. Dois-je tricoter ainsi: 2 end, 2ens, 2 jete(1 fois), surjet simple, 1 end? Dois-je faire 2 jete 1 seule fois ou 2 fois l'une apres l"autre? J'ai fait 2 jete 1 seule fois (1 trou) et il me manque 18 mailles a la fin du rang...
12.08.2020 - 16:48DROPS Design answered:
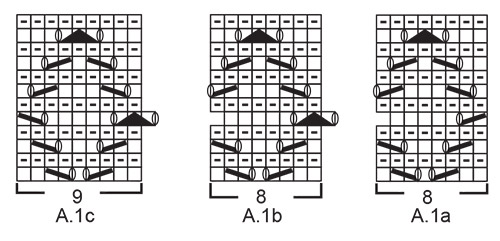
Bonjour Isabelle, vous n'avez pas de jetés côte à côte dans le point ajouré, vous aurez par ex au 1er rang de A.1a: 2 m end, 2 m ens à l'end, 1 jeté, 1 m end, 1 jeté, glisser 1 maille à l'endroit, tricoter 1 maille endroit, passer la maille glissée par-dessus la maille tricotée, 1 m end (= 8 mailles). Vous pouvez mettre un marqueur entre chaque diagramme pour pouvoir bien vérifier le nombre de mailles à chaque rang: 8 mailles pour A.1a et A.1b et 9 mailles pour A.1c. Bon tricot!
12.08.2020 - 17:09
![]() Isabelle wrote:
Isabelle wrote:
J'ai tricote le 1er rang des diagrammes. Je suis au 2ieme rang soit sur l'envers donc je tricote a l'endroit toutes les mailles. Par contre, lorsque j'arrive a la jete double, je lache la 1iere jete mais dois-je tricoter la 2ieme a l'endroit ou l'envers apres avoir lache la 1iere jete? Merci a l'avance.
05.08.2020 - 17:55DROPS Design answered:
Bonjour Isabelle, sur l'envers, vous tricotez toutes les mailles à l'endroit, autrement dit, les jetés aussi: lâchez le 1er jeté et tricotez le 2ème à l'endroit. Bon tricot!
06.08.2020 - 08:57
|
||||||||||||||||||||||||||||
Comfort Wrap#comfortwrap |
||||||||||||||||||||||||||||
 |
 |
|||||||||||||||||||||||||||
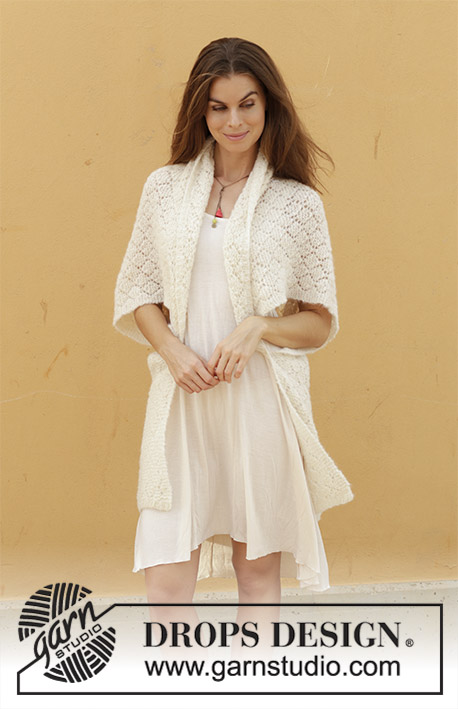
Knitted vest with lace pattern. Sizes S - XXXL. The piece is worked in DROPS Brushed Alpaca Silk.
DROPS 187-27 |
||||||||||||||||||||||||||||
|
INFORMATION FOR THE PATTERN: RIDGE/GARTER STITCH (worked back and forth): 1 ridge = Knit 2 rows. PATTERN: See diagram A.1. The diagram shows all the rows in the pattern seen from the right side. CASTING OFF TIP: To avoid the cast-off edge being tight, you can cast off with ½ size larger needle. ---------------------------------------------------------- VEST: The piece is worked back and forth with circular needle. Start at the bottom of the back piece and knit to the neck. Then the piece is folded double and sewn in each side for the armholes. Loosely cast on 143-151-151-159 stitches with circular needle size 5.5 mm and Brushed Alpaca Silk – it is important that the cast-on edge is not tight. Purl 1 row from the wrong side. The next row is worked as follows – from the right side: 1 stitch GARTER STITCH – see description above, * knit 1, purl 1 *, work from *-* until there are 2 stitches left, knit 1, 1 stitch garter stitch. Continue like this until the rib measures 2 cm. The next row is worked as follows – from the right side: 3 stitches garter stitch, A.1a (= 8 stitches), A.1b (= 8 stitches) a total of 15-16-16-17 times in width, A.1c (= 9 stitches) and 3 stitches garter stitch. Continue with this pattern. REMEMBER THE KNITTING TENSION! When the piece measures 29-31-33-34 cm insert 1 marker in each side, the markers mark where the armholes start. When the piece measures approx. 101-107-112-115 cm (adjust so that you finish after either the 6th or the 12th row in the diagram) work the next row as follows – from the right side: 1 stitch garter stitch, * knit 1, purl 1 *, work from *-* until there are 2 stitches left, knit 1, 1 stitch garter stitch. Continue like this until the rib measures 2 cm. Loosely cast off with knit over knit and purl over purl – it is important that the cast-off edge is not tight – read CASTING OFF TIP. ASSEMBLY: See the sketch for how to assemble the garment. Fold the cast-off edge down towards the bottom edge with wrong side to wrong side. The corners should stop exactly by each marker. Sew each corner approx. 3 cm in the side so they stay in place. |
||||||||||||||||||||||||||||
Diagram explanations |
||||||||||||||||||||||||||||
|
||||||||||||||||||||||||||||
 |
||||||||||||||||||||||||||||
 |
||||||||||||||||||||||||||||
Have you finished this pattern?Tag your pictures with #dropspattern #comfortwrap or submit them to the #dropsfan gallery. Do you need help with this pattern?You'll find 19 tutorial videos, a Comments/Questions area and more by visiting the pattern on garnstudio.com. © 1982-2026 DROPS Design A/S. We reserve all rights. This document, including all its sub-sections, has copyrights. Read more about what you can do with our patterns at the bottom of each pattern on our site. |
||||||||||||||||||||||||||||


With over 40 years in knitting and crochet design, DROPS Design offers one of the most extensive collections of free patterns on the internet - translated to 17 languages. As of today we count 324 catalogues and 12290 patterns translated into English (UK/cm).
We work hard to bring you the best knitting and crochet have to offer, inspiration and advice as well as great quality yarns at incredible prices! Would you like to use our patterns for other than personal use? You can read what you are allowed to do in the Copyright text at the bottom of all our patterns. Happy crafting!
Post a comment to pattern DROPS 187-27
We would love to hear what you have to say about this pattern!
If you want to leave a question, please make sure you select the correct category in the form below, to speed up the answering process. Required fields are marked *.