
Popular categories
Looking for a yarn?


Comments / Questions (8)
![]() Lena Ericsson wrote:
Lena Ericsson wrote:
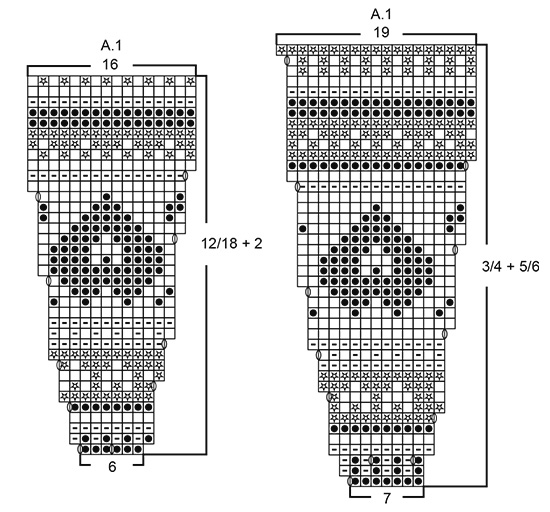
Hej, Det finns ett fel i diagrammet för den större storleken 3/4 + 5/6 år. Det saknas en markering, svart plupp för röd på varv 26 längst till vänster ovanför föregående varvs plupp. Mvh Lena
23.02.2022 - 20:59
![]() Rosannagh Duffin wrote:
Rosannagh Duffin wrote:
Can this be made as a Cardigan (without the legs) and at what point would it stop for size 3/4? Or do you have this as a pattern already?
07.11.2021 - 15:12DROPS Design answered:
Dear Rosannagh, yes, this can be worked as a Cardigan, the total approx. length would be 40 cm for size 3/4. Don't forget to work the last few cm in length in rib. Happy knitting!
07.11.2021 - 17:35
![]() Karen wrote:
Karen wrote:
En la sección de la elevación de la espalda cuando dice hasta que resten 14 puntos se incluyen los 5 en punto musgo?
05.12.2020 - 20:16DROPS Design answered:
Hola Karen, sí, se incluyen los 5 puntos en punto musgo; es decir, es hasta que queden 14 puntos en total.
06.12.2020 - 16:45
![]() Tine wrote:
Tine wrote:
Hallo, leider komme ich mit den Farbwechseln nach der Blende nicht klar. Es sind ja nicht von jeder Farbe 2 Reihen, so dass die Blenden dann ja unterschiedlich aussehen. Ist das beabsichtigt oder habe ich einen Denkfehler?
29.07.2018 - 22:19DROPS Design answered:
Liebe Tine, die Blenden sind immer mit der Farben den Strifen oder Musterborten gestrickt - siehe STRICKTIPP. Viel Spaß beim stricken!
31.07.2018 - 09:28
![]() Martine wrote:
Martine wrote:
Stemmer antall oppleggsmasker?
04.08.2017 - 11:27DROPS Design answered:
Hei Martine. Ja, det stemmer. Er det noen grunn for at du mener noe annet?
07.08.2017 - 13:50
![]() Renata wrote:
Renata wrote:
Opis do zrobienia kombinezonu jest nie zrozumialy i zagmatwany. Prosze o przeslanie prostszego i prawidlowego opisu. Dzieki
03.12.2016 - 19:50
![]() Helene Paulsen wrote:
Helene Paulsen wrote:
Hei. Holder på å strikke denne heldressen. Jeg kunne godt tenke meg at oppskriften hadde presisert hvor mange masker jeg skal ha på pinnen etter hver økning. Syns det er vanskelig å følge med på om jeg har øket helt riktig.
23.09.2016 - 13:57
![]() Liisa Virtanen wrote:
Liisa Virtanen wrote:
Hei, en onnistunut tulostamaan kuviomallin piirrosta. Tekstit tulostuvat mutta kuviomalli ei. Missä vika? Minussa, tulostimessa vai jossain muuallla? Vastauksesta kiittäen Liisa
04.09.2016 - 14:14DROPS Design answered:
Hei! Piirroksen tulisi tulostua. Olethan tarkistanut, että tulostin on säädetty tulostamaan kaikkia sivuja?
19.09.2016 - 13:34
|
||||||||||||||||
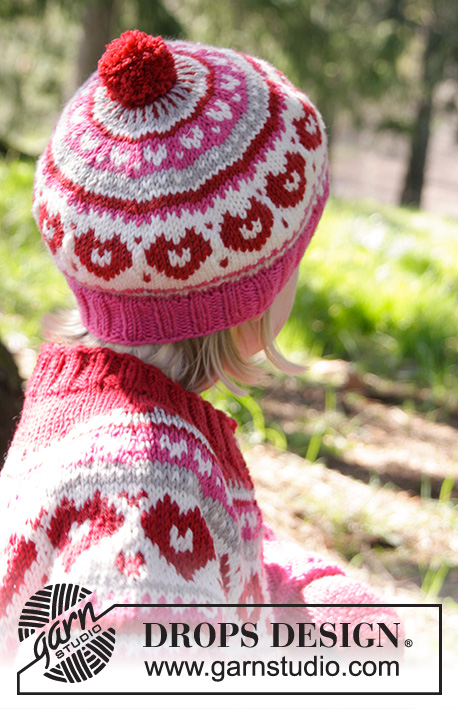
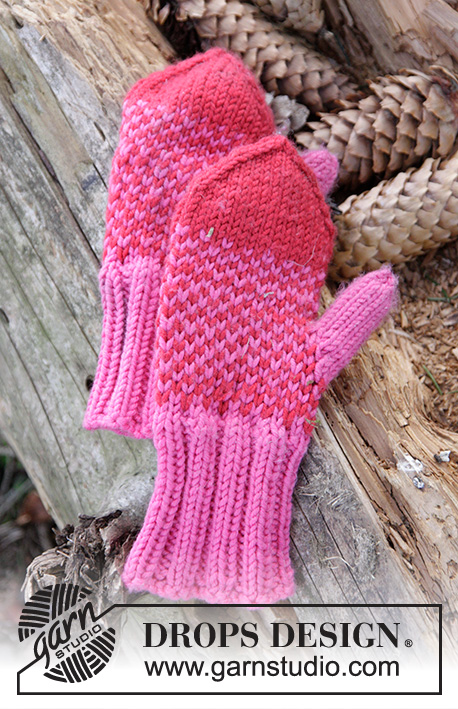
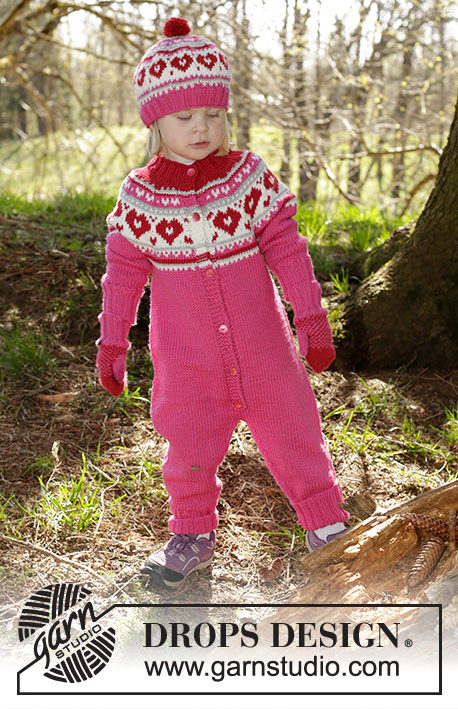
Warmhearted#warmheartedoverall |
||||||||||||||||
 |
 |
|||||||||||||||
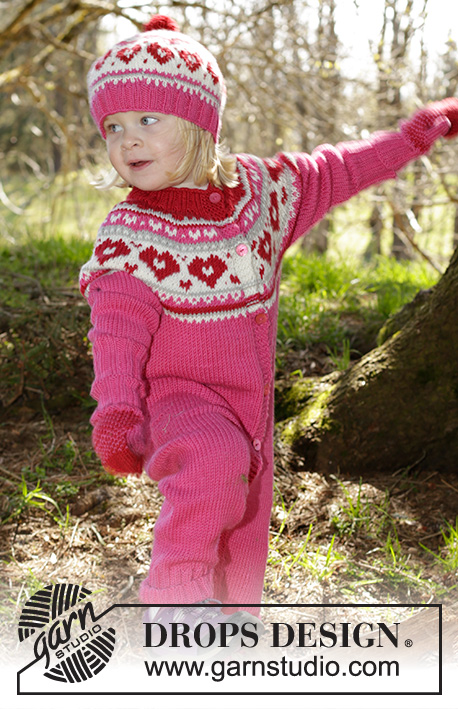
Knitted onesie worked top down with Nordic pattern and round yoke in DROPS Merino Extra Fine. Size children 1 - 6 years.
DROPS Children 27-2 |
||||||||||||||||
|
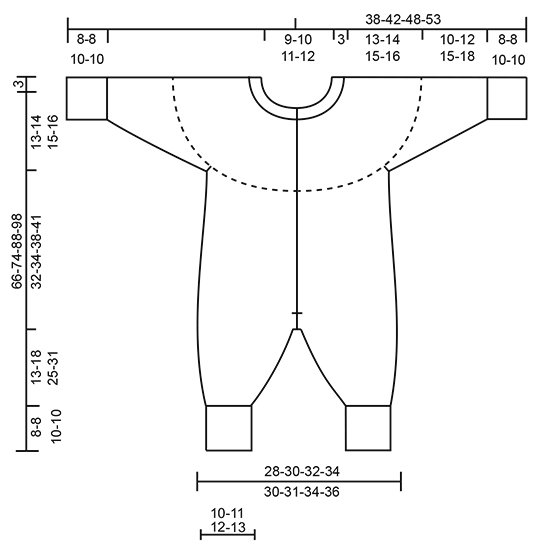
GARTER ST (back and forth): K all rows. 1 ridge = 2 rows K. PATTERN: See diagram A.1 - NOTE: Choose diagram for correct size. Work entire pattern in stocking st. KNITTING TIP (applies to bands): On the rows where there are either stripes or pattern border work the colour in the stripes or the base colour of pattern border also over the 5 band sts in each side but do yarn change between band and body (to avoid fastening the yarn on band). DECREASE/INCREASE TIP: To calculate how often dec/inc should be done, use the total no of sts on row (e.g. 84 sts), minus bands (e.g. 10 sts) and divide the remaining sts by no of dec/inc to be done (e.g. 7) = 10.6. I.e. In this example dec by working alternately approx. every 9th and 10th st and 10th and 11th st tog or inc after alternately approx. every 10th and 11th st by making 1 YO (work YO twisted on next row to avoid hole – NOTE: Do not inc/dec over bands). INCREASE TIP-1: Inc 1 st on each side of marker as follows: Beg 2 sts before marker and make 1 YO, work 4 sts (marker is in the middle of these sts), make 1 YO (= 2 sts inc). On next row work YOs twisted to avoid holes. DECREASE TIP-1 (applies to mid under sleeve and on inside of leg): Dec 1 st on each side of marker as follows: Beg 3 sts before marker and K 2 tog, K 2 (marker is between these 2 sts), slip 1 st as if to K, K 1, psso (= 2 sts dec). BUTTONHOLES: Dec for buttonhole on right band (when garment is worn). 1 button hole = beg from WS and K tog second and third st from edge and make 1 YO. On next row K the YO to make a hole. Dec for first buttonhole after 1½-2 cm on neck edge, then dec the next 5-5-6-6 buttonholes every 7½-8-7½-8 cm. ---------------------------------------------------------- SUIT: Worked back and forth on circular needle from mid front. To make it easier to adjust the length of sleeves and legs the suit is worked top down. YOKE: Cast on 84-88-92-96 sts (incl 5 band sts in each side towards mid front) on a short circular needle size 3 mm with red. P 1 row from WS. Work next row as follows from RS: 5 band sts in GARTER ST - see explanation above - * K 2, P 2 *, repeat from *-* until 7 sts remain on needle, finish with K 2 and 5 bands sts in garter st. Continue rib like this for 3 cm – remember BUTTONHOLES on right band – see explanation above and finish after 1 row from RS (= neck edge). Switch to a short circular needle size 4 mm. P 1 row from WS while dec 7-5-4-1 sts evenly - READ DECREASE/INCREASE TIP = 77-83-88-95 sts on needle. Then work an elevation at the back in stocking st as follows: K until 12-13-14-15 sts remain, turn, tighten yarn and P until 12-13-14-15 sts remain in the other side. Turn, tighten yarn and K until 20-22-24-26 sts remain, turn, tighten yarn and P until 20-22-24-26 sts remain in the other side. Turn, tighten yarn and K until 28-31-34-37 sts remain, turn, tighten yarn and P until 28-31-34-37 sts remain in the other side. Turn, tighten yarn and K the rest of row, then P 1 row from WS (work bands in garter st). Work next row as follows from RS: 5 band sts in garter st, work pattern according to diagram A.1 until 6 sts remain on row - NOTE: Choose diagram for correct size (= 11-12-11-12 repetitions of 6-6-7-7 sts), work first st in A.1 (so that pattern beg and ends the same way inside band in each - NOTE: Do not inc in this st) and finish with 5 band sts in garter st. Continue pattern like this and inc as shown in diagram - READ KNITTING TIP AND REMEMBER KNITTING TENSION. When A.1 has been worked = 187-203-220-239 sts on needle. Work 0-1-0-1 cm with cerise. Piece now measures approx. 13-14-15-16 cm mid front (measured without rib in the neck). Now work piece in stocking st with cerise. On first row from RS inc now 7-7-10-7 sts evenly (do not inc over bands) = 194-210-230-246 sts. Work next row as follows from WS: Work 29-31-34-36 sts as before, slip the next 42-46-50-54 sts on 1 stitch holder for sleeve (without working them first), cast on 6 new sts on row, work 52-56-62-66 sts (= back piece), slip the next 42-46-50-54 sts on 1 stitch holder for sleeve (without working them first), cast on 6 new sts on row and work 29-31-34-36 sts as before. BODY: = 122-130-142-150 sts. Insert 1 marker 32-34-37-39 sts in from each side (= 58-62-68-72 sts between markers on back piece). NOW MEASURE PIECE FROM HERE! Then continue back and forth in stocking st and 5 band sts in garter st in each side towards mid front - remember BUTTONHOLES on band. When piece measures 10-10-12-12 cm, inc on each side of both markers – READ INCREASE TIP 1 (= 4 sts inc). Repeat inc when piece measures 20-20-24-24 cm = 130-138-150-158 sts. When piece measures 29-31-35-38 cm from armhole, end bands mid front. Cast off the first 3 sts at the beg of the next 2 rows = 124-132-144-152 sts. Then work in stocking st in the round over all sts for approx. 3 cm – piece now measures 32-34-38-41 cm from armhole and 45-48-53-57 cm from mid front (measured without rib in neck). Now divide for legs. LEG: Beg mid front, switch to double pointed needles size 4 mm and work in stocking st in the round over the first 62-66-72-76 sts (keep the remaining 62-66-72-76 sts on circular needle). Insert 1 marker at beg of round = inside of leg. On next round, dec 2 sts on inside of leg - READ DECREASE TIP-1 (= 2 sts dec). Dec like this every round a total of 2-3-3-3 times = 58-60-66-70 sts. Then dec every 4th-5th-7th-9th round a total of 8-7-8-8 times = 42-46-50-54 sts. When leg measures 13-18-25-31 cm, K 1 round while inc 10 sts evenly = 52-56-60-64 sts. Switch to double pointed needles size 3 mm and work rib in the round = K 2/P 2 for 8-8-10-10 cm (or desired length). On next round, inc all 2 P sts to 3 P sts = 65-70-75-80 sts. Then cast off sts with K over K and P over P. Slip sts from circular needle on double pointed needles size 4 mm and work the other leg the same way. Entire suit now measures approx. 66-74-88-98 cm mid front (measured without rib in the neck). SLEEVE: Slip sts from one stitch holder back on double pointed needles size 4 mm, pick up 1 st in each of the 6 sts cast on under sleeve = 48-52-56-60 sts. Insert 1 marker in the middle of the 6 sts (= mid under sleeve). NOW MEASURE PIECE FROM HERE! Work in stocking st in the round with cerise. When sleeve measures 2-2-1-1 cm, dec 2 sts mid under sleeve - READ DECREASE TIP-1. Repeat dec every 3rd-3rd-4th-4th round a total of 7-9-10-12 times = 34-34-36-36 sts. When sleeve measures 10-12-15-18 cm, K 1 round while inc 6-6-8-8 sts evenly = 40-40-44-44 sts. Switch to double pointed needles size 3 mm and work rib in the round = K 2/P 2 for 8-8-10-10 cm (or desired length). On next round, inc all 2 P sts to 3 P sts = 50-50-55-55 sts. Then cast off sts with K over K and P over P. Work the other sleeve the same way. ASSEMBLY: Place right band over left band and fasten at the bottom with small stitches. Sew the buttons on to the left band. |
||||||||||||||||
Diagram explanations |
||||||||||||||||
|
||||||||||||||||
 |
||||||||||||||||
 |
||||||||||||||||
Have you finished this pattern?Tag your pictures with #dropspattern #warmheartedoverall or submit them to the #dropsfan gallery. Do you need help with this pattern?You'll find 30 tutorial videos, a Comments/Questions area and more by visiting the pattern on garnstudio.com. © 1982-2026 DROPS Design A/S. We reserve all rights. This document, including all its sub-sections, has copyrights. Read more about what you can do with our patterns at the bottom of each pattern on our site. |
||||||||||||||||


With over 40 years in knitting and crochet design, DROPS Design offers one of the most extensive collections of free patterns on the internet - translated to 17 languages. As of today we count 324 catalogues and 12290 patterns translated into English (UK/cm).
We work hard to bring you the best knitting and crochet have to offer, inspiration and advice as well as great quality yarns at incredible prices! Would you like to use our patterns for other than personal use? You can read what you are allowed to do in the Copyright text at the bottom of all our patterns. Happy crafting!
Post a comment to pattern DROPS Children 27-2
We would love to hear what you have to say about this pattern!
If you want to leave a question, please make sure you select the correct category in the form below, to speed up the answering process. Required fields are marked *.