
Popular categories
Looking for a yarn?


Comments / Questions (30)
![]() Gloria wrote:
Gloria wrote:
Since I can’t work from diagrams, do you have written instructions? Thank you!
10.06.2019 - 02:36DROPS Design answered:
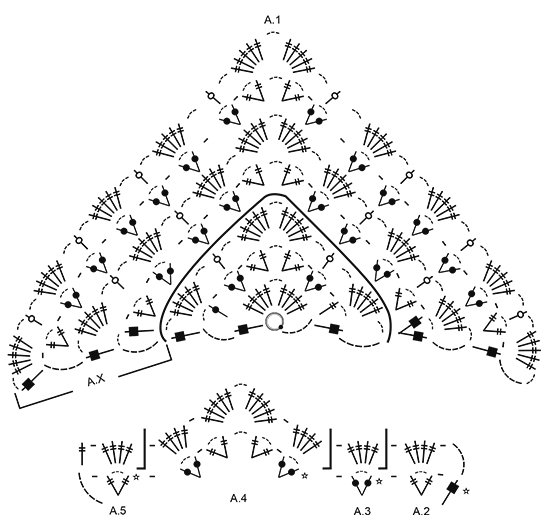
Dear Gloria, this pattern has not written instructions, it is only available as a diagram. But it is not so difficult - just try! You read the diagram from bottom to top, from right to left. 1 symbol = 1 stitch (specified in the symbol definition). You can read more about how to read a crochet diagram here. Happy crocheting!
10.06.2019 - 06:29
![]() Hanne wrote:
Hanne wrote:
Hallo, ik stel hierbij nog eens mijn vraag: Ik heb het eerste rijtje gemaakt: de lus, de vier dubbele stokjes, drie losse, vier dubbele stokjes. maar dan zit ik vast. Ik snap niet hoe ik dan verder moet. Hoe maak ik het driedubbel stokje OM de l-lus? Ik heb het instructiefilmpje van drops hierover bekeken, maar ik raak er niet wijzer uit. Kunnen jullie me verder helpen? Alvast bedankt! Hanne
24.10.2018 - 19:37DROPS Design answered:
Dag Hanne, De driedubbele stokjes om de lus maak je gewoon op dezelfde manier als de dubbele stokjes om de lus. Je maakt hem dus om de lossenlus in plaats van in een steek of in een losse.
24.10.2018 - 20:39
![]() Hanne wrote:
Hanne wrote:
Hallo, ik heb het eerste rijtje gemaakt: de lus, de vier dubbele stokjes, drie losse, vier dubbele stokjes. maar dan zit ik vast. Ik snap niet hoe ik dan verder moet. Hoe maak ik het driedubbel stokje OM de l-lus? Ik heb het instructiefilmpje van drops hierover bekeken, maar ik raak er niet wijzer uit. Kunnen jullie me verder helpen? Alvast bedankt! Hanne
19.10.2018 - 21:32
![]() Petra Schuster wrote:
Petra Schuster wrote:
Ich verstehe leider A2 - A5 nicht wirklich, kann man das auch einfacher erklären? Danke und viele Grüße Petra
01.08.2018 - 23:10DROPS Design answered:
Liebe Frau Schuster, bei jeder Hinreihe häkeln Sie zuerst A.2, dann A.3 wiederholen bis 2 Doppelstäbchen Gruppen vor dem Mittlebogen übrig sind, dann A.4 über die nächsten 4 Doppelstäbchen Gruppen häkeln (= 1 x in der Breite), dann A.3 häkeln bis 1 Doppelstäbchen Gruppe übrig ist, und die Reihe mit A.5 enden. Von der Rückseite häkeln Sie: A.5, A.3 wiederholen bis 2 Doppelstâbchen vor dem Mittelbogen übrig sind, A.4 1 x über die nächsten 4 Doppelstäbchen Gruppen häkeln, A.3 wiederholen bis noch 1 Doppelstäbchen Gruppe ürbig ist, A.2 über die letzte Doppelstäbchen Gruppe häkeln. Viel Spaß beim häkeln!
02.08.2018 - 09:16
![]() Marthe Scheffer wrote:
Marthe Scheffer wrote:
Wat fijn, dan kan ik nu beginnen met haken. Dank jullie wel voor de snelle reactie. Met vriendelijke groet, Marthe
22.07.2018 - 20:19
![]() Marthe Scheffer wrote:
Marthe Scheffer wrote:
Ik begrijp het ene tekentje van het stokje met het bolletje erin niet. Erachter staat= dstk in dstk/driedubbel stk. Betekent dit dan eerst een dubbel stokje, dan 3 lossen en dan een driedubbel stokje? Of begrijp ik het verkeerd? Groetjes, Marthe
21.07.2018 - 21:39DROPS Design answered:
Dag Marthe, Het betekent dat je een dubbel stokje maakt in het dubbele stokje of driedubbel stokje van de vorige toer.
22.07.2018 - 11:51
![]() Denise Hawryluk wrote:
Denise Hawryluk wrote:
I understand the illustrated pattern up to A-1. But what should I do with A.2, A.3, A.4, and A.5 ? It looks like you should repeat the four rows of A.X until the edge. Then for the edge, do I make a row like the third row of AX and then a row with treble groups of four except for the turning corner at the top of the triangle when it's 2 groups of 5 treble stitches?
28.06.2017 - 08:46DROPS Design answered:
Dear Mrs Hawryluk, for the shawl you repeat A.X in height (there will be always more sts/group of sts between sides and middle ch-space), then work the edge following A.2 (starting on 2nd row, 1st row shows last row in A.x) at the beg of the row, then repeat A.3 to the middle ch-space, repeat A.3 to the last ch-space and finish with A.5 at the end of row. Happy crocheting!
28.06.2017 - 10:14
![]() Heidi Skaare wrote:
Heidi Skaare wrote:
Hei igjen! Må også bare spørre om det også blir økning av de andre maskene i AX ? Dvs når A1 er ferdig og man begynner på første rad i AX, blir det da også flere masker der eller blir det bare maskene som allerede vises i diagrammet? Takk for tålmodigheten med en nybegynner :-)
06.04.2017 - 19:58DROPS Design answered:
Hei Heidi, Ja du fortsetter med økninger hele veien, hver 2.rad økes det 2 dbl-st-grupper à 5 dbl-st på raden som beskrevet. Det er bare hyggelig å svare på spørsmål og vi har alle vært nybegynnere og vet hvordan det er! Mvh, Deirdre
07.04.2017 - 08:58
![]() Heidi Skaare wrote:
Heidi Skaare wrote:
Er helt nybegynner, kun heklet i 1 mnd, og må derfor ha litt tydelig beskrivelse. Jeg har heklet A1 og skal begynne på AX. Står at man skal øke med 2 dobbeltstavgrupper med 5 staver i hver. Skjønner ikke helt hvor jeg skal øke. Forstår av tidligere spørsmål og svar at det er på midten. Skal det ikke være luftmasker eller stav gjennom buen mellom de to man øker på med på hver side?
31.03.2017 - 15:17DROPS Design answered:
Hei Heidi Om du ser på diagrammet og i midten (rett under der det står A.1), ser du at det økes med 2 dobbeltstave-grupper a 5 stk dobbeltstaver (= 10 dobbeltstaver med 3 luftmasker i midten). Alle disse maskene hekles om 3-luftmaskebuen fra forrige omgang, dette gjøres på hver 2. rad. God fornøyelse!
04.04.2017 - 07:51
![]() Elena wrote:
Elena wrote:
Ho un dubbio: dopo aver lavorato le 4 righe di A.X, devo ripeterle ripartendo dalla prima, ovvero facendo 5 cat+3cat e una m.a. tripla (e finendo la riga con due m.a.triple?)
17.02.2017 - 18:27DROPS Design answered:
Buonasera Elena, alla fine del diagramma A.1 deve continuare a ripetere le 4 righe di A.x fino a quando il lavoro misura 70 cm, finendo con la 3° riga del diagramma. Buon lavoro!
17.02.2017 - 19:32
|
|||||||||||||||||||||||||
Carmen#carmenscarf |
|||||||||||||||||||||||||
|
|
|||||||||||||||||||||||||
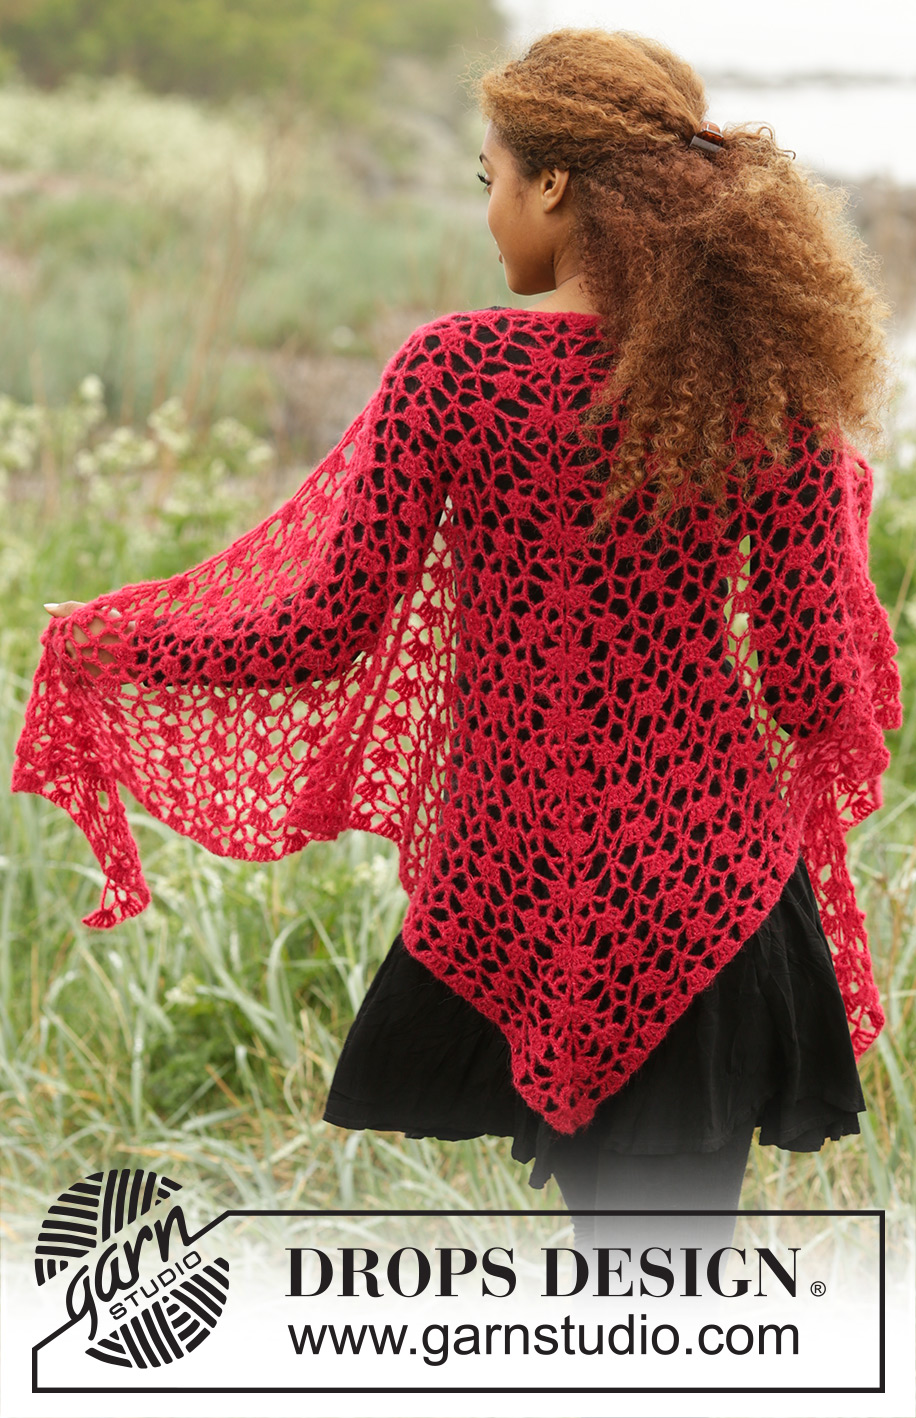
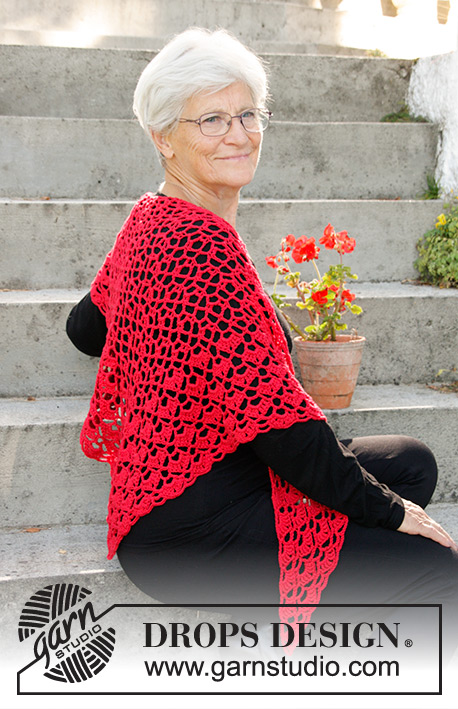
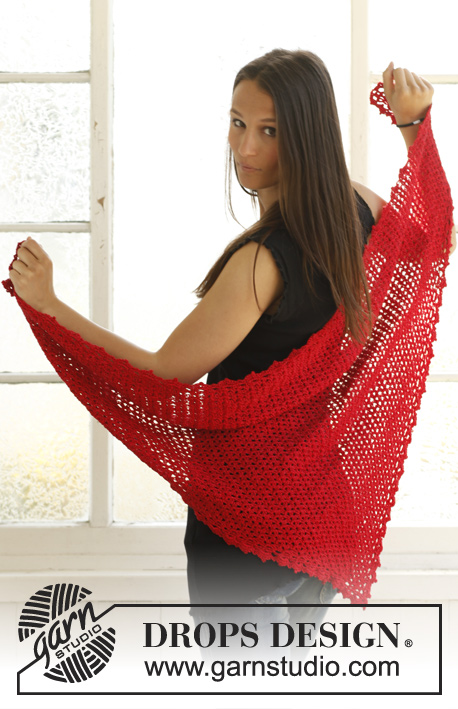
Crochet DROPS shawl with lace pattern, worked top down in ”Brushed Alpaca Silk”.
DROPS 172-11 |
|||||||||||||||||||||||||
|
PATTERN: See diagrams A.1 to A.5. ---------------------------------------------------------- SHAWL: Work 6 ch on hook size 4.5 mm with Brushed Alpaca Silk and form a ring with 1 sl st in first ch. Continue back and forth according to diagram A.1. REMEMBER THE CROCHET TENSION! When A.1 has been done, repeat rows in A.X (= 4 rows) with inc (i.e. for every other row inc 2 dtr groups of 5 dtr on row). Continue like this until piece measures approx. 70 cm along the middle - adjust after 3rd row in A.X, the work an edge. EDGE: Work A.2, A.3 until 2 dtr groups remain before middle space, work A.4, then work A.3 until 1 dtr group remains on previous row, finish with A.5. When row is done, fasten off. Piece measures approx. 75 cm vertically measured in the middle of shawl. |
|||||||||||||||||||||||||
Diagram explanations |
|||||||||||||||||||||||||
|
|||||||||||||||||||||||||
 |
|||||||||||||||||||||||||
Have you finished this pattern?Tag your pictures with #dropspattern #carmenscarf or submit them to the #dropsfan gallery. Do you need help with this pattern?You'll find 6 tutorial videos, a Comments/Questions area and more by visiting the pattern on garnstudio.com. © 1982-2026 DROPS Design A/S. We reserve all rights. This document, including all its sub-sections, has copyrights. Read more about what you can do with our patterns at the bottom of each pattern on our site. |
|||||||||||||||||||||||||


With over 40 years in knitting and crochet design, DROPS Design offers one of the most extensive collections of free patterns on the internet - translated to 17 languages. As of today we count 324 catalogues and 12290 patterns translated into English (UK/cm).
We work hard to bring you the best knitting and crochet have to offer, inspiration and advice as well as great quality yarns at incredible prices! Would you like to use our patterns for other than personal use? You can read what you are allowed to do in the Copyright text at the bottom of all our patterns. Happy crafting!
Post a comment to pattern DROPS 172-11
We would love to hear what you have to say about this pattern!
If you want to leave a question, please make sure you select the correct category in the form below, to speed up the answering process. Required fields are marked *.