Comments / Questions (88)
![]() Debby wrote:
Debby wrote:
Ik loop vast! Ik ben bij de rechterschouder en ben begonnen met 98 steken ben nu in de rij waar ik in A1 7 steken 3 lossen en dan een vaste moet doen en ze zeggen dan de volgende 60 steken als A2 dan hebben ze het over A4 nog 9 steken. Valt A3 nu weg ? En ga ik over in A4 of komt A4 gewoon na A3 alleen 78 min min 7 A1 en min 60 A2 dan hou ik er nog 11 over. Heb ik iets fout gedaan.
08.03.2019 - 10:48DROPS Design answered:
Dag Debby,
Voor de rechter schouder hoef je A.3 inderdaad niet te haken en haak je inderdaad A.4.
11.04.2019 - 15:30
![]() Mourdon wrote:
Mourdon wrote:
Bonjour, J'aimerais faire ce modèle mais je ne sais pas quelle quantité de laine commander
09.01.2019 - 21:18DROPS Design answered:
Bonjour Mme Mourdon, vous trouverez la quantité nécessaire pour chaque taille indiquée au poids sous l'en-tête, par ex, en taille S/M il faut 650 g DROPS Cotton Merino / 50 g la pelote = 13 pelotes en taille S/M. Bon crochet!
10.01.2019 - 09:27
![]() Willa wrote:
Willa wrote:
The very first row of this pattern says \\\"skip ch 1\\\"? What exactly does this mean?
22.09.2018 - 21:44DROPS Design answered:
Dear Willa, this means skip 1 chain stitch from the beginning chain row - so you will crochet not into this chain stitch, but into the next one. Happy crocheting!
22.09.2018 - 22:41
![]() Sharon wrote:
Sharon wrote:
Hi there, I'm slightly confused - it says you work the pattern back and forth from top down. Do you also read the pattern graphic back and forth or only from the right? Or do you need to work rows 3 - 6 in one direction only in order to get increases in A.4? Many thanks Sharon
14.07.2018 - 19:11DROPS Design answered:
Hi Sharon, You read the diagram starting at the bottom, from right to left when working from the right side and from left to right on the wrong side. Happy crocheting!
15.07.2018 - 14:36
![]() Marie wrote:
Marie wrote:
Sur l’epaule Gauche on doute faire a5 a2 et a3 Doit on faire a5 de droite vers la gauche et a2 et a3 aussi de droite vers gauche et ensuite le contraire
25.06.2018 - 06:07DROPS Design answered:
Bonjour Marie, pour l'épaule gauche, on crochète les diagrammes comme indiqué dans la réponse précédente, soit sur l'endroit: A.5, A.2, A.3 et sur l'envers: A.3, A.2, A.5. Bon crochet!
25.06.2018 - 09:23
![]() Marie wrote:
Marie wrote:
Pour débuter nous devons faire a1 a2 A4 Est ce que c’est toujours de droite vers gauche et rang suivant de gauche vers droite
25.06.2018 - 05:59DROPS Design answered:
Bonjour Marie, crochetez les diagrammes en commençant sur l'endroit, en bas à droite et lisez les rangs sur l'endroit de droite à gauche sur l'endroit et ceux sur l'envers de gauche à droite sur l'envers. Bon crochet!
25.06.2018 - 09:22
![]() Marie wrote:
Marie wrote:
Moi sa ne fonctionne pas du tout \\r\\nAu début on doit faire a1 a2 A4 doit on suite toujours le patron de droite vers gauche et prochain rang de gauche vers droite
25.06.2018 - 05:57
![]() Aatje wrote:
Aatje wrote:
Na het haken van beide schouders en deze aan elkaar vast te hebben gezet, bezig met toer 7 echter hoe ik ook tel ik kom niet uit met het aantal steken in A2 (165 steken). Beide schouders over 78 steken gehaakt en als ik reken is 78 + 78 gelijk aan 156 + 4 kantsteken, dat is 160 steken dus hoe kan ik dan het patroon over A2 dan haken over 165 steken zoals in het patroon vermeld staat?? HELP.
07.06.2018 - 09:06Ursula CHEVALLIER wrote:
Guten Tag, ich häkele Gr. S/M und habe 63 St. auf 80 Maschen in der 1.Reihe. Mit Beginn des Diagramms A1,2,3 hatte ich plötzlich 78 St. , weil ich über die Luftm. zwischen den 4 St. der Vorderreihe auch St. häkelte. Ich sollte vielleicht nur über die 63 ST. weiterhäkeln. Dann ergibt es eine insgesamte Maschenreduktion von 15. Ist das richtig ???Bitte bestätigen. Danke
16.05.2018 - 16:15DROPS Design answered:
Liebe Frau Chevallier, A.1, A.2 und A.3 werden über die 63 Stb der 1. Reihe gehäkelt - bei der 1. Reihe in A.1-A.3 haben Sie 3 D-Stb (A.1), 3 x 5 DStb (A.2) und 3 D-Stb (A.3) und bei der 2. Reihe in A.1-3 sollen Sie wieder 63 Stb haben (= 7 Stb in A.1, 15 Stb in jedem A.2 x 3 (= 45 Stb) und 9 Stb in A.3) - Markierer zwischen jedem Rapport einsetzen kann Ihnen helfen, die richtigen Maschenanzahl zu behalten. Viel Spaß beim häkeln!
17.05.2018 - 07:55
![]() Ursula CHEVALLIER wrote:
Ursula CHEVALLIER wrote:
Bonjour, J\\\'ai comme vous aviez indiqué 63 brides sur 80 mailles . MAIS: en rg 1 du diagramme (A1,2,3) j\\\'ai en tout 78 brides, car j\\\'ai fait aussi une brides au dessus des ml entre les 4 brides du rg précédent. S\\\'il ne fallait pas le faire, c\\\'est vrai que le travail continue sur 63 brides ...mais dans ce cas il y a une diminution de 15 mailles (brides) après le 1ier rang. Veuillez me confirmer SVP, car en ce moment je me trouve dans un brouillard.
15.05.2018 - 23:52DROPS Design answered:
Bonjour Mme Chevallier, au 1er rang (= sur les 63 brides), on crochète ainsi: (côté droit): 2 brides, A.1 (au-dessus des 7 b suivantes), A.2 sur 45 b (= 3 fois A.2), et A.4 (= au-dessus des 9brides suivantes), vous crochetez ainsi bien sur 63 brides (=2+7+45+9). Mettez bien un marqueur entre chaque diagramme à répéter pour bien vous repérer entre les différents diagrammes. Bon crochet!
16.05.2018 - 09:31
Graceful Mermaid#gracefulmermaidponcho |
|||||||||||||||||||||||||||||||||||||||||||||||||||||||||||||||||||
|
|
|||||||||||||||||||||||||||||||||||||||||||||||||||||||||||||||||||
Crochet DROPS poncho with lace pattern, worked top down in ”Cotton Merino”. Size: S - XXXL.
DROPS 168-29 |
|||||||||||||||||||||||||||||||||||||||||||||||||||||||||||||||||||
|
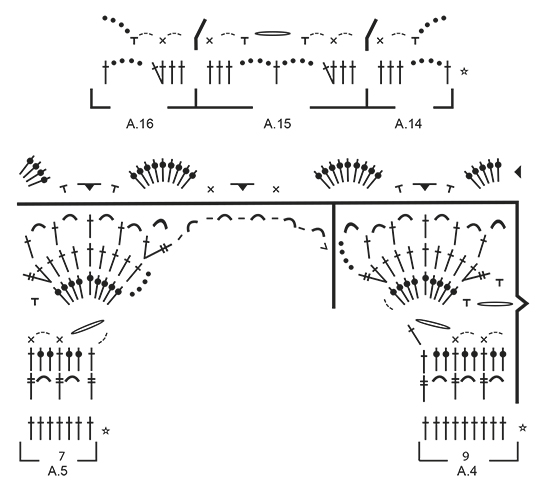
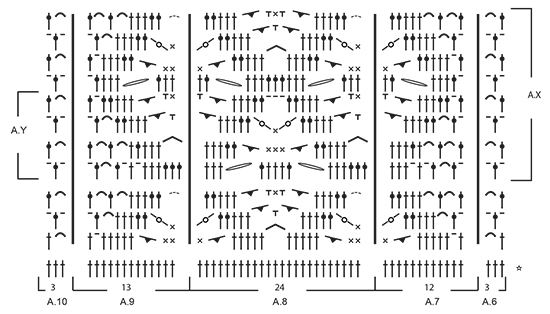
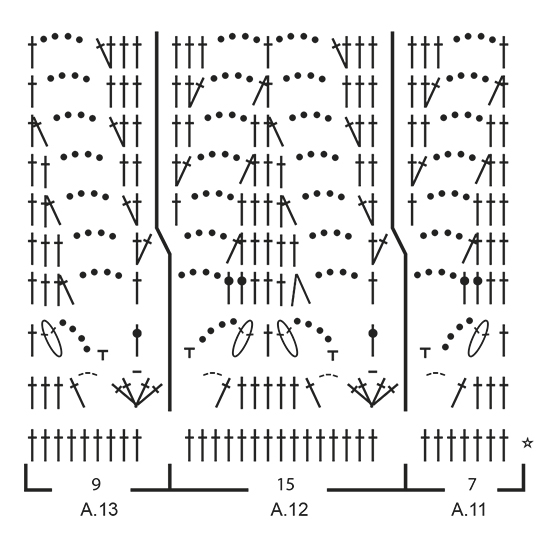
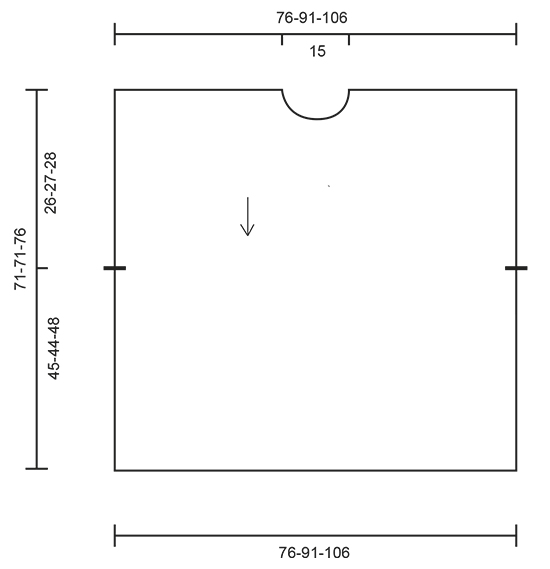
PATTERN: See diagrams A.1 to A.16. CROCHET INFO: Replace first tr at beg of every tr row with 3 ch. Replace first dtr at beg of every dtr row with 4 ch. Replace first dc at beg of every dc row with 1 ch. ---------------------------------------------------------- PONCHO: The poncho is the same at the front and back with opening in the sides. Work back and forth, top down. RIGHT SHOULDER - FRONT PIECE: Work 80-98-117 ch on hook size 3.5 mm with Cotton Merino. Turn and work 1 tr in 4th ch from hook (= 2 tr), 1 tr in each of the next 1-4-3 ch, * skip 1 ch, 1 tr in each of the next 4 ch *, repeat from *-* the entire row = 63-78-93 tr (incl 2 edge sts in the side). Work next row (= from RS) as follows: READ CROCHET INFO! 1 tr in each of the first 2 tr (= edge sts), A.1 over the next 7 tr, A.2 over the next 45-60-75 tr (=3-4-5 times), finish with A.4 over the next 9 tr. Work to and with 6th row. Put piece aside and work left shoulder. REMEMBER THE CROCHET TENSION! LEFT SHOULDER - FRONT PIECE: Work first row as on right shoulder - front piece = 63-78-93 tr. Work next row (= from RS) as follows: A.5 over the first 7 tr, A.2 over the next 45-60-75 tr (=3-4-5 times), A.3 over the next 9 tr, finish with 1 tr in each of the next 2 tr (= edge sts). Work to and with 6th row - NOTE: Fasten sl st at the end of A.5 in right shoulder so that the shoulder are fastened tog. Cut the yarn and beg to work from RS over both shoulders. FRONT PIECE: Continue on diagram (= 7th row), i.e. work next row (= from RS) as follows: 1 dc in each of the first 2 tr (= edge sts), A.1 over the next 7 tr, A.2 over the next 135-165-195 tr/ch (= 9-11-13 times) - NOTE: See last row in A.4/A.5 on how 7th row is worked over the middle 2 repetitions, A.3 over the next 9 tr, finish with 1 dc in each of the next 2 tr (= edge st). Work diagram A.1/A.2/A.3 1 time in total vertically (NOTE! You also begin and finish with 1 dc in first and last 2 dc's on row 8 and hereafter you work 1 tr in first 2 and last st on remaining rows)= 155-185-215 tr on last row. Work next row (= from WS) as follows: 1 tr in each of the first 2 tr, A.10 over the next 51-66-69 tr (= 17-22-23 times), A.9 over the next 13 tr, A.8 over the next 24-24-48 tr (= 1-1-2 times), A.7 over the next 12 tr, A.6 over the next 51-66-69 tr (= 17-22-23 times), finish with 1 tr in each of the next 2 tr. Work to and with 3rd row. Then work A.X 2-2-3 times in total vertically. Then work A.Y 1-1-0 times in total vertically. Work next row (= from RS) as follows: Work 1 tr in every tr/dc, 1 tr around every ch, 2 tr around every ch-space with 2 ch, 3 tr around every ch-space with 3 ch and 4 tr around every ch-space with 5 ch = 155-185-215 tr. Work next row (= from WS) as follows: Work 1 tr in each of the first 2 tr, A.3 over the next 9 tr, A.2 over the next 135-165-195 tr (= 9-11-13 times), A.1 over the next 7 tr, finish with 1 tr in each of the next 2 tr. Work A.3/A.2/A.1 1 time in total vertically = 155-185-215 tr on last row. Work next row (= from RS) as follows: Work 1 tr in each of the first 2 tr, A.11 over the next 7 tr, A.12 over the next 135-165-195 tr (= 9-11-13 times), A.13 over the next 7 tr, finish with 1 tr in each of the next 2 tr. Work A.11/A.12/A.13 1 time in total vertically. Work next row (= from WS) as follows: Work 1 tr in each of the first 2 tr, A.16 over A.13, A.15 over A.12 and A.14 over A.11. Then work 4th and 5th row in A.1/A.2/A.3, i.e. work next row (= from RS) as follows: Work 1 tr in each of the first 2 tr, A.1 over A.14, A.2 over A.15, A.3 over A.16, finish with 1 tr in each of the next 2 tr. Fasten off. LEFT SHOULDER - BACK PIECE: Work in left shoulder on front piece but in opposite direction, beg from WS. Instead of working ch and first tr-row work as follows: Work 1 dc in each of the 78-93-108 tr. Then work as right shoulder - front piece. RIGHT SHOULDER - BACK PIECE: Work in right shoulder on front piece but in opposite direction, beg from WS. Instead of working ch and first tr-row work as follows: Work 1 dc in each of the 78-93-108 tr. Then work as left shoulder - front piece. BACK PIECE: Continue as on front piece. NECK EDGE: Beg on one shoulder, work as follows along the entire neck from RS: 2 dc around every tr-row, 1 ch, 3 dc around every dtr row/ch-space, 1 ch etc. Finish with 1 sl st in first dc. Fasten off. TWINED STRING: Cut 2 lengths Cotton Merino yarn of 6 metres each. Twine the strands tog until they resist, fold the string double so that it twines again. Tie a knot in each end and thread it through a hole in the side on front and back piece, approx. 26-27-28 cm down from shoulder, tie a bow. Make another string and fasten it to the other side of poncho. |
|||||||||||||||||||||||||||||||||||||||||||||||||||||||||||||||||||
Diagram explanations |
|||||||||||||||||||||||||||||||||||||||||||||||||||||||||||||||||||
|
|||||||||||||||||||||||||||||||||||||||||||||||||||||||||||||||||||
 |
|||||||||||||||||||||||||||||||||||||||||||||||||||||||||||||||||||
 |
|||||||||||||||||||||||||||||||||||||||||||||||||||||||||||||||||||
 |
|||||||||||||||||||||||||||||||||||||||||||||||||||||||||||||||||||
 |
|||||||||||||||||||||||||||||||||||||||||||||||||||||||||||||||||||
 |
|||||||||||||||||||||||||||||||||||||||||||||||||||||||||||||||||||
Have you finished this pattern?Tag your pictures with #dropspattern #gracefulmermaidponcho or submit them to the #dropsfan gallery. Do you need help with this pattern?You'll find 9 tutorial videos, a Comments/Questions area and more by visiting the pattern on garnstudio.com. © 1982-2026 DROPS Design A/S. We reserve all rights. This document, including all its sub-sections, has copyrights. Read more about what you can do with our patterns at the bottom of each pattern on our site. |
|||||||||||||||||||||||||||||||||||||||||||||||||||||||||||||||||||


Post a comment to pattern DROPS 168-29
We would love to hear what you have to say about this pattern!
If you want to leave a question, please make sure you select the correct category in the form below, to speed up the answering process. Required fields are marked *.