
Popular categories
Looking for a yarn?


Comments / Questions (12)
![]() Gazos Zoltán wrote:
Gazos Zoltán wrote:
Helló, megint én. Elnézést kell kérnem, rájöttem, én értelmeztem roszul a minta 2. sorát. Másik mintánál megnéztem, ott kicsit érthetőbb volt ugyanez a minta lerás. Mostmár stimmelek. Köszönöm.
29.01.2020 - 12:49
![]() Gazos Zoltánné wrote:
Gazos Zoltánné wrote:
A diagramm csak a mintát írja le. Ha így kötöm, elvesznek szemek, így nem jön ki a kezdéskor és a végén a minta. Szerintem plusz síma szemek kellenek a sor elején.
29.01.2020 - 07:19
![]() Tiina wrote:
Tiina wrote:
Miksi ohjeessa on tyhjät ruudut piirroksen ohjeessa , oikea silmukka, nurja silmukka ja 2 s oikein yhteen + 1 1 k , miten tehdään ?
18.06.2019 - 13:06DROPS Design answered:
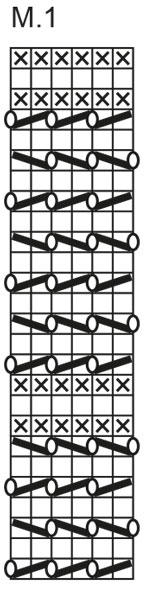
Hei, tyhjät ruudut ovat oikeita silmukoita. Piirros luetaan oikealta vasemmalle ja alhaalta ylös.
20.06.2019 - 14:08
![]() Laure wrote:
Laure wrote:
Merci beacoup pour votre réponse rapide. Est ce que c'est possible de faire une épaule complète sur l'avant et l'autre sur l'arrière (un peu comme un puzzle que s'emboîte!)? Ou ça reste mieux de faire les deux des deux côtés?
09.03.2018 - 00:26DROPS Design answered:
Bonjour Laure, je ne suis pas certaine de bien visualiser ce que vous voulez dire, mais n'hésitez pas à demander de l'aide auprès du magasin où vous avez acheté votre laine. Bon tricot!
09.03.2018 - 09:09
![]() Laure wrote:
Laure wrote:
Bonjour, c'est le premier vêtements adulte que je fais. Je ne comprends pas comment faire l'encolure. Je comprends de rabattre les mailles centrales, mais comment faire pour continuer l'ouvrage sans couper le fil entre l'encolure pour les 2 épaules? Merci
04.03.2018 - 02:15DROPS Design answered:
Bonjour Laure, il vous faudra couper le fil pour faire la 2ème épaule. Procédez ainsi: tricotez 1 rang en rabattant les mailles centrales pour l'encolure, tournez et tricotez la 1ère épaule sur les mailles de la fin du rang. Quand cette épaule est terminée et que les mailles sont rabattues, coupez le fil, et reprenez les mailles de l'autre épaule de la même façon, mais en sens inverse. Bon tricot!
05.03.2018 - 08:46Kathy wrote:
Me again. The chart should show the stitches you are to do, not what you see. Also, I find the armhole decrease confusing - "...knit 3 edge sts in garter stitch and make decreases inside the edge sts along armhole" What is meant by "inside the edge sts"?
28.01.2018 - 23:11DROPS Design answered:
Dear Kathy, decrease inside edge sts means you will dec after the edge st at the beg of row and before edge st at the end of row. Happy knitting!
29.01.2018 - 10:39Kathy wrote:
I agree that it's confusing, and actually printing out the actualinstruction would be best... I'm not sure if pattern goes up or down,
28.01.2018 - 22:54April Sokolowsky wrote:
It would be better if you could write out the pattern row by row. It is very confusing the way the pattern is given
05.02.2017 - 15:58
![]() Serial Frogger wrote:
Serial Frogger wrote:
The diagram for this tunic is confusing. Is there supposed to be a knit row between the yarn over rows? Also, if I do what the diagram indicates for rows 8-10 rows (pkp) they will not end up in garter stitch. So this leaves me thinking that the diagram does no actually have knit rows. This diagram totally needs to be reworked for this cute tunic. Thanks!
21.05.2014 - 06:44DROPS Design answered:
Dear Serial Frogger, diagram shows pattern seen from RS, you on rows 2,4, 6, you should see K sts from RS, ie you will P these from WS. Row 8 will be K from WS, row 9 K from RS and row 10 K from RS. Happy knitting!
21.05.2014 - 09:53
![]() Cat wrote:
Cat wrote:
Feather - for the name
25.07.2013 - 19:56
|
|||||||||||||
Lake Geneva |
|||||||||||||
|
|
|||||||||||||
DROPS Lacy Tunic in Passion
DROPS 68-13 |
|||||||||||||
|
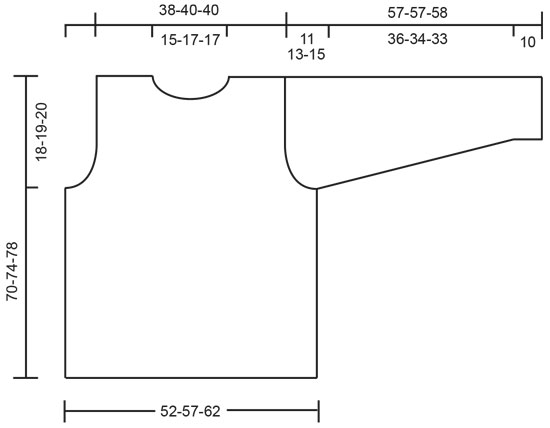
Gauge: 13 sts in the pattern = 10 cm Garter st, when knitting flat: Knit all sts, all rows. Pattern: See chart. The pattern is seen from the right side. Note: the 8th through 10th rows on the chart and the last 3 rows on the chart are 3 rows of garter st. Knitting tips: Bind off for armhole at each side, but after initial bind off row, knit 3 edge sts in garter st and make decs inside the edge sts along armhole. Note: Passion has a tendency to twist when knit. For best results, untwist the yarn as you go along. Note: All measurements in pattern refer to the garment when held up or worn, because the pattern pulls in and lengthens. Front: Cast on 68-74-80 sts and knit 4 rows garter st. Change to Pattern 1 but keep 3 sts at each side in garter st throughout. When the piece measures 52-55-58 cm bind off 4-4-6 sts at each side for armhole. Dec 1 st every other row - see knitting tips - a total of 5-7-8 times = 50-52-52 sts. Note: See that the pattern is not disrupted by the armhole shaping – if it is not possible to knit the pattern over all the sts, knit leftover sts in stockinette st. After armhole shaping continue to knit the 3 edge sts in garter st to finished measurements. When the piece measures approx. 62-66-70 cm (approx. 8 cm remains to finished dimensions; adjust length so that there will be 3 rows garter st before shoulder bind off) bind off the center 10-12-12 sts for the neck. Bind off at each neck edge every other row: 2 sts 1 time and 1 st 3 times. Bind off the remaining 15 sts on each shoulder when the piece measures approx. 70-74-78 cm - adjust so you bind off after 3 rows garter st. Back: Cast on and knit the same as the front. Bind off for armhole as on front and knit until the piece measures 68-72-76 cm. Bind off the center 18-20-20 sts for the neck. Dec 1 st at each neck edge on the next row. Bind off the remaining 15 sts on each shoulder when the piece measures approx. 70-74-78 cm - adjust so you bind off after 3 rows garter st and match up length with front. Sleeve: Cast on 28-30-32 sts and knit 4 rows garter st. Change to Pattern 1, keeping 3 sts at each side in garter st throughout. When the piece measures 10 cm inc 1 st at each side (inside 3 edge sts) 8-9-9 times every 4.5-3.5-3.5 cm = 44-48-50 sts - knit the increased sts into Pattern 1 as you go along and there are enough sts for pattern. Bind off for sleeve cap when sleeve measures approx. 46-44-43 cm. Bind off 2 sts at each side every other row until the piece measures 57-57-58 cm. Bind off the remaining sts. Assembly: Sew right shoulder. Pick up approx. 50 to 56 sts around the neck and knit 4 rows garter st, bind off. Sew left shoulder and neckband. Sew in sleeves. Sew sleeve and side seams, leaving an opening for the side slit of desired length. |
|||||||||||||
Diagram explanations |
|||||||||||||
|
|||||||||||||
 |
|||||||||||||
 |
|||||||||||||
Have you finished this pattern?Tag your pictures with #dropspattern or submit them to the #dropsfan gallery. Do you need help with this pattern?You'll find 18 tutorial videos, a Comments/Questions area and more by visiting the pattern on garnstudio.com. © 1982-2026 DROPS Design A/S. We reserve all rights. This document, including all its sub-sections, has copyrights. Read more about what you can do with our patterns at the bottom of each pattern on our site. |
|||||||||||||


With over 40 years in knitting and crochet design, DROPS Design offers one of the most extensive collections of free patterns on the internet - translated to 17 languages. As of today we count 324 catalogues and 12290 patterns translated into English (UK/cm).
We work hard to bring you the best knitting and crochet have to offer, inspiration and advice as well as great quality yarns at incredible prices! Would you like to use our patterns for other than personal use? You can read what you are allowed to do in the Copyright text at the bottom of all our patterns. Happy crafting!
Post a comment to pattern DROPS 68-13
We would love to hear what you have to say about this pattern!
If you want to leave a question, please make sure you select the correct category in the form below, to speed up the answering process. Required fields are marked *.