
Popular categories
Looking for a yarn?


Comments / Questions (55)
![]() Zabeth wrote:
Zabeth wrote:
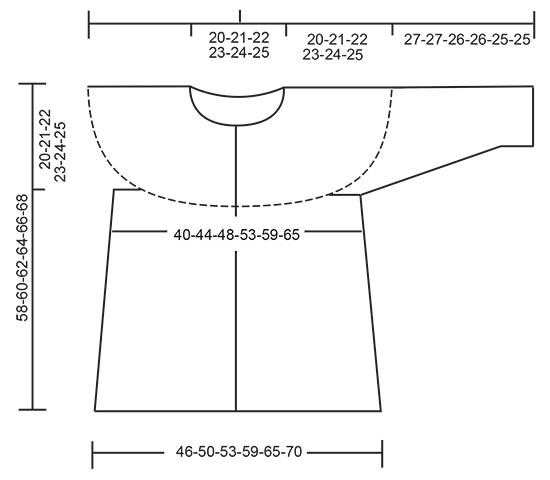
Est-ce-qu'il serait possible d'avoir plus de précision concernant les tailles. A quoi correspond chaque taille en tour de poitrine, tour de taille etc.. Actuellement, j'aimerai faire le modèle 169-2, mais je ne sais pas laquelle choisir : entre L ou XL. Vous n'avez pas de tableau de correspondance ou bien je ne l'ai pas trouvé sur le site. Merci de me renseigner.
08.08.2016 - 09:52DROPS Design answered:
Bonjour Zabeth, à la fin de chaque modèle vous trouverez un schéma avec toutes les mesures pour chaque taille, en cm, prises à plat. Comparez ces mesures avec celle d'un vêtement similaire dont vous aimez la forme pour trouver la taille correspondante. Voir également ici. Bon tricot!
08.08.2016 - 10:11
![]() ANNE MARY Rispal wrote:
ANNE MARY Rispal wrote:
Bonjour pouvez vous me dire si la partie point mousse entre les feuilles diminue au fur et à mesure des rangs Par avance merci
04.07.2016 - 16:21DROPS Design answered:
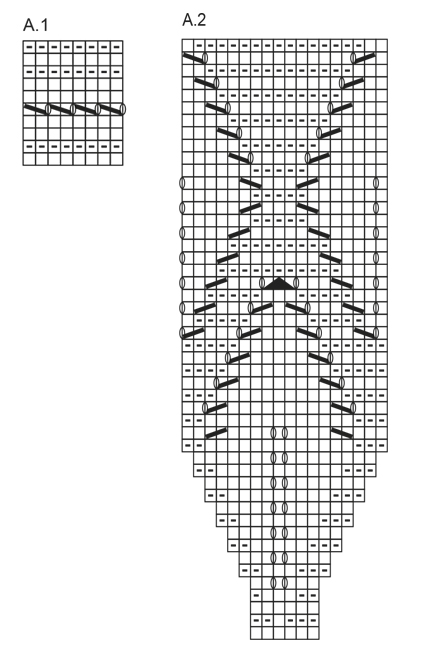
Bonjour Mme Rispal, le nbe de mailles doit rester le même dans chaque motif de A.2 une fois que les augmentations sont faites. Pouvez-vous préciser à quel niveau de A.2 vous pensez? Bon tricot!
05.07.2016 - 08:49
![]() Clawur wrote:
Clawur wrote:
Die Weste habe ich gerade als Geburtstagsgeschenk für meine Mutter fertiggestellt. Sie ist nicht besonders schwierig zu stricken, macht aber sehr viel her. Ich find sie toll!!!
19.04.2016 - 10:36
![]() Kerstin Bassmann wrote:
Kerstin Bassmann wrote:
En liten undran i diagrammet A1 menar ni det är 10 varv att sticka eller 20? Ni skriver att Diag visar alla v i mönstret sett från rätsidan alltså när jag läser detta så motsvarar 20 varv eller???
09.04.2016 - 22:39DROPS Design answered:
Hej. A1 består av 10 varv. Alla varv är med men de visas från rätsidan så t.ex. den första symbolen stickas rät från rätsidan men avig om du är på avigsidan. Lycka till!
11.04.2016 - 10:11
![]() Capizzi wrote:
Capizzi wrote:
Je vous remercie beaucoup. J'y suis arrivée .. Je suis très surprise que vous m'avez répondu de suite. Bonne journée. Cordialement
09.03.2016 - 13:06
![]() Capizzi wrote:
Capizzi wrote:
Bonjour. je voudrais savoir si le diagramme a été modifié ? Je suis bloqué vers le 18e rang c'est-à-dire le septième jour. Je ne sais pas ce que je dois faire ?? Merci de me renseigner ..
09.03.2016 - 09:03DROPS Design answered:
Bonjour Mme Capizzi, les diagrammes actuellement en ligne sont corrects (l'intérieur des feuilles de A.2 se tricotent bien en jersey end). Bon tricot!
09.03.2016 - 09:17
![]() Caroline wrote:
Caroline wrote:
I am sorry I don't understand.. "Repeat the 6 stitches in A2?" What 6stitches? There are 18 in pattern. Is this where all the increase in stitches takes place?
25.02.2016 - 07:21DROPS Design answered:
Dear Caroline, start reading diagram from the bottom corner on the right side towards the left and from bottom up, ie A.2 starts with 6 sts and finish with 18 sts. Read more about diagrams here. Happy knitting!
25.02.2016 - 10:43
![]() Caroline Jennings wrote:
Caroline Jennings wrote:
I am trying to do Summer leaves cardigan (169-2) size large.. I do not understand with regard to A2 as it says repeat 15 times in total and one time vertically.. yet following the stitch repeat over 101 stitches it only allows for A2 to be repeated 5 times. Please explain what I have done as I cannot understand how I would then end up with 281 stitches.. Where have I gone wrong?
22.02.2016 - 12:42DROPS Design answered:
Dear Mrs Jennings, You work A.2 over 101 as follows: 5 sts in garter st, repeat the 6 sts in A.2 a total of 15 times (= over the next 90 sts), work then 1st st in A.2 and finish with 5 sts in garter st: 101 sts. When you have worked A.2 1 time in height, there are 18 sts in each A.2: 5 sts in garter st, 18 sts x 15 times (= 270 sts), 1st st in A.2 and 5 sts in garter st, ie 5+270+1+5=281 sts. Happy knitting!
22.02.2016 - 15:26
![]() Sandra Quentin wrote:
Sandra Quentin wrote:
Hallo Ich komme mit der Aufteilung nach dem Anschlag nicht klar. Anschlag mit 125 maschen abzüglich 10 blendenmaschen habe ich noch 115 maschen die ich im Muster A1 stricken soll , da A1 über 2 Maschen (1 Umschlag 2 m zusammen ) gestrickt wird kann ich es nicht teilen. Wäre glücklich über einen Lösungsvorschlag.
18.02.2016 - 17:10DROPS Design answered:
Sie können in der Loch-R von A.1 die erste M nach den Blenden-M einfach re str und dann mit dem Umschlag beginnen, dann beginnt und endet das Muster nach und vor den Blenden-M mit 1 M re.
24.02.2016 - 20:04
![]() Gunda Poll wrote:
Gunda Poll wrote:
Einfach fantastisch, diese Kollektion, wo soll ich nur anfangen, eins schöner als das andere, herrlich, danke, tausendmal danke!!!
10.02.2016 - 09:27
|
||||||||||||||||||||||
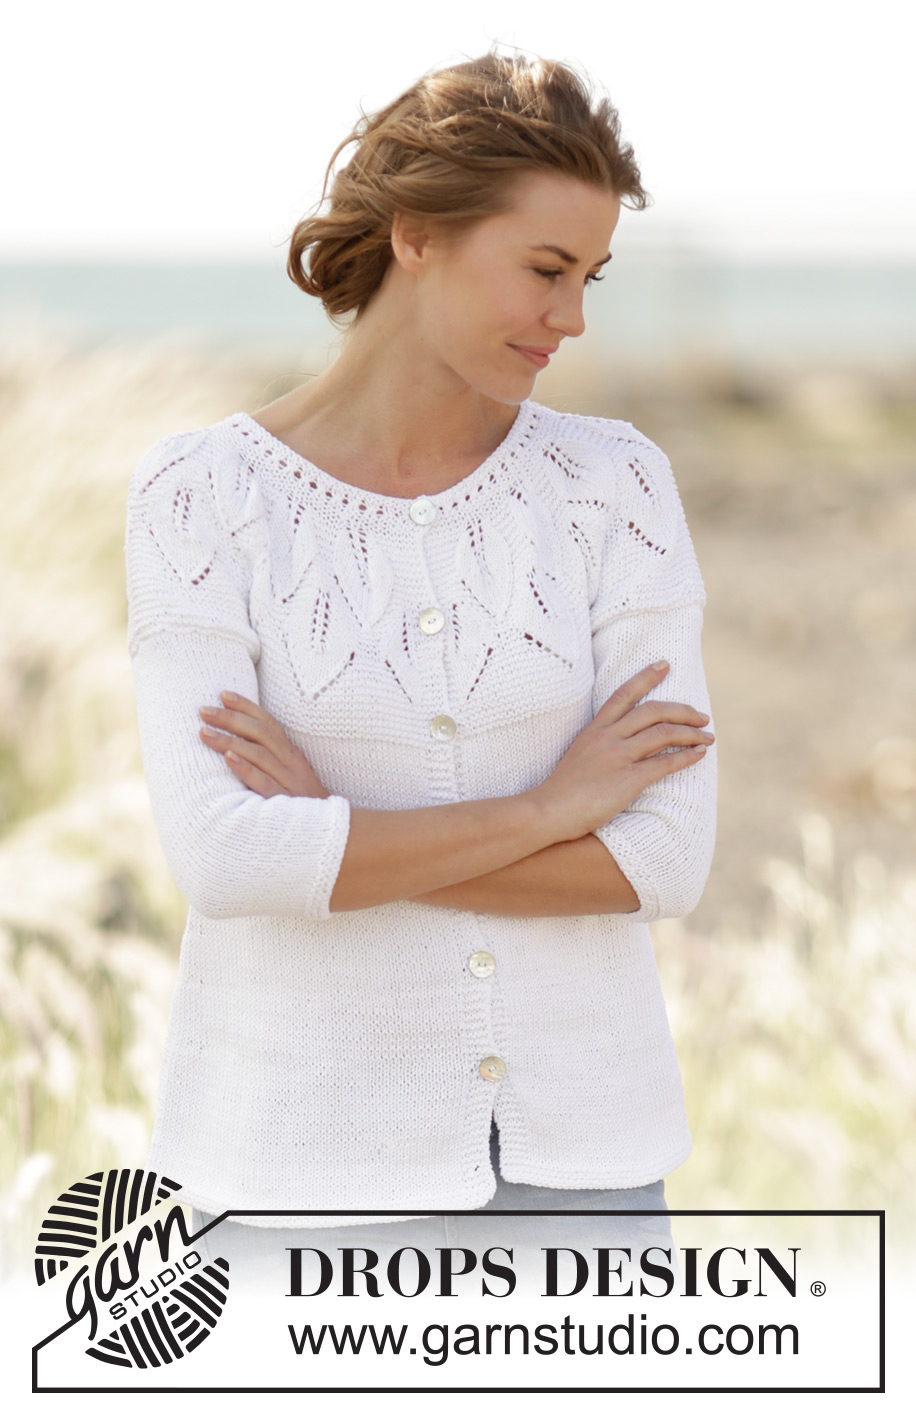
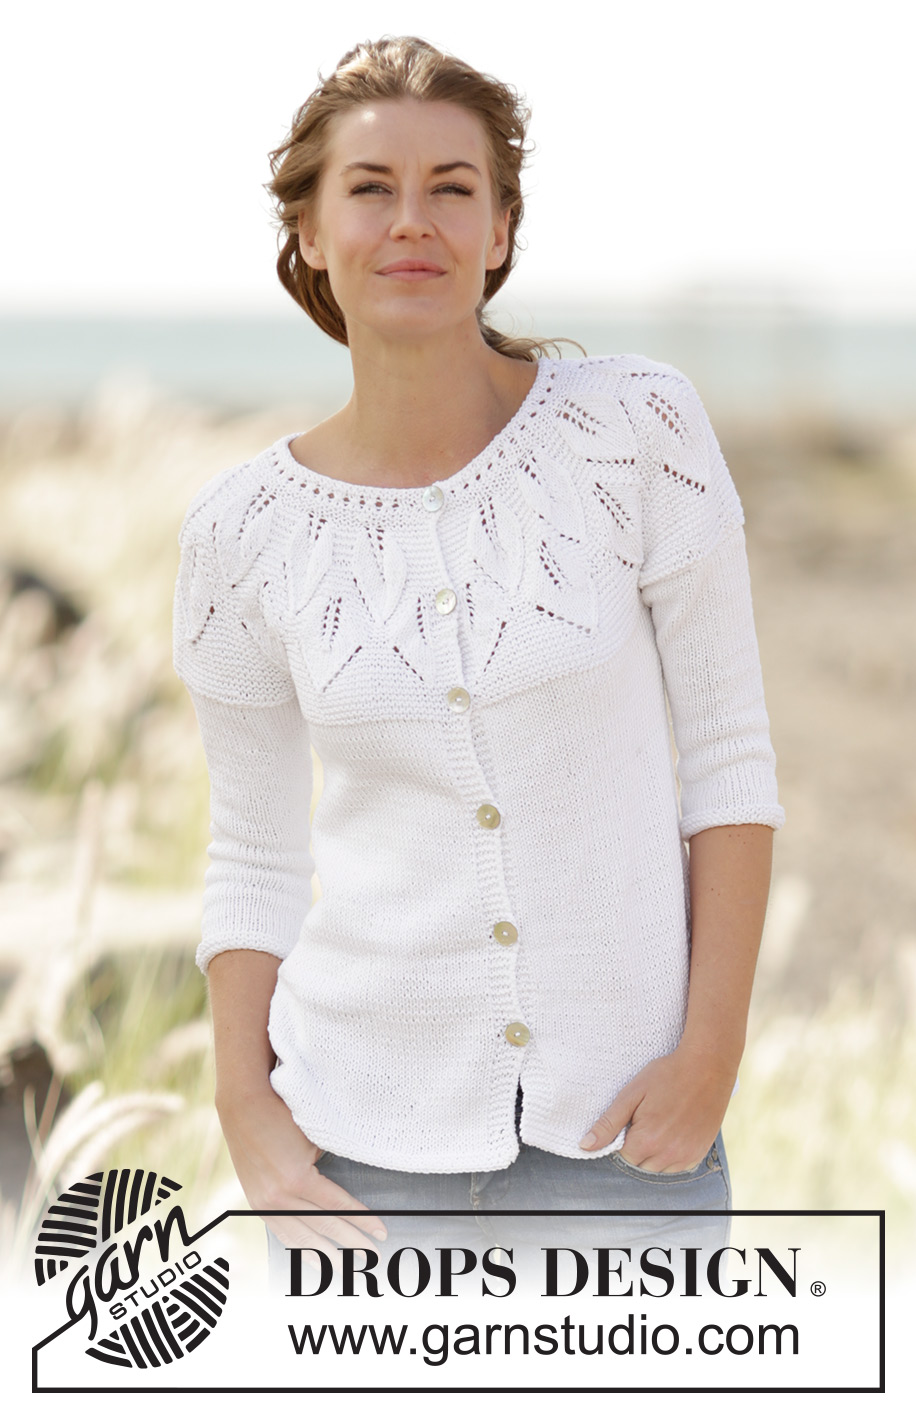
Summer Leaves Cardigan#summerleavescardigan |
||||||||||||||||||||||
 |
 |
|||||||||||||||||||||
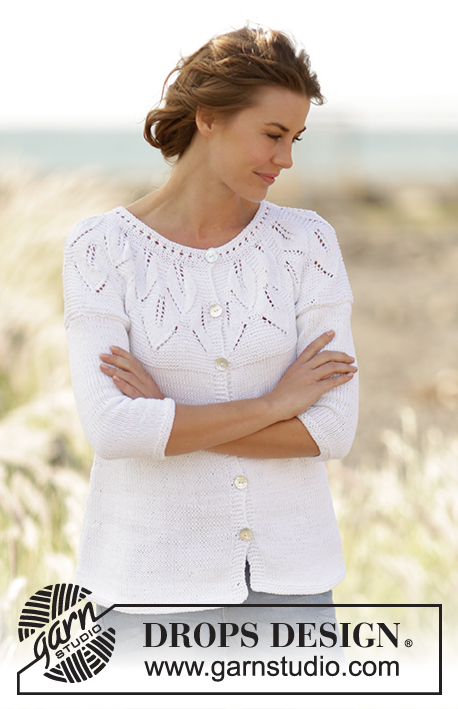
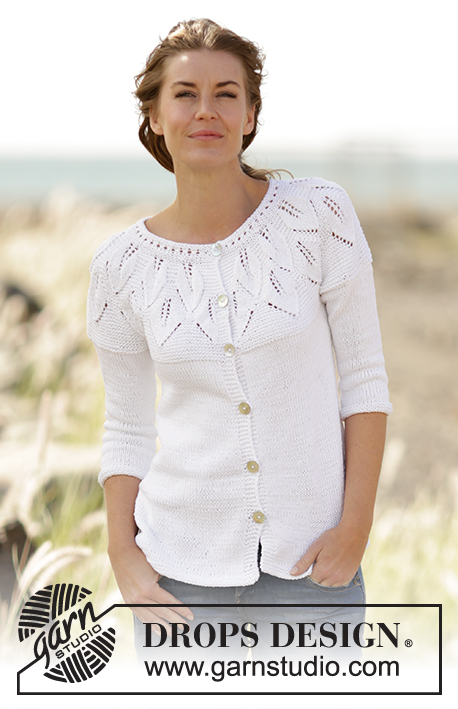
Knitted DROPS jacket with leaf pattern, ridges and round yoke, worked top down in ”Muskat”. Size S-XXXL.
DROPS 169-2 |
||||||||||||||||||||||
|
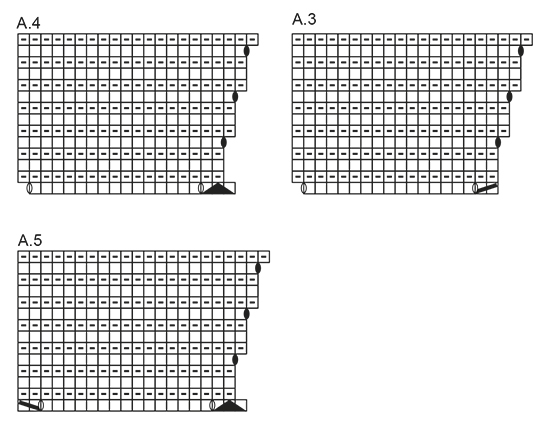
GARTER ST (back and forth): K all rows. 1 ridge = 2 rows K. GARTER ST (worked in the round): 1 ridge = 2 rounds. * K 1 round and P 1 round *, repeat from *-*. PATTERN: See diagrams A.1 to A.5. The diagrams show all rows in pattern seen from RS. BUTTONHOLES: Dec for buttonholes on right band (i.e. band at the end of row seen from RS). 1 buttonhole = K tog third and fourth st from edge and make 1 YO. Dec for buttonholes when piece measures (from cast-on edge and along the band): SIZE S-M-L: 2, 10, 18, 26, 34, 42 and 50 cm SIZE XL-XXL-XXXL: 2, 10, 18, 26, 34, 42, 50 and 58 cm ---------------------------------------------------------- JACKET: Worked back and forth on circular needle, top down. YOKE: Cast on 89-95-101-113-125-131 sts on circular needle size 3.5 mm with Muskat. Dec for BUTTONHOLES on right band - see explanation above. Work 5 sts in GARTER ST - see explanation above (= band), A.1 until 5 sts remain, 5 sts in garter st (= band). When A.1 has been worked 1 time vertically, continue as follows: 5 sts in garter st, A.2 (= 6 sts), repeat A.2 13-14-15-17-19-20 times in total, finish with first st in A.2 (so that pattern is the same in each side), finish with 5 sts in garter st. REMEMBER THE KNITTING TENSION When A.2 has been worked 1 time vertically, there are 245-263-281-317-353-371 sts on needle. Then work as follows: 5 sts in garter st, A.3 (= 17 sts), repeat A.4 11-12-13-15-17-18 times, A.5 (= 20 sts) and 5 sts in garter st. When A.3-A.5 have been worked 1 time vertically, there are 284-305-326-368-410-431 sts on needle. Continue in garter st until piece measures 20-21-22-23-24-25 cm, on last row from WS adjust no of sts to 288-312-336-370-402-434. Continue to work as follows (from RS): Work the first 44-48-52-58-64-70 sts (= left front piece), slip the next 61-65-69-74-78-82 sts on a stitch holder (= sleeve), cast on 6 new sts under sleeve, work the next 78-86-94-106-118-130 sts (= back piece), slip the next 61-65-69-74-78-82 sts on a stitch holder (= sleeve), cast on 6 new sts under sleeve, work the remaining 44-48-52-58-64-70 sts (= right front piece). BODY: There are now 178-194-210-234-258-282 sts for body. Insert a marker in each side of body where new sts were cast on under sleeve (= 3 new sts on each side of marker). NOW MEASURE THE PIECE FROM HERE. Switch to circular needle size 4 mm. Continue in stocking st and garter st on bands. When piece measures 4 cm, inc 1 st on each side of each marker (= 4 sts inc). Repeat inc every 5-5-5-6-6-6 cm 5 more times = 202-218-234-258-282-306 sts. Continue in stocking st and garter st until piece measures 34-35-36-37-38-39 cm, switch to circular needle size 3,5 mm and work 3 ridges. Cast off. The whole piece measures approx. 58-60-62-64-66-68 cm. SLEEVE: Slip sts from stitch holder back on double pointed needles size 3.5 mm (= 61-65-69-74-78-82 sts). Pick up 1 st in each of the 6 sts cast on under sleeve, insert a marker in the middle of these sts = 67-71-75-80-84-88 sts. Work 2 ridges in GARTER ST – see explanation above, switch to double pointed needles size 4 mm, then work in stocking st. When piece measures 3 cm, dec 1 st on each side of marker, repeat dec every 2-2-1½-1½-1-1 cm 9-10-11-13-14-15 more times = 47-49-51-52-54-56 sts. Continue in stocking st until sleeve measures 27-27-26-26-25-25 cm (shorter measurements in the larger sizes because of longer yoke), switch to double pointed needle size 3.5 mm and work 3 ridges. Cast off. Work the other sleeve the same way. ASSEMBLY: Sew the buttons on to left front piece. |
||||||||||||||||||||||
Diagram explanations |
||||||||||||||||||||||
|
||||||||||||||||||||||
 |
||||||||||||||||||||||
 |
||||||||||||||||||||||
 |
||||||||||||||||||||||
Have you finished this pattern?Tag your pictures with #dropspattern #summerleavescardigan or submit them to the #dropsfan gallery. Do you need help with this pattern?You'll find 24 tutorial videos, a Comments/Questions area and more by visiting the pattern on garnstudio.com. © 1982-2026 DROPS Design A/S. We reserve all rights. This document, including all its sub-sections, has copyrights. Read more about what you can do with our patterns at the bottom of each pattern on our site. |
||||||||||||||||||||||


With over 40 years in knitting and crochet design, DROPS Design offers one of the most extensive collections of free patterns on the internet - translated to 17 languages. As of today we count 324 catalogues and 12290 patterns translated into English (UK/cm).
We work hard to bring you the best knitting and crochet have to offer, inspiration and advice as well as great quality yarns at incredible prices! Would you like to use our patterns for other than personal use? You can read what you are allowed to do in the Copyright text at the bottom of all our patterns. Happy crafting!
Post a comment to pattern DROPS 169-2
We would love to hear what you have to say about this pattern!
If you want to leave a question, please make sure you select the correct category in the form below, to speed up the answering process. Required fields are marked *.