
Popular categories
Looking for a yarn?


Comments / Questions (55)
![]() Nancy Bennett wrote:
Nancy Bennett wrote:
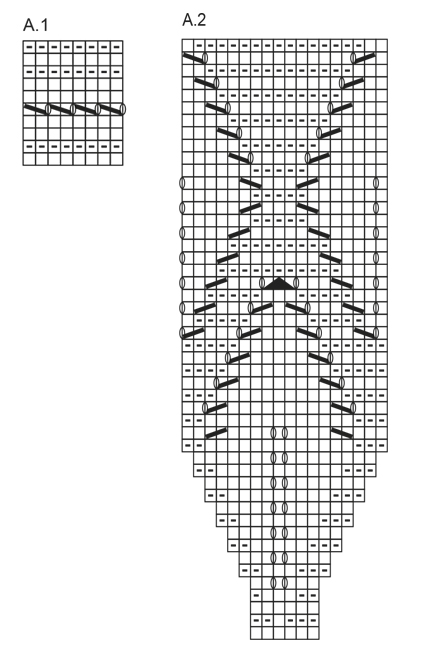
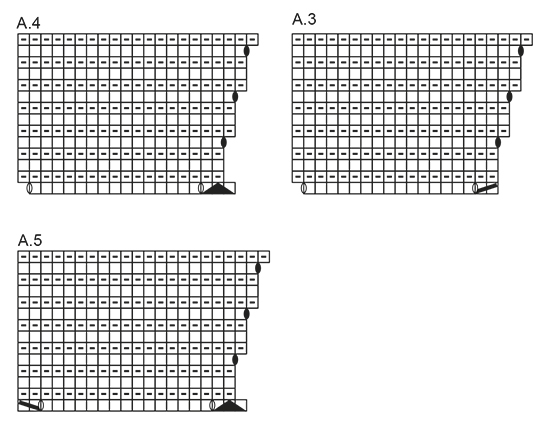
If A1 start on RS and it is 10 rows and then you do 5 row gather st. Does A2 start on the wrong side?
20.06.2019 - 21:08DROPS Design answered:
Dear Nancy, there are no 5 rows in garter stitch between A.1 and A.2. A.1 finishes on WS and A.2 starts on RS, just afterwards.
20.06.2019 - 22:57
![]() Mimi wrote:
Mimi wrote:
Hi, how do you work the increases under the armhole: do you do a yarn over and work it twisted on WS and at how many stitches before the marker, i.e. make a YO 2 st before and 2 st after marker? usually drops patterns indicate how increases are worked but not this one. Thanks!
05.06.2019 - 22:58DROPS Design answered:
Hi Mimi. Yes, you can make 1 yarn over on each side of marker, an purl them twisted on the next row. You can make the yarn overs with 2 stitches in between (ie, 1 stitch on each side of marker). Happy knitting
06.06.2019 - 08:45
![]() Sigrid wrote:
Sigrid wrote:
Er kommet til omgang 5 på A2. Skjønner ikke hva det menes der det står 1 kast mellom 2m. Det er jo bare 1 maske mellom kastene. Det blir 8 masker istedenfor 6 når jeg strikker 2 kast. Takknemlig for svar.
25.03.2019 - 21:38DROPS Design answered:
Hei Sigrid, Du skal bare lage 1 kast mellom maske 3 og 4 (som er strikket rett, og 1 kast mellom masker 4 og 5 (som er strikket rett). Så det er 1 strikket maske mellom begge kastene. God fornøyelse!
27.03.2019 - 06:58
![]() Loralee Belden wrote:
Loralee Belden wrote:
Why do I have 1 stitch too many when you divide 115 by 6 there is 1 stitch left over am I missing something? 125 minus 10 band stitches.
11.03.2019 - 19:53DROPS Design answered:
Dear Mrs Belden, you have to work (from RS): 5 band sts, repeat A.2 a total of 19 times, and finish row with the first st in A.2 (so that pattern is symetrical) and 5 band sts - from WS work 5 band sts, first st in A.2 then repeat A.2 (reading from the left towards the right), 5 band sts = 125 sts. Happy knitting!
12.03.2019 - 09:37
![]() Gisèle Veillette wrote:
Gisèle Veillette wrote:
Bonjour, J'ai commencé ce modèle avec une laine Drops cotton viscose. J'en ai le 3/4 de fait mais je manque de laine. Comme elle est discontinuée, pouvez-vous me dire ce que je pourrais employer pour le terminer. J'ai pensé faire tout ce qui est en jersey, rayé avec une autre laine un peu plus foncé. Pouvez-vous m'aider?
11.03.2019 - 15:45DROPS Design answered:
Bonjour Mme Veillette, ce modèle se tricote avec un fil du groupe B alors que Cotton Viscose se tricote avec un fil du groupe A N'hésitez pas à contacter individuellement chaque magasin DROPS pour savoir ce que chacun peut vous proposer, en fonction du stock qui lui reste. Bon tricot!
12.03.2019 - 09:24
![]() Bribri wrote:
Bribri wrote:
Je suis déjà bloquée : fin du 5 ème rg en A 1 j'ai une maile de trop avant les 5 dernières m point mousse ; j'ai bien un total de 95 m en ayant bien réalisé les consignes. N'y a t-il pas un problème dans le diagramme avec les jetés ? Merci
10.11.2018 - 21:30DROPS Design answered:
Bonjour bribri, le diagramme est juste, vous devez tricoter le 5ème rang de A.1 (1 jeté, 2 m ens à l'end), mais comme votre nombre de mailles est impair, vous terminez par 1 m end avant les 5 m point mousse. Bon tricot!
12.11.2018 - 09:33
![]() Claudia wrote:
Claudia wrote:
Hallo Drops-Team, ich bin jetzt mit Muster A1 fertig und die Gesamtlänge ist bereits über 25 cm (in Gr. XXL). Warum weicht das bei mir so stark ab? Ich habe mit Nadel 3,5 gestrickt. Ich muss jetzt quasi die Muster A3 -A5 weglassen und gleich mit dem Rumpf anfangen. LG Claudia
14.03.2018 - 07:39DROPS Design answered:
Liebe Claudia, wenn Ihre Maschenprobe stimmt, dann sollten Sie auch 25 cm haben - A.3-A.5 werden kraus rechts und nicht glatt rechts gestrickt. Viel Spaß beim stricken!
14.03.2018 - 09:57
![]() Cecilia wrote:
Cecilia wrote:
There are two blank symbols one is = slip 1 st as if to K, K 1, psso, the second is = 1 YO between 2 sts, on next row K YO twisted (= to avoid holes). I can figure out the first one is the filled in yo, but is the second the first line of graph A4 and A5
28.10.2017 - 02:17DROPS Design answered:
Dear Cecilia, when working first row in A.4 work: slip 1 as if to K, K2 tog, psso (= 5th symbol), YO (6th symbol), K 15, YO - On next row, K these both YO's to create holes. Beg rounds 5, 9 and 13 with a YO (= 7th symbol) and on next row, K YO twisted to avoid a hole. Happy knitting!
30.10.2017 - 08:59
![]() Anne-Marie wrote:
Anne-Marie wrote:
Har nu lagt upp 101 maskor och ska börja med A1. Men blir första varvet rätsidan el avigsidan på plagget? Viktigt är ju att kanten blir snygg. Ser ut som som första varvet blir avigan med tanke på hur uppläggningsvarvet ser ut. Kan det stämma?
22.09.2017 - 16:58DROPS Design answered:
Hei Anne-Marie. Først legger du opp det antallet du skal, så starter du på 1.rad. God Fornøyelse!
25.09.2017 - 11:54
![]() Anne-Marie wrote:
Anne-Marie wrote:
Har kört fast på A1,femte varvet. Visst bör det gå jämnt ut? Har 101 maskor ,stl L,gör omslag ,lyfter och stickar 1 rm ,sen den lyfta maskan över men får en maska över till slut?
20.09.2017 - 20:44DROPS Design answered:
Hej Anne-Marie, sista maskan stickar du rät, den behöver du sedan när du stickar A.2, då stickas den som första m i diagrammet så att mönstret blir lika i varje sida. Lycka till!
22.09.2017 - 09:53
|
||||||||||||||||||||||
Summer Leaves Cardigan#summerleavescardigan |
||||||||||||||||||||||
 |
 |
|||||||||||||||||||||
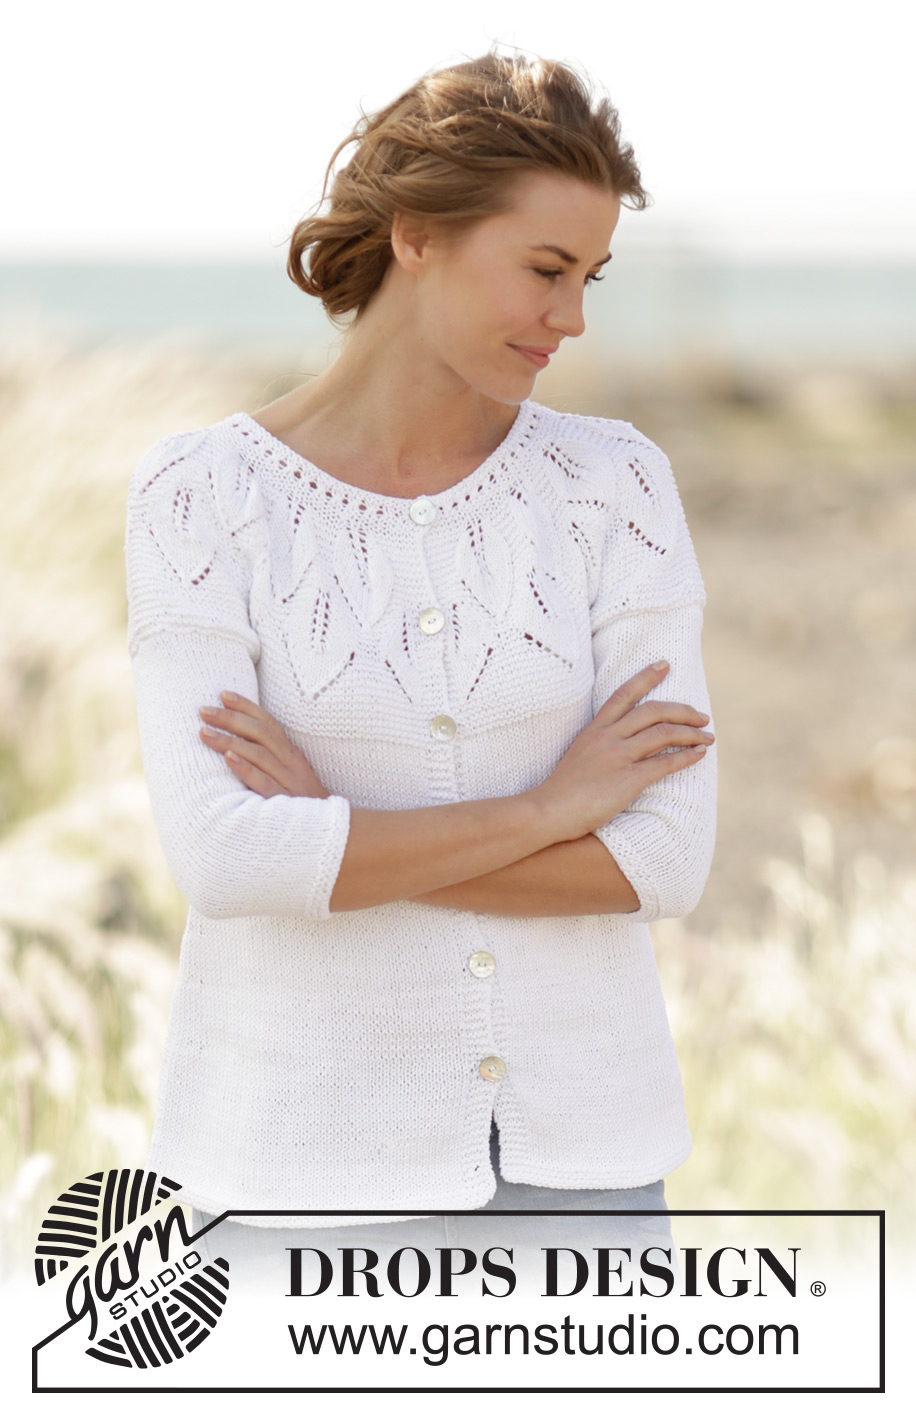
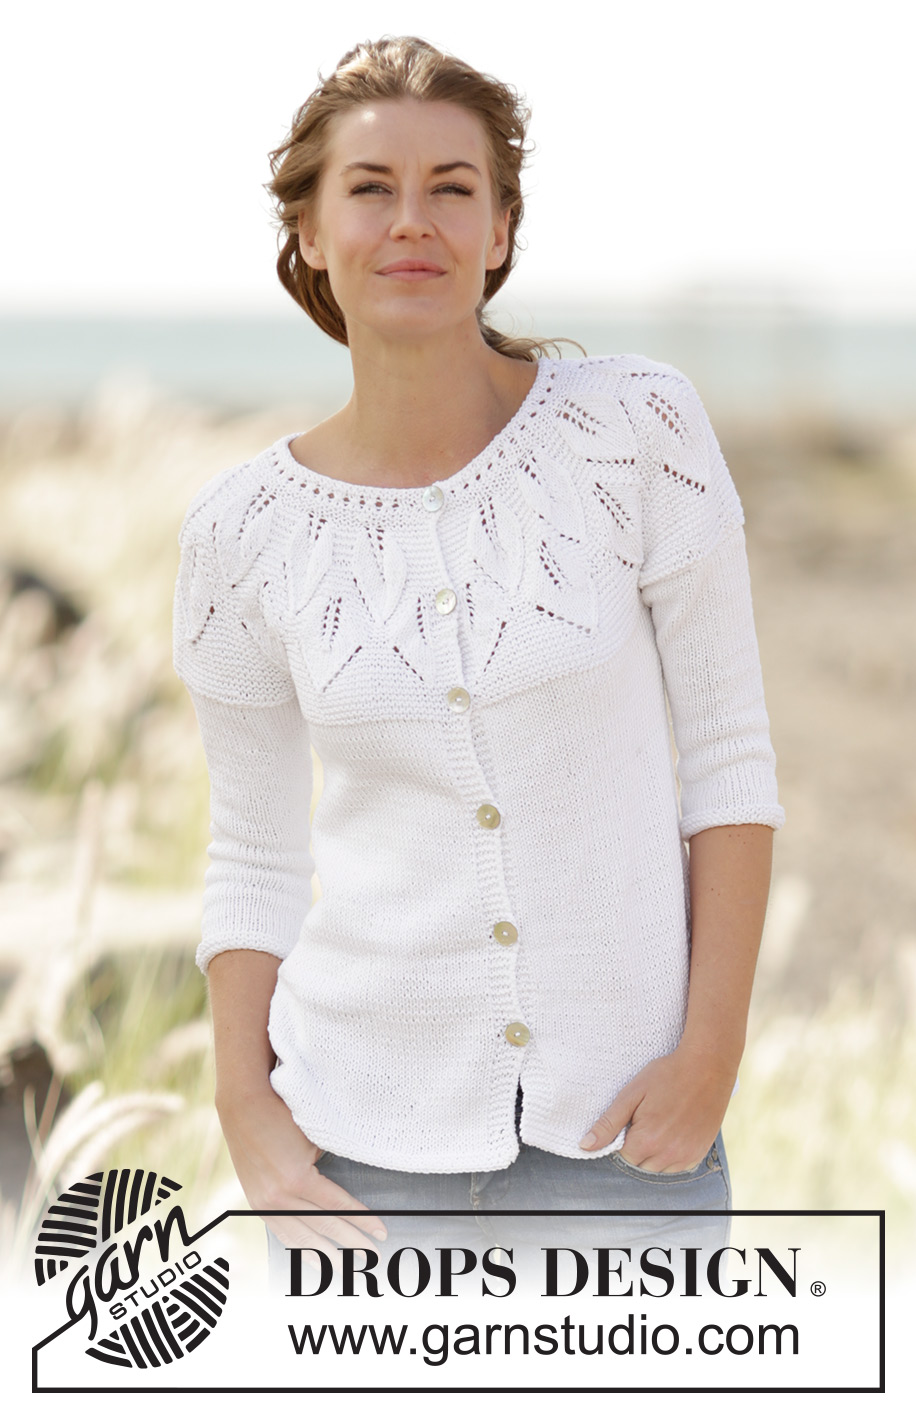
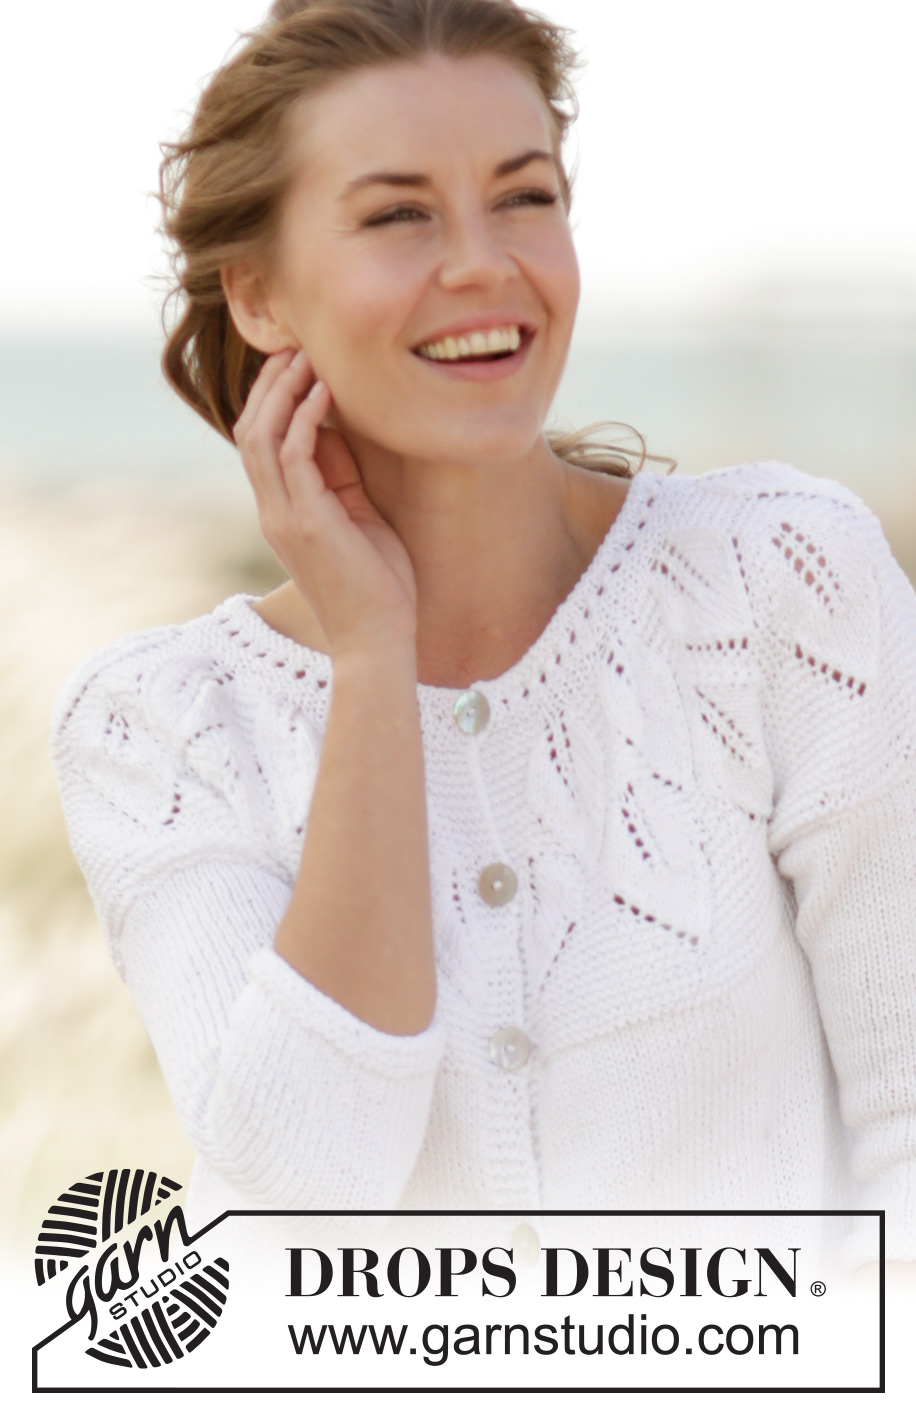
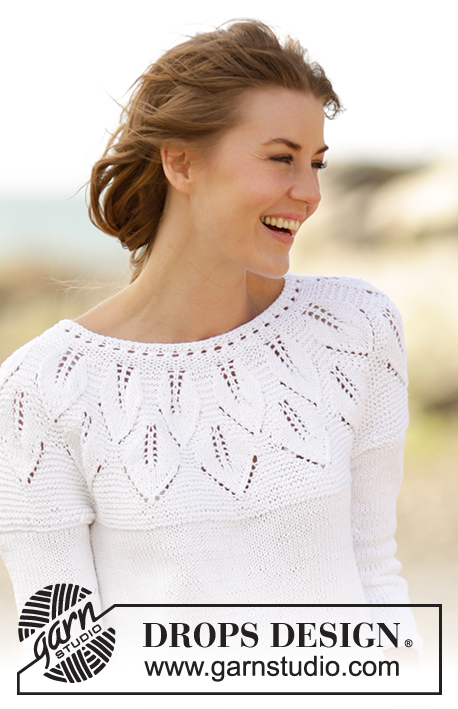
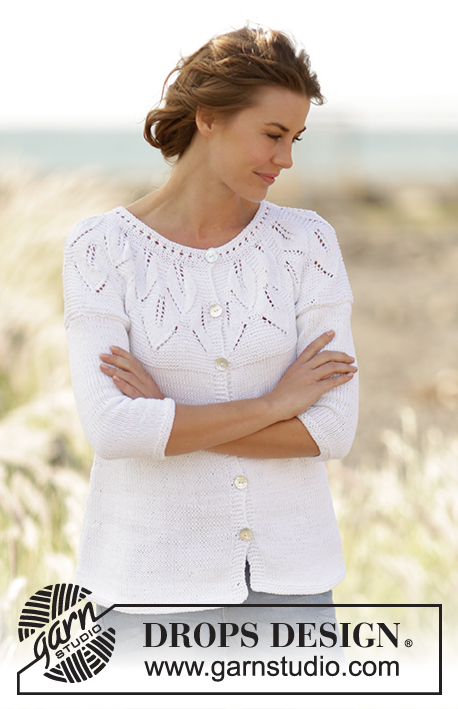
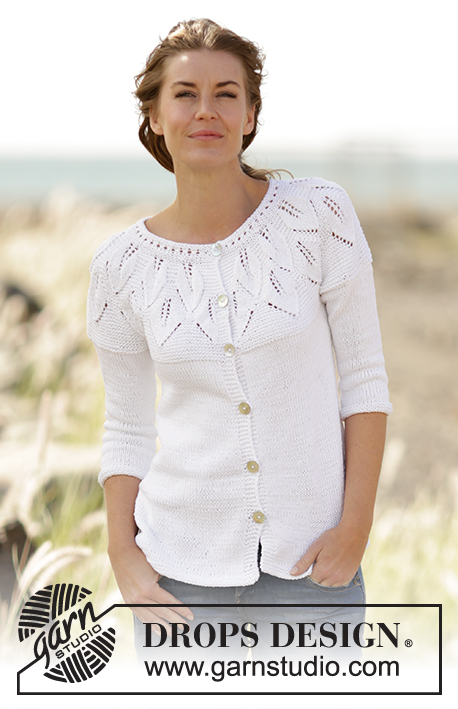
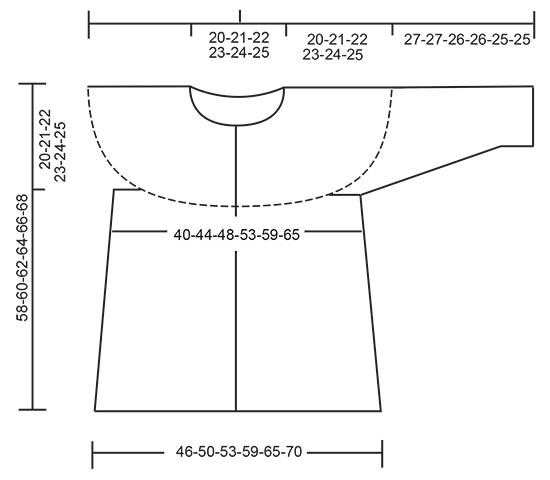
Knitted DROPS jacket with leaf pattern, ridges and round yoke, worked top down in ”Muskat”. Size S-XXXL.
DROPS 169-2 |
||||||||||||||||||||||
|
GARTER ST (back and forth): K all rows. 1 ridge = 2 rows K. GARTER ST (worked in the round): 1 ridge = 2 rounds. * K 1 round and P 1 round *, repeat from *-*. PATTERN: See diagrams A.1 to A.5. The diagrams show all rows in pattern seen from RS. BUTTONHOLES: Dec for buttonholes on right band (i.e. band at the end of row seen from RS). 1 buttonhole = K tog third and fourth st from edge and make 1 YO. Dec for buttonholes when piece measures (from cast-on edge and along the band): SIZE S-M-L: 2, 10, 18, 26, 34, 42 and 50 cm SIZE XL-XXL-XXXL: 2, 10, 18, 26, 34, 42, 50 and 58 cm ---------------------------------------------------------- JACKET: Worked back and forth on circular needle, top down. YOKE: Cast on 89-95-101-113-125-131 sts on circular needle size 3.5 mm with Muskat. Dec for BUTTONHOLES on right band - see explanation above. Work 5 sts in GARTER ST - see explanation above (= band), A.1 until 5 sts remain, 5 sts in garter st (= band). When A.1 has been worked 1 time vertically, continue as follows: 5 sts in garter st, A.2 (= 6 sts), repeat A.2 13-14-15-17-19-20 times in total, finish with first st in A.2 (so that pattern is the same in each side), finish with 5 sts in garter st. REMEMBER THE KNITTING TENSION When A.2 has been worked 1 time vertically, there are 245-263-281-317-353-371 sts on needle. Then work as follows: 5 sts in garter st, A.3 (= 17 sts), repeat A.4 11-12-13-15-17-18 times, A.5 (= 20 sts) and 5 sts in garter st. When A.3-A.5 have been worked 1 time vertically, there are 284-305-326-368-410-431 sts on needle. Continue in garter st until piece measures 20-21-22-23-24-25 cm, on last row from WS adjust no of sts to 288-312-336-370-402-434. Continue to work as follows (from RS): Work the first 44-48-52-58-64-70 sts (= left front piece), slip the next 61-65-69-74-78-82 sts on a stitch holder (= sleeve), cast on 6 new sts under sleeve, work the next 78-86-94-106-118-130 sts (= back piece), slip the next 61-65-69-74-78-82 sts on a stitch holder (= sleeve), cast on 6 new sts under sleeve, work the remaining 44-48-52-58-64-70 sts (= right front piece). BODY: There are now 178-194-210-234-258-282 sts for body. Insert a marker in each side of body where new sts were cast on under sleeve (= 3 new sts on each side of marker). NOW MEASURE THE PIECE FROM HERE. Switch to circular needle size 4 mm. Continue in stocking st and garter st on bands. When piece measures 4 cm, inc 1 st on each side of each marker (= 4 sts inc). Repeat inc every 5-5-5-6-6-6 cm 5 more times = 202-218-234-258-282-306 sts. Continue in stocking st and garter st until piece measures 34-35-36-37-38-39 cm, switch to circular needle size 3,5 mm and work 3 ridges. Cast off. The whole piece measures approx. 58-60-62-64-66-68 cm. SLEEVE: Slip sts from stitch holder back on double pointed needles size 3.5 mm (= 61-65-69-74-78-82 sts). Pick up 1 st in each of the 6 sts cast on under sleeve, insert a marker in the middle of these sts = 67-71-75-80-84-88 sts. Work 2 ridges in GARTER ST – see explanation above, switch to double pointed needles size 4 mm, then work in stocking st. When piece measures 3 cm, dec 1 st on each side of marker, repeat dec every 2-2-1½-1½-1-1 cm 9-10-11-13-14-15 more times = 47-49-51-52-54-56 sts. Continue in stocking st until sleeve measures 27-27-26-26-25-25 cm (shorter measurements in the larger sizes because of longer yoke), switch to double pointed needle size 3.5 mm and work 3 ridges. Cast off. Work the other sleeve the same way. ASSEMBLY: Sew the buttons on to left front piece. |
||||||||||||||||||||||
Diagram explanations |
||||||||||||||||||||||
|
||||||||||||||||||||||
 |
||||||||||||||||||||||
 |
||||||||||||||||||||||
 |
||||||||||||||||||||||
Have you finished this pattern?Tag your pictures with #dropspattern #summerleavescardigan or submit them to the #dropsfan gallery. Do you need help with this pattern?You'll find 24 tutorial videos, a Comments/Questions area and more by visiting the pattern on garnstudio.com. © 1982-2026 DROPS Design A/S. We reserve all rights. This document, including all its sub-sections, has copyrights. Read more about what you can do with our patterns at the bottom of each pattern on our site. |
||||||||||||||||||||||


With over 40 years in knitting and crochet design, DROPS Design offers one of the most extensive collections of free patterns on the internet - translated to 17 languages. As of today we count 324 catalogues and 12290 patterns translated into English (UK/cm).
We work hard to bring you the best knitting and crochet have to offer, inspiration and advice as well as great quality yarns at incredible prices! Would you like to use our patterns for other than personal use? You can read what you are allowed to do in the Copyright text at the bottom of all our patterns. Happy crafting!
Post a comment to pattern DROPS 169-2
We would love to hear what you have to say about this pattern!
If you want to leave a question, please make sure you select the correct category in the form below, to speed up the answering process. Required fields are marked *.